기능 구현은 끝났으나, 연동할 그라파나 버전이 낮아서 그대로 사용할 수 없었다.
그래서 버전을 낮춰야 했다. 최종 사용 버전은 다음과 같다.
- grafana: 6.7.4
- influxDB: 1.8 (UI 미지원)
환경 세팅
로컬 개발환경은 도커로 세팅한다.
❯ docker pull grafana/grafana:6.7.4
❯ docker pull influxdb:1.8

❯ docker network create --driver=bridge influx-old

❯ docker run -d -ti --name grafana-old -p 3000:3000 --network influx-old grafana/grafana:6.7.4
❯ docker run -d -ti --name influx-old -p 8086:8086 --network influx-old influxdb:1.8
InfluxDB 세팅
InfluxDB에 들어가 필요한 세팅을 해주자.
❯ docker exec -ti influx-old influx
Connected to http://localhost:8086 version 1.8.10
InfluxDB shell version: 1.8.10

> create database "k8s"

> show databases
name: databases
name
----
_internal
k8s

> create user manager with password 'manager' with all privileges
> show users
user    admin
----    -----
manager true

# 생성한 DB는 retention 정책이 없다 (infinite duration)
> use k8s
Using database k8s

> show retention policies
name    duration shardGroupDuration replicaN default
----    -------- ------------------ -------- -------
autogen 0s       168h0m0s           1        true

# 기본에 있던걸 보면...
> use _internal
Using database _internal

> show retention policies
name    duration shardGroupDuration replicaN default
----    -------- ------------------ -------- -------
monitor 168h0m0s 24h0m0s 1 trueshardGroupDuration은 무슨 역할인지 아직 정확히는 모르겠으나,
실제 데이터가 삭제되는 시간은 duration+shardGroupDuration 주기인 것 같다.
k8s의 새로운 retention을 만들었다.
# duration은 최소 1시간 이상으로 잡아야 된다.
> create retention policy "test" on "k8s" duration 1h replication 1 default
> show retention policies
name    duration shardGroupDuration replicaN default
----    -------- ------------------ -------- -------
autogen 0s       168h0m0s           1        false
test 1h0m0s 1h0m0s 1 truebatch 기능 개선
batch도 DB 버전에 맞춰서 좀 바꿔야 한다.
다행히 클라이언트 라이브러리는 v2가 기본이지만 v1.8도 지원을 한다. [여기]
// Set InfluxDB Client
log.Debugf("Connecting to InfluxDB -- %s", commons.DB.Host)
loginfo := fmt.Sprintf("%s:%s", commons.DB.User, commons.DB.Password)
client := influxdb2.NewClient(commons.DB.Host, loginfo)
w := client.WriteAPI("", commons.DB.Bucket) // Org name is not used
log.Infof("InfluxDB Connected -- %s", commons.DB.Host)
이걸 고치면서 config를 불러오는 방식도 다시 바꿨다. 20개 이상의 목적지를 서로 다르거나 중복되는 endpoint로 호출해야 되는데, 기존 형식으로 작성하면 파일을 쓸 때 오타가 많이 날 수 있다. 최대한 공통으로 적용되는 부분은 따로 빼고, 목적지 정보는 이름과 아이피 정도만 쓰는 것으로 수정했다.
수정된 이후의 실행 구조는 아래와 같아진다.
checklist: 모니터링 대상을 정의한yaml파일을 모아둔다kubemon: go build로 생성된 바이너리config.yml: 호출 주기, DB 정보 등 공통 내용을 정의한 config 파일
directory/
┣ checklist/ # monitoring target list
┃ ┣ etcd.yml
┃ ┣ master.yml
┃ ┣ worker.yml
┃ ┣ other.yml
┃ ┗ [ADD MORE FILES]
┣ kubemon # binary
┗ config.yml # common config
config.yml - 공통 정보 예시
commons:
  scheduler: "@every 1m"
  slack_token: "TOKEN/TOKEN/TOKEN"
  timeout: 5 # Seconds
  dashboard: "http://dashboard-grafana/path/"
  database:
      host: "http://localhost:8086"
      user: "admin"
      password: "admin"
      bucket: "bucket-name"
checklist - etcd.yml 예시
endpoint:
  - name: etcd
    protocol: http
    port: 8080
    path: /

urls:
  - name: etcd-server1
    url: 127.0.0.1
  - name: etcd-server2
    url: localhost
Grafana 연동 & 대시보드 예시
그라파나 v6.7.4와 연동한다.
컨테이너 네트워크, 계정, 버킷 등은 사전에 생성했으므로, 그라파나에서 Data Source를 불러온 후, 대시보드 작성시 Measurement가 자동으로 잘 보이면 된다.
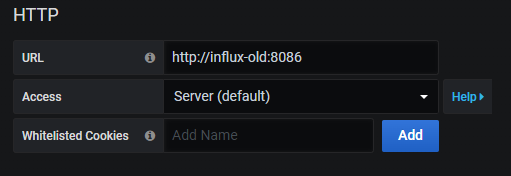
유의할 점은 DB 주소를 쓸 때 http://[컨테이너 이름]:8086 으로 써야한다. 앞에 http 까먹지 않도록 주의.
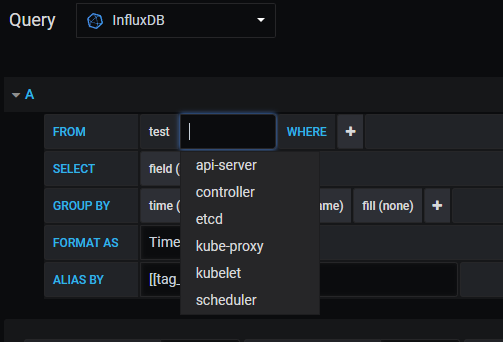
endpoint 이름이 자동으로 measurement로 들어가도록 설정했는데, 그게 잘 보인다.
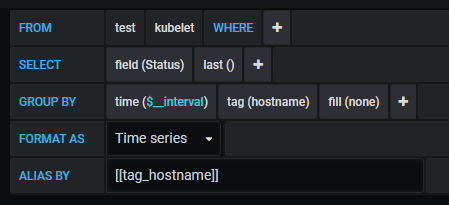
예시 쿼리는 아래와 같다. 태그로 구분하고 싶다면 ALIAS BY 내용을 참고하자.
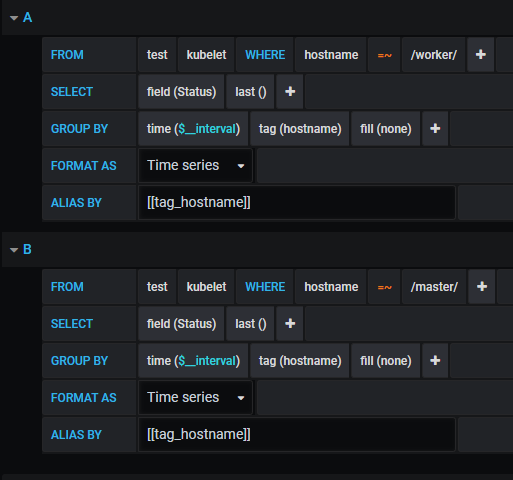
이런 식으로 구분하는 것도 가능하다. (대시보드는 Stat으로 지정해둬서 다 뜨긴 한다)
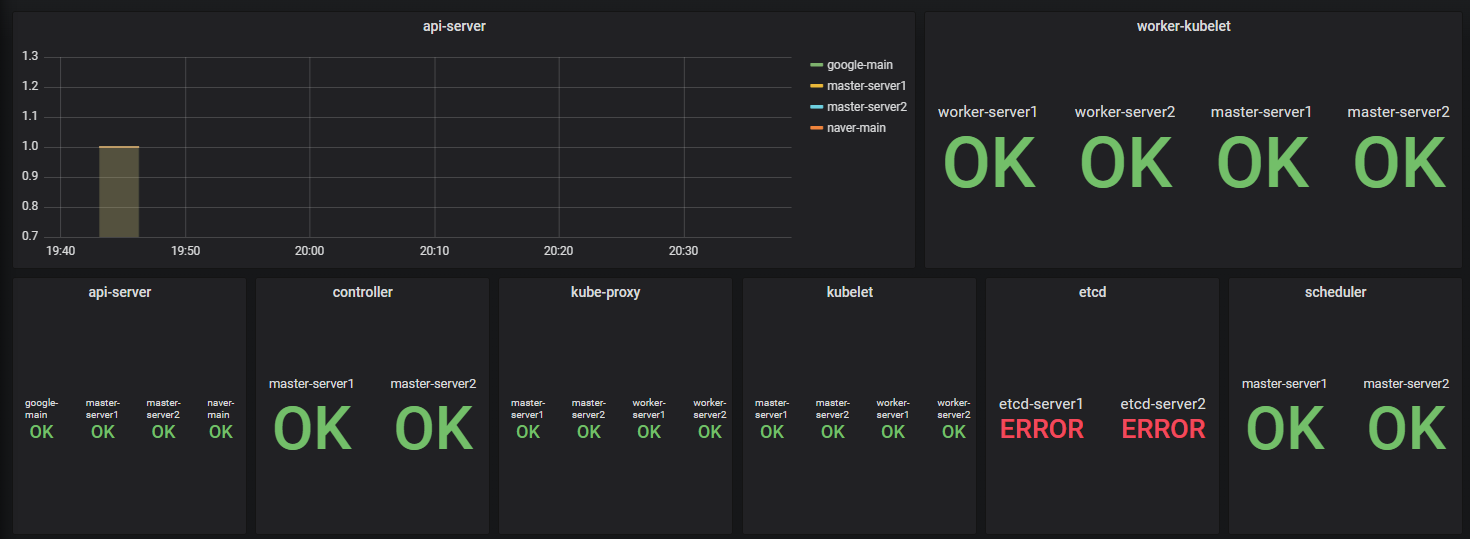
임시로 구성하면 이렇게 된다.
알림 메세지 수정
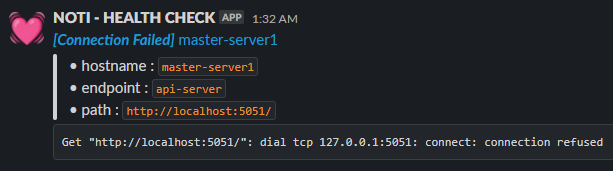
기존 메세지에 정보를 추가했다. 링크는 그라파나 대시보드로 통한다.
참고 문서 :
리텐션 체크 기본 30분: https://jhleeeme.github.io/influxdb-retention-policy/
InfluxDB 그라파나 연동: https://sh-safer.tistory.com/7
슬랙 마크다운 문법: https://api.slack.com/reference/surfaces/formatting#block-formatting