
API 연동
구축된 REST API를 가지고 직접 API를 연동해보도록 하겠습니다. 먼저, 코드를 작성하기에 앞서 필요한 몇가지 개념을 확인해보겠습니다.
1. 기본 개념
1-1. Javacript fetch API란?
fetch API란 AJAX요청을 하기 위한 기술 중 하나입니다.
여기서 AJAX란 서버에서 추가 정보를 비동기적으로 가져올 수 있게 해주는 포괄적인 기술을 나타내는 용어입니다. 쉽게 말해서 부분적으로 데이터를 가져오지만 새로고침이 되지 않는다고 생각하면 되겠습니다.
이러한 AJAX에는 XHR, JQuery, Fetch 등의 선택지가 있지만 가장 최신 기술인 fetch API를 사용해 프로젝트를 구현 해보도록 하겠습니다.
1-2. fetch API 사용법
fetch API의 response는 실제 json 이 아닙니다. 따라서 .json()이라는 추가 메서드를 호출해 응답 본문을 받아와야 합니다. 만약 axios를 사용하는 경우 이 과정을 자동으로 해주기 때문에 바로 response를 받을 수 있습니다.
var url = 'https://example.com/profile';
var data = {username: 'example'};

fetch(url, {
  method: 'POST', // or 'PUT'
  body: JSON.stringify(data), // data can be `string` or {object}!
  headers:{
    'Content-Type': 'application/json'
  }
}).then(res => res.json())
.then(response => console.log('Success:', JSON.stringify(response)))
.catch(error => console.error('Error:', error));
여기서 body 데이터 타입은 헤더의 content-type 와 일치해야 합니다.
1-3. DOMContentLoaded 이벤트
HTML의 이벤트중 하나인 DOMContentLoaded는 브라우저가 HTML을 전부 읽고 DOM 트리를 완성하는 즉시 발생합니다. 이미지 파일이나 스타일시트 등의 기타 자원은 기다리지 않습니다.
이러한 DOMContentLoaded이벤트는 DOM이 준비된 것을 확인한 후 원하는 DOM 노드를 찾아 핸들러를 등록해 인터페이스를 초기화할 때 사용할 수 있습니다.
window.addEventListener('DOMContentLoaded', (event) => {
    console.log('DOM fully loaded and parsed');
});
2. 데이터 불러오기
index.html
  <body>
    <div class="wrap">
      <div class="header">
        <h2>TO DO LIST</h2>
        <form class="todo_form">
          <input
            type="text"
            class="todo_input"
            placeholder="할 일을 입력해 주세요."
            autofocus="true"
          />
          <button type="submit" class="todo_submit_button">
            <i class="fas fa-plus"></i>
          </button>
        </form>
      </div>
      <div class="todos"></div>
    </div>
    <script src="script.js"></script>
  </body>
2-1. todos 데이터가져오기
;(function () {
  'use strict'

  const getTodos = () => {
    fetch('http://localhost:3000/todos')
      .then((response) => response.json())
      .then((todos) => console.log(todos))
      .catch(error => console.error(error))
  }

  const init = () => {
    window.addEventListener('DOMContentLoaded', () => {
      getTodos()
    })
  }
  init()
})()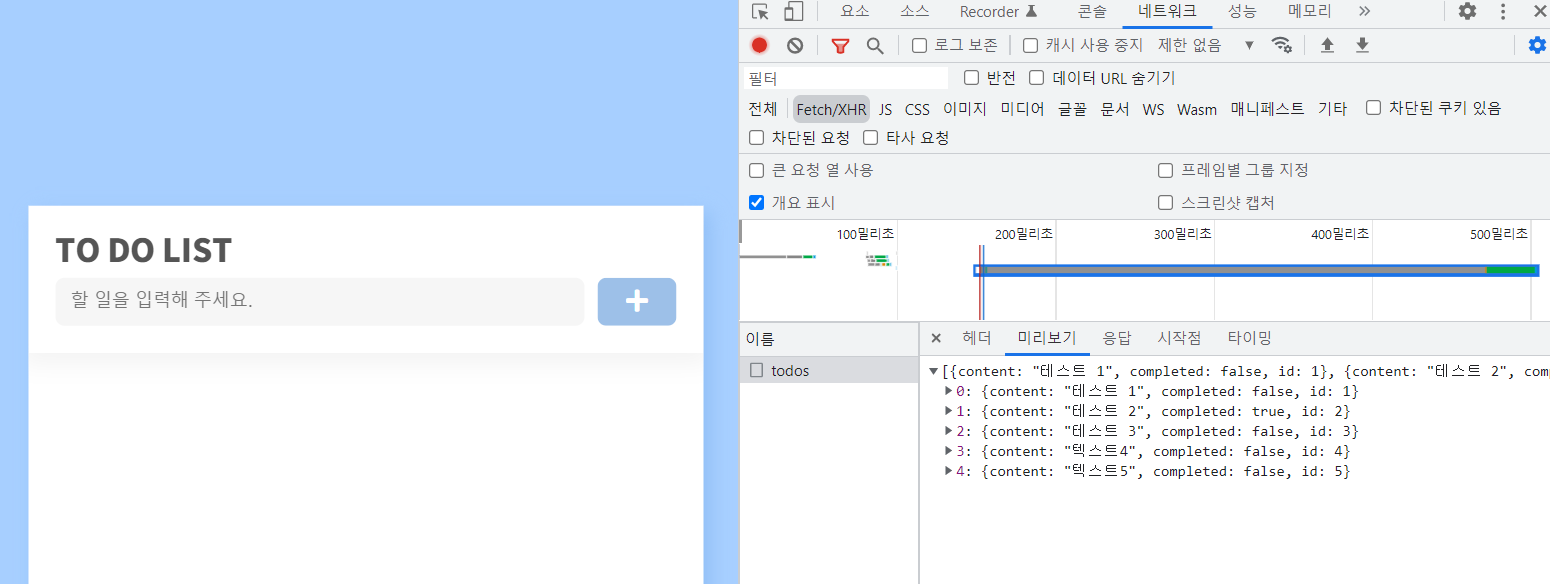
개발자도구 - 네트워크를 확인해보면 아이템을 잘 불러온 것을 확인할 수 있습니다.
2-2. DOM 렌더링
;(function () {
  'use strict'

  const get = (target) => {
    return document.querySelector(target)
  }

  const $todos = get('.todos')

  const createTodoElement = (item) => {
    const {
      id,
      content
    } = item
    const $todoItem = document.createElement('div')
    $todoItem.classList.add('item')
    $todoItem.dataset.id = id
    $todoItem.innerHTML = `
            <div class="content">
              <input
                type="checkbox"
                class='todo_checkbox'
              />
              <label>${content}</label>
              <input type="text" value="${content}" />
            </div>
            <div class="item_buttons content_buttons">
              <button class="todo_edit_button">
                <i class="far fa-edit"></i>
              </button>
              <button class="todo_remove_button">
                <i class="far fa-trash-alt"></i>
              </button>
            </div>
            <div class="item_buttons edit_buttons">
              <button class="todo_edit_confirm_button">
                <i class="fas fa-check"></i>
              </button>
              <button class="todo_edit_cancel_button">
                <i class="fas fa-times"></i>
              </button>
            </div>
      `
    return $todoItem
  }

  const renderAllTodos = (todos) => {
    $todos.innerHTML = ''
    todos.forEach((item) => {
      const todoElement = createTodoElement(item)
      $todos.appendChild(todoElement)
    })
  }
  const renderAllTodos = (todos) => {
    $todos.innerHTML = '' //초기화
    todos.forEach((item) => { //item하나하나 렌더링
      const todoElement = createTodoElement(item)
      $todos.appendChild(todoElement)
    })
  }
0seo