User 구현시 username Unique 처리
- findOne으로 user를 탐색 후 있다면 가입 x 없다면 가입 처리하기
- userEntity에
@Unique(['username'])을 하여 username을 유니크하게 만들기
try catch
async createUser(userCredentailDto: UserCredentailDto): Promise<UserEntity> {
    const { username, password } = userCredentailDto;
    const user = this.userRepository.create({ username, password });
    try {
      await this.userRepository.save(user);
      return user;
    } catch (error) {
      if (error.code === '23505') {
        throw new ConflictException('Username already exists');
      }
      else {
        throw new InternalServerErrorException();
      }
    }

  }
try-catch문으로 감싸주지 않으면 해당 에러가 Controller 레벨로 가서 그냥 500(서버에러)를 내보냄. 그래서 catch구문에서 error.code ===23505 일때 에러를 다르게 줘서 에러를 잡아줘야함.
비밀번호 암호화(bcryptjs)
Salt(임의의 값) + Hash된 password로 저장하기. 다른 방법을 사용할 경우 위험도가 있을 수 있음.
const salt = await bcrypt.genSalt();
    const hashedPassword = await bcrypt.hash(password, salt);
    const user = this.userRepository.create({ username, password: hashedPassword });
로그인
 async signIn(userCredentailDto: UserCredentailDto): Promise<UserEntity> {
    const { username, password } = userCredentailDto;
    const user = await this.userRepository.findOne({ where: { username } });
    if (user && await bcrypt.compare(password, user.password)) {
      return user;
    }
    else {
      throw new UnauthorizedException('Invalid credentials');
    }
  }
받아온 password랑 이미 있는 username과 같은 user의 password랑 bcrypt.compare을 통해 같은지 찾아 같다면 user를 반환(성공) 없다면 error를 보내준다.
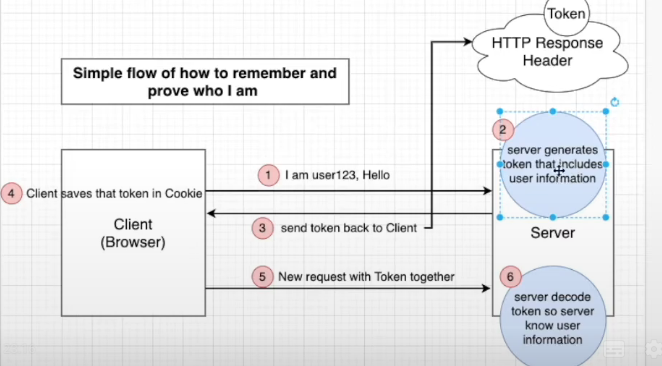
JWT
JWT는 사용자 인증 정보를 토큰 형태로 저장하여 인증을 처리하는 방식이다.
서버는 로그인 시 JWT 토큰을 발급하고, 클라이언트는 이후 요청마다 토큰을 함께 보내 인증을 진행한다.
JWT 인증 과정
1. 로그인 요청
클라이언트가 사용자 인증을 위해 아이디와 비밀번호를 서버로 전송한다.
POST /login
{
  "email": "user@example.com",
  "password": "1234"
}
2. 서버에서 사용자 검증
서버는 데이터베이스에 저장된 사용자 정보를 확인하여
아이디와 비밀번호가 일치하는지 검증한다.
3. JWT 토큰 생성
사용자가 확인되면 서버는 JWT 토큰을 생성하여 클라이언트에게 전달한다.
JWT는 다음과 같은 구조로 이루어져 있다.
Header.Payload.Signature

예시

eyJhbGciOiJIUzI1NiIsInR5cCI6IkpXVCJ9
.
eyJ1c2VySWQiOjEsIm5hbWUiOiJtaW5zZW9rIn0
.
abc123signature
구성 요소
- Header 토큰 타입과 암호화 알고리즘 정보
- Payload 사용자 정보 (userId 등)
- Signature 서버의 secret key로 생성된 서명
4. 클라이언트 토큰 저장
클라이언트는 전달받은 JWT 토큰을 저장한다.
대표적인 저장 방법
- LocalStorage
- SessionStorage
- Cookie
5. API 요청 시 토큰 전달
사용자 권한이 필요한 API 요청 시 클라이언트는 HTTP Header에 JWT 토큰을 포함하여 요청한다.
GET /profile
Authorization: Bearer <JWT_TOKEN>
6. 서버에서 토큰 검증
서버는 전달받은 JWT 토큰을 검증한다.
- 토큰의 Signature(서명) 확인
- 토큰 만료 시간(exp) 확인
- Payload의 사용자 정보 확인
이 과정에서 토큰을 다시 생성해서 비교하는 것이 아니라 서명을 검증하여 토큰이 위조되지 않았는지 확인한다.
JWT 장점
서버에서 세션을 저장하지 않아 Stateless 구조
확장성이 좋음
마이크로서비스 환경에 적합
JWT 단점
토큰 탈취 시 보안 문제 발생 가능
토큰 만료 전까지 강제 로그아웃이 어려움
Payload에 민감한 정보 저장 불가
JWT 적용
app.module.ts에 import 해주어야 사용이 가능함.
imports: [
PassportModule.register({
      defaultStrategy: 'jwt',
    }),
   TypeOrmModule.forRoot(typeOrmConfig),
    BoardsModule,
    AuthModule,
    JwtModule.register({
      secret: 'secretKey',
      signOptions: {
        expiresIn: 3600,
      }
    })
  ],
서비스에 jwtService 를 사용할 수 있게 해준 다음
 constructor(
    @InjectRepository(UserEntity)
    private readonly userRepository: Repository<UserEntity>,
    private readonly jwtService: JwtService,
  ) { }
로그인 성공 시 payload에 중요 정보가 아닌 username을 생성해줌 그 다음 jwtService.sign 을 통해 payload + secret 을 포함한 토큰을 만들어 클라이언트에게 보내준다.
 if (user && await bcrypt.compare(password, user.password)) {
      const payload = { username };
      const accessToken = await this.jwtService.sign(payload);
      return { accessToken };
    }
토큰 인증 후 유저 정보 가져오기
JWT STRATEGY 생성
NestJS에서 JWT 인증을 처리하기 위해 Passport.js 기반의 Strategy를 생성한다.
클라이언트가 요청을 보낼 때 Header에 JWT 토큰을 포함하면 서버는 이 Strategy를 통해 토큰을 검증하고 사용자 정보를 확인한다.
@Injectable()
export class JwtStrategy extends PassportStrategy(Strategy) {
  constructor(
    @InjectRepository(UserEntity)
    private readonly userRepository: Repository<UserEntity>,
  ) {
    super({
      secretOrKey: 'secretKey',
      jwtFromRequest: ExtractJwt.fromAuthHeaderAsBearerToken(),
    })
  }

  async validate(payload: any): Promise<UserEntity> {
    const { username } = payload;
    const user = await this.userRepository.findOne({ where: { username } });
    if (!user) {
      throw new UnauthorizedException('Invalid credentials');
    }
    return user;
  }
}
정리
- 요청에서 JWT 토큰 추출
- 토큰 서명 검증
- payload에서 사용자 정보 확인
- DB에서 사용자 조회
- 인증 성공 시 user 반환
UseGuard
UseGuards 안에 AuthGuard를 이용하면 요청 안에 유저 정보를 넣어줄 수 있음.
@Post("/test")
  @UseGuards(AuthGuard())
  test(@Req() req: Request): void {
    console.log(req);
  }
Nest Js 미들웨어
Pipes,Filters,Guards,interceptors 등이 있으며 각기 다른 목적으로 사용됨.
- Pipes : 유효성 검사 및 페이로드 변환을 위해 사용
- Filters : 오류 처리 미들웨어
- Guards : 인증 미들웨어
- Interceptors : 응답 매핑 및 캐시관리화 함께 요청 로깅과 같은 전후 미들웨어
커스텀 데코레이터
원래 @Req : req로 받아왔던 코드를 쉽게 사용할 수 있게 커스텀 데코레이터를 만들어봤다.
아래의 코드는 쉽게말해 ctx.switchToHttp().getRequest();가 request로 불러왔던 값을 가지고 있는 것이다. 그래서 req.user를 불러오면 request값 안에 user의 값을 바로 사용할 수 있게된다.
import { createParamDecorator, ExecutionContext } from "@nestjs/common";
import { UserEntity } from "./user.entity";

export const GetUser = createParamDecorator((data, ctx: ExecutionContext): UserEntity => {
  const req = ctx.switchToHttp().getRequest();
  return req.user;
})
아래와 같이 사용을 할 수 있다.
@UseGuards(AuthGuard())
  test(@GetUser() user: UserEntity): void {
    console.log(user);
  }