pgAdmin에 서버 및 DB 생성
pgAdmin이 켜지면 servers라는 게 보일것임. 그 다음 그럼 servers를 우클릭 후 register -> server 를 클릭한 후 General에 Name 설정한 후 Connection 에 Host name/ address 에 지금은 로컬이기 때문에 localhost 입력 그 후 port번호 설정 후 비밀번호 입력 후 save 하면 서버 생성
DB는 생성된 server를 우클릭해 create -> database를 클릭하면 창 하나가 뜨는데 Database라는 입력칸을 입력하면 그것이 database의 name이 됨.
TypeORM
node.js에서 실행되고 TypeScript로 작성된 객체 관계형 매퍼 라이브러리 객체와 관계형 데이터베이스를 매핑하여 객체 기반으로 데이터베이스를 쉽게 조작할 수 있도록 도와준다
ORM
객체와 관계형 데이터베이스의 데이터를 자동으로 변형 및 연결하는 작업
TypeORM 특징과 이점
- 모델을 기반으로 DB 테이블 체계 자동 생성
- DB에 객체를 쉽게 CRUD 가능.
- 테이블 간의 매핑을 만듬
- 간단한 CLI 명령 제공
- NestJS 등 다른 프레임워크와 쉽게 통합 가능
TypeORM 사용 시 설치할 모듈
- @nestjs/typeorm : Nestjs에서 TypeORM 사용하기 위해 연동시켜주는 모듈
- typeorm : typeORM 모듈
- pg : Postgres 모듈
npm i pg typeorm @nestjs/typeorm --save
TypeORM 연결
1. TypeORM 설정 파일 생성
src 폴더 아래에 configs라는 폴더 생성 후
typeorm.config.ts 파일을 생성
2. TypeORM 설정 파일 작성
pgAdmin에 생성한 것 과 같이 지정해주면 된다.
import { TypeOrmModuleOptions } from "@nestjs/typeorm";

export const typeOrmConfig: TypeOrmModuleOptions = {
  type: 'postgres',
  host: 'localhost',
  port: 5432,
  username: 'postgres',
  password: 'postgres',
  database: 'board-app',
  entities: [__dirname + '/../**/*.entity.{js,ts}'],
  synchronize: true,
}
3. 루트 module에 import
@Module({
  imports: [TypeOrmModule.forRoot(typeOrmConfig), BoardsModule],
  controllers: [BoardsController],
  providers: [BoardsService]
})
루트 모듈에 imports에 넣어주면 사용이 가능하다.
게시물 엔티티 생성
import { BaseEntity, Column, Entity, PrimaryGeneratedColumn } from "typeorm";
import { BoardStatus } from "./boards.model";

@Entity()
export class BoardEntity extends BaseEntity {
  @PrimaryGeneratedColumn()
  id: number;

  @Column()
  title: string;

  @Column()
  description: string;

  @Column()
  status: BoardStatus;
}
PrimaryGeneratedColumn은 기본키를 알려주는 것.
Entitiy는 이 클래스가 엔티티 임을 알려줌
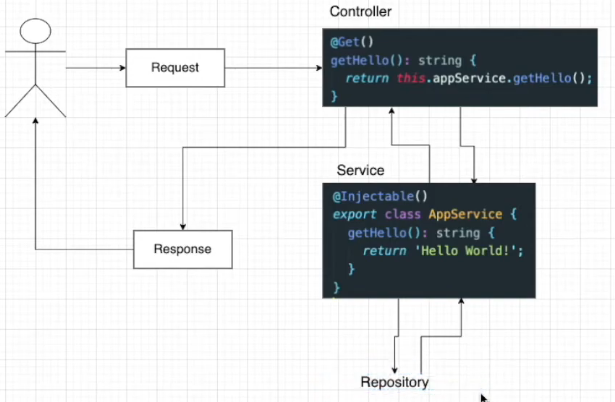
Repository
엔티티 개체와 함께 작동하며 데이터베이스에 관련된 일을 하게됨.
constructor(
    @InjectRepository(BoardEntity)
    private readonly boardsRepository: Repository<BoardEntity>,
  ) { }
원래는 레포지토리를 따로 만들었지만 최신 버전에서는 서비스에 레포지토리를 바로 주입하는 방식을 사용한다.

나만의 기록장