wecode에서 repl.it을 통해 HTML/CSS 공부한 내용 정리
id, class
하나의 태그에 id와 class를 모두 가질 수 있음
아래의 예시와 같이 하나의 태그에 id와 class 모두 가질 수 있다
<div id="profile" class="content-wrap">CSS selector
naming rule
이름은 영문 대문자, 숫자, 특수문자로 시작 할 수 없음
div class="2nd" 와 같은 것 불가능!
class와 id selector
- class의 css selector
- . 이용
- .class_name {style}
- id의 css selector
- # 이용
- #id_name {style}
"*" selector
모든 태그에 css style을 적용할 때 "*" selector로 모든 태그에 적용 가능
<style>
* {
  color:blue;
}
</style>


<p> p태그 파란색 됨 </p>
<span> span태그도 파란색 됨 </span>
<div> div태그도 파란색 됨 </div>
그룹(Grouping)
몇 가지 태그 및 클래스 등에 같은 style 적용할 때 : "," 를 이용
다음과 같이 사용한다.
태그1, 클래스, 태그2 {
style
}
예시 : class="what-is-blockquote"와 span 태그에 style 지정
<style>
.what-is-blockquote, span {
  color: green;
}
</style>
하위 selector
style을 지정할 때 특정 요소의 하위에 있는 요소를 선택 가능
태그/클래스/id등을 스페이스로 띄워서 구분
예시) 아래의 css에서 최종적으로 적용되는 selector는 span
모든 span이 아니라 "pre" 클래스 내부에 있는 span이라는 뜻
<style>
.pre span {
  background-color: yellow;
}
<style>


<div class="pre">
  <span> 이건 노란색 배경적용 </span>
</div>
<div class="main">
  <span> 이건 적용 안됨 </span>
</div>
<span class="pre"> 이것도 적용 안됨 </span>
<div>
  <p class="pre">
    <span> 여기도 노란색 배경 적용! </span>
  </p>
</div>
selector 우선순위
inline styling (style 요소로 직접) >>>>> id >>> class >> tag
여기서 말하는 inline styling은 아래 예시와 같은 경우
<div style="color:blue;">우선순위1</div>특성 선택자
주어진 특성의 존재 여부나 그 값에 따라 요소를 선택
1. selector[attribute]
<style>
a[href] {
color:red;
}
</style>

<a href="http://www.naver.com">naver.com</a>
위와 같은 style을 적용하면 아래의 사진과 같이 글씨에 빨간색으로 적용이 됨

2. selector[attribute="value"]
<style>
input[type="text"] {
}
</style>
위의 특성 선택자를 이용하면 input box중 type="text"인 경우에만 스타일 적용됨
3. placeholder selector
inputbox의 placeholder에 style을 주는 방법
<style>
::placeholder {
  css declarations;
}
</style>
아래의 예시처럼 사용
<style>
input[type="text"]::placeholder {
  color: red;
}
</style>
4. hover
hover : 마우스를 올렸다는 의미
- 예시1 ) 버튼에 마우스를 올리면 cursor 모양을 바꾸기
<style>
button:hover {
    cursor: pointer;
}
</style>
위 스타일을 적용하면 버튼에 마우스를 올렸을때 포인터 모양이 바뀜
cursor의 종류는 pointer말고도 다양 여기를 참고하여 확인
- 예시2 ) 버튼에 마우스를 올리면 버튼 불투명하게 하기
<style>
button:hover {
    opacity: 0.8;
}
</style>
opacity : 해당 요소 불투명하게 만들어줌
opacity : 0 --> 0%만큼 흐려져서 화면에서 아예 안보임
opacity : 0.8 --> 80% 만큼 흐려짐
아래와 같이 cursor와 opacity를 함께 주면
<style>
button:hover {
    cursor: pointer;
    opacity: 0.8;
}
</style>
위의 오른쪽사진이 hover 적용 --> 포인터 바뀜 / 투명해짐
5. :nth-child( ), :nth-last-child( )
특정 순서에 있는 요소를 선택할 때 사용하는 선택자
-
:nth-child(an+b)
- 특정 순서에 있는 요소를 선택할 때 사용하는 선택자
- 앞에서부터 숫자 셈
-
:nth-last-child(an+b)
- 특정 순서에 있는 요소를 선택할 때 사용하는 선택자
- 뒤에서부터 숫자 셈
-
an+b
- a와 b는 정수 (0과 음수도 가능)
- n에는 음이 아닌 정수 --> 0, 1, 2, 3, … 이 차례대로 대입
- an+b 대신에 even, odd를 넣을 수도 있음
- even --> 짝수번 요소 선택
- odd --> 홀수번 요소 선택
사용 예시)
<style>
li:last-child {       # list의 마지막 요소
   padding-bottom: 0;
}

li:nth-child(odd) {   #  list의 홀수번째 요소
  background: red;
}

li:nth-child(even) {   #  list의 짝수번째 요소
  background: blue;
}
 </style>
selector_ref) https://poiemaweb.com/css3-selector
hover_ref) https://www.w3schools.com/cssref/sel_hover.asp
placeholder_ref)https://www.w3schools.com/cssref/sel_placeholder.asp
nth_ref) https://www.codingfactory.net/10781
img
img alt="이미지와 대체할 txt" src="이미지 주소"
-
alt
- 만약 이미지가 보이지 않는 환경이라면 "이미지와 대체할 tx"라는 텍스트로 alt(대체)하여 표시
-
src
- 이미지 파일 경로 or 이미지 url 주소
background-image로 이미지 넣기
1. html에서 img태그로 이미지 넣기
<img alt="이미지" src="image.png">위 예시와 같이 이미지 적용하기
2. css 이용
2-1. css에서 background-image: url(" ") 이용하여 이미지 추가
아래의 예시와 같이 이용한다.
예시 )
<style>
.bg-img {
  background-color: yellow;
  background-image: url("https://image.png");
}
</style>

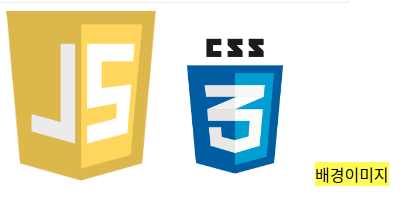
<div class="bg-img">배경이미지</div>
여기서 background-color는 범위를 보여주기 위하여 추가한 속성
- 위와 같은 경우일 때 이미지의 크기
- 가로 크기 : div 태그는 block level 요소 이므로 화면 한줄
- 세로 크기 : txt 높이 만큼
- 아래의 그림에 "배경이미지" 라고 써있는 한 줄

- 만약 div class="bg-img"가 아니라 span class="bg-img" 인 경우
- 가로 크기 : span 태그는 inline 요소 이므로 차지하는 영역 만큼
- 세로 크기 : txt 높이 만큼
- 아래의 그림에 "배경이미지" 라고 써있는 부분

2-2. width/height로 영역을 지정
위의 이미지가 txt높이 만큼으로 지정이 되어서 잘 보이지 않으므로
width와 height를 이용하여 영역을 지정해주었음
<style>
.bg-img {
  background-color: yellow;
  background-image: url("https://upload.wikimedia.org/wikipedia/commons/thumb/6/61/HTML5_logo_and_wordmark.svg/1280px-HTML5_logo_and_wordmark.svg.png");
height : 300px;
width : 300px;
 }
</style>

<div class="bg-img">배경이미지</div>
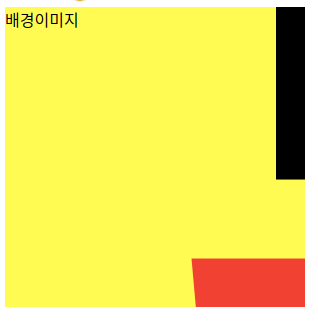
위와 같이 설정해주면 아래의 그림과 같이 나옴

이렇게 나오는 이유는 이미지의 실제 크기가 원본크기 그대로이고, 그 중 div 영역의 크기만큼만 보여지기 때문
따라서 이미지 크기를 조절하기
2-3. background-size: 100%;
background-size: 100%; 를 이용하여 이미지 크기를 조절함
아래의 예시와 같이 사용
<style>
.bg-img {
  background-color: yellow;
  background-image: url("https://upload.wikimedia.org/wikipedia/commons/thumb/6/61/HTML5_logo_and_wordmark.svg/1280px-HTML5_logo_and_wordmark.svg.png");
height : 300px;
width : 300px;
background-size: 100%;
}
</style>

<div class="bg-img">배경이미지</div>
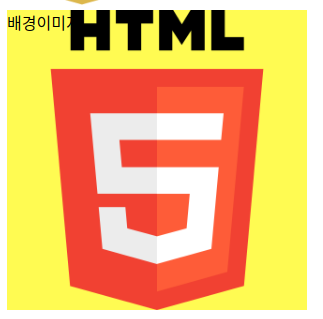
이를 적용하면 아래의 그림과 같이 모든 이미지가 나타남

여기서 "배경이미지" 라는 글이 없어도 css에서 가로/세로를 고정하면 그 크기만큼 영역을 차지하고 있으므로 화면에서 나타남
밑줄 긋기
underline 이용하기
아래의 예시와 같이 text-decoration을 줘서 밑줄을 그을 수 있음
<style>
h2 {text-decoration : underline;
}
</style>
border-bottom 이용하기
아래의 예시와 같이 border-bottom을 주어서 밑줄을 그은 것 처럼 보이게하기
<style>
span {
  border-bottom : 3px solid black;
  padding : 5px;
}
</style>

 <span>span 태그의 테두리</span>
위의 속성을 적용하면 아래의 그림과 같이 표현됨

text-decoration: underline;은 마음대로 customizing하기 어렵기 때문에 웹 사이트에서 대부분의 밑줄 스타일은 border-bottom 이용하여 사용
들여쓰기
blockquote
blockquote 태그는 인용구문을 넣을 때 쓰는 태그
 <blockquote> blockquote 적용 </blockquote>
blockquote 적용 X
아래 이미지 처럼 blockquote 태그를 쓰면 들여쓰기 됨

text indent
css속성을 이용하여 들여쓰기 가능
<style>
.js-description {
  text-indent: 50px;
}
</style>
위와 같이 text-indent를 적용하면 들여쓰기가 됨
list
list style
-
리스트의 시작점과 같은 표시 없애고 싶을 때
- list-style: none; 이용
-
리스트옆에 세로 줄 만들고 싶을 때
- border-left 이용
아래의 예시와 같이 사용
예시)
<style>
ul {
  list-style: none;
  border-left: 3px solid black;
}
</style>
위와 같은 스타일을 적용한 리스트는 아래의 이미지와 같이 표현됨

ul에 적용한 것 처럼 li에도 padding/ margin 등 style 적용 가능
아래의 예시 참고
예시)
<style>
li {
  padding-top:5px;
}
</style>
table
테이블은 항상 table태그로 감싸져있음
table태그 내에 행/열을 만드는 것
-
tr 태그
- 한 행을 시작할 때는 tr 태그로 시작
- tr은 table row의 줄임말
-
td 태그
- 각각의 셀은 tr태그 내에 td태그를 사용
- td는 table data의 줄임말
-
th 태그
- td 태그 대신 사용할 수 있음
- 주로 행과 열의 첫번째 줄에 사용
- th는 table heading의 줄임말
- th 태그를 사용하면 가운데정렬이 되고 글씨 두께가 두꺼워짐
-
rowspan
- 행 병합
- td, th 태그 등에 속성으로 이용
- td rowspan="n" / n은 병합하고 싶은 셀의 갯수
-
colspan
- 열 병합
- td, th 태그 등에 속성으로 이용
- td colspan="n" / n은 병합하고 싶은 셀의 갯수
아래의 예시와 같이 위의 태그들을 이용할 수 있음
<style>
.border-table th, .border-table td {
  border: 1px solid black;
}
</style>

 <table class="border-table">
      <tr>
        <th></th>
        <th>내용</th>
        <th>장소</th>
      </tr>
      <tr>
        <th>1시</th>
        <td>HTML이란</td>
        <td>101호</td>
      </tr>
       <tr>
        <th>2시</th>
        <td rowspan="2">HTML실습</td>  # 행 병합
        <td>102호</td>
      </tr>
       <tr>
        <th>3시</th>
        <td>103호</td>
      </tr>
      <tr>
        <th>4시</th>
        <td>CSS란</td>
        <td>104호</td>
      </tr>
      <tr>
        <th>5시</th>
        <td>CSS실습</td>
        <td>104호</td>
      </tr>
      <tr>
        <th>6시</th>
        <td colspan="2">수업 없습니다.</td> # 열 병합
      </tr>
    </table>
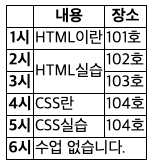
위와 같이 table을 만들면 아래의 그림과 같이 표현됨

첫 행/ 첫 열에 th 태그를 이용하여 heading을 나타냈으며
아래에 td 태그를 이용하여 데이터 입력
td 태그에 colspan/rowspan 속성을 주어서 열과 행을 병합하였음
bold체 없애기
기본 속성으로 bold체가 적용된 경우 --> 예를들어 table의 th태그
이러한 경우 bold체 없애는 방법은 font-weight: normal; 을 이용하면 됨!
예시)
<style>
.assignment th{
  font-weight: normal;
  text-align:left;
}
</style>
위의 예시와 같이 th태그에 font-weight: normal; 을 적용해주면 bold체가 사라짐
추가로, th태그에 tex-align을 적용해주면 기본 속성인 가운데 정렬을 왼쪽/ 오른쪽 정렬로 바꿀 수 있음
textarea
textarea 태그는 input보다는 더 긴 텍스트를 입력받고 싶을 때 사용
보통 짧은 방명록이나 댓글을 입력할 때 textarea 태그를 사용
- input type="text"
- 한 줄만 입력이 가능
- input type="textarea"
- 여러 줄 입력이 가능
div에서 width
<div width=300px>이렇게 하면 적용 안됨!!!</div>div에서 width나 height 줄 때는 css style 이용해서 사용할 것!
<style>
div {
width:300px;}
</style>

<div> 이런식으로 사용 </div>