사설 CA 인증서 발급 절차
- 사설 CA : 공인 CA 가 CA 인증서를 만들어주는게(암호화해주는게) 아니라 프로그램으로 CA 인증서 생성
- WINDOW : OpenSSL 프로그램 사용하여 서버 개인키 및 CA 인증서까지 제작
- MAC : OpenSSL 아닌 Minica 프로그램 사용하여 서버 개인키 및 CA 인증서까지 제작 가능
사설 CA 인증서 발급 절차
사설 CA 인증서 발급 방법 - (1) CA
NGINX 가 처음이라면, 아래 링크를 참고하여 먼저 설치 및 실행 진행
Openssl 설치 확인
openssl version- 실행 결과

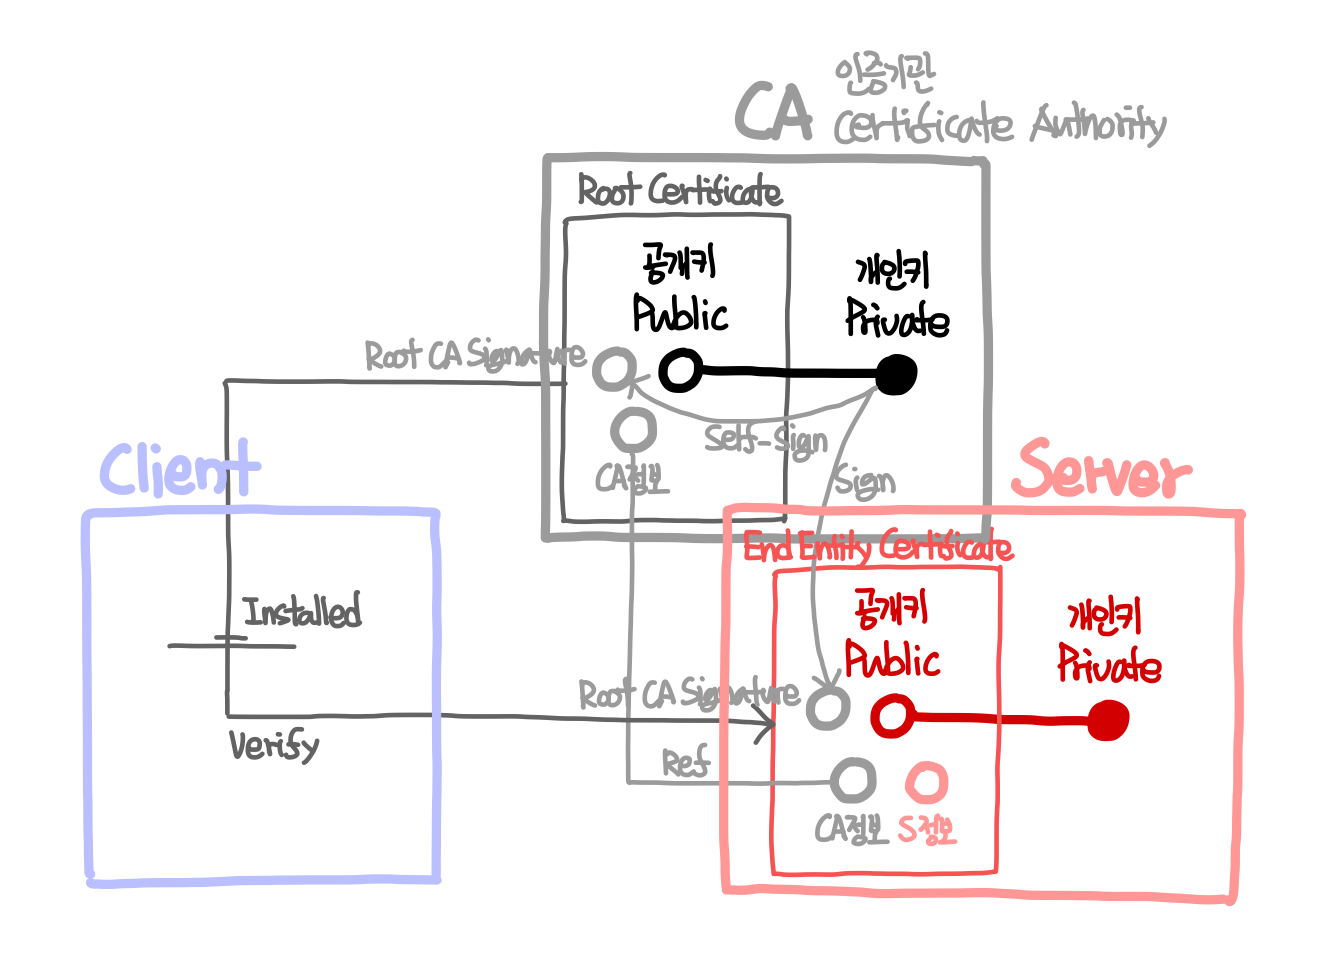
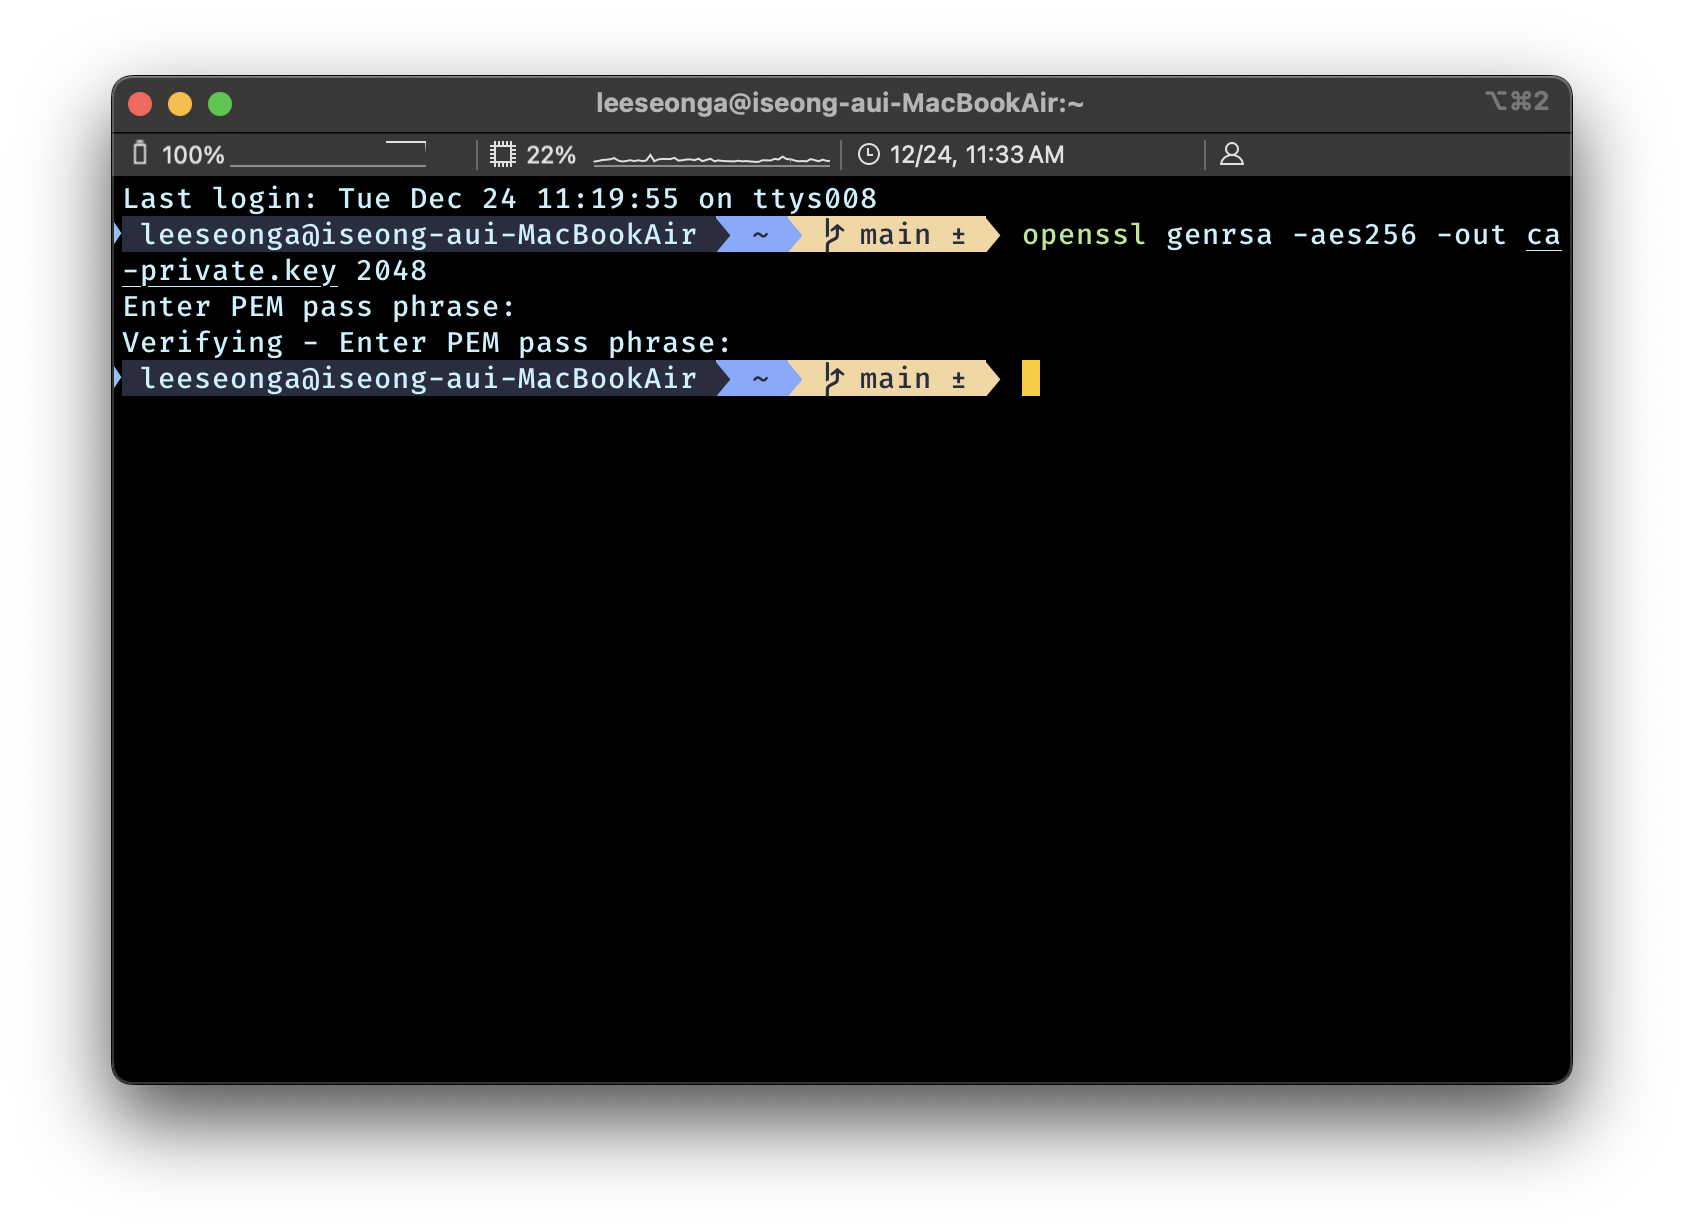
CA : Private Key 개인키 생성
← 수많은 클라이언트들의 End Entity Certificate 발행을 위한 Key
- DES3 혹은 3DES 보다 AES256 사용하는 것을 추천 + RSA 키 사이즈 2048
- Pass Phrase(패스워드)는 입력하라고 뜨면 간단하게 4글자 문자를 입력 : ex ) 1234
- DES3 혹은 3DES 이나 AES256 를 옵션에 넣으면 Pass Phrase 를 요구
openssl gen**rsa** -**aes256** -out **ca-private.key** **2048**- 실행 결과
CA : Public Key 공개키 = Root Certificate 생성
← 클라이언트에서 서버에 접속하기 위해 필요한 Cert
- 앞서 만든 Server Key(Private Key) 를 기반으로 Client Key(Public Key) 생성
-nodes: Pass Phrase(패스워드)가 필요없는 평문 Public Key 생성 (확장자.pem)-days 1825: 5년 (10년 3650일의 절반)-key ca-private.key: Sign(암호화)하기 위한 키 설정
openssl req -x509 -new -nodes -key **ca-private.key** -sha256 -days 1825 -out **ca-public.pem**- 실행 결과
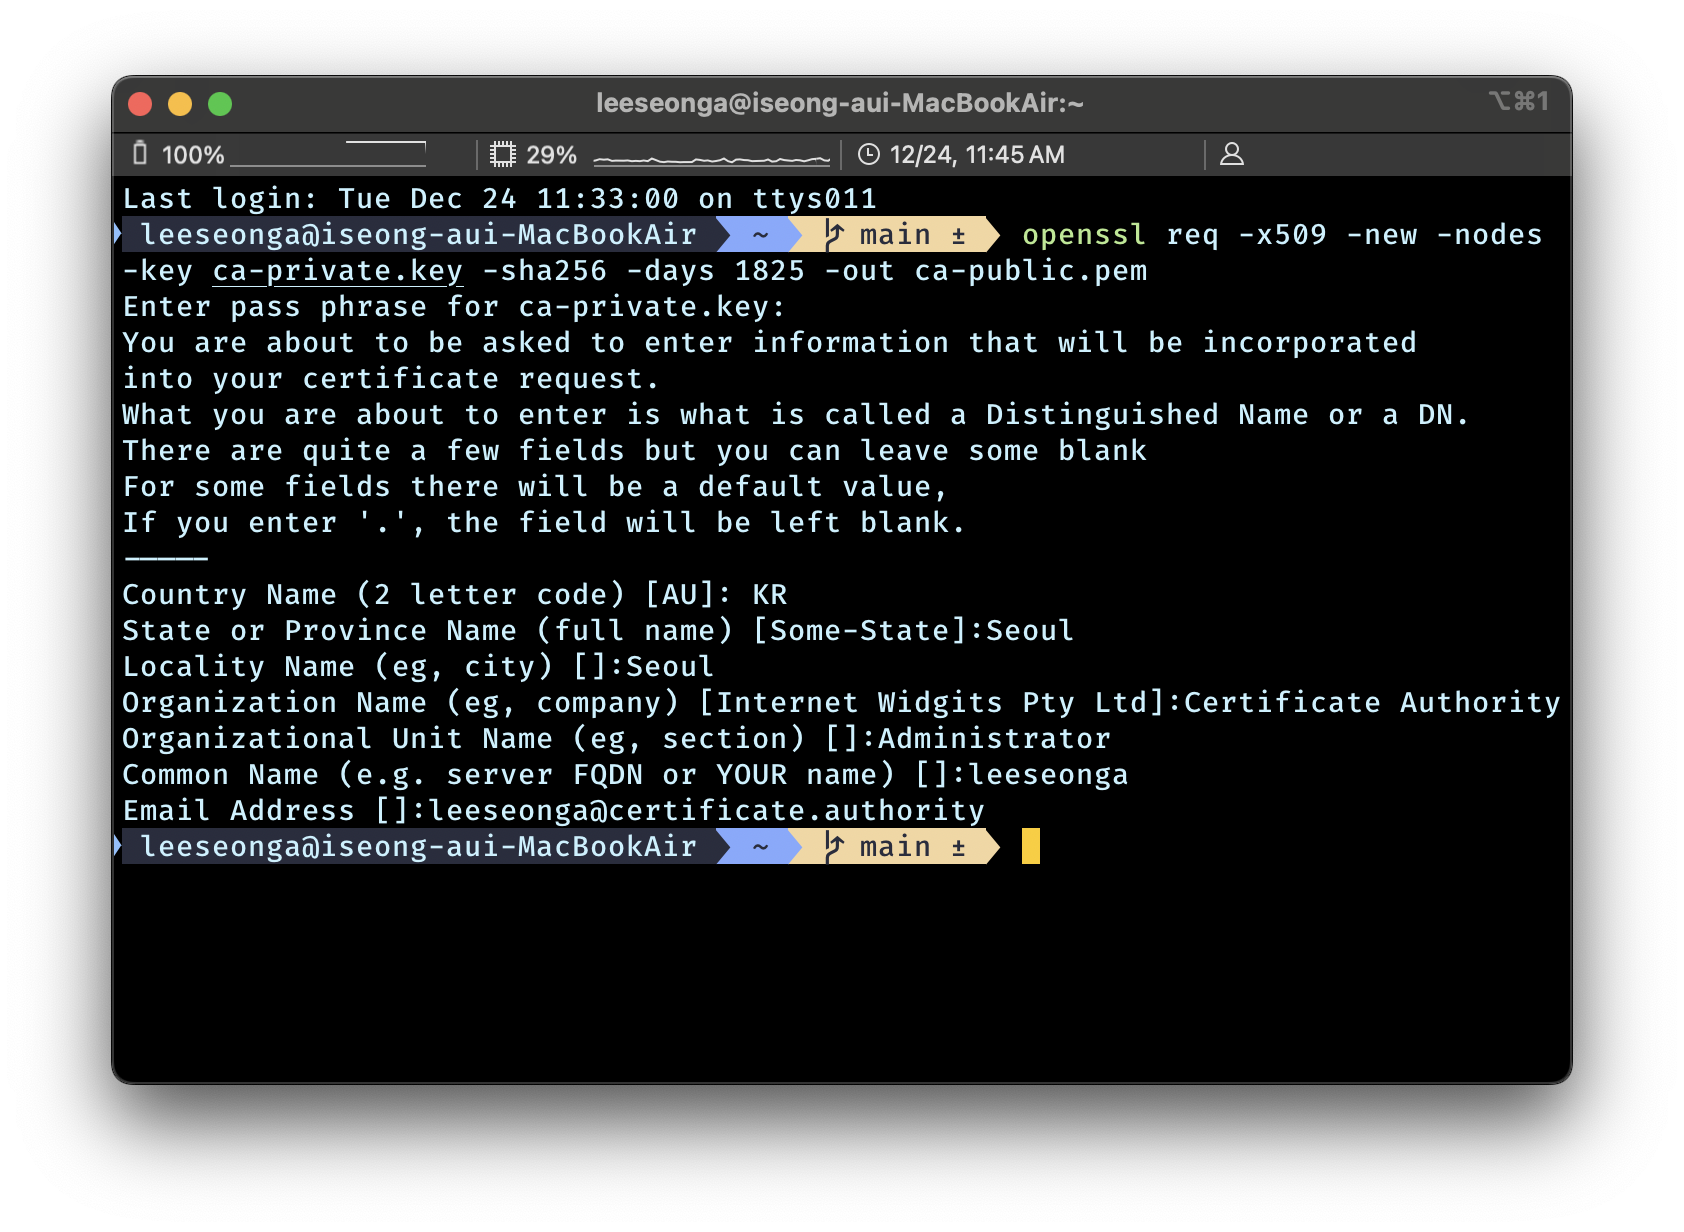
이렇게 만든 Root Certificate 는 클라이언트(브라우저)에 저장하여 Server 와 통신을 가능하게 함
사설 CA 인증서 발급 방법 - (2) Server
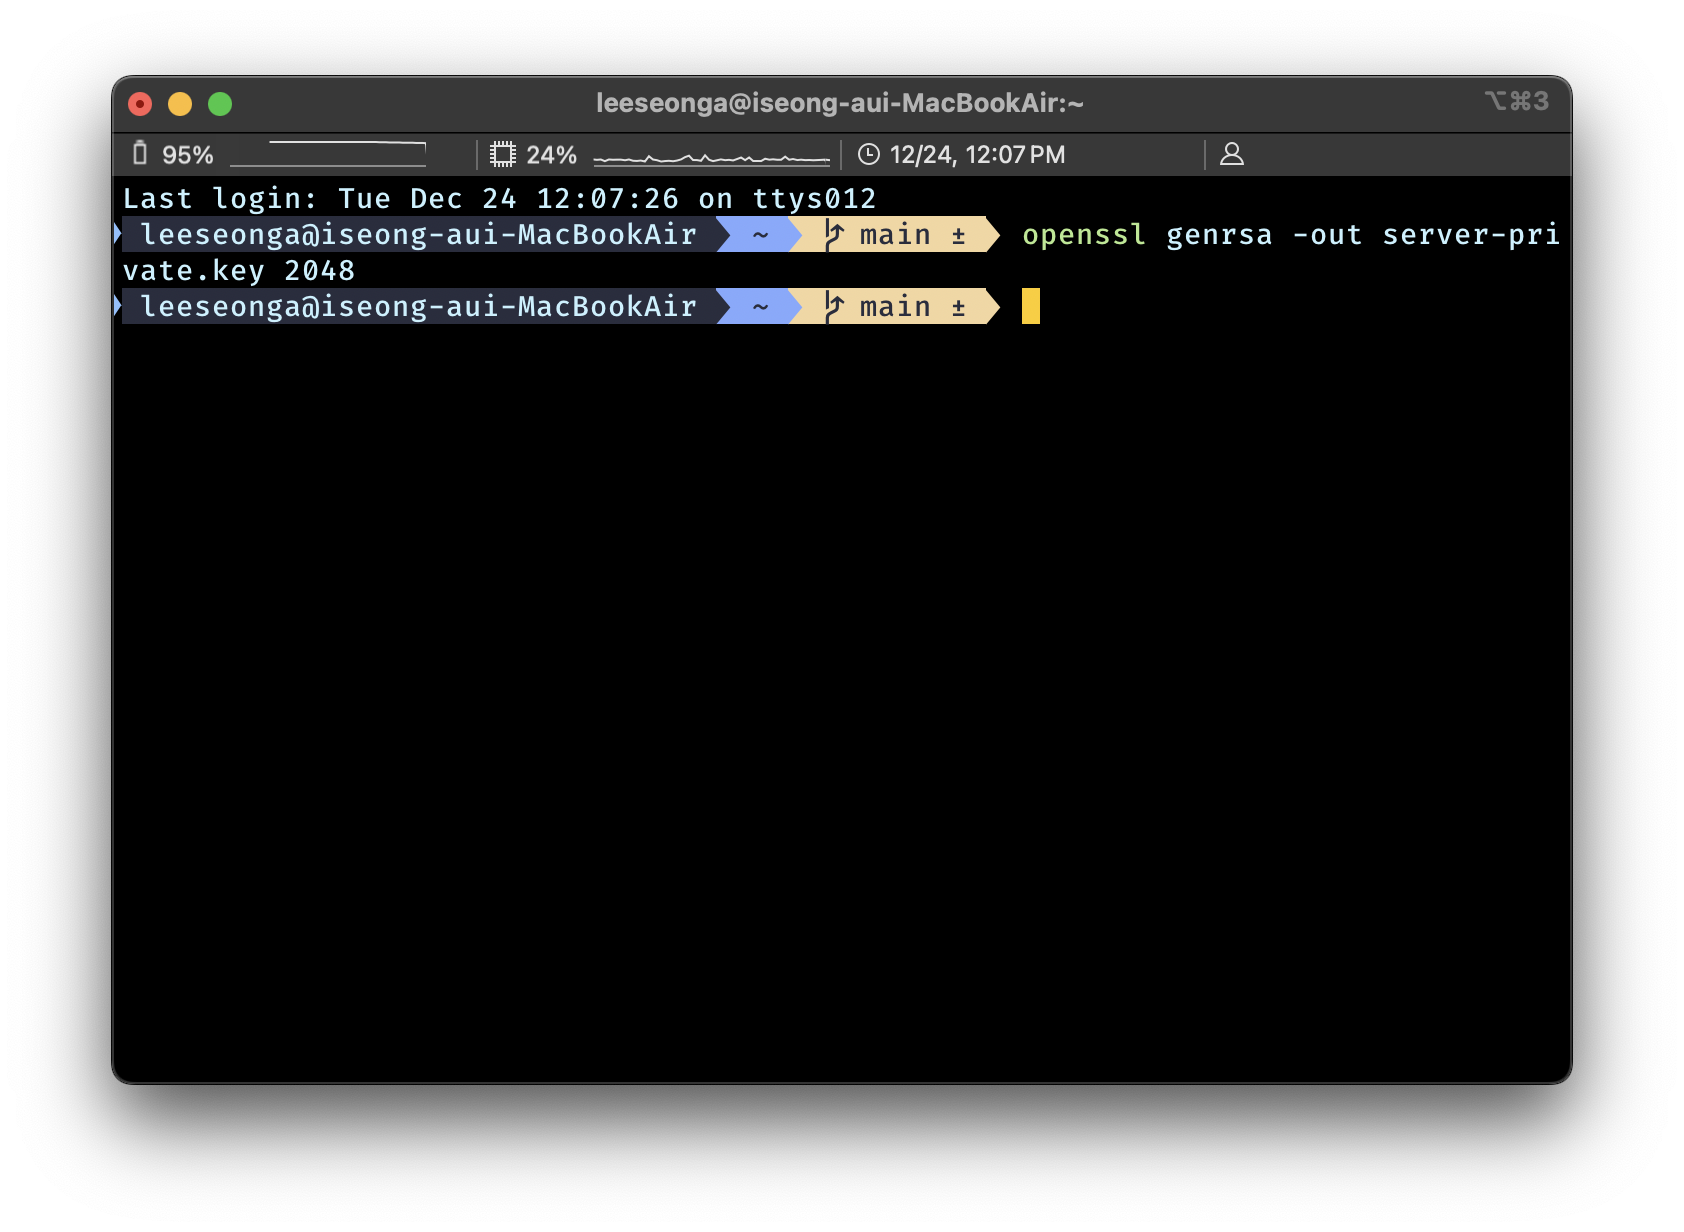
Server : Private Key 개인키 생성
← 서버에 위치시킬 Server Key 생성
- DES3 혹은 3DES 이나 AES256 를 옵션에 넣으면 Pass Phrase 를 요구
openssl gen**rsa** -out **server-private.key** **2048**- 실행 결과
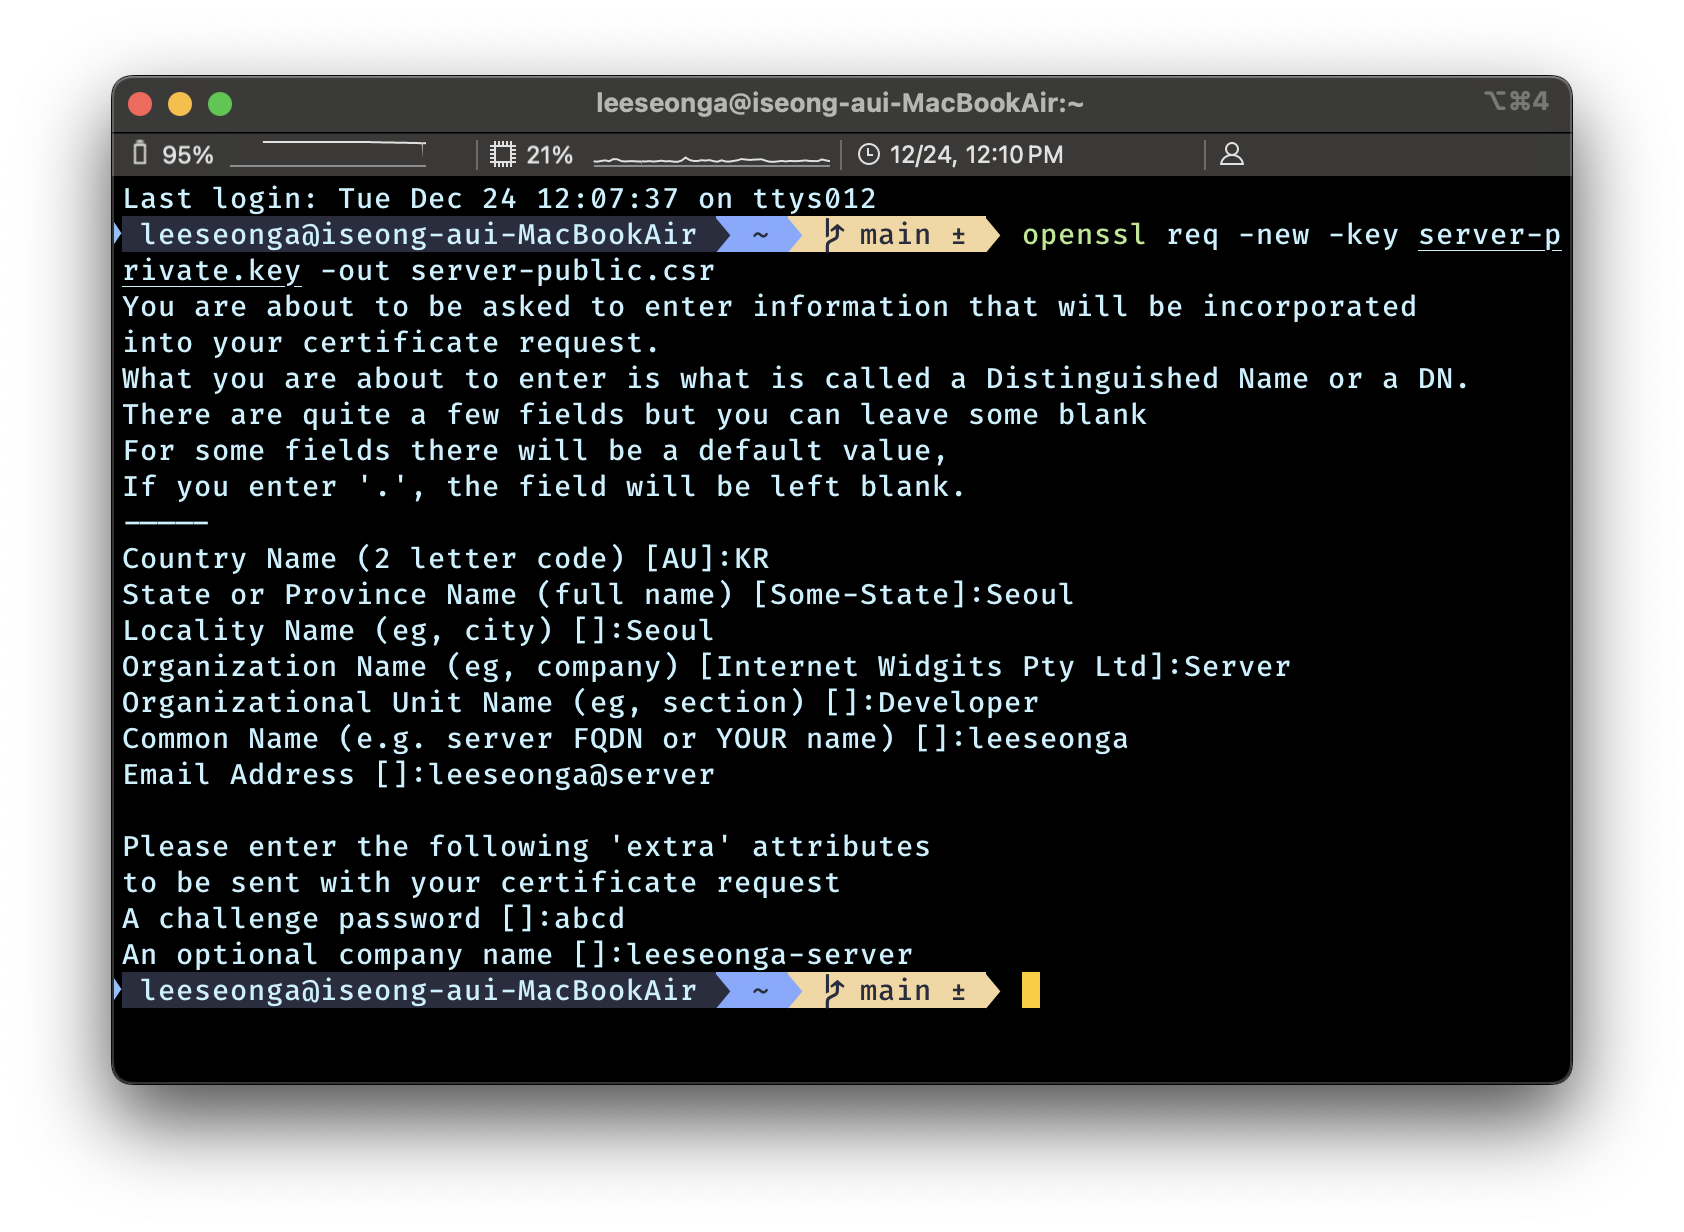
Server : End Entity Certificate 생성을 위한 인증 요청서(CSR, Certificate Signing Request) 생성
-config ./openssl.cnf를 통해 서버의 메타 데이터를 주입하지 않고, 우리가 직접 입력
openssl req -new -key **server-private.key** -out **server-public.csr**- 실행 결과
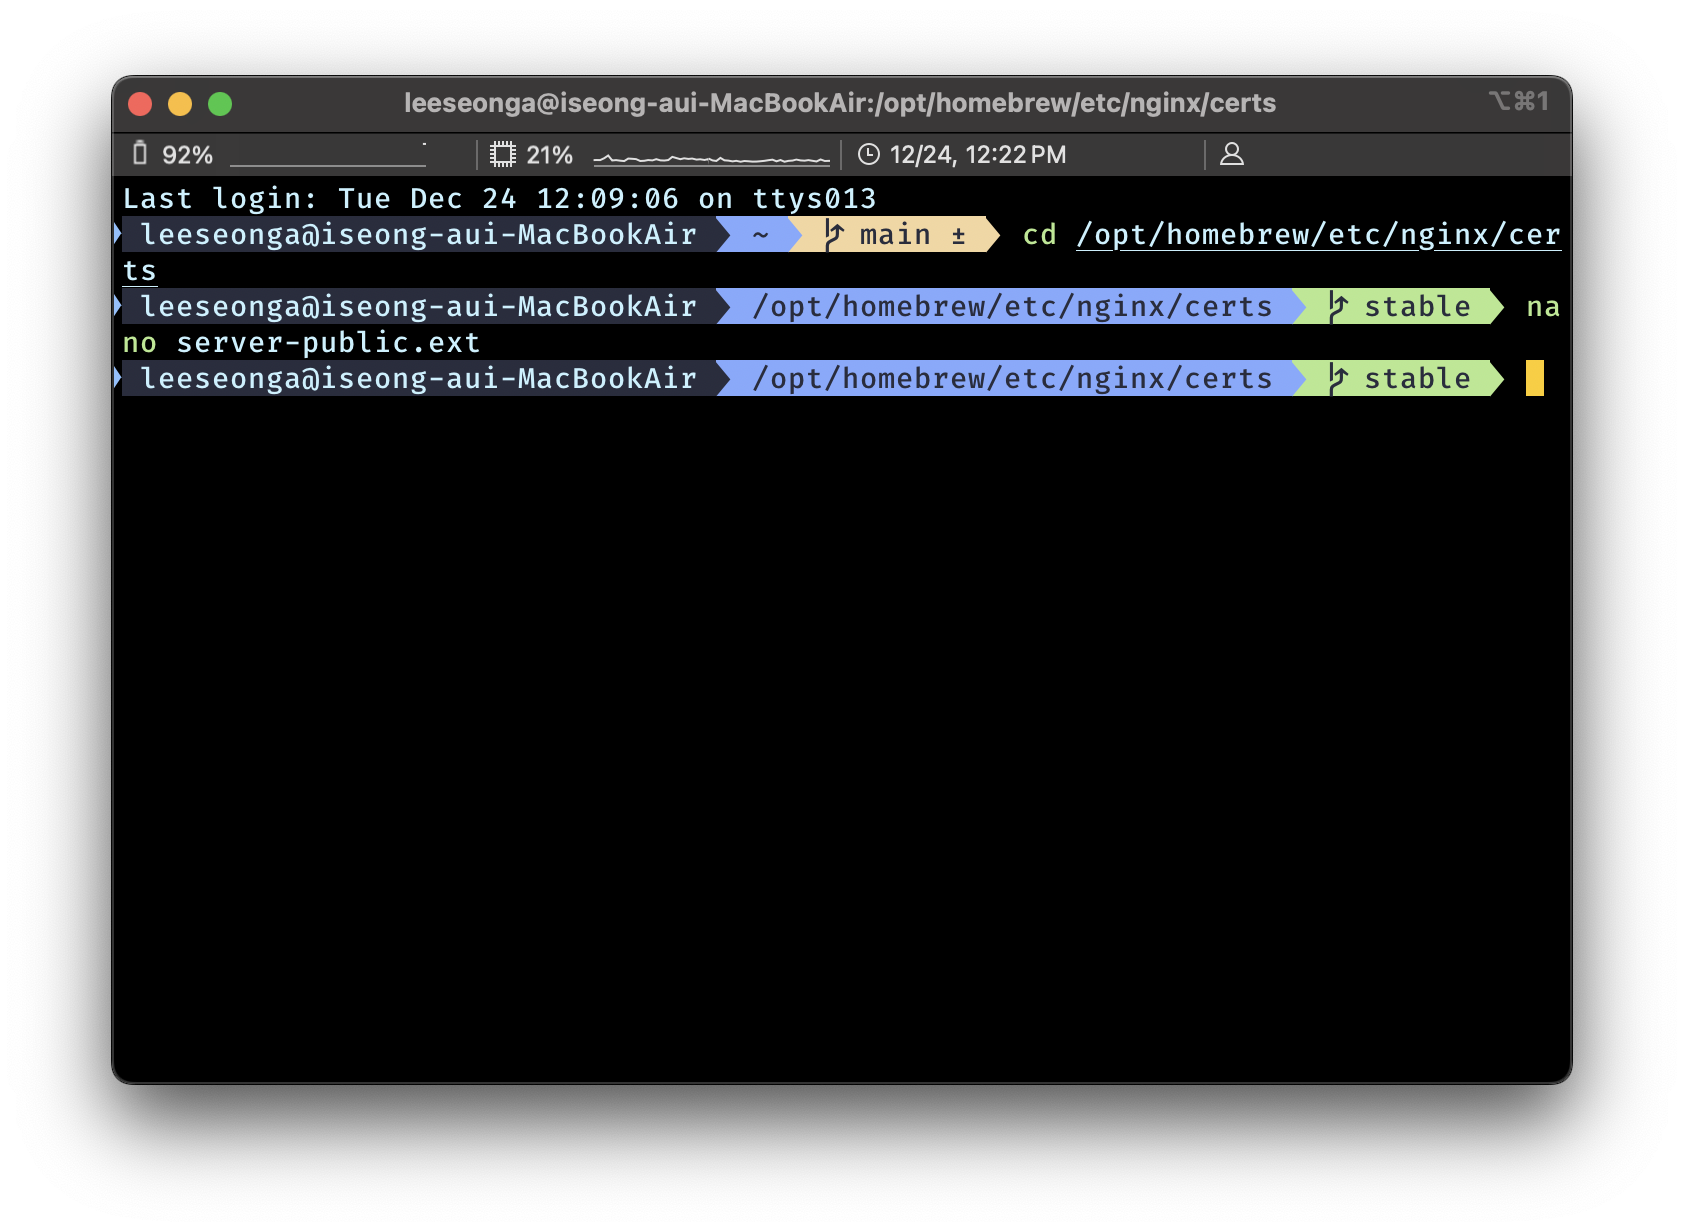
server-public.ext 생성
cd /opt/homebrew/etc/nginxmkdir certscd certsnano server-public.extauthorityKeyIdentifier=keyid,issuer
basicConstraints=CA:FALSE
keyUsage = digitalSignature, nonRepudiation, keyEncipherment, dataEncipherment
subjectAltName = @alt_names
[alt_names]
DNS.1 = localhost
IP.1 = 127.0.0.1- 실행 결과
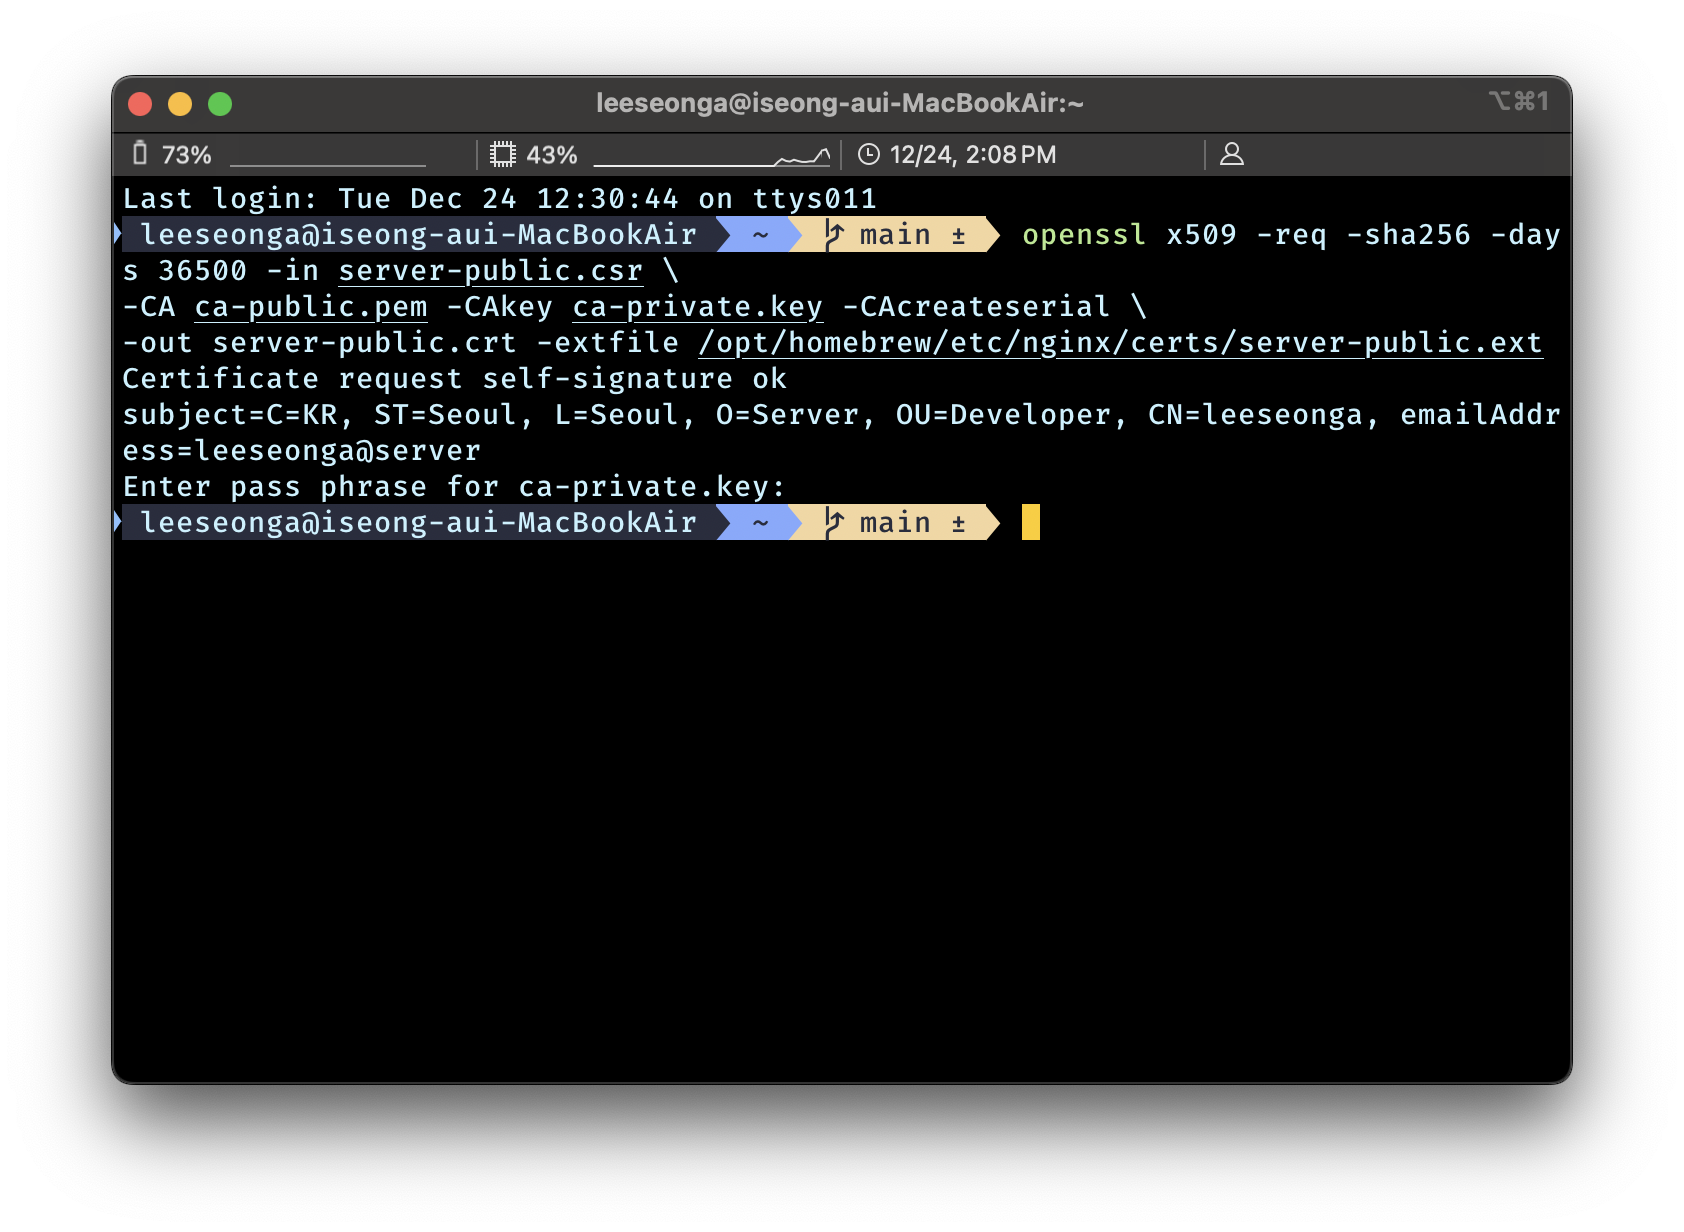
Server : Public Key 공개키 = End Entity Certificate 생성
← 클라이언트에 위치시킬 Client Key 발행
openssl x509 -req -sha256 -days 36500 -in server-public.csr \
-CA ca-public.pem -CAkey ca-private.key -CAcreateserial \
-out server-public.crt -extfile /opt/homebrew/etc/nginx/certs/server-public.ext- CA : Public Key 공개키 = Root Certificate 는
ca-public.pem혹은ca-public.crt - 실행 결과
Nginx 에 TLS 적용을 위해선 2개 키만 설정 : server-private.key 는 웹 서버용 / server-public.crt 는 웹 브라우저용
NGINX 내 앞서 발급받은 사설 CA 인증서로 TLS(SSL) 적용
nginx.conf내에 앞서 생성한 서버 공개키 (웹 브라우저에게 전달할 것) 와 서버 개인키 (웹 서버가 직접 쓸것) 설정- 서버 공개키 (웹 브라우저에게 전달할 것) :
ssl_certificate server-public.crt; - 서버 개인키 (웹 서버가 직접 쓸것) :
ssl_certificate_key server-private.key;
- 서버 공개키 (웹 브라우저에게 전달할 것) :
- 작성한
nginx.conf
http {
    include mime.types;

    log_format main '$http_x_forwarded_for - $remote_user [$time_local] '
                    '"$request" $status $body_bytes_sent '
                    '"$http_referer" "$http_user_agent"';
    access_log /opt/homebrew/var/log/nginx/access.log; # 기본 로그
    access_log /opt/homebrew/var/log/nginx/ip.log main; # 클라이언트 IP 주소 로그

    upstream backendserver {
        server 127.0.0.1:1111 weight=3;
        server 127.0.0.1:2222;
        server 127.0.0.1:3333;
        server 127.0.0.1:4444;
    }

    server {
        listen 8080;
        root /Users/leeseonga/Desktop/NGINX;

        location / {
            proxy_pass http://backendserver/;
            proxy_redirect     off;
            proxy_set_header   Host $http_host;
            proxy_set_header   X-Real-IP $remote_addr;
            proxy_set_header   X-Forwarded-For $http_x_forwarded_for;
            proxy_set_header   X-Forwarded-For $proxy_add_x_forwarded_for;

            return 301 https://$host$request_uri; # 리다이렉트 HTTP 요청을 HTTPS로
        }

        location ~*/count/[0-9] {
            root /Users/leeseonga/Desktop/NGINX;
            try_files /index.html =404;
        }

        location /fruits {
            root /Users/leeseonga/Desktop/NGINX;
        }

        location /carbs {
            alias /Users/leeseonga/Desktop/NGINX/fruits;
        }

        location /vegetables {
            root /Users/leeseonga/Desktop/NGINX;
            try_files /vegetables/veggies.html /index.html =404;
        }

        location /crops {
            return 307 /fruits;
        }
    }

    server {
        listen 443 ssl;
        server_name localhost;

        ssl_certificate      /Users/leeseonga/server-public.crt;
        ssl_certificate_key  /Users/leeseonga/server-private.key;

        root /Users/leeseonga/Desktop/NGINX;

        location / {
            proxy_pass http://backendserver/;
            proxy_redirect     off;
            proxy_set_header   Host $http_host;
            proxy_set_header   X-Real-IP $remote_addr;
            proxy_set_header   X-Forwarded-For $http_x_forwarded_for;
            proxy_set_header   X-Forwarded-For $proxy_add_x_forwarded_for;
        }

        location ~*/count/[0-9] {
            root /Users/leeseonga/Desktop/NGINX;
            try_files /index.html =404;
        }

        location /fruits {
            root /Users/leeseonga/Desktop/NGINX;
        }

        location /carbs {
            alias /Users/leeseonga/Desktop/NGINX/fruits;
        }

        location /vegetables {
            root /Users/leeseonga/Desktop/NGINX;
            try_files /vegetables/veggies.html /index.html =404;
        }

        location /crops {
            return 307 /fruits;
        }
    }
}

events {}
NGINX 웹 서버 응답 시 웹 브라우저 내 Public Cache 설정
-
웹 브라우저 혹은 웹 브라우저와 NGINX 사이에 위치한 프록시에 캐시 : Private / Shared Cache
-
웹 브라우저에 보내는 응답 내 Cache-Control 헤더로 웹 브라우저 / 중간 프록시 내 캐시 저장 설정
-
NGINX 는 기본적으로 캐시 사용 여부와 상관없이
Etag,Last-Modified헤더 세팅Etag를 쓰고싶지 않으면etag off;옵션 추가
-
add_header옵션으로 웹 서버 개발자가 원하는 헤더를 담아 웹 브라우저에 응답 반환 가능
location = /index.html {
		add_header X-Aarons-Custom-Header "Hello, World!";
}- 이
add_header옵션을 통해 location 에 따라 Cache-Control 헤더 달리 적용 - Cache-Control :
"no-store""no-cache""public""public, max-age=10";등 설정 가능max-age말고 NGINX 에서 제공하는expires로도 설정 가능
location = /index.html {
		expires    60m;
#		add_header Cache-Control   "max-age=3600";
		add_header Cache-Control   "public";
		add_header Pragma          "public";
}

location ~* \.(plist|apk|ipa)$ {
		add_header Cache-Control "no-store";
		etag       off;
}
NGINX 웹 서버를 리버스 프록시로 활용한 뒤, 관리형 캐시 설정
- 리버스 프록시 활용 : Shared Cache
- Shared Cache 중 프록시 캐시가 아니라 관리형 캐시
NGINX 설정 관리 방법
nginx.conf (메인) : 설정은 이 파일로 끝
- 인터넷에 떠도는 다른 설정 파일들 : 추가 설정에 해당
- nginx.conf (메인) 내
include /etc/nginx/sites-enabled/*;와 같은 형태로 연결- sites-available + sites-enabled (서브) 디렉토리 설정 : 심볼릭 링크(
ln -s) 활용- sites-available : 사용 가능한 모든 설정 파일들 저장
- sites-enabled : 실제 사용하려는 설정 파일
- conf.d (서브) 디렉토리 설정 : 설정을 Detach (미적용) 하려면 명칭 변경 혹은 파일 삭제
- sites-available + sites-enabled (서브) 디렉토리 설정 : 심볼릭 링크(
→ 1, 2 방법 중 솔직히 무엇을 쓰는지는 크게 상관없고 어차피 nginx.conf 내 연결
웹 서버 리버스 프록시 설정
- 1번째 설정 파일
/sites-available/default- 원 서버- 8000번 포트를 통해 웹 페이지 반환
server {
		listen 80 default_server;
		root /var/www/html;
		index index.html;

		server_name _;

		location / {
				try_files $uri $uri/ =404;
		}
}- 2번째 설정 파일
/sites-available/**cache.conf**- 프록시 서버- 80번 포트로 요청을 받아 위 8000번 포트로 전달
upstream origin_server {
		server 127.0.0.1:8000;
}

server {
		listen 80;

		server_name _;

		location / {
				include proxy_params;
				proxy_pass http://origin_server;
		}
}
프록시 서버에 관리형 캐시 설정
- 2번째 설정 파일
/sites-available/**cache.conf**- 프록시 서버 설정에 캐시 설정 추가- custom_cache 라는 이름의 캐시 저장소를
/var/cache/nginx라는 디렉토리로 설정 proxy_cache설정을 통해 앞서 설정한 custom_cache 캐시 저장소를 사용add_header로 응답 페이지가 캐시된 것인지, 원본인지 웹 브라우저가 인지
- custom_cache 라는 이름의 캐시 저장소를
proxy_cache_path /var/cache/nginx levels=1:2 keys_zone=custom_cache:10m inactive=60m;

upstream origin_server {
		server 127.0.0.1:8000;
}

server {
		listen 80;

		server_name _;

		location / {
				include proxy_params;
				proxy_pass http://origin_server;

				proxy_cache        custom_cache;
				proxy_cache_valid  any            10m;
				add_header         X-Proxy-Cache  $upstream_cache_status;
		}
}