💠 callback
- 모델저장, 모델학습 조기중단
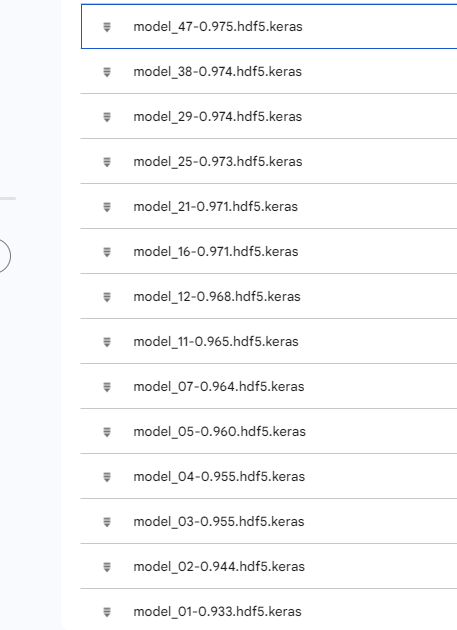
- 모델저장 : 딥러닝 모델 학습시 지정된 epochs를 다 끝내면 과대적합되는 경우가 있음. -> 학습 중간에 일반화된 모델을 저장하는 기능
- 모델학습 조기중단 : epochs를 크게 설정한 경우 일정 횟수 이후로는 모델의 성능이 개선되지 않는 경우가 있음 시간이 낭비 -> 모델의 성능이 더이상 개선되지 않는 경우에는 조기중단이 필요
# 라이브러리 불러오기
import numpy as np
import pandas as pd
import matplotlib.pyplot as plt
from tensorflow.keras.models import Sequential
from tensorflow.keras.layers import InputLayer, Dense, Flatten
from tensorflow.keras.optimizers import SGD, Adam # 최적화함수 클래스
from tensorflow.keras.callbacks import ModelCheckpoint, EarlyStopping
# 모델 중간 저장
# 모델 조기 중단 # 모델저장 객체 생성
# 경로 설정 - 절대경로
# 상대경로 지정을 원할 시에는 %cd 현재 작업위치를 변경후에 진행
model_path = "/content/drive/MyDrive/Colab Notebooks/24.08.29 DeepLearning/model/model_{epoch:02d}-{val_accuracy:0.3f}.hdf5.keras"
# d = interger, f = float
# 0.3f 소수점 세번째자리까지
mcp = ModelCheckpoint(filepath = model_path,
verbose=1, # verbose : 모델학습시 로그를 출력 -> 저장되는 epoch를 표시해줌
save_best_only = True, # 모델 성능이 최고점을 경신할 때마다 저장
monitor = 'val_accuracy') # 모델 성능을 확인하는 기준
# loss, accuracy도 가능하지만 검증데이터를 활용하는 것을 추천 # 조기중단 객체 생성
early = EarlyStopping(monitor = 'val_accuracy', # 학습을 중단할 기준 설정
verbose=1, # 로그 출력
patience=10) # 모델 성능 개선을 기다리는 최대 횟수
# 10번의 성능개선 기회를 줌# 데이터 불러오기
from tensorflow.keras.datasets import mnist
(X_train,y_train), (X_test,y_test) = mnist.load_data()
# relu + adam 모델 설계
# 신경망 모델 설계
model = Sequential()
model.add(InputLayer(shape=(28,28)))
model.add(Flatten())
model.add(Dense(units=64, activation='relu'))
model.add(Dense(units=128, activation='relu'))
model.add(Dense(units=256, activation='relu'))
model.add(Dense(units=128, activation='relu'))
model.add(Dense(units=64, activation='relu'))
model.add(Dense(units=10, activation='softmax'))
# 학습방법 및 평가방법 설정
model.compile(loss='sparse_categorical_crossentropy',
optimizer=Adam(),
# Adam 기본 학습률=0.001
metrics=['accuracy'])
# 모델학습 epochs = 100
h = model.fit(X_train, y_train, validation_split=0.2, batch_size=64, epochs=100, callbacks = [mcp, early])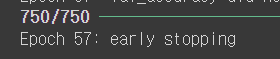

[실습] 저장한 모델 사용
test 데이터 불러오기
# 직접 작성한 손글씨 숫자 불러오기
import PIL.Image as pimg
import numpy as np
import matplotlib.pyplot as plt

# convert("L") : 컬러 이미지를 흑백 이미지로 변경
img = pimg.open("/content/drive/MyDrive/Colab Notebooks/24.08.29 DeepLearning/data/0.png").convert("L")
plt.imshow(img, cmap="gray")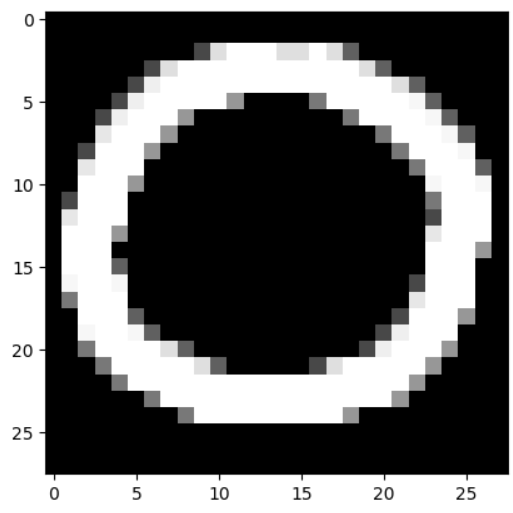
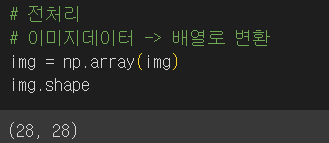
# 훈련데이터에 진행했던 Flatten 작업진행
# 2차원 -> 1차원
# reshape(데이터개수1개, 행, 열, 색상차원(흑백=1))
test_img = img.reshape(1,28,28,1)
test_img = test_img.astype("float32")/255
저장된 모델 불러오기
# 저장한 모델 불러와서 예측
from tensorflow.keras.models import load_model
best_model = load_model("/content/drive/MyDrive/Colab Notebooks/24.08.29 DeepLearning/model/model_47-0.975.hdf5.keras")
예측
# 예측
best_model.predict(test_img)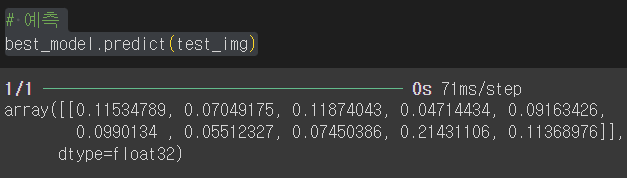
최종 예측값
# 최종 예측값만 보려면
best_model.predict(test_img).argmax()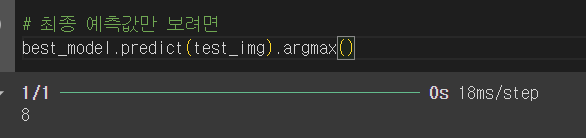

Hello, World!