
1. Stack
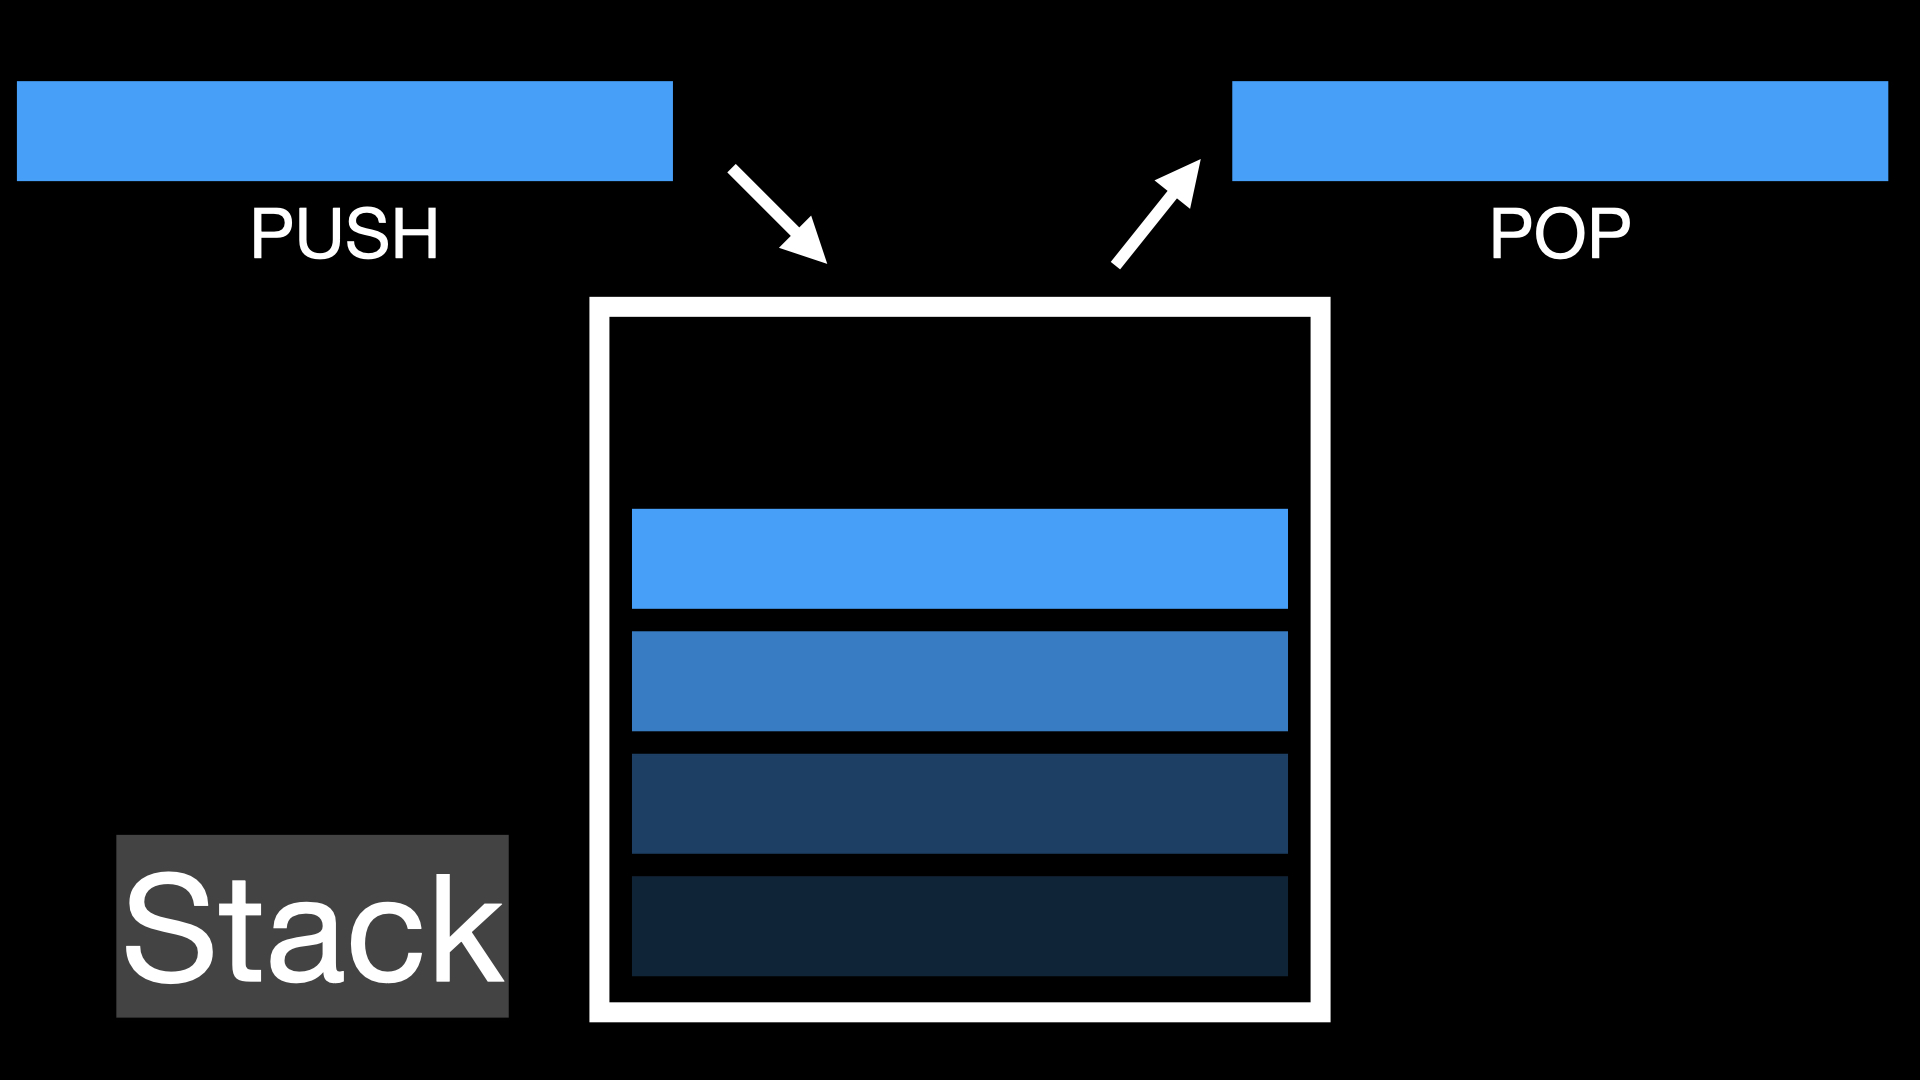
스택은 요소를 추가할 때, 위에서 부터 추가하고
요소를 제거(꺼낼)할 때, 위에서 부터 제거하는 자료구조이다. (LIOF)
값을 추가할 때, O(1) 의 시간복잡도를 가진다.
값을 제거할 때, O(1) 의 시간복잡도를 가진다.
특정 값을 가져올 때, O(n) 의 시간복잡도를 가진다.
1-1. 구현
class Stack {
  constructor() {
    this.storage = {};
    this.top = -1;
  }

  size() {
    return Object.keys(this.storage).length
  }

  push(element) {
    this.top++
    this.storage[this.top] = element;
    return this.storage;
  }

  pop() {
    const last = this.storage[this.top]
    delete this.storage[this.top]
    this.top--
    return last
  }
}
2. Queue

큐는 요소를 추가할 때, 뒤에 추가하고
요소를 제거(꺼낼)할 때, 앞에서 부터 제거한다.(FIFO)
값을 추가할 때, O(1) 의 시간복잡도를 가진다.
값을 제거할 때, O(1) 의 시간복잡도를 가진다.
특정 값을 가져올 때, O(n) 의 시간복잡도를 가진다.
2-1. 구현
class Queue {
  constructor() {
    this.storage = {};
    this.front = 0;
    this.rear = 0;
  }

  size() {
    return Object.keys(this.storage).length;
  }

  enqueue(element) {
    this.storage[this.rear] = element;
    this.rear++;
    return this.storage;
  }

  dequeue() {
    let result = this.storage[this.front];
    delete this.storage[this.front];
    if (this.front < this.rear) {
      this.front++;
    }
    return result;
  }
}
3. Linked List
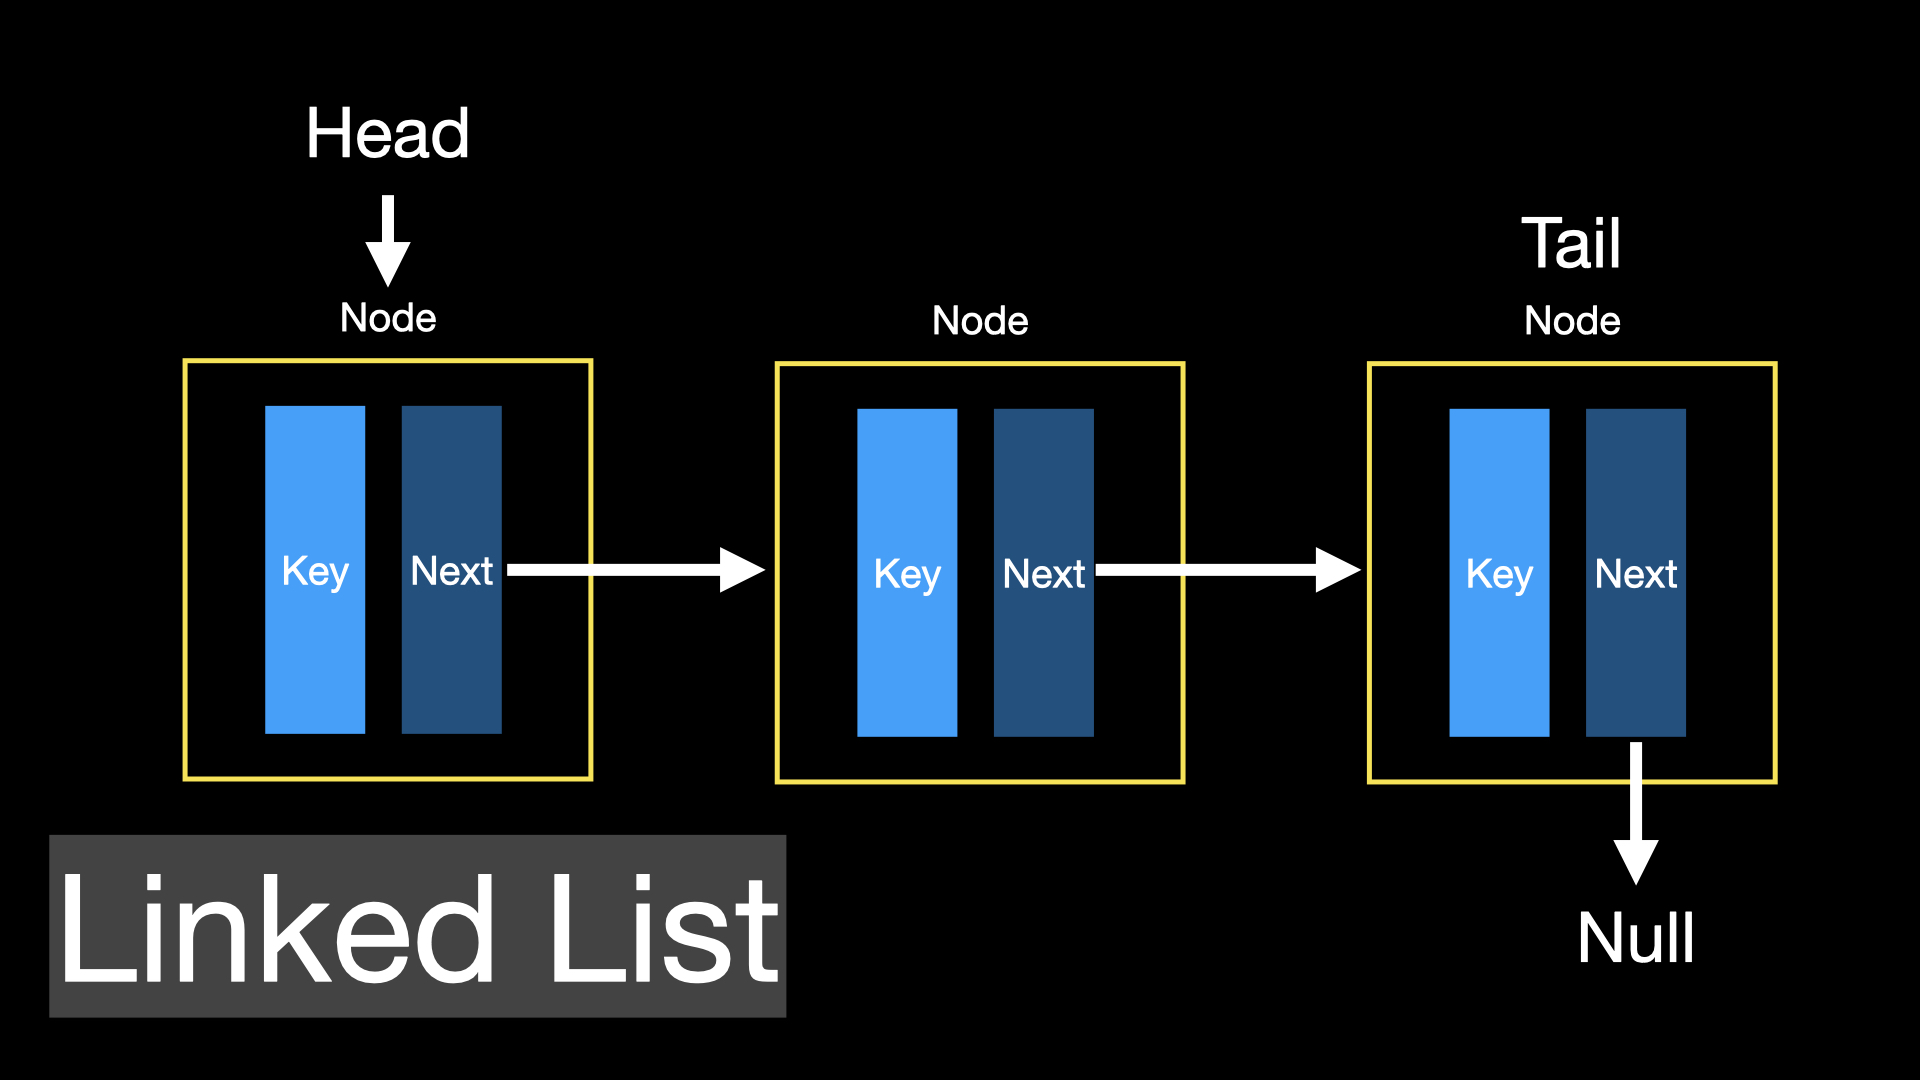
링크 리스트는 여러 노드로 구성 된다.
Node 는 Key(value) 와 다음 Node를 가리키는 Next(Pointer)로 이루어진다.
이 때, Next는 전 노드와 후 노드를 전부 가리킬 수 있는데
이것을 Double-Linked List 라고 한다.
필자는 Singly-Linked List 기준으로 설명하겠다.
링크 리스트의 첫번째는 Head라고 하며, Head는 첫 노드를 가리킨다.
(물론 첫 노드 자체가 Head 가 될 수 있다.)
노드의 Next 가 Null 일 때, 해당 노드를 Tail 이라고 일컫는다.
이런 구조를 Linked-List라고 한다.
값을 추가할 때, O(1) 의 시간복잡도를 가진다.
값을 제거할 때, O(1) 의 시간복잡도를 가진다.
특정 값을 가져올 때, O(n) 의 시간복잡도를 가진다.
3-1. 구현
class LinkedList {
  constructor() {
    this.head = null;
    this.tail = null;
    this._size = 0;
  }

  addToTail(value) {
    let node = new Node(value)
    this._size ++;
    // 1. 처음으로 추가할 때, head에 node 할당
    if (this.head === null) {
      this.head = node;
    }
    // 3. 앞에 node가 이미 있는 경우.
    if (this.tail !== null) {
      this.tail.next = node;
      this.tail = node;
    }
    // 2. 새로운 노드가 추가될 때마다 tail에 node 할당
    else {
      this.tail = node;
    }
  }

  remove(value) {
    if (this._size > 0) {
      if (this.head.value === value) { // 헤드의 벨류가 같을 때
        this.head = this.head.next; // 헤드를 다음 노드로 변경하기
        this._size--;
      }
      else {
        let prevHead = this.head;
        let newHead = this.head.next;
        let size = this._size;
        while (size) {
          if (newHead.value === value) { // value 일 경우
            if (newHead.next === null) {
              prevHead.next = null;
              prevHead = false;
              this.tail = prevHead;
              this._size--;
              }
            else {
              prevHead.next = newHead.next;
              newHead.next = null;
              //newHead = false;
              this._size--;
            }
            break;
          }
          else if (newHead.value !== value) { // value 아닐 경우
            prevHead = this.head.next.next;
            size--;
          }
        }
      }
    }
  }

  getNodeAt(index) {
    let checkHead = this.head
    while(index > -1) {
      if (index === 0 && this.head !== null) {
        return checkHead;
      }
      if (index > 0) {
        index--
        if (checkHead.next === null) {
          return undefined;
        }
        checkHead = checkHead.next;
      }
    }
    return undefined;
  }

  contains(value) {
    let size = this._size
    let checkHead = this.head
    while (size) {
      if (checkHead.value === value) {
        return true;
      }
      else {
        checkHead = checkHead.next;
      }
      size--
    }
    return false;
  }

  indexOf(value) {
    let size = this._size
    let result = 0
    let checkHead = this.head
    while (size) {
      if (checkHead.value === value) {
        return result;
      }
      else {
        checkHead = checkHead.next;
        result++
      }
      size--
    }
    return -1;
  }

  size() {
    return this._size;
  }
}
4. Hash Table
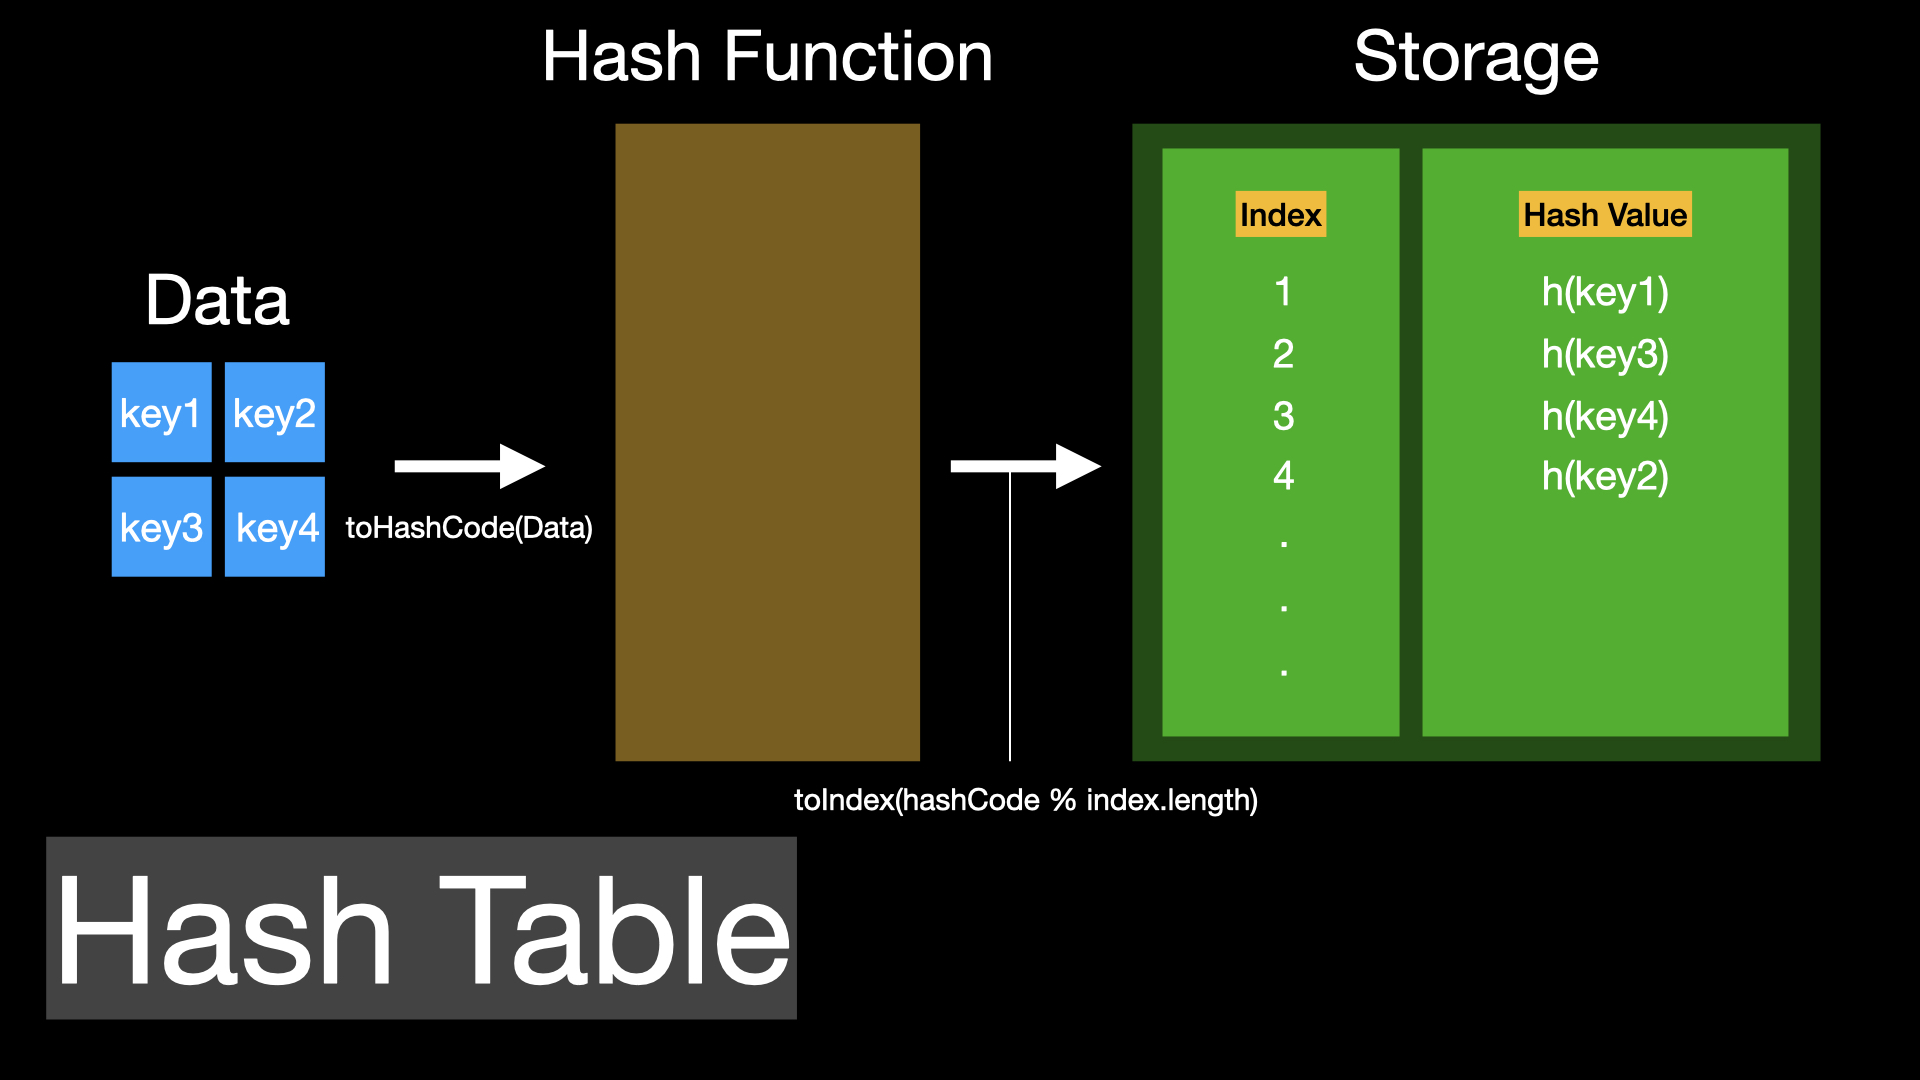
해시 테이블은 데이터를 저장할 때 Hash Function, Storage 를 이용한다.
Hash Function 은 입력 받은 데이터를 Hash값으로 바꾸고,
Hash 값을 Storage 의 Index 값으로 맵핑한다.
그리고 그 데이터를 해당 인덱스에 넣어준다.
이 때, 입력받은 데이터를 Hash 값으로 바꾸고 index로 맵핑한 값이 두 개 이상일 때
두 개 이상의 값이 한 index 에 들어가야 되는 Collision 가 발생한다.
(물론 목적에 따라 덮어씌워 주는 경우도 있다.)
해당 문제를 해결하는 방법은 두가지로 나뉜다.
1. Open Addressing
: 충돌이 난 두 개 값 중 하나를 비어있는 다른 인덱스에 넣는 방법이다.
2. Separate Chaining
: 값 두개를 chaining 해서 하나의 인덱스에 넣어두는 방법이다.
값을 추가할 때, O(1) 의 시간복잡도를 가진다.
값을 제거할 때, O(1) 의 시간복잡도를 가진다.
특정 값을 가져올 때, O(1) 의 시간복잡도를 가진다.
4-1. 구현
const LimitedArray = require('./helpers/limitedArray');
const hashFunction = require('./helpers/hashFunction');
// 위 문법은 helpers 폴더에 있는 limitedArray와 hashFunction을 불러오는 문법입니다.
// 위와 같이 require를 사용해서 다른 파일로부터 함수 등을 불러오는 작업은 이후에 따로 설명합니다.
class HashTable {
  constructor() {
    this._size = 0;
    this._bucketNum = 8;
    this._storage = LimitedArray(this._bucketNum);
  }
  insert(key, value) {
    const index = hashFunction(key, this._bucketNum); // 0, 1, 2, 3, ...
    let obj = {}
    if (this._storage.get(index) === undefined) {
      obj[key] = value;
      this._storage.set(index, obj)
    } else {
      obj = this._storage.get(index)
      obj[key] = value;
      this._storage.set(index, obj)
    }
    this._size++;
    //this._resize(this._bucketNum);
    // 추가
    if (this._bucketNum * 0.75 <= this._size) {
      this._resize(this._bucketNum * 2)
    }
  }
  retrieve(key) {
    const index = hashFunction(key, this._bucketNum);
    if (this._storage.get(index) === undefined) {
      return undefined;
    }
    return this._storage.get(index)[key];
  }
  remove(key) {
    const index = hashFunction(key, this._bucketNum);
    delete this._storage.get(index)[key];
    this._size--;
    // 추가
    if (this._bucketNum * 0.25 > this._size) {
      this._resize(this._bucketNum * 0.5);
    }
  }
  _resize(newBucketNum) {
    let past = this._storage;
    this._size = 0;
    this._bucketNum = newBucketNum;
    this._storage = LimitedArray(this._bucketNum); // new storage
    // 해싱
    past.each(function(past){
      for (let i in past) {
        this.insert(i, past[i])
      }
    }.bind(this))
  }
}
5. Graph
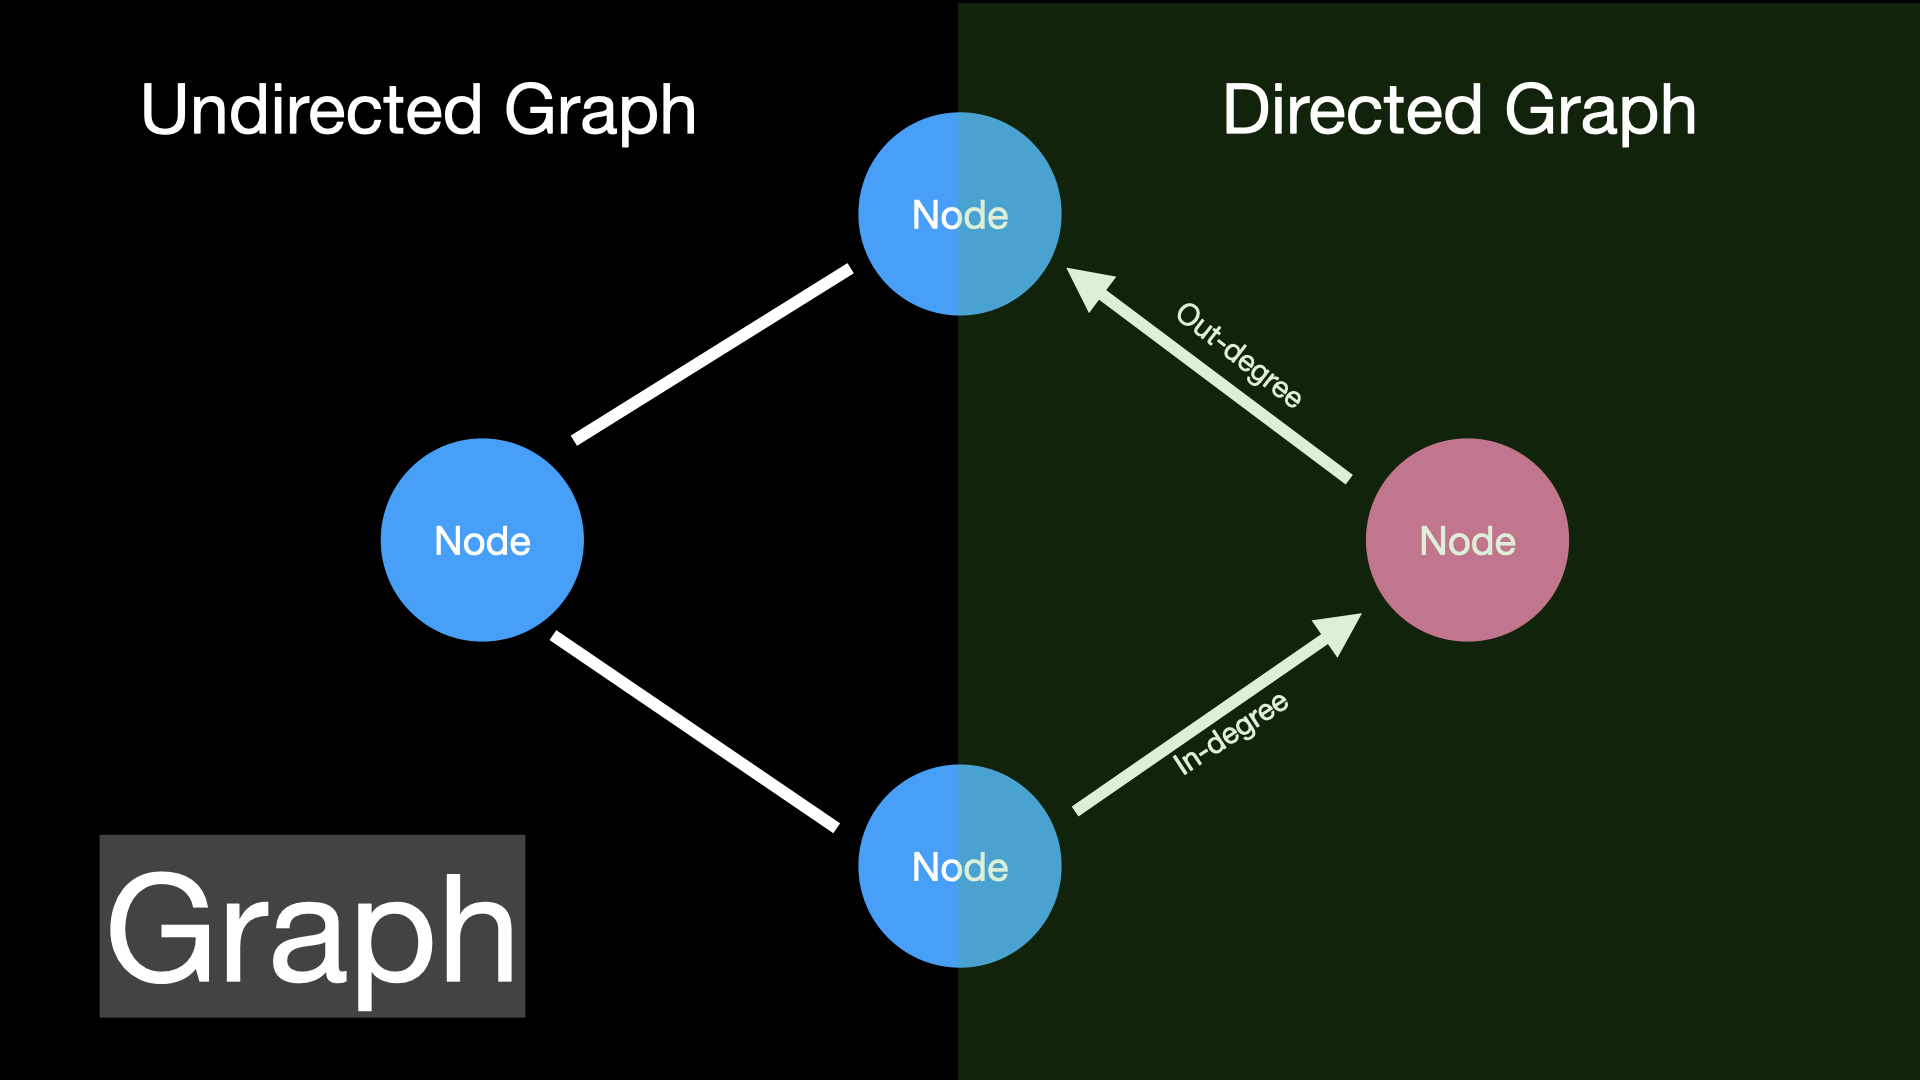
그래프는 여러개의 노드로 구성된다.
그리고 그 노드들의 관계로 edge(간선) 를 가진다.
edge는 단방향이 될 수 있고, 양방향이 될 수 있다.
(간선이 방향을 가지면 Direct Graph 아니면 Undirect Graph)
그래프의 대표적인 구현방법은 두가지로 나뉜다.
1. 인접행렬
: 이차원 배열로 구현하는 방법이다. (간선이 없으면 0, 있으면 1)
두 정점 사이의 간선 여부를 O(1) 만에 알 수 있다는 장점이 있다.
정점의 차수는 O(n), 모든 간선의 수는 O(n^2) 이 걸린다.
2. 인접리스트
: 각각 정점에 인접한 정점을 리스트로 구현하는 방법이다. (필자 사용)
두 정점을 연결하는 간선 여부나 차수를 알기 위해서 O(n) 이 걸린다.
모든 간선의 수는 O(n + e) 가 걸린다. (e = 간선의 개수)
목적에 따라 구현 방법을 선택하는게 일반적이다.
5-1. 구현
class Graph {
  constructor() {
    /*
     *  ex)
     *    nodes = {
     *      0: [ 1, 2 ],
     *      1: [ 0 ],
     *      2: [ 0 ]
     *    }
     */
    this.nodes = {};
  }

  addNode(node) {
    this.nodes[node] = this.nodes[node] || [];
  }

  contains(node) { // 해당노드가 들어있는지 유무 리턴
    return node in this.nodes;
  }

  removeNode(node) {
    delete this.nodes[node];
    for (let key in this.nodes) {
      if (this.nodes[key].includes(node)) {
        this.nodes[key].splice(this.nodes[key].indexOf(node), 1);
      }
    }
  }

  hasEdge(fromNode, toNode) {
    if (this.nodes[fromNode] !== undefined && this.nodes[toNode] !== undefined) {
      return this.nodes[fromNode].includes(toNode) && this.nodes[toNode].includes(fromNode);
    }
    return false;
  }

  addEdge(fromNode, toNode) {
    this.nodes[fromNode].push(toNode);
    this.nodes[toNode].push(fromNode);
  }

  removeEdge(fromNode, toNode) {
    this.nodes[fromNode].splice(this.nodes[fromNode].indexOf(toNode), 1)
    this.nodes[toNode].splice(this.nodes[toNode].indexOf(fromNode), 1)
  }
}
5. Tree
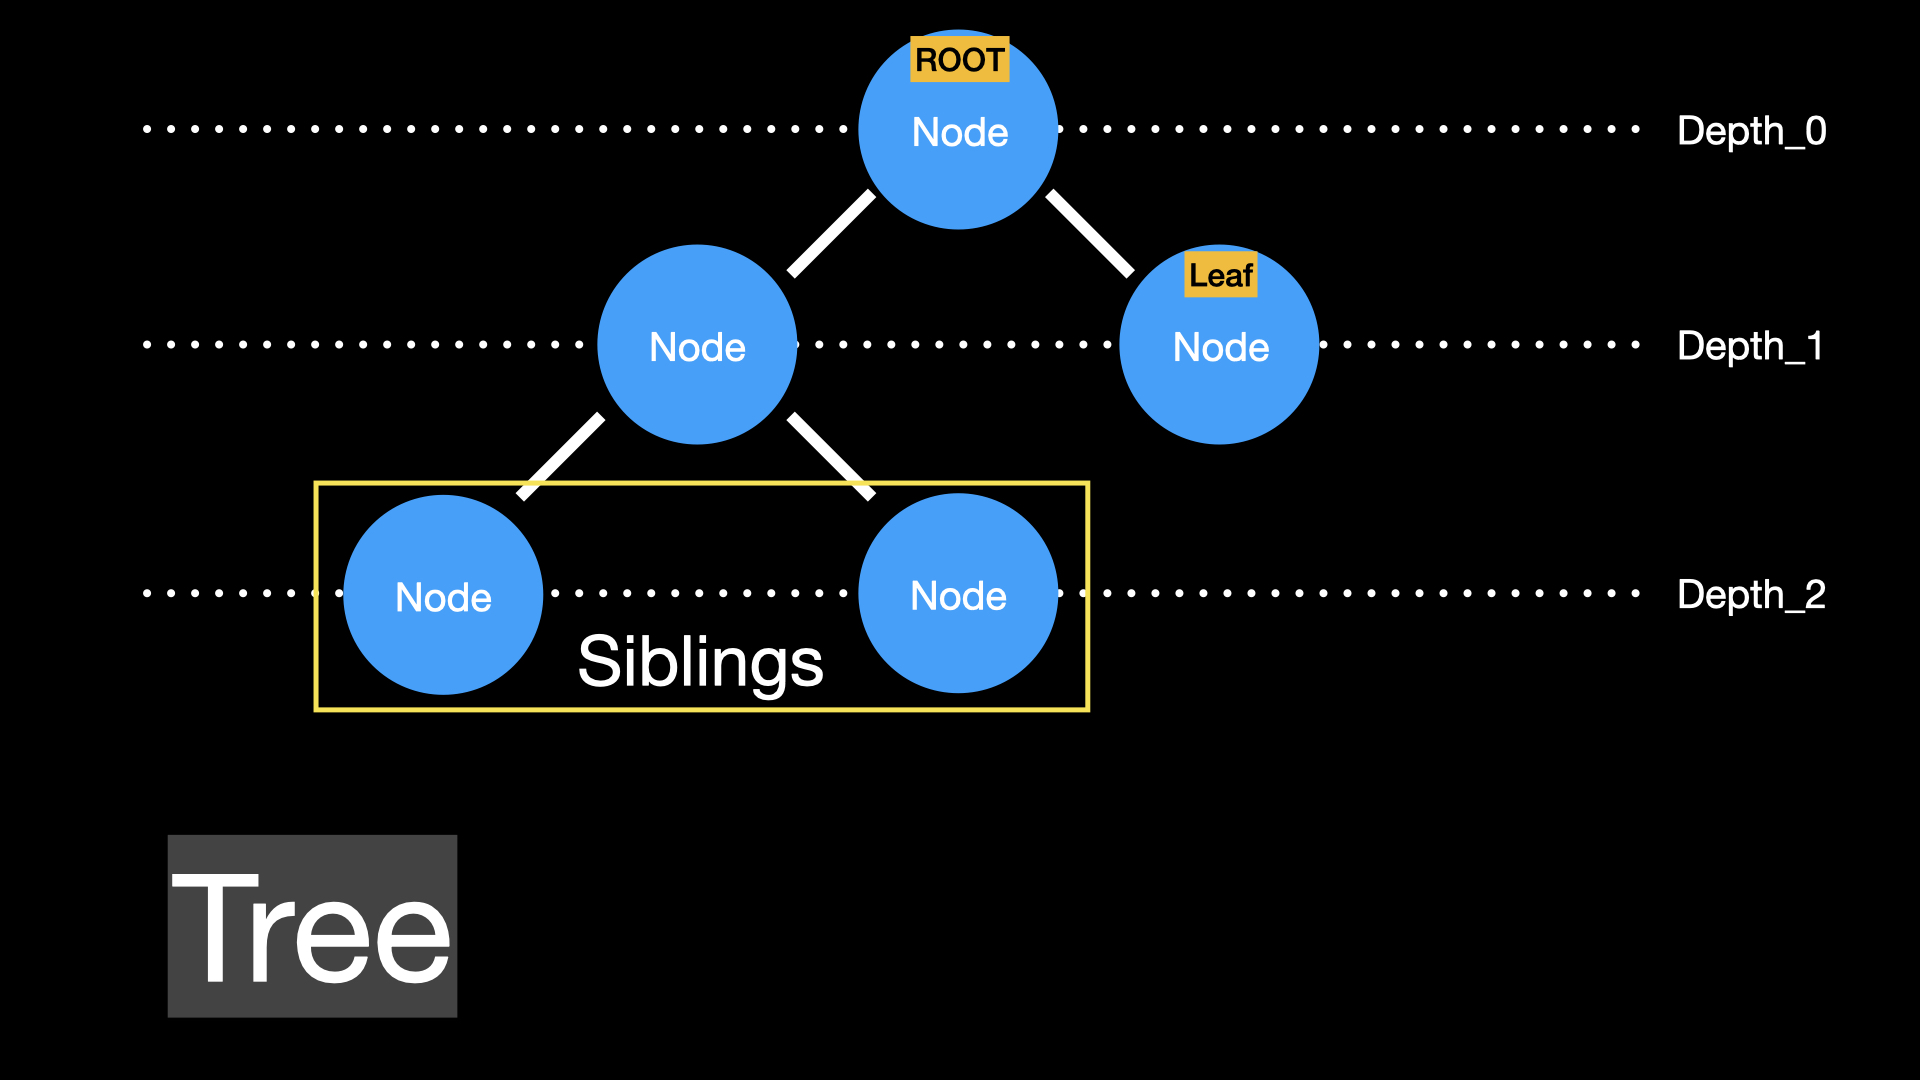
트리는 그래프의 일부로, 계층적 자료구조이다.
마찬가지로 여러 노드로 구성되며, 최상단에 root 를 만들고
root 에 child 를 이어붙여 구현된다.
자식이 없는 노드를 Leaf 라고 부르며,
추가로 최하단에 자식이 없는 노드를 Sibligs 라고 부른다.
트리의 종류
1. Binary tree
2. Binary Search Tree
3. Balance
4. Complete binary tree
5. Full binary tree
6. Perfect binary tree
7. Binary tree traversal
트리의 순회 방법
1. Inorder(중위순회): Left, Root, Right (LRootR)
2. Preorder(전위순회): Root, Left, Right (RootLR)
3. Postorder(후위순회): Left, Right, Root (LRRoot)
트리의 종류와 순회 방법에 대한 자세한 내용은 여기를 참고하자
5-1. 구현
class TreeNode {
  constructor(value) {
    this.value = value;
    this.children = [];
  }

  insertNode(value) {
    let node = new TreeNode(value);
    this.children.push(node);
  }

  contains(value) {
    let result = false;
    if (this.value === value) {
      return true;
    }
    for (let i = 0; i < this.children.length; i++){
      result = this.children[i].contains(value)
      if (result !== false) {
        return result;
      }
    }
    return false;
  }
}