
들어가며
이번에는 4탄에서 완성한 HTTP GET, POST, PUT, DELETE API에 대한 명세서를 작성해보려 한다.
Front-end 개발을 하다보니 Back-end와의 협업 과정에서 가장 필수적이라고 생각하는 것들 중 하나가 바로 API 명세서이다. 물론 API가 빨리 개발되는 것도 중요하지만, API가 개발되었더라도 어떻게 사용하면 되는지 명세서가 있고 없고는 개발 효율성 측면에서 꽤나 차이가 난다고 생각한다.
아주 간단한 데이터를 주고 받는 API지만, 잠시나마 Back-end 개발자의 입장이 되어 어떻게 하면 Front-end 개발자가 좀 더 편리하게 사용할 수 있을지 고민하며 성공 응답부터 에러 응답까지 꼼꼼하게 작성해보았다.
Swagger 작성
1️⃣ 라이브러리 설치
$ npm install swagger-ui-express swagger-jsdocExpress 환경에서 Swagger를 사용하기 위해 먼저 swagger-ui-express 라이브러리와 swagger-jsdoc 라이브러리를 설치한다.
swagger-ui-express: swagger-ui를 express에 쉽게 적용시킬 수 있도록 해주는 라이브러리swagger-jsdoc: jsdoc 주석으로 Swagger API 문서를 표현할 수 있도록 해주는 라이브러리
2️⃣ swagger-jsdoc 옵션 설정
src 폴더 내부에 swagger 폴더를 생성하고 내부에 config.js 파일을 생성한다. config.js 파일은 Swagger 문서의 옵션을 설정해 주는 js 파일이다.
export const swaggerOptions = {
  definition: {
    openapi: '3.0.0',
    info: {
      title: '테스트 서버',
      version: '1.0.0',
      description: 'Notes 정보를 관리하는 RESTful API 서버',
    },
    servers: [
      {
        url: 'http://localhost:3000',
        description: '로컬 서버',
      },
      {
        url: 'https://api.jinwook.site',
        description: '배포 서버',
      },
    ],
  },
  apis: ['./src/swagger/*.swagger.js'],
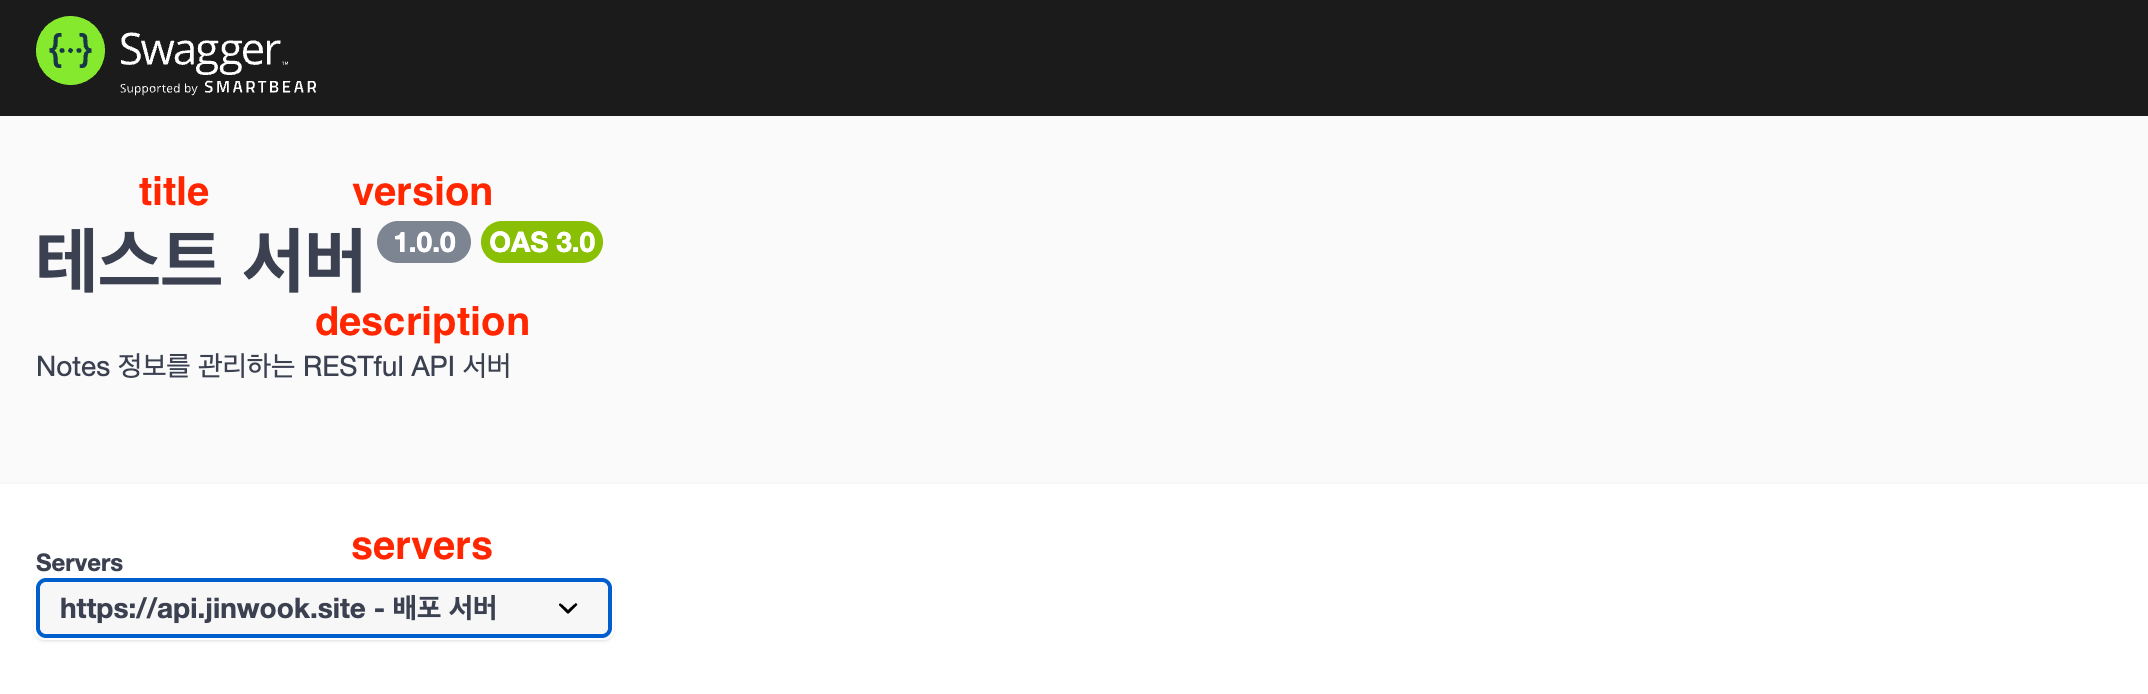
};infotitle: API의 이름을 명시한다.version: API의 배포 버전을 명시한다.description: API에 대한 설명을 작성한다.
servers: 지원하는 서버의 URL을 명시한다.apis: 문서화할 정보가 들어있는 파일의 경로를 명시한다.'./src/swagger/*.swagger.js'는swagger폴더 안에 존재하는[파일명].swagger.js로 끝나는 모든 파일들을 문서화한다는 의미이다.
3️⃣ app.js 파일에 연결
Express 서버를 관리하는 src/app.js로 이동한다.
import swaggerJsdoc from 'swagger-jsdoc';
import swaggerUi from 'swagger-ui-express';
import { swaggerOptions } from './swagger/config.js';

...

// Swagger 설정
const swaggerSpec = swaggerJsdoc(swaggerOptions);
app.use('/api-docs', swaggerUi.serve, swaggerUi.setup(swaggerSpec));
위에서 작성한 swaggerOptions를 app.js 파일에서 import 한 후 Swagger 설정 부분을 추가한다. 옵션을 swaggerJsdoc의 인수로 전달하여 swaggerSpec을 생성하고, /api-docs로 접속 시 API 문서를 제공하도록 설정한다.
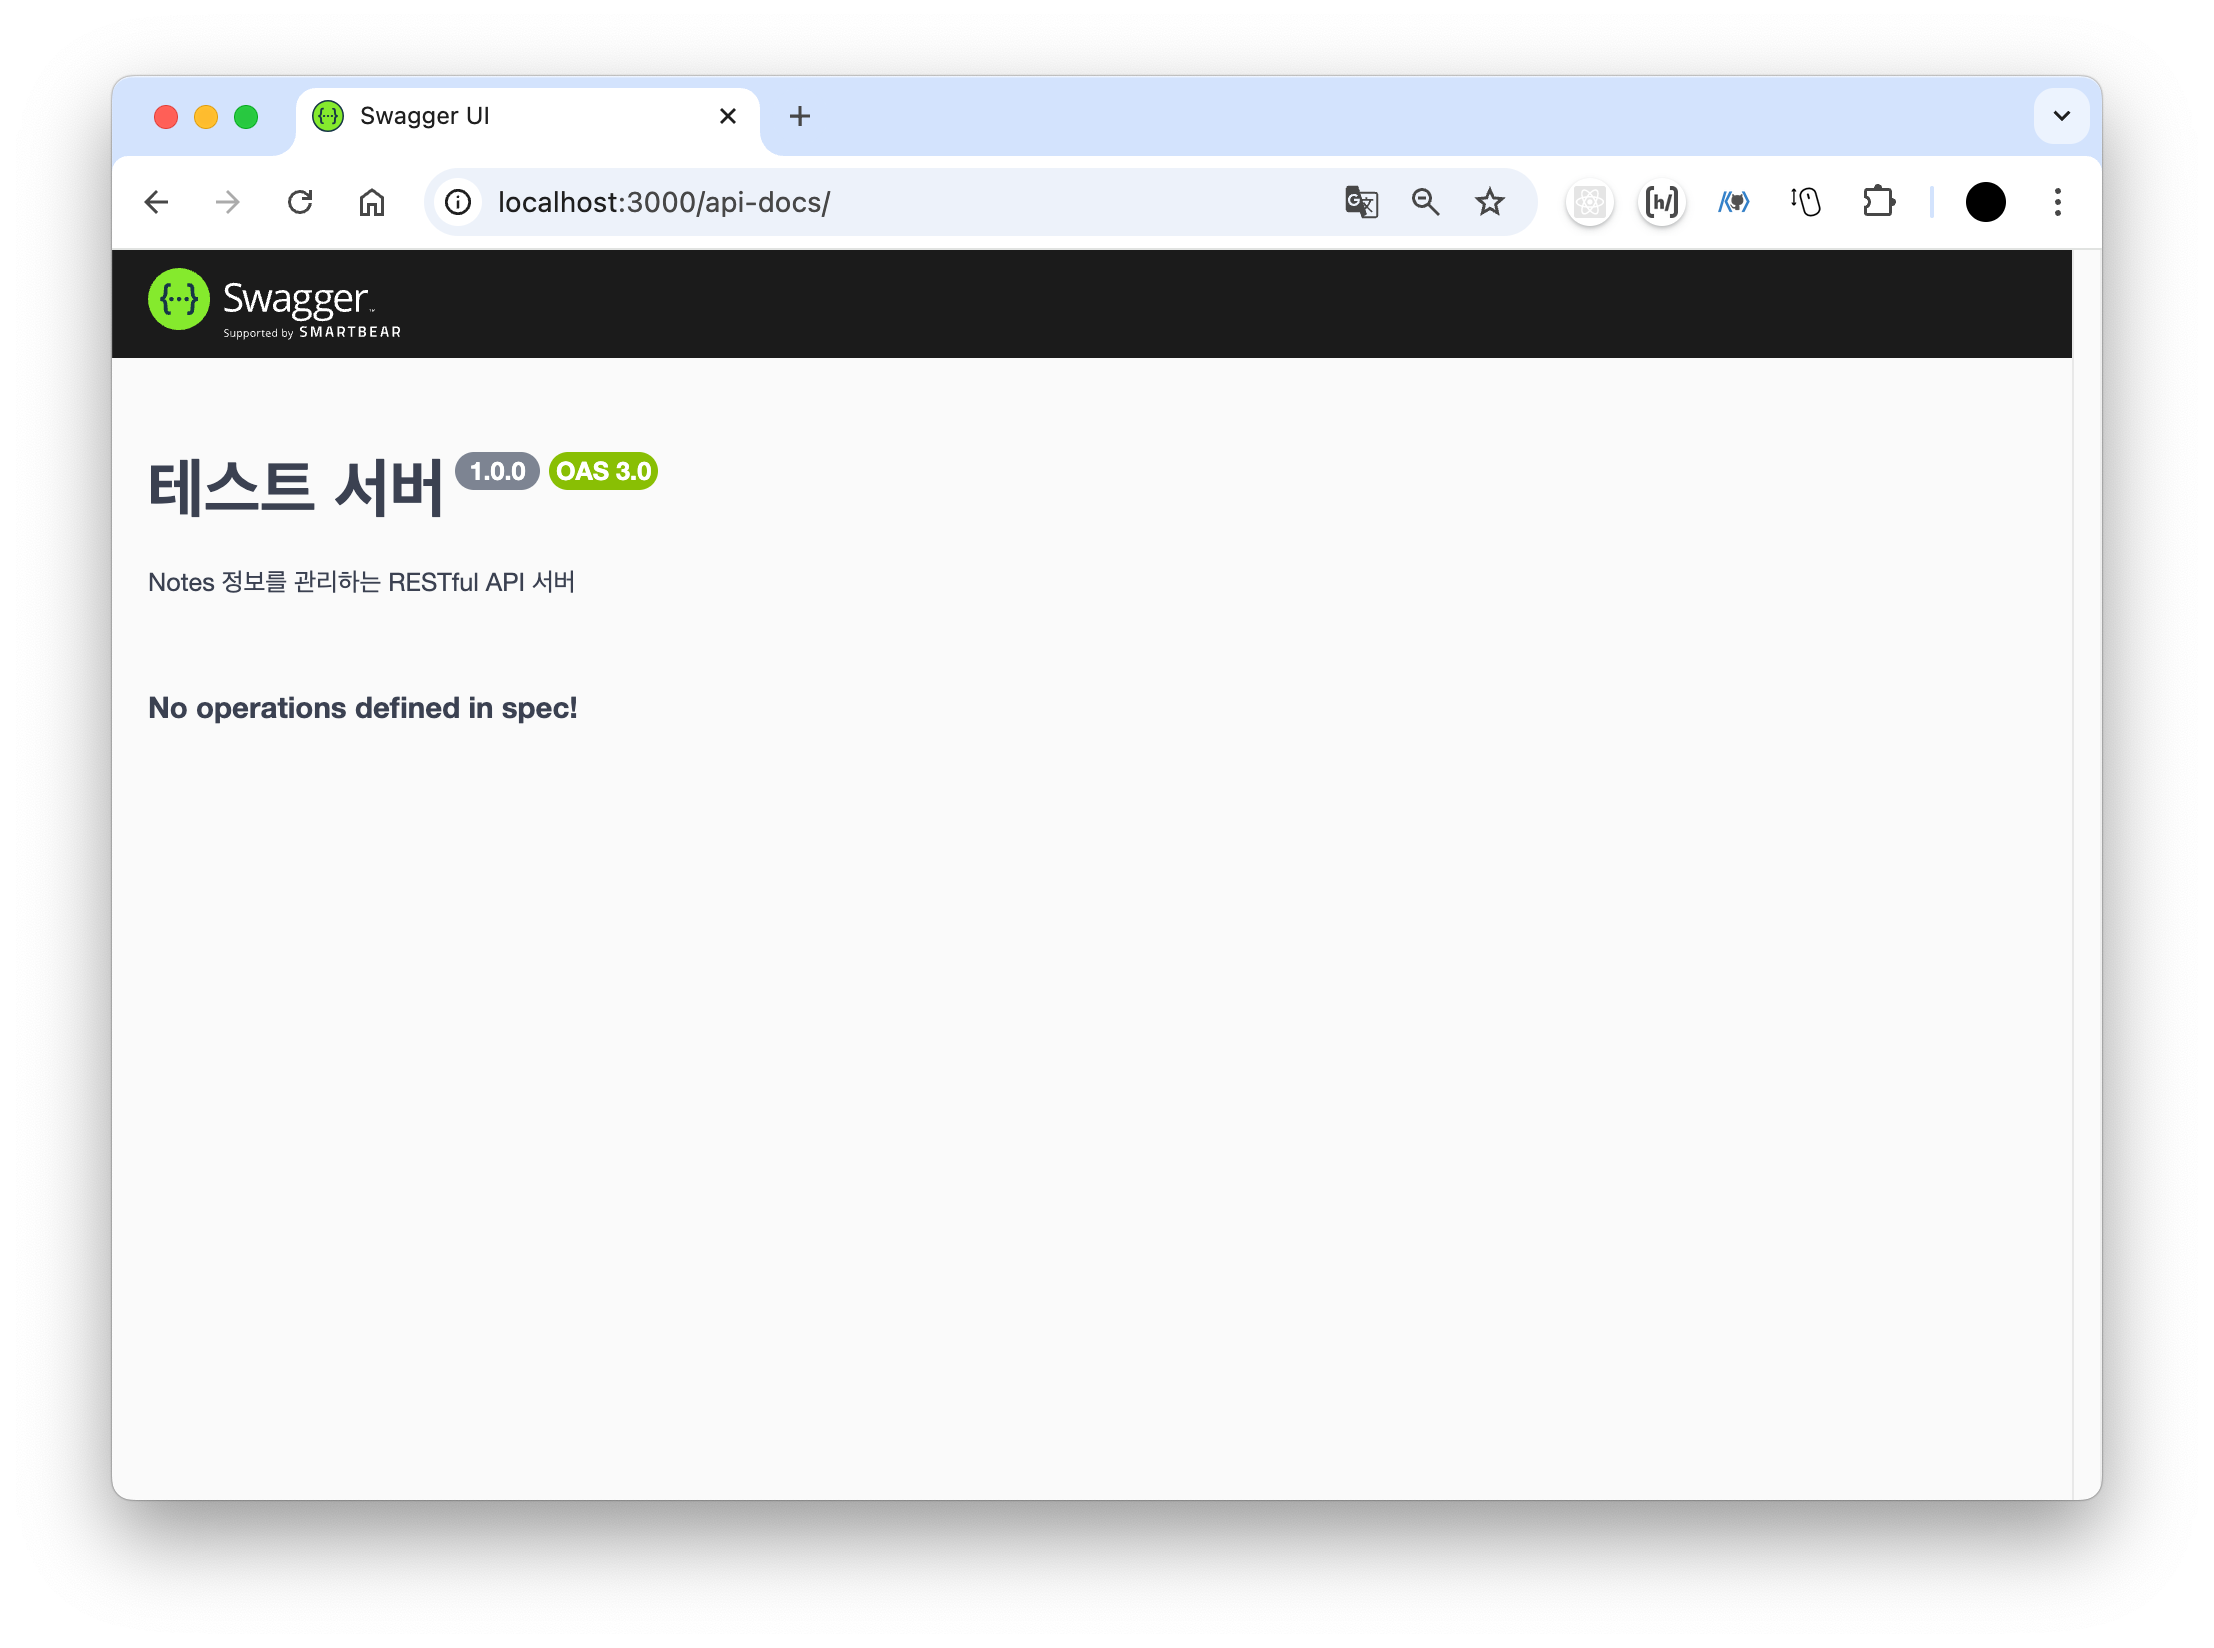
서버 URL/api-docs 주소로 접속해보면 위와 같이 서버의 API 명세서가 잘 나타나는 것을 확인할 수 있다!
3️⃣ API 문서 작성
이제 API 명세서를 작성할 차례이다. src/swagger 폴더 내부에 [파일명].swagger.js 형태로 API 명세서를 위한 파일을 생성한다. 나는 notes에 관련된 API 명세서를 작성할 예정이므로 notes.swagger.js라는 파일을 추가하였다.
Swagger 명세서는 JSDoc 형태로 작성하게 되는데, 이 때 JSDoc은 들여쓰기에 매우 민감하니 주의해야 한다. 만약 들여쓰기를 통일성있게 사용하지 않으면 잘못 들여 쓰여진 API에 대한 명세서가 나타나지 않을 수 있으니 반드시 일정한 간격의 들여쓰기를 사용해야 한다.
먼저 파일의 최상단에 다음과 같은 jsdoc을 추가한다.
/**
 * @openapi
 * tags:
 * - name: Notes
 *   description: 메모 관련 기능
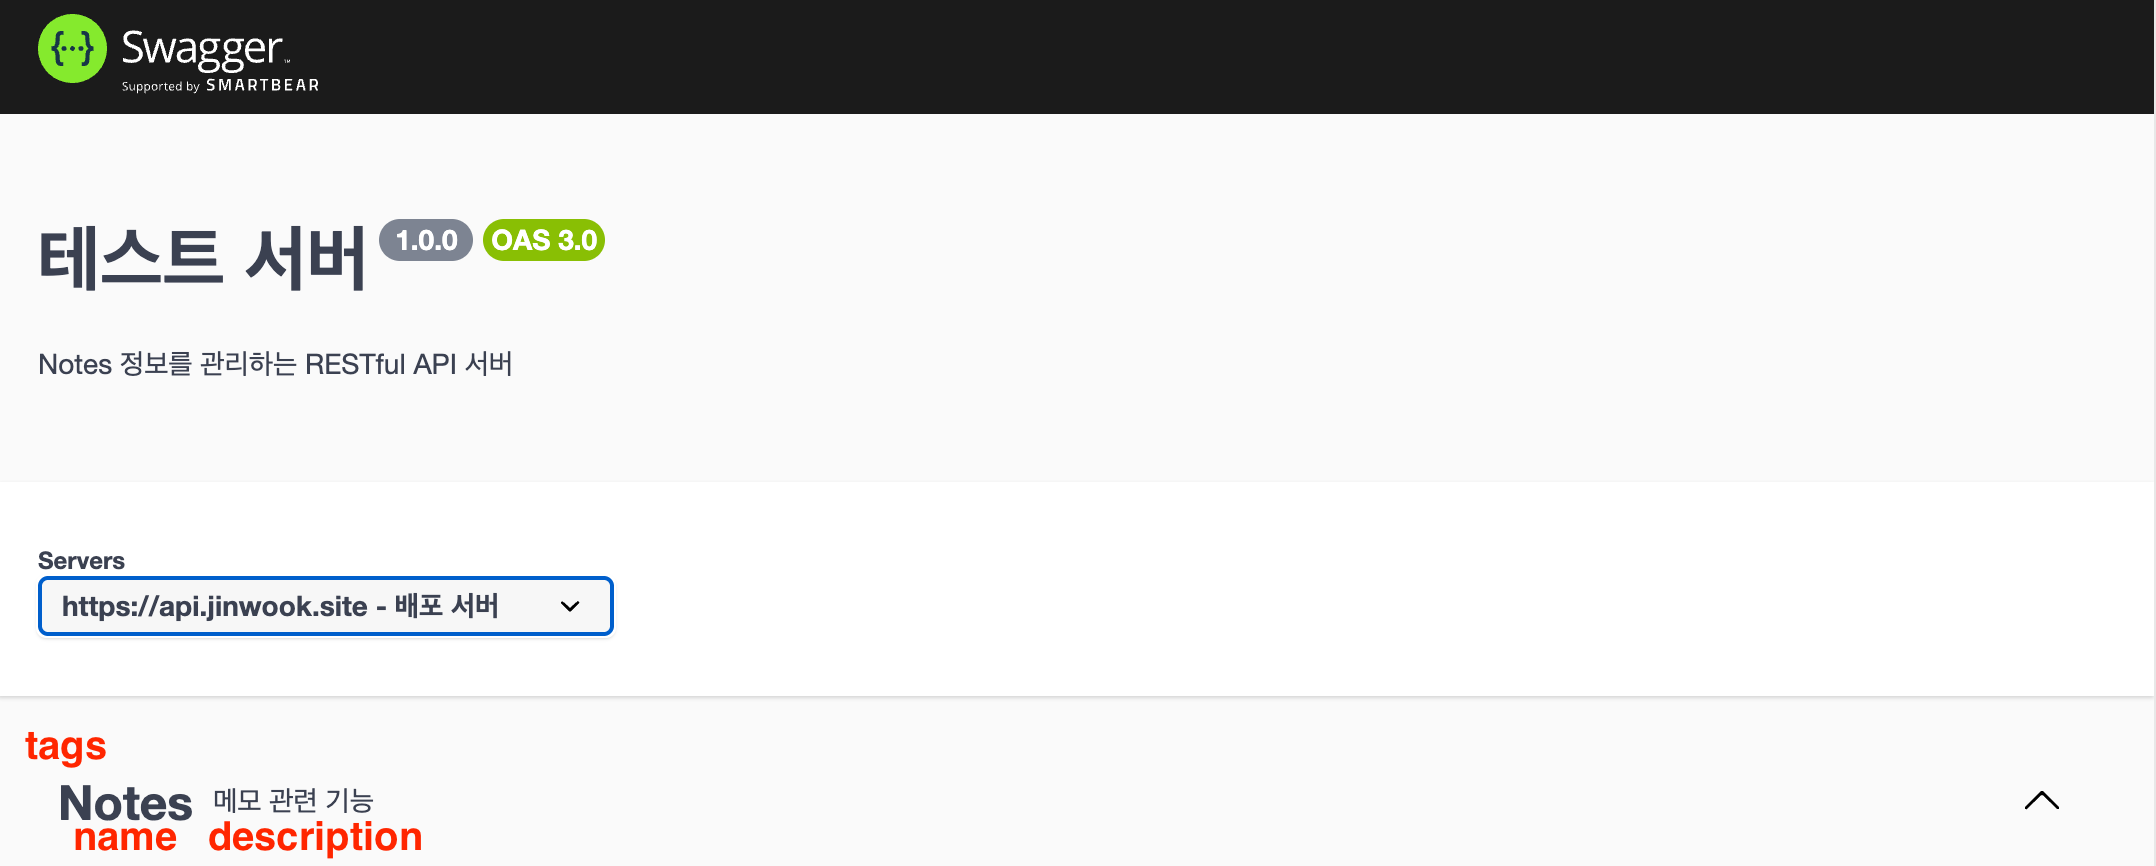
*/swagger-jsdoc을 이용해 Swagger의 API 명세를 작성할 때에는 각 API 명세 전에 @openapi라는 어노테이션을 추가해 API 문서를 생성하도록 할 수 있다.
tags 속성의 경우 특정 기능을 수행하는 API들의 그룹을 지정하는 것이다. 예를 들면 메모 관련 기능을 가진 API들은 위와 같이 Notes라는 태그를 이용해 그룹화 해 줄 수 있다. 아직은 API를 작성하지 않은 상태이기 때문에 그룹만 먼저 지정해두고, 나중에 API 작성 시 tags 속성의 값으로 Notes를 부여하여 API들을 그룹화 할 예정이다.
➀ 메모 목록 조회
다음으로, notes 목록을 조회하는 GET API에 대한 명세서를 작성한다.
// GET notes
router.get('/', async (req, res) => {
  const notes = await getNotes();

  if (notes.length === 0)
    res.send({
      ok: 1,
      item: [],
    });

  res.send({ ok: 1, item: notes });
});
API는 다음과 같다. 데이터베이스에서 notes 목록을 조회한 후, 200번 응답과 함께 notes 배열의 길이가 0보다 크다면 item 속성에 notes 배열을 반환하고, 아니라면 빈 배열을 반환하는 형태이다.
 /* @openapi
 * /notes:
 *   get:
 *     summary: 메모 목록 조회
 *     description: 메모 목록을 조회합니다.
 *     tags: [Notes]
 *     responses:
 *       200:
 *         description: 조회 결과
 *         content:
 *           application/json:
 *             schema:
 *               type: object
 *                 properties:
 *                   ok:
 *                     type: number
 *                     example: 1
 *                   item:
 *                     type: array
 *                     items:
 *                       type: object
 *                       properties:
 *         				   uuid:
 *           				 type: string
 *           				 example: 9b1deb4d-3b7d-4bad-9bdd-2b0d7b3dcb6d
 *          				 description: 메모 id
 *                		   title:
 *                           type: string
 *                           example: Note 1
 *           				 description: 메모 제목
 *                         contents:
 *                           type: string
 *                           example: Contents 1
 *                           description: 메모 내용
 *                         created:
 *                           type: Date
 *                           example: 2025-07-01T10:45:22.000Z
 *                           description: 메모 생성 일시
 *                         updated:
 *                           type: Date
 *                           example: 2025-07-04T10:45:22.000Z
 *                           description: 메모 생성 일시
 *       500:
 *         description: 서버 에러
 *         content:
 *           application/json:
 *             schema:
 *               type: object
 *               properties:
 *                 ok:
 *                   type: number
 *                   example: 0
 *                 message:
 *                   type: string
 *                   example: Internal Server Error
 */
위에서 설명했듯이 모든 API의 명세는 @openapi 어노테이션으로 시작한다. 그 아래에 API의 엔드포인트인 /notes 경로를 정의하고, 들여쓰기 한 후 어떤 HTTP 메서드를 사용하는지 명시한다.
메서드 하위의 내용은 다음과 같다.
summary,description: 해당 API의 이름과 설명을 정의한다.tags: 맨 처음에 생성한 그룹 이름을 할당한다.responses: 성공, 실패 응답에 대한 형식을 제공한다.200: 성공적으로 데이터를 응답했을 때 어떤 데이터 형식을 가지는지 명시한다. 각 요소의 형식과 예시 데이터를 함께 작성한다.500:500번 대 서버 에러가 발생했을 때 어떤 데이터를 응답하는지 명시한다.content: 응답 데이터에 대한 정보를 정의한다.application/json:application/json형태의 데이터를 응답함을 명시한다. 하위에는schema속성을 이용해 데이터의 형식을 정의한다.
API 명세 작성 결과는 다음과 같다.
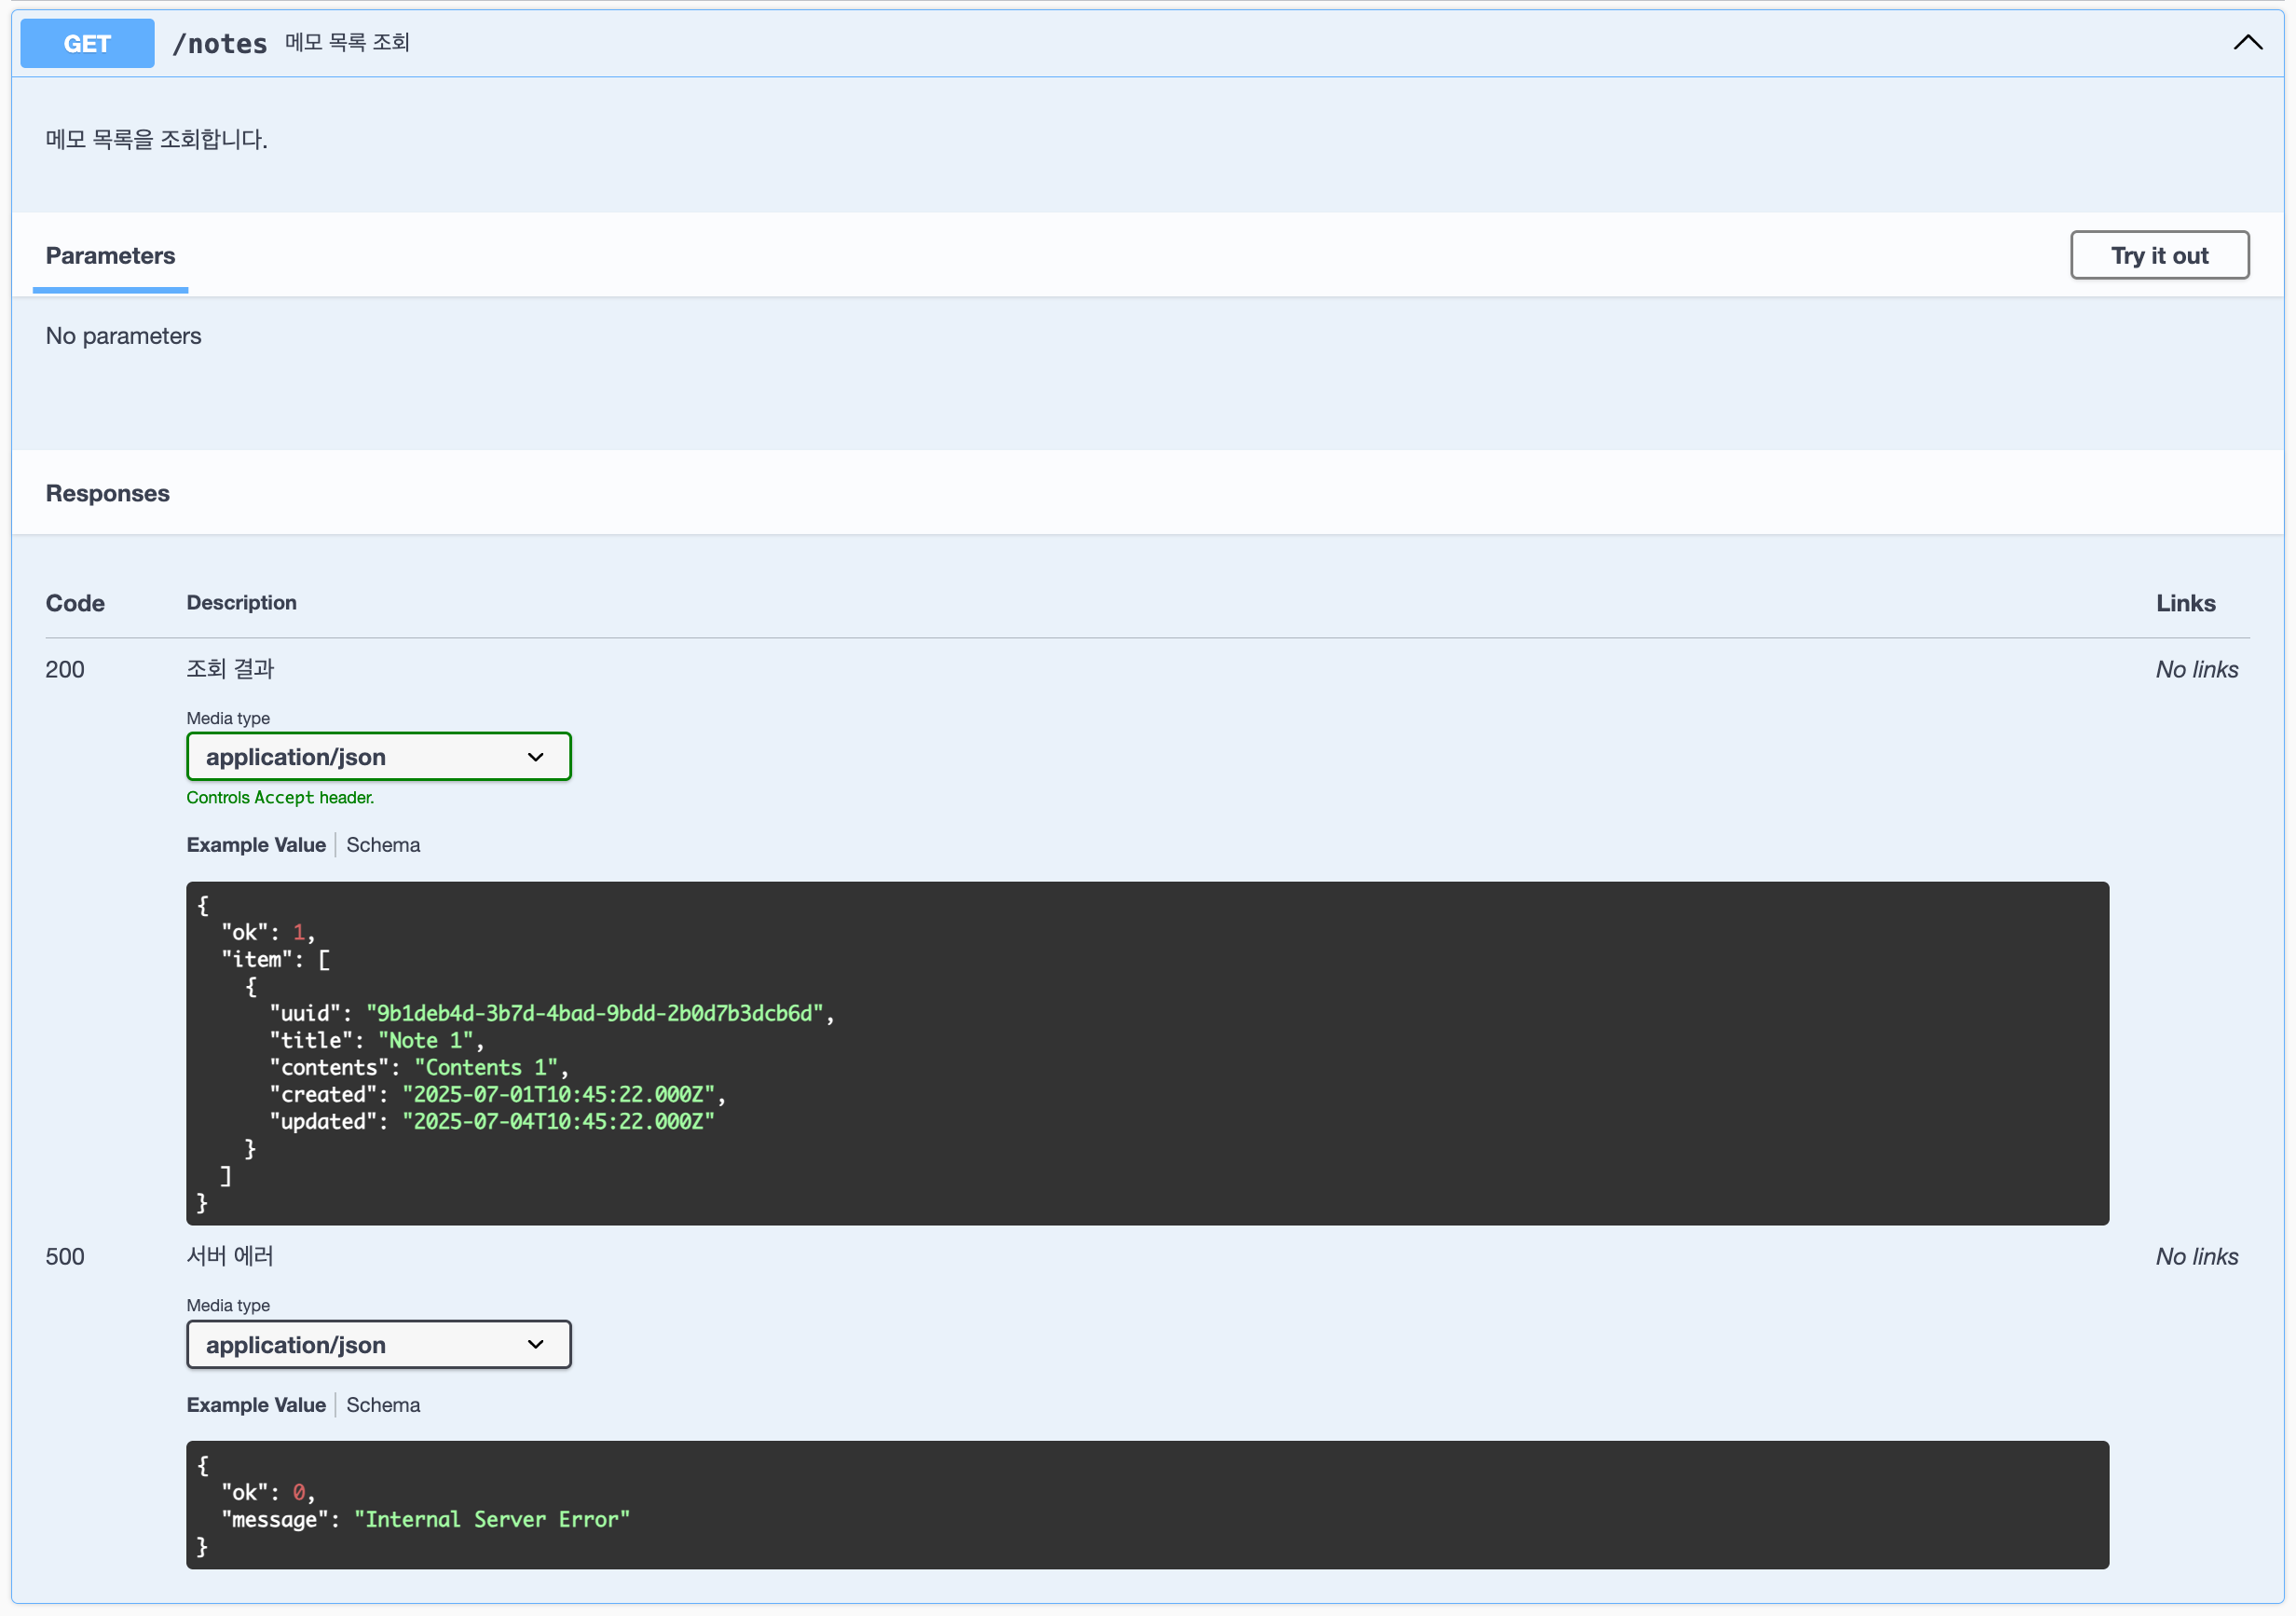
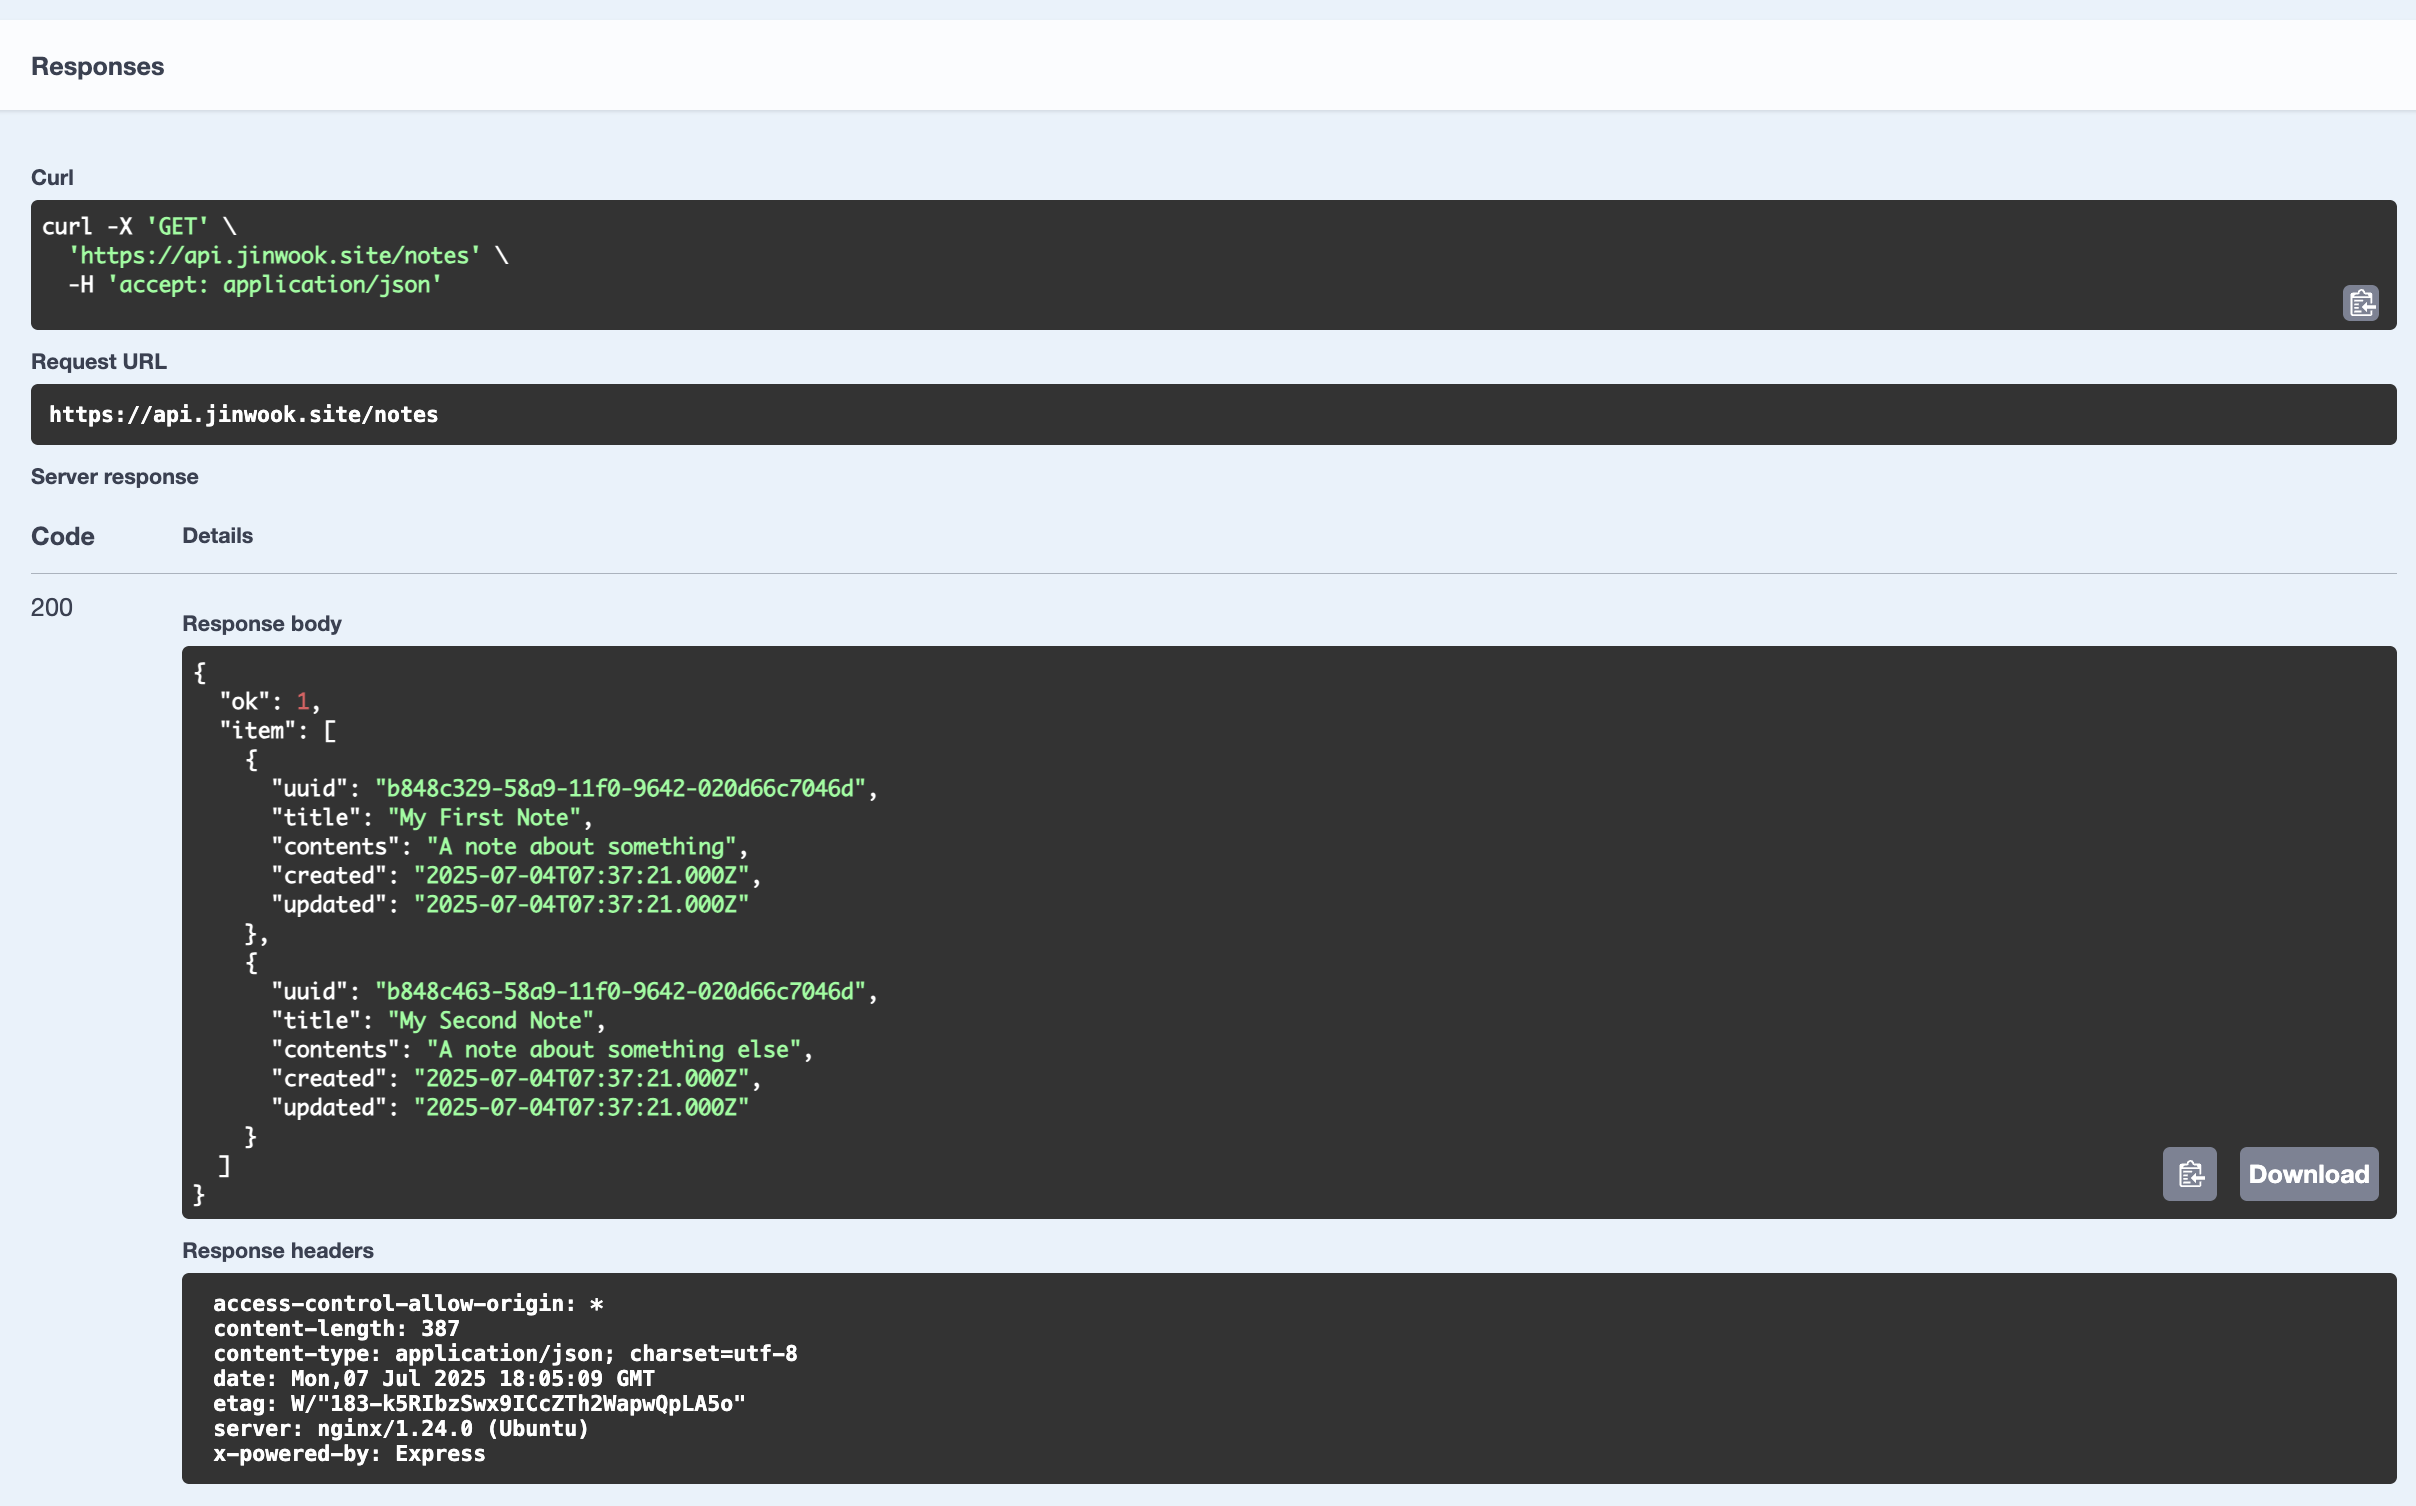
Swagger 내에서 직접 서버에 요청을 보내 테스트를 진행할 수도 있다. 실제로 서버에 GET /notes 요청을 보내면 API 명세서에 작성한 예시와 동일한 형식의 데이터를 응답하는 것을 확인할 수 있다.
➁ 공통 모델 분리
다음은 메모 상세 조회 API(GET /notes/{uuid})에 대한 명세를 작성할 차례이다.
// GET note
router.get('/:uuid', async (req, res, next) => {
  try {
    const uuid = req.params.uuid;

    if (!uuid) {
      const error = new Error('id를 입력하세요.');
      error.status = 400;
      throw error;
    }

    if (uuid.length !== 36) {
      const error = new Error('id 형식이 올바르지 않습니다.');
      error.status = 400;
      throw error;
    }

    const note = await getNote(uuid);

    if (!note || note.length === 0) {
      const error = new Error('해당 메모를 찾을 수 없습니다.');
      error.status = 404;
      throw error;
    }

    res.send({
      ok: 1,
      item: note[0],
    });
  } catch (err) {
    next(err);
  }
});
API는 다음과 같다. 뭐가 많이 늘어난 것 같지만, 사실 예외 처리 부분을 제외하면 메모 목록 조회 API와 크게 다르지 않다. 데이터베이스에서 parameter로 전달한 uuid와 일치하는 note 데이터를 조회한 후, 데이터가 존재한다면 200번 응답과 함께 해당 메모 객체를 응답하고, 데이터가 존재하지 않는다면 404 에러를, uuid를 입력하지 않았거나 형식이 잘못되었다면 400 에러를 응답하는 것이다.
그런데 자세히 살펴보니 메모 1개를 조회했을 때 서버로부터 받을 수 있는 응답 데이터가 메모 목록을 조회했을 때 받을 수 있는 배열 내부의 요소와 일치하므로 이를 변수 형태로 관리할 수 있을 것으로 보인다. 따라서 메모 1개에 대한 응답 데이터인 NoteResponseModel 변수와, 반복해서 나타나는 응답 성공/실패 여부에 대한 객체를 각각 ResponseSuccessModel, ResponseErrorModel로 변수화한다.
/**
 * @openapi
 * tags:
 * - name: Notes
 *   description: 메모 관련 기능
 * components:
 *   schemas:
 *     ResponseSuccessModel:
 *       type: object
 *       properties:
 *         ok:
 *           type: number
 *           example: 1
 *           description: 성공
 *     ResponseErrorModel:
 *       type: object
 *       properties:
 *         ok:
 *           type: number
 *           example: 0
 *           description: 실패
 *     NoteResponseModel:
 *       type: object
 *       properties:
 *         uuid:
 *           type: string
 *           example: 9b1deb4d-3b7d-4bad-9bdd-2b0d7b3dcb6d
 *           description: 메모 id
 *         title:
 *           type: string
 *           example: Note 1
 *           description: 메모 제목
 *         contents:
 *           type: string
 *           example: Contents 1
 *           description: 메모 내용
 *         created:
 *           type: Date
 *           example: 2025-07-04T10:45:22.000Z
 *           description: 메모 생성 일시
 */
JSDoc 최상단에 tags를 지정한 부분 아래에 이어서 components > schemas 속성을 작성하고, 그 안에 각각의 객체를 변수화한 Model을 추가한다.
➀에서 작성한 메모 목록 조회 API 명세서에 지정한 변수를 대입한다.
/* @openapi
 * /notes:
 *   get:
 *     summary: 메모 목록 조회
 *     description: 메모 목록을 조회합니다.
 *     tags: [Notes]
 *     responses:
 *       200:
 *         description: 조회 결과
 *         content:
 *           application/json:
 *             schema:
 *               allOf:
 *                 - $ref: '#/components/schemas/ResponseSuccessModel'
 *                 - type: object
 *                   properties:
 *                     item:
 *                       type: array
 *                       items:
 *                         $ref: '#/components/schemas/NoteResponseModel'
 *       500:
 *         description: 서버 에러
 *         content:
 *           application/json:
 *             schema:
 *               allOf:
 *                 - $ref: '#/components/schemas/ResponseErrorModel'
 *                 - type: object
 *                   properties:
 *                     message:
 *                       type: string
 *                       example: Internal Server Error
 */
API의 응답 데이터가 다음과 같은 객체 형태이므로,
{
  ok: 1,
  item: [
    {
      "uuid": "9b1deb4d-3b7d-4bad-9bdd-2b0d7b3dcb6d",
      "title": "Note 1",
      "contents": "Contents 1",
      "created": "2025-07-01T10:45:22.000Z",
      "updated": "2025-07-04T10:45:22.000Z",
    },
  ],
}
위에서 지정한 ResponseSuccessModel과 NoteResponseModel을 함께 사용해야 한다.
이를 위해 Swagger의 allOf 키워드를 활용해 components/schemas에 등록한 ResponseSuccessModel에 item 프로퍼티를 추가해 NoteResponseModel로 이루어진 배열을 할당한다.
🔍 참고
allOf키워드에 대한 자세한 설명은 Swagger 공식문서를 참고하는 것을 추천한다.
➂ 메모 상세 조회
이제 다시 돌아와서 메모 상세 조회 API에 대한 명세를 작성한다.
/* @openapi
 * /notes/{uuid}:
 *   get:
 *     summary: 메모 상세 조회
 *     description: 메모 상세 정보를 조회합니다.
 *     tags: [Notes]
 *     parameters:
 *       - in: path
 *         name: uuid
 *         type: string
 *     responses:
 *       200:
 *         description: 조회 결과
 *         content:
 *           application/json:
 *             schema:
 *               allOf:
 *                 - $ref: '#/components/schemas/ResponseSuccessModel'
 *                 - type: object
 *                   properties:
 *                     item:
 *                       $ref: '#/components/schemas/NoteResponseModel'
 *       400:
 *         description: path 값 에러
 *         content:
 *           application/json:
 *             schema:
 *               allOf:
 *                 - $ref: '#/components/schemas/ResponseErrorModel'
 *                 - type: object
 *                   properties:
 *                     message:
 *                       type: string
 *                       example: id 형식이 올바르지 않습니다.
  *       404:
 *         description: 데이터 조회 실패
 *         content:
 *           application/json:
 *             schema:
 *               allOf:
 *                 - $ref: '#/components/schemas/ResponseErrorModel'
 *                 - type: object
 *                   properties:
 *                     message:
 *                       type: string
 *                       example: 해당 메모를 찾을 수 없습니다.
 *       500:
 *         description: 서버 에러
 *         content:
 *           application/json:
 *             schema:
 *               allOf:
 *                 - $ref: '#/components/schemas/ResponseErrorModel'
 *                 - type: object
 *                   properties:
 *                     message:
 *                       type: string
 *                       example: Internal Server Error
 */
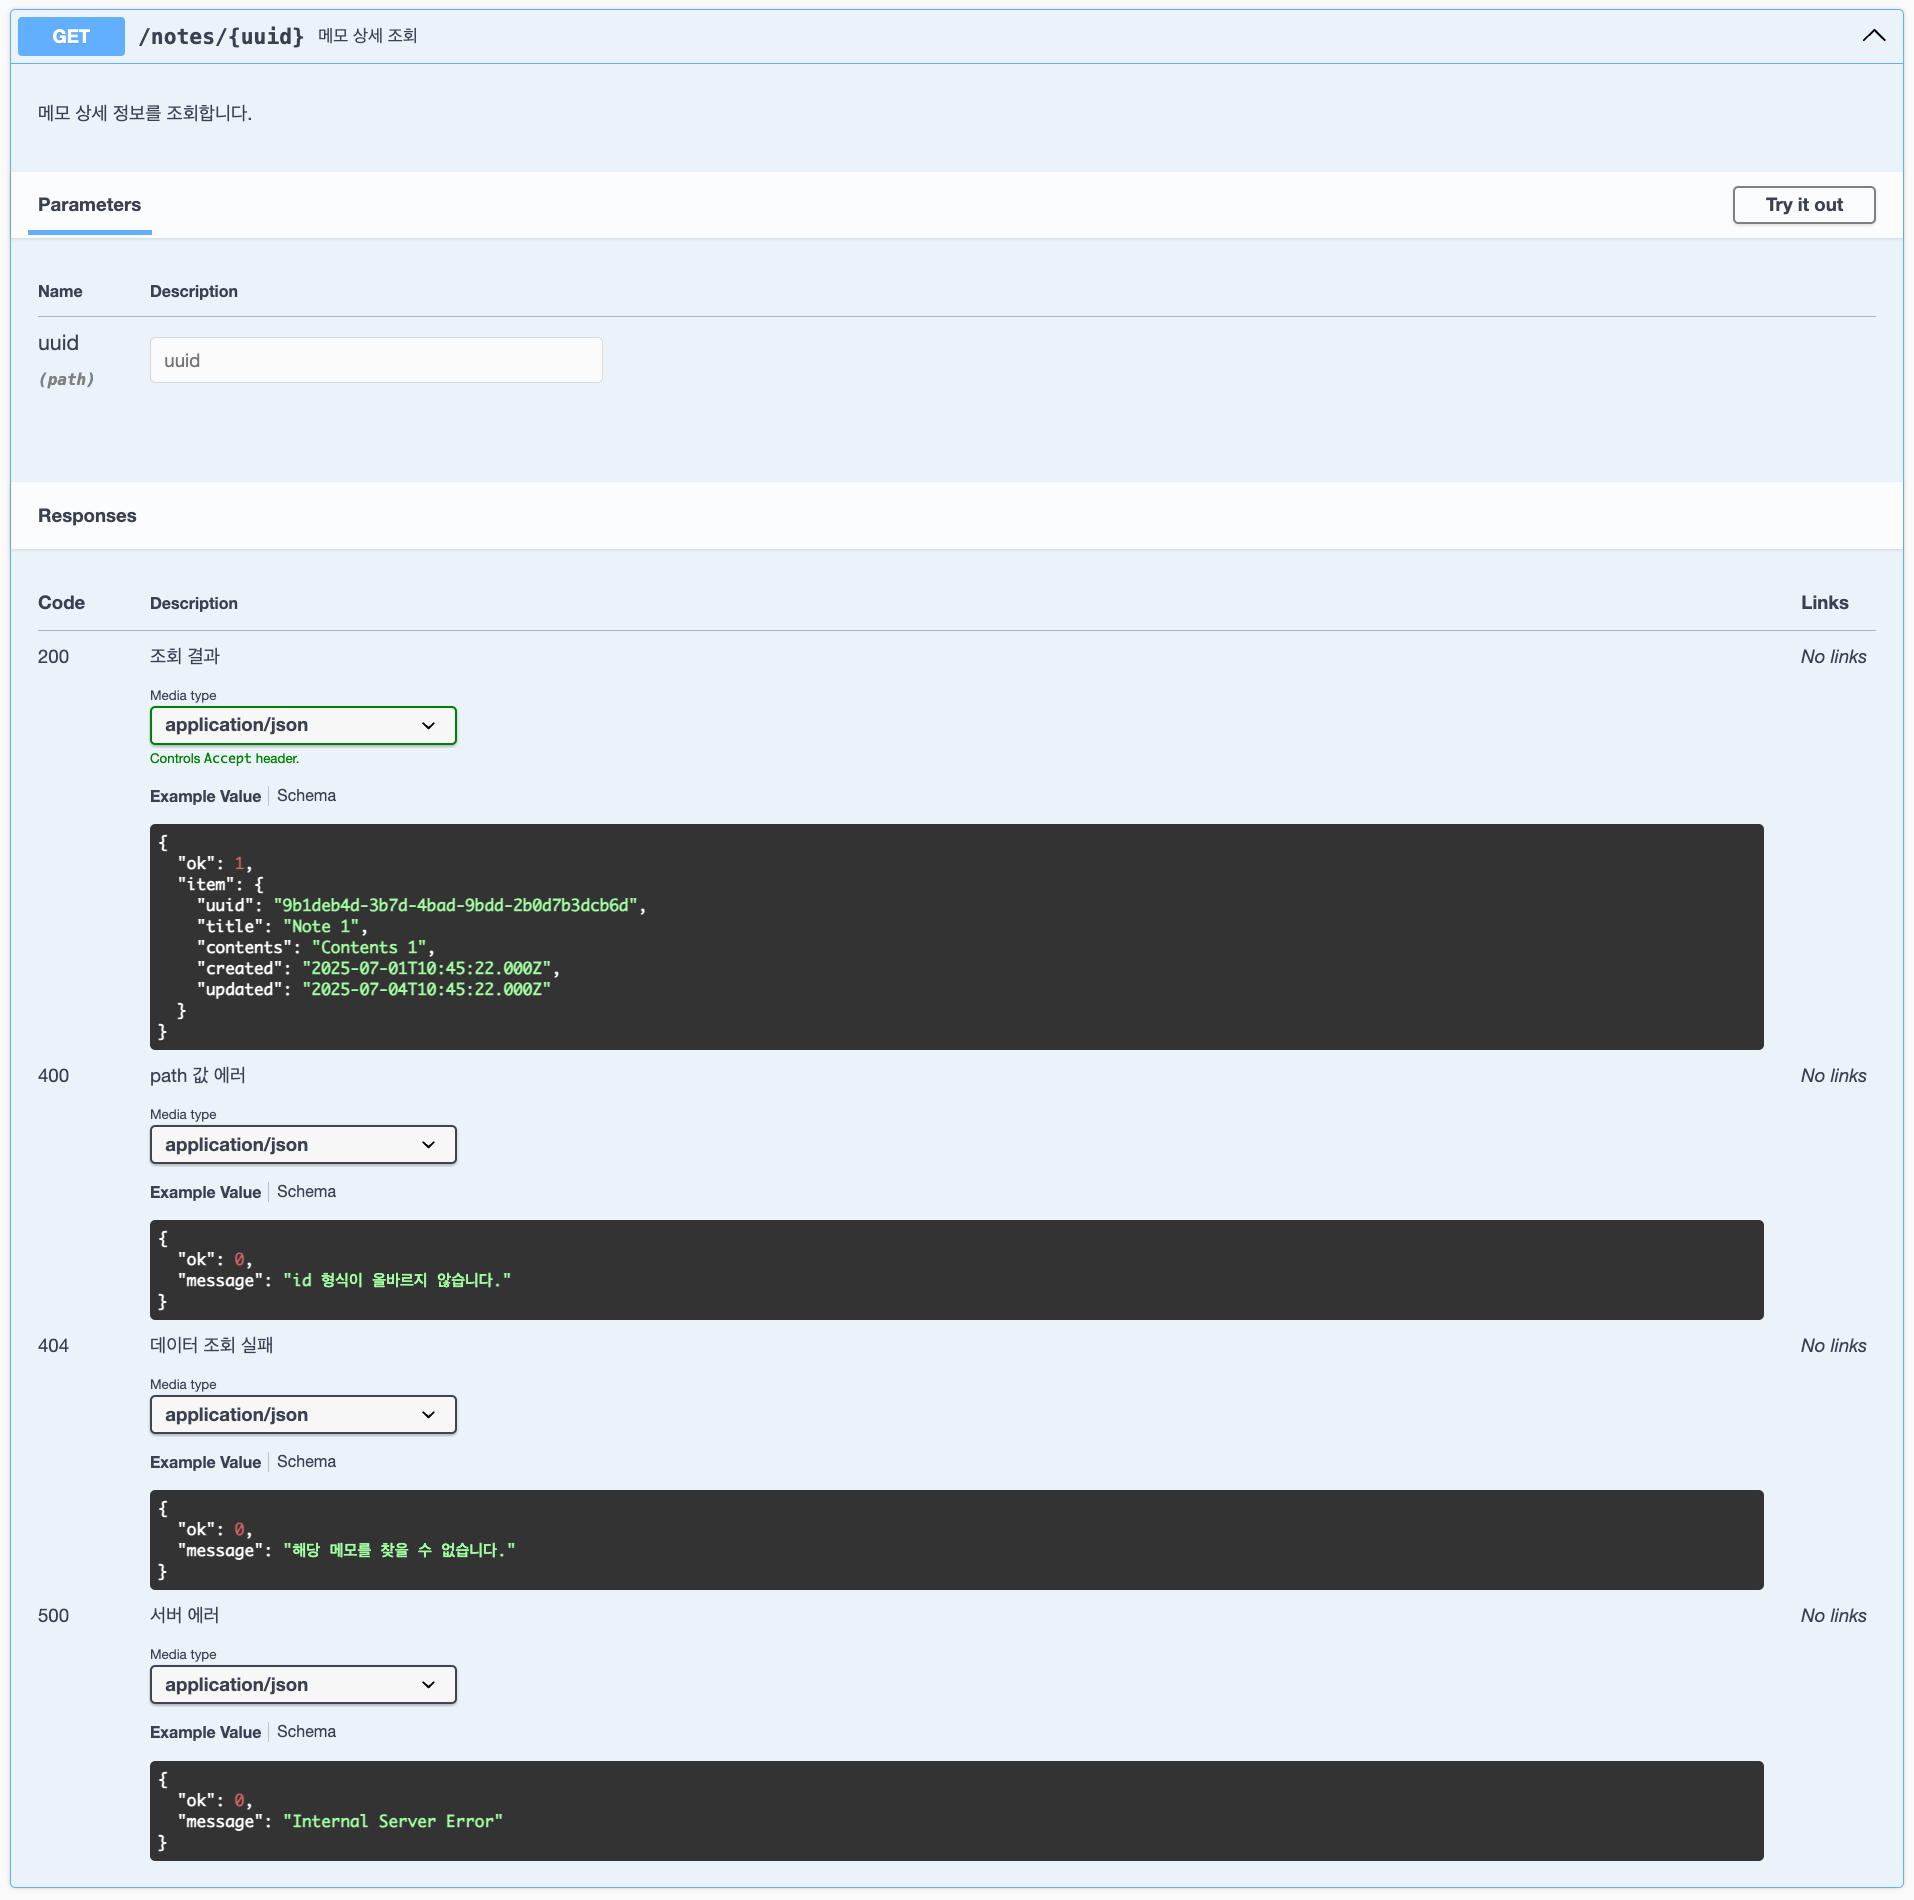
GET /notes API 명세와 다른 점은, parameters 속성을 추가했다는 점이다.
GET /notes/{uuid} API는 Path Parameter 형식으로 uuid를 입력 받아 이를 이용해 해당 데이터를 조회한다. 따라서 API 명세를 작성할 때에도 이 속성을 명시해 주어야 한다. parameters 속성을 이용해 이 input을 정의할 수 있다.
parameters
in: Query parameter(ex./notes?title=Note 1)를 사용한다면in속성에query를 지정하고, 이번 예시와 같이 Path parameter(ex./notes/9b1deb4d-3b7d-4bad-9bdd-2b0d7b3dcb6d)를 사용한다면in속성에path를 지정한다.name: parameter의 이름을 명시한다.type: parameter의 형식을 명시한다.
또한 이번에는 uuid를 입력하지 않았거나 형식이 올바르지 않을 경우 반환하는 400 에러와, 입력한 uuid와 일치하는 데이터가 없을 때 반환하는 404 에러를 명시하는 부분도 추가해준다.
API 명세 작성 결과는 다음과 같다.
➃ 메모 작성
다음으로 메모 작성 POST 요청에 대한 API 명세를 작성한다. 먼저 POST /notes API는 다음과 같다.
// POST note
router.post('/', async (req, res, next) => {
  try {
    const { title, contents } = req.body;

    if (!title || !contents) {
      const error = new Error('필수 데이터를 입력하세요.');
      error.status = 400;
      throw error;
    }

    await addNote(title, contents);

    res.status(201).send({
      ok: 1,
      message: '메모가 추가되었습니다.',
    });
  } catch (err) {
    next(err);
  }
});
메모 작성에 성공하면 201번 응답과 함께 성공 메시지를 보내고, 필수 데이터를 입력하지 않은 경우에는 400번 에러를 응답한다. 사실 지금부터 작성하는 API 명세는 각 HTTP 메서드에 따라 조금씩 다를 뿐 그렇게 큰 차이는 존재하지 않는다.
/* @openapi
 * /notes:
 *   post:
 *     summary: 메모 작성
 *     description: 메모를 작성합니다.
 *     tags: [Notes]
 *     requestBody:
 *       required: true
 *       content:
 *         application/json:
 *           schema:
 *             $ref: '#/components/schemas/NoteRequestModel'
 *     responses:
 *       201:
 *         description: Created
 *         content:
 *           application/json:
 *             schema:
 *               allOf:
 *                 - $ref: '#/components/schemas/ResponseSuccessModel'
 *                 - type: object
 *                   properties:
 *                     message:
 *                       type: string
 *                       example: 메모가 추가되었습니다.
 *       400:
 *         description: 필수 데이터 미입력
 *         content:
 *           application/json:
 *             schema:
 *               allOf:
 *                 - $ref: '#/components/schemas/ResponseErrorModel'
 *                 - type: object
 *                   properties:
 *                     message:
 *                       type: string
 *                       example: 필수 데이터를 입력하세요.
 *       500:
 *         description: 서버 에러
 *         content:
 *           application/json:
 *             schema:
 *               allOf:
 *                 - $ref: '#/components/schemas/ResponseErrorModel'
 *                 - type: object
 *                   properties:
 *                     message:
 *                       type: string
 *                       example: Internal Server Error
 */
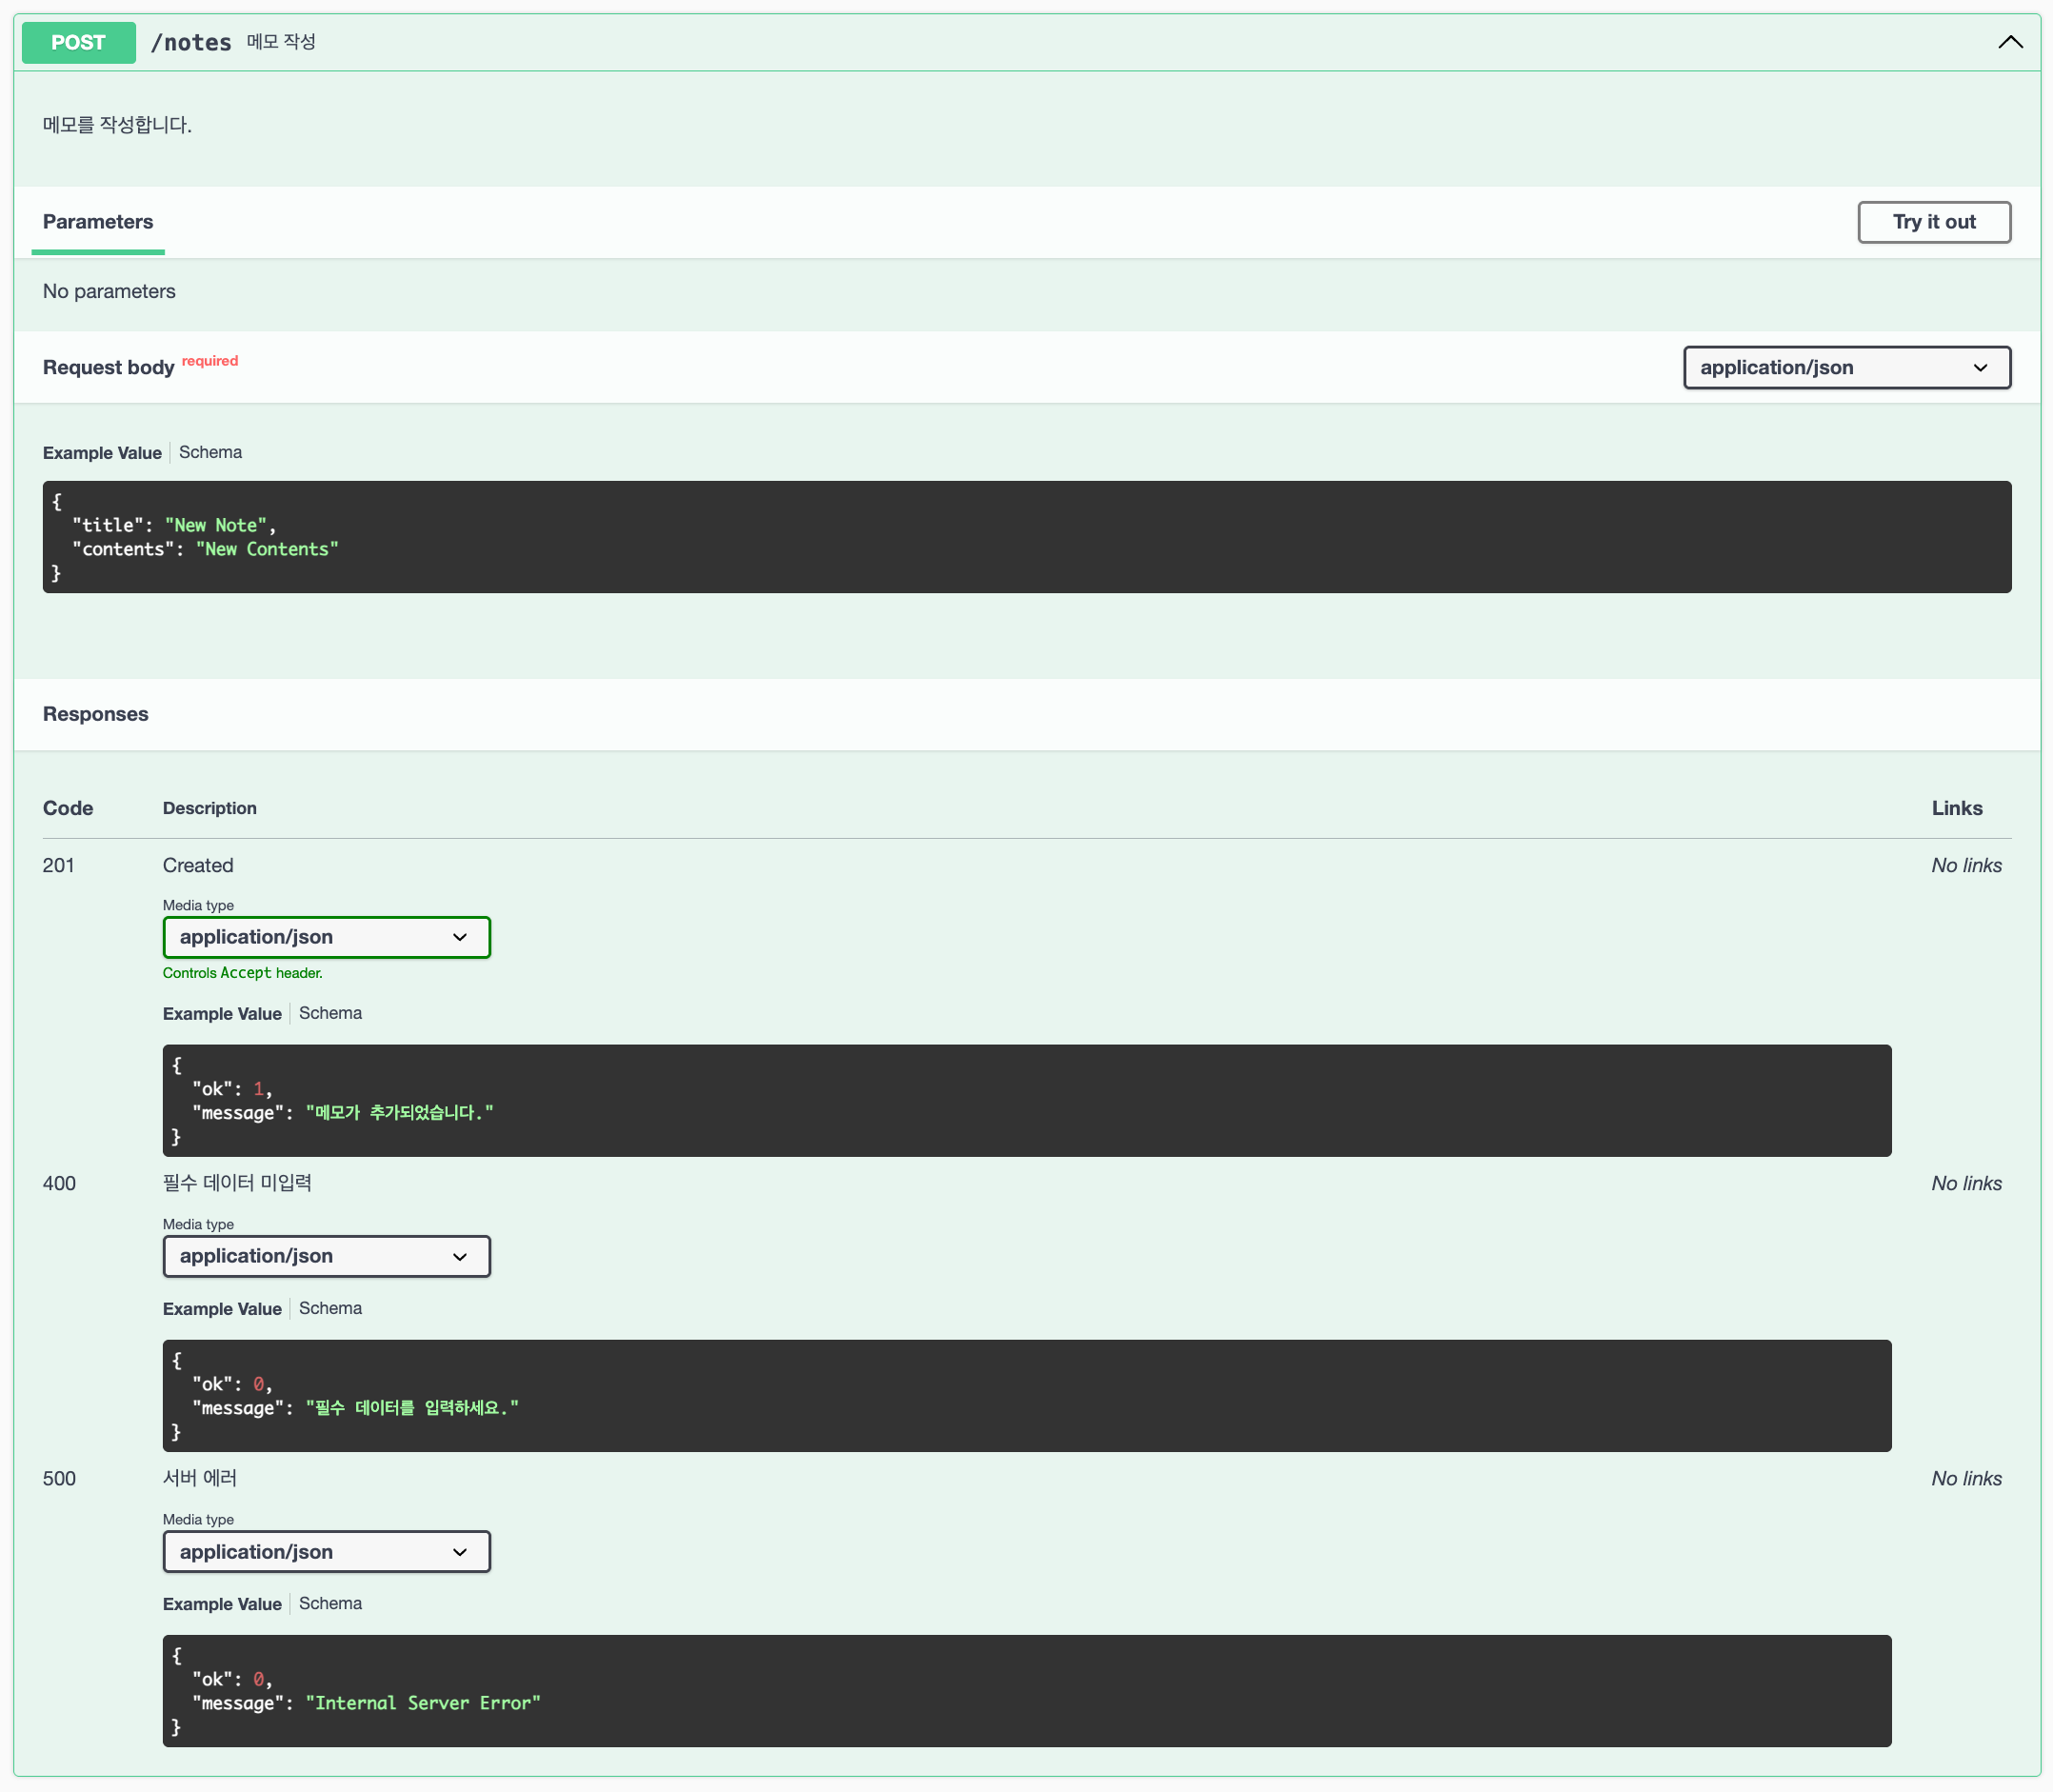
이번 API 명세와 위에서 작성한 두 가지 API 명세의 가장 큰 차이점은 POST 요청은 request body를 전송한다는 점이다. 따라서 API 명세에도 어떤 형식의 request body를 API 엔드포인트로 전달해야 하는지 명시하는 것이 필수다. request body 형식은 responses를 정의하기 전에 requestBody 속성을 이용해 정의한다.
requestBody
required: 해당 request body를 반드시 전달해야 하는지true,false형태로 명시한다.content: request body로 전달하는 데이터의 포맷과 해당 데이터가 어떤 형태로 이루어져 있는지 명시한다.
API 명세 작성 결과는 다음과 같다.
➄ 메모 수정
이번에는 메모를 수정하는 PUT /notes/{uuid} 차례이다. 먼저 API를 살펴보면
// PUT note
router.put('/:uuid', async (req, res, next) => {
  try {
    const uuid = req.params.uuid;
    let { title, contents } = req.body;

    if (!uuid) {
      const error = new Error('id를 입력하세요.');
      error.status = 400;
      throw error;
    }

    if (uuid.length !== 36) {
      const error = new Error('id 형식이 올바르지 않습니다.');
      error.status = 400;
      throw error;
    }

    if (!title && !contents) {
      const error = new Error('수정할 제목이나 내용을 입력하세요.');
      error.status = 400;
      throw error;
    }

    const previousNote = await getNote(uuid);

    if (!previousNote || previousNote.length === 0) {
      const error = new Error('해당 메모를 찾을 수 없습니다.');
      error.status = 404;
      throw error;
    }

    if (!title) {
      title = previousNote[0].title;
    }

    if (!contents) {
      contents = previousNote[0].contents;
    }

    await updateNote(uuid, title, contents);

    const updatedNote = await getNote(uuid);

    res.status(200).send({
      ok: 1,
      item: updatedNote[0],
    });
  } catch (err) {
    next(err);
  }
});
GET /notes/{uuid}와 마찬가지로 Path parameter로 uuid를 전달한 후 해당 uuid와 일치하는 데이터를 수정한다. 수정이 모두 완료되면 다시 해당 데이터를 조회한 후 수정된 정보를 200번 코드와 함께 응답한다. 마찬가지로 uuid가 일치하는 데이터가 없다면 404 에러를, 사용자가 아무 값도 request body에 입력하지 않았거나 uuid 형식이 잘못된 경우 400 에러를 응답한다.
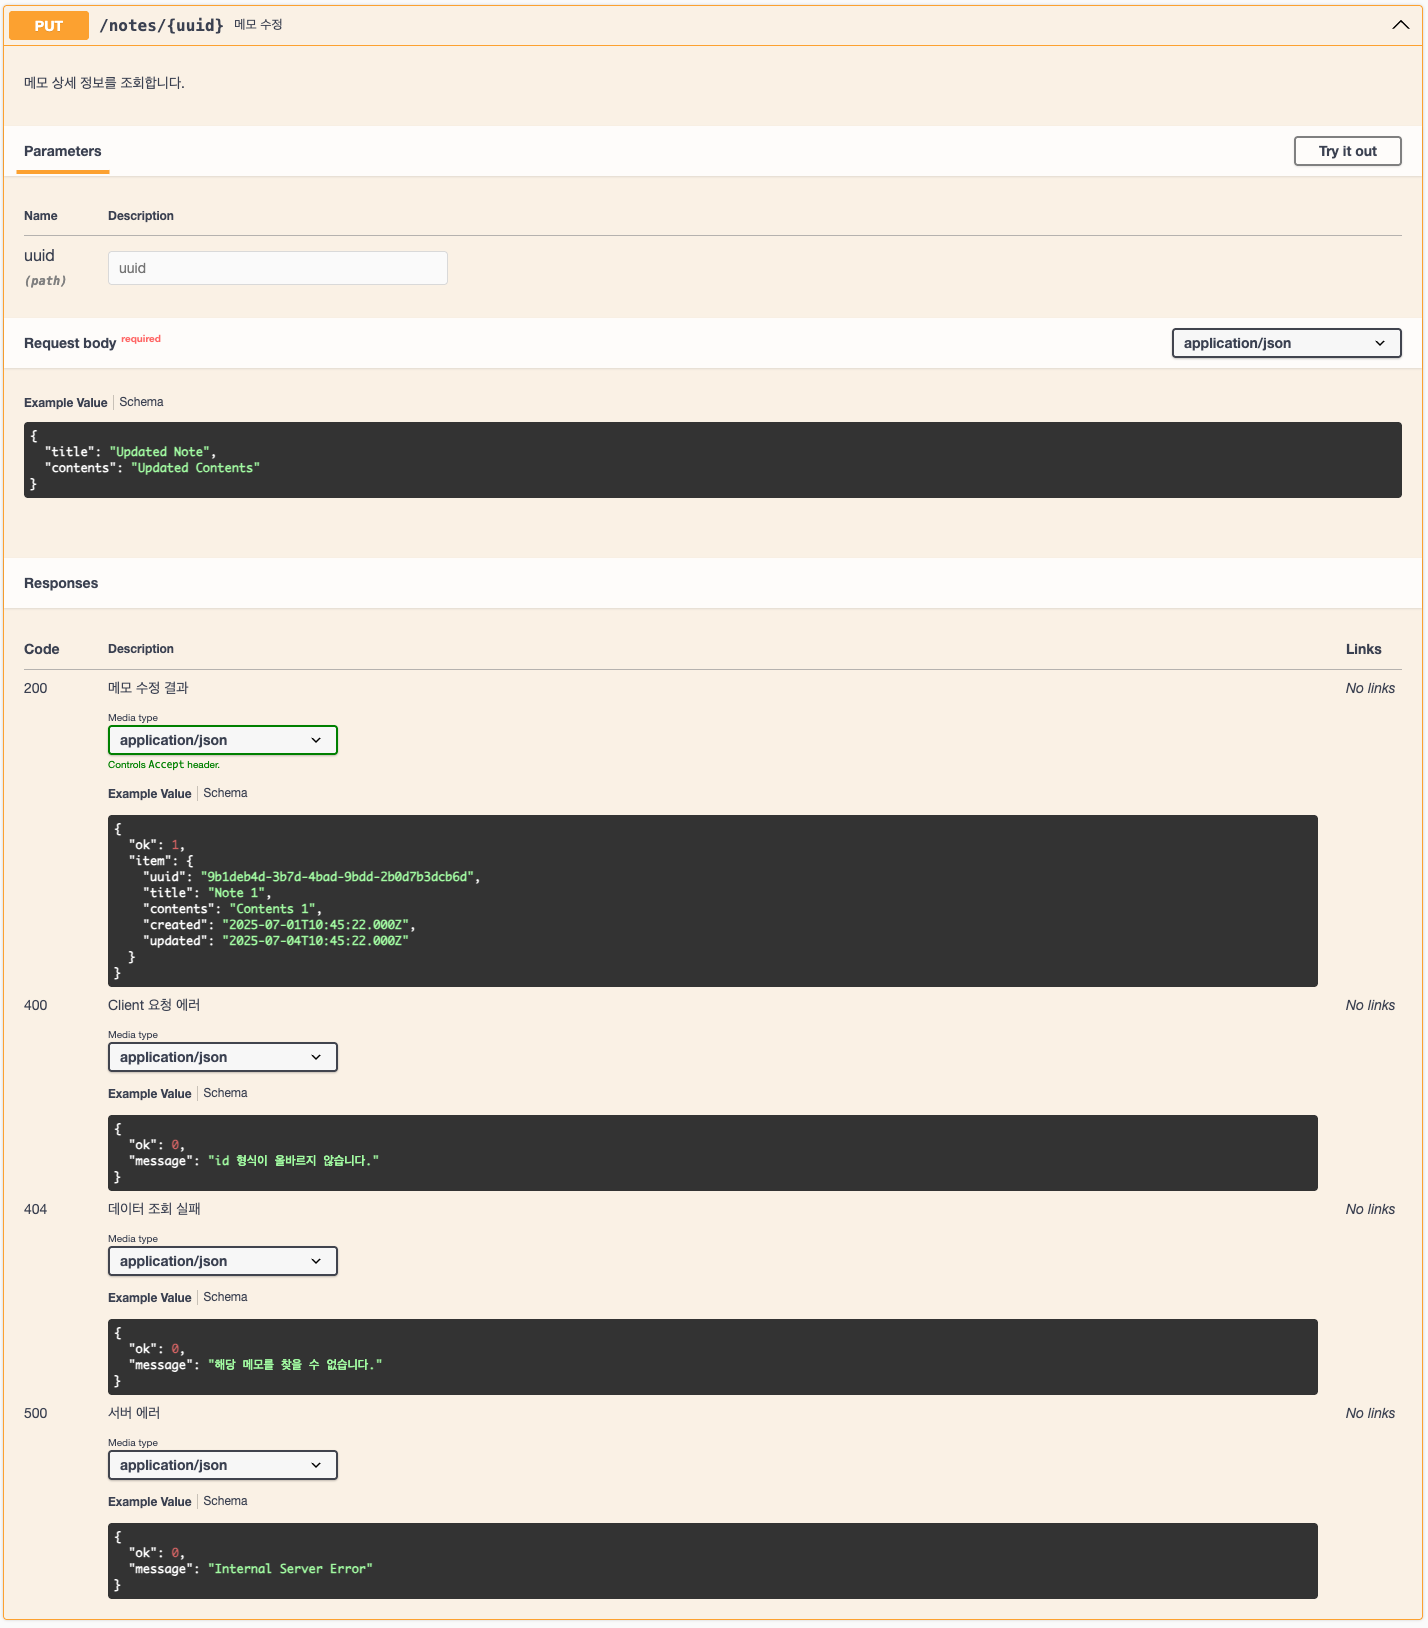
이번 API 명세는 위에서 사용한 parameters와 requestBody의 합작품이라고 보아도 될 듯 하다.
/* @openapi
 * /notes/{uuid}:
 *   put:
 *     summary: 메모 수정
 *     description: 메모 상세 정보를 조회합니다.
 *     tags: [Notes]
 *     parameters:
 *       - in: path
 *         name: uuid
 *         type: string
 *     requestBody:
 *       required: true
 *       content:
 *         application/json:
 *           schema:
 *             $ref: '#/components/schemas/NoteRequestModel'
 *     responses:
 *       200:
 *         description: 메모 수정 결과
 *         content:
 *           application/json:
 *             schema:
 *               allOf:
 *                 - $ref: '#/components/schemas/ResponseSuccessModel'
 *                 - type: object
 *                   properties:
 *                     item:
 *                       $ref: '#/components/schemas/NoteResponseModel'
 *       400:
 *         description: Client 요청 에러
 *         content:
 *           application/json:
 *             schema:
 *               oneOf:
 *                 - allOf:
 *                   - $ref: '#/components/schemas/ResponseErrorModel'
 *                   - type: object
 *                     properties:
 *                       message:
 *                         type: string
 *                         example: id 형식이 올바르지 않습니다.
 *                 - allOf:
 *                   - $ref: '#/components/schemas/ResponseErrorModel'
 *                   - type: object
 *                     properties:
 *                       message:
 *                         type: string
 *                         example: 필수 데이터를 입력하세요.
 *       404:
 *         description: 데이터 조회 실패
 *         content:
 *           application/json:
 *             schema:
 *               allOf:
 *                 - $ref: '#/components/schemas/ResponseErrorModel'
 *                 - type: object
 *                   properties:
 *                     message:
 *                       type: string
 *                       example: 해당 메모를 찾을 수 없습니다.
 *       500:
 *         description: 서버 에러
 *         content:
 *           application/json:
 *             schema:
 *               allOf:
 *                 - $ref: '#/components/schemas/ResponseErrorModel'
 *                 - type: object
 *                   properties:
 *                     message:
 *                       type: string
 *                       example: Internal Server Error
 */
한 가지 차이점은, 400번 에러가 1) uuid 형식이 올바르지 않은 경우 또는 2)사용자가 title, contents 중 어떤 수정값도 입력하지 않은 경우, 이 두 가지 경우에 발생하므로 Swagger의 oneOf 키워드를 이용해 두 가지 응답이 존재할 수 있다는 것을 명시했다는 점이다.
🔍 참고
마찬가지로
oneOf키워드에 대한 자세한 설명은 Swagger 공식문서를 참고하는 것을 추천한다.
API 명세 작성 결과는 다음과 같다.
➅ 메모 삭제
마지막으로 메모를 삭제하는 DELETE /notes/{uuid}에 대한 API 명세를 작성할 차례이다. 먼저 API는 다음과 같다.
// DELETE note
router.delete('/:uuid', async (req, res, next) => {
  try {
    const uuid = req.params.uuid;

    if (!uuid) {
      const error = new Error('id를 입력하세요.');
      error.status = 400;
      throw error;
    }

    if (uuid.length !== 36) {
      const error = new Error('id 형식이 올바르지 않습니다.');
      error.status = 400;
      throw error;
    }

    const note = await getNote(uuid);

    if (!note || note.length === 0) {
      const error = new Error('해당 메모를 찾을 수 없습니다.');
      error.status = 404;
      throw error;
    }

    await deleteNote(uuid);

    res.status(200).send({
      ok: 1,
      message: '메모가 삭제되었습니다.',
    });
  } catch (err) {
    next(err);
  }
});
마찬가지로 Path parameter로 uuid를 전달한 후 해당 uuid와 일치하는 데이터를 삭제한다. 삭제 완료 후 200번 코드와 함께 삭제 완료 메시지를 응답한다. 클라이언트에서 전달한 uuid가 일치하는 데이터가 없다면 404 에러를, 사용자가 아무 값도 request body에 입력하지 않았거나 uuid 형식이 잘못된 경우 400 에러를 응답한다.
API 명세에는 크게 다른 점이 없다.
/* @openapi
 * /notes/{uuid}:
 *   delete:
 *     summary: 메모 삭제
 *     description: 메모를 삭제합니다.
 *     tags: [Notes]
 *     parameters:
 *       - in: path
 *         name: uuid
 *         type: string
 *     responses:
 *       200:
 *         description: 삭제 완료
 *         content:
 *           application/json:
 *             schema:
 *               allOf:
 *                 - $ref: '#/components/schemas/ResponseSuccessModel'
 *                 - type: object
 *                   properties:
 *                     message:
 *                       type: string
 *                       example: 메모가 삭제되었습니다.
 *       400:
 *         description: path 값 에러
 *         content:
 *           application/json:
 *             schema:
 *               allOf:
 *                 - $ref: '#/components/schemas/ResponseErrorModel'
 *                 - type: object
 *                   properties:
 *                     message:
 *                       type: string
 *                       example: id 형식이 올바르지 않습니다.
 *       404:
 *         description: 데이터 조회 실패
 *         content:
 *           application/json:
 *             schema:
 *               allOf:
 *                 - $ref: '#/components/schemas/ResponseErrorModel'
 *                 - type: object
 *                   properties:
 *                     message:
 *                       type: string
 *                       example: 해당 메모를 찾을 수 없습니다.
 *       500:
 *         description: 서버 에러
 *         content:
 *           application/json:
 *             schema:
 *               allOf:
 *                 - $ref: '#/components/schemas/ResponseErrorModel'
 *                 - type: object
 *                   properties:
 *                     message:
 *                       type: string
 *                       example: Internal Server Error
 */
API 명세 작성 결과는 다음과 같다.
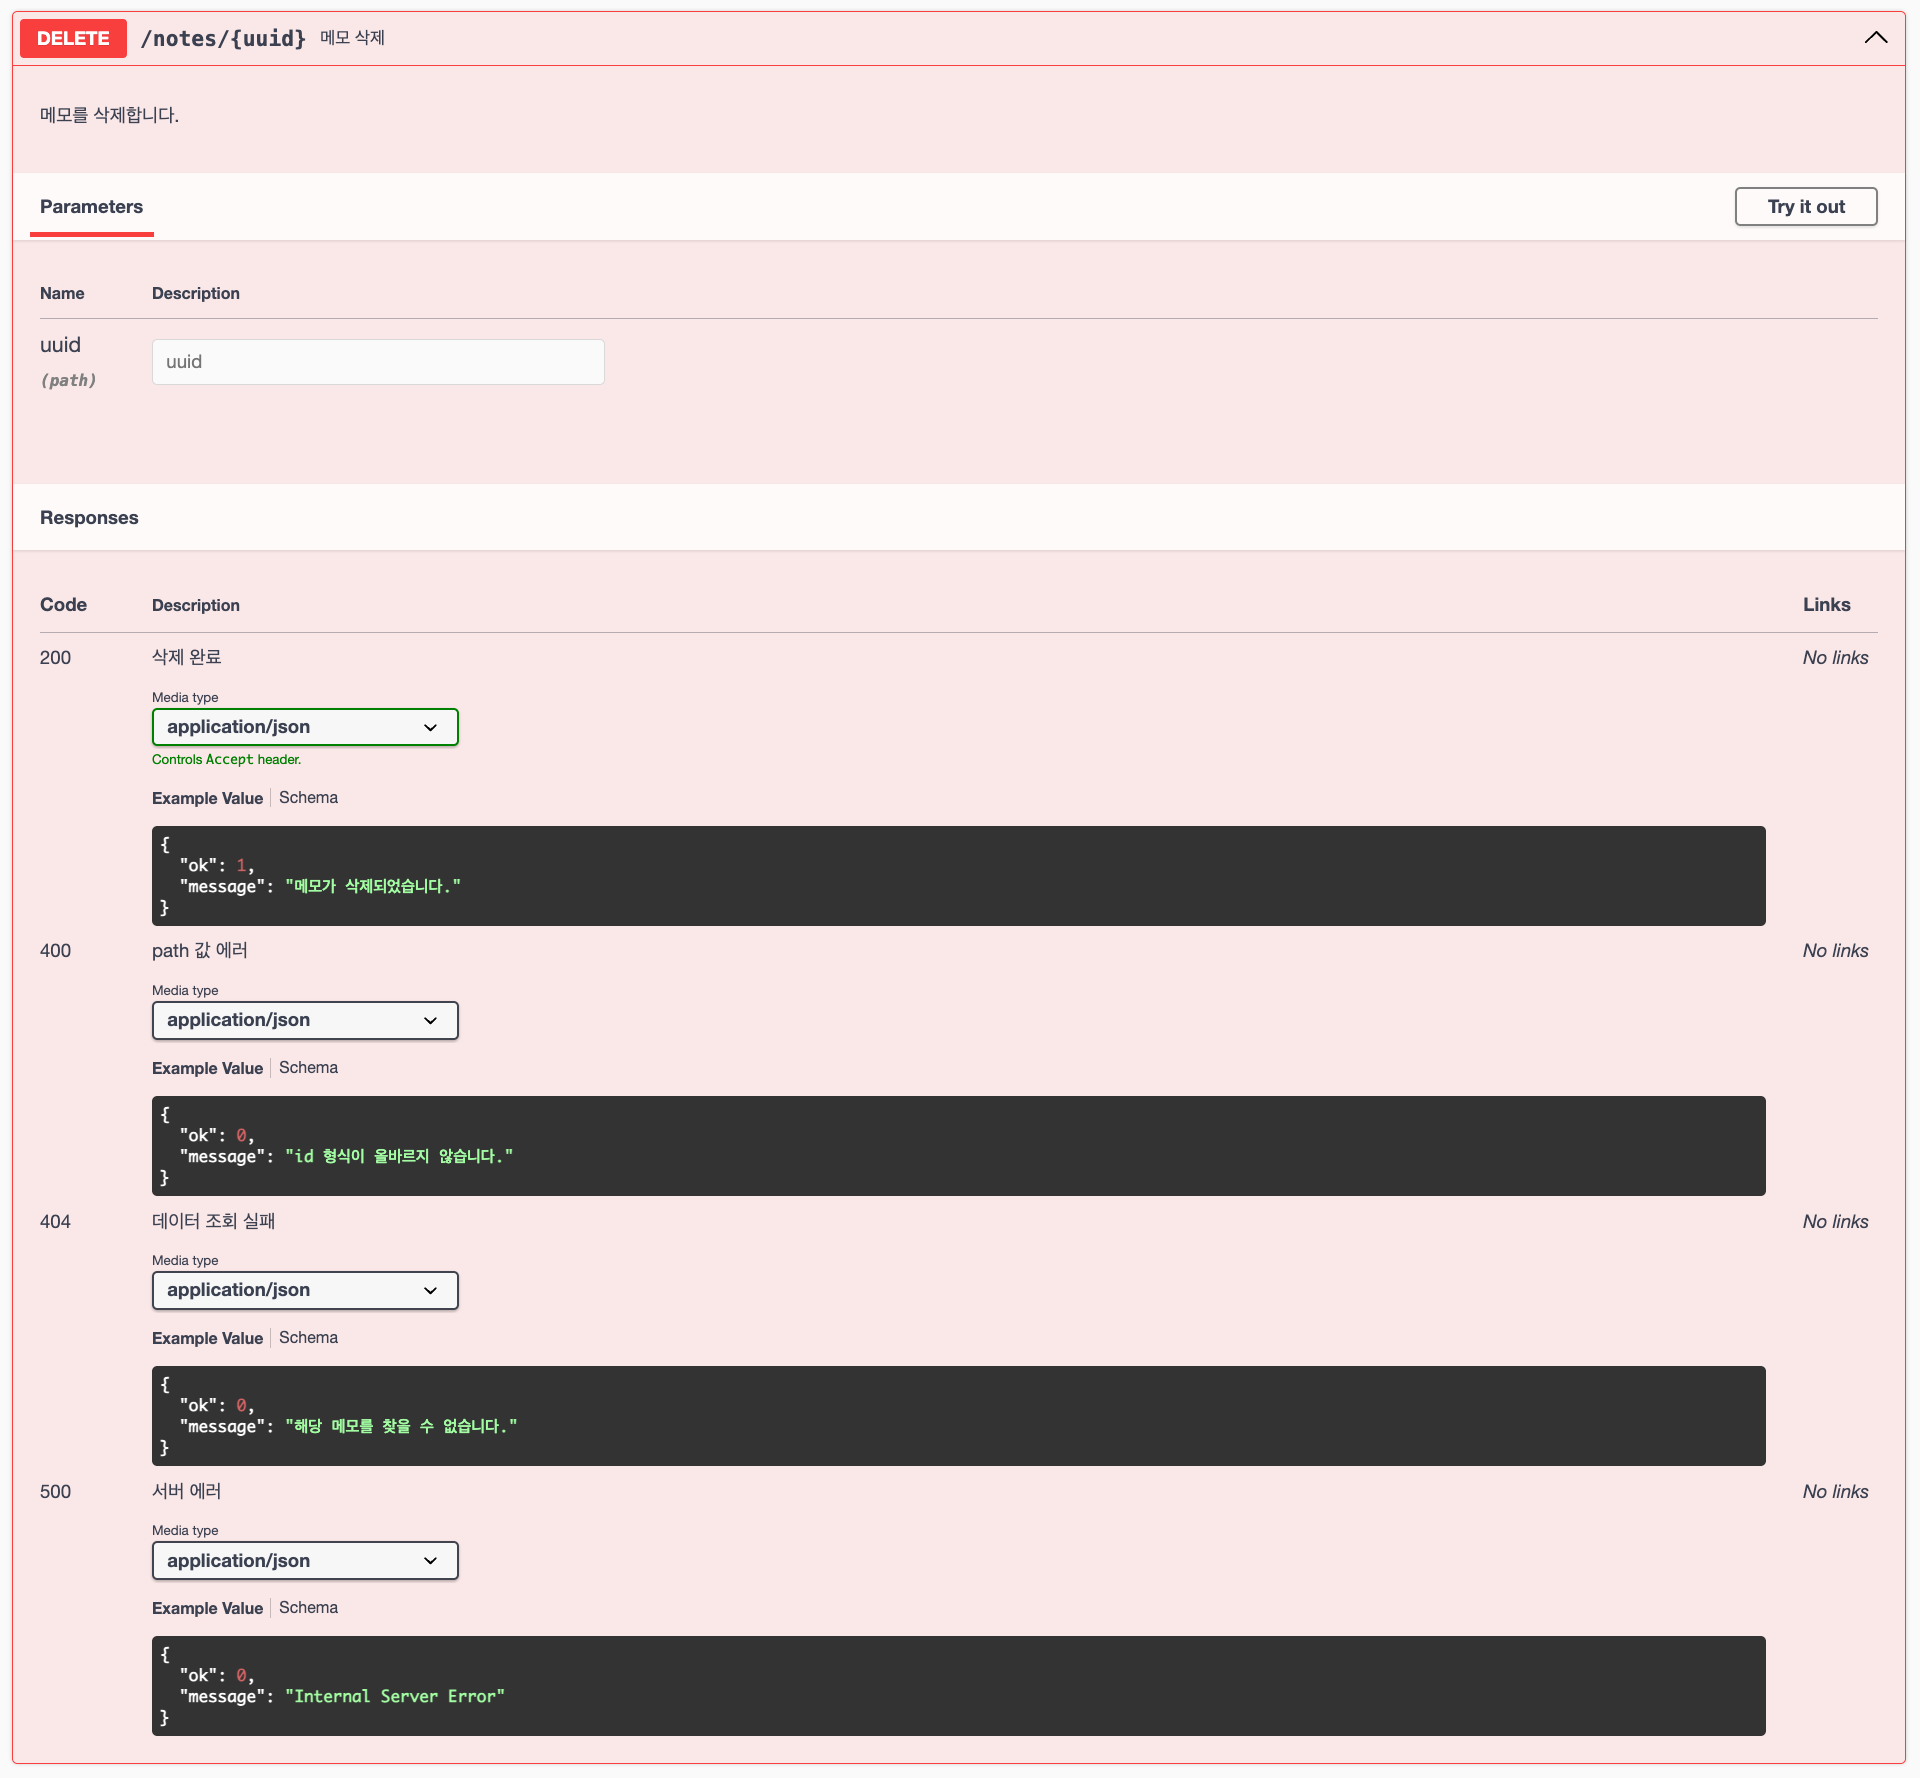
이로써 CRUD 작업에 대한 API 명세 작성을 완료했다!
마치며
이것으로 API 명세서까지 작성하며 Back-end의 구색 정도는 갖출 수 있게 되었다. 이제 남은 건 가장 복잡한 JWT 토큰 관리와 이를 이용한 로그인, 쿠키나 세션 사용 등을 구현하는 것이고 이를 마무리한다면 본격적으로 Front-end와 연동하여 하나의 서비스를 개발해 볼 예정이다. 이 때 CORS 등 보안을 위한 중요한 설정에도 도전해야겠다. 최대한 빠른 시일 내에 로그인/회원가입 로직을 구현해 돌아올 수 있기를...!