1 인코딩
1.1 인코딩(Encoding)
- 많은 실제 데이터셋에는 수치형(numerical)과 범주형(categorical) 변수가 혼재하고 있음
- 인코딩은 컴퓨터가 처리하기 용이하도록 기존의 데이터를 변경하는 것
- 범주형 데이터는 일반적으로 텍스트(string)로 되어 있으므로 이를 숫자(일반적으로 양의 정수)로 변환 → 레이블 인코딩(Label encoding)
- 분류(classification) 문제에서는 종속변수가 범주형이어야 하므로 수치형(numerical) 데이터는 범주형으로 변환해주어야 함 -> 이진화(Binarizsaztion), 이산화(Discretization)
- 회귀(regression) 모형이나 신경망에서는 독립변수는 수치형 변수이어야 하므로 범주형 변수를 수치형으로 변환해주어야 함 → 원핫인코딩(One-hot encoding), 더미변수화(Dummy encoding)
- 텍스트 데이터는 자연어 처리를 위해 토큰화(tokenization) 과정을 거쳐야 함
→ 정수인코딩(Integer encoding)
- 인코딩된 코드를 원래의 데이터로 변환하는 것은 디코딩(Decoding)이라고 함
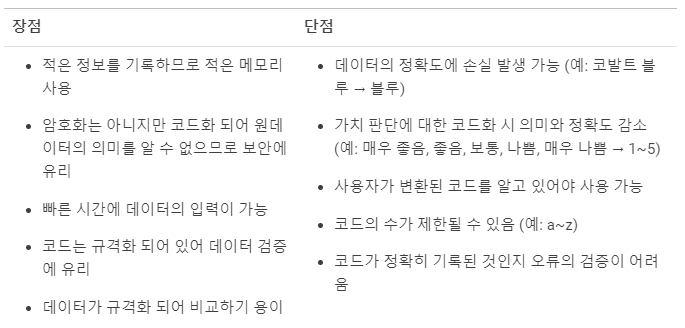
인코딩의 장단점
1.2 인코딩 분류
1. 범주형 데이터 -> 이산 수치형 데이터
- OrdinalEncoder() (1:1)
- 범주형 데이터를 정수로 인코딩
- 여러 컬럼(독립변수)에 사용 가능
- LabelEncoder() (1:1)
- 범주형 데이터를 정수로 인코딩
- 하나의 컬럼(종속변수, 타겟)에만 사용 가능
- TargetEncoder() (1:1)
- 범주형 데이터를 특정한 컬럼(타겟)의 값의 크기와 비례한 숫자로 인코딩
2. 범주형 데이터 -> 이진 데이터
- One-hot encoding (1:M)
- 하나의 컬럼에 있는 범주형 데이터를 여러개의 이진수 컬럼(수치형 데이터)로 인코딩
- one-of-K 인코딩이라고도 함
- Dummy encoding (1:M)
- One-hot encoding과 동일한 기능
- 회귀분석에서 범주형 변수를 고려할 때 사용
3. 연속 수치형 데이터 -> 이진 데이터
- Binarizer() (1:1)
- 연속 수치형 데이터를 기준값(threshold)을 기준으로 이진수로 인코딩
- LabelBinarizer() (1:M)
- 연속형 데이터를 이진수 컬럼으로 인코딩
- 하나의 컬럼(종속변수, 타겟)에만 사용 가능
- MultiLabelBinarizer() (1:M)
- multi-class(여러개의 범주가 있는) 데이터를 이진수 컬럼으로 인코딩
- 하나의 컬럼(종속변수, 타겟)에만 사용 가능
2 인코딩 방법
2.1 범주형 데이터 -> 이산 수치형 데이터
테스트를 위한 데이터 세트 생성하기
import pandas as pd
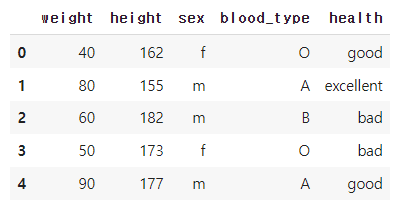
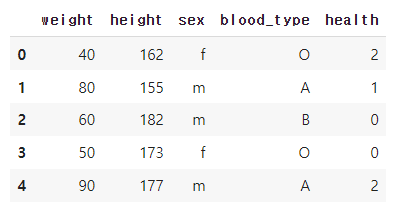
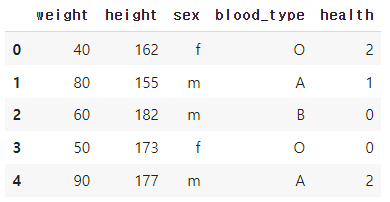
df = pd.DataFrame({'weight':[40, 80, 60, 50, 90], # feature: weight, continuous
'height':[162, 155, 182, 173, 177], # feature: height, continuous
'sex':['f', 'm', 'm', 'f', 'm'], # feature: sex, categorical
'blood_type':['O', 'A', 'B', 'O', 'A'], # feature: blood_type, categorical
'health':['good', 'excellent', 'bad', 'bad', 'good'], # target: health, categorical
})
df↳ 결과
OrdinalEncoder
- 범주형 데이터를 정수로 인코딩
- 여러 컬럼(독립변수)에 사용 가능
from sklearn.preprocessing import OrdinalEncoder
# 데이터프레임 복사
df_oe = df.copy()
# OrdinalEncoder에 대한 객체 생성
oe = OrdinalEncoder()
# 데이터로 oe 학습
oe.fit(df)
# 학습된 결과
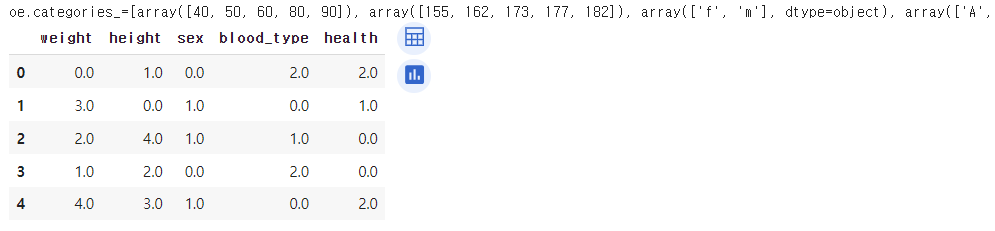
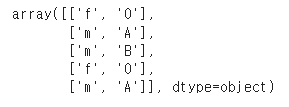
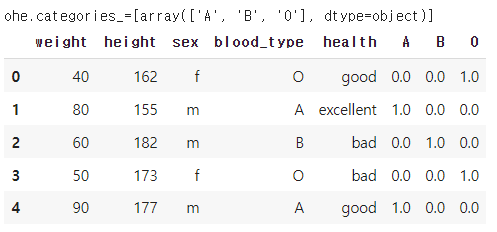
print(f'{oe.categories_=}')
# OrdinalEncoder는 수치형 weight와 height도 범주형으로 인식하여 변경하므로 주의
# 학습된 결과를 적용하여 변환
df_oe = pd.DataFrame(oe.transform(df), columns=df.columns)
df_oe↳ 결과
# OrdinalEncoder 수정된 사용
# 데이터프레임 복사
df_oe = df.copy()
# OrdinalEncoder에 대한 객체 생성
oe = OrdinalEncoder()
# 데이터로 oe 학습
oe.fit(df[['sex', 'blood_type']])
# 학습된 결과
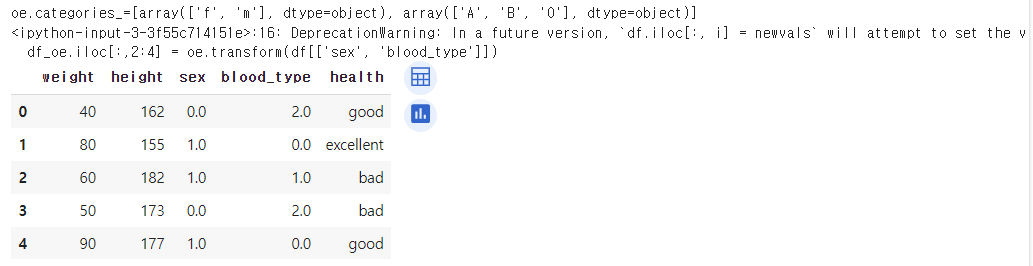
print(f'{oe.categories_=}')
# 학습된 결과를 적용하여 삽입
df_oe.iloc[:,2:4] = oe.transform(df[['sex', 'blood_type']])
df_oe↳ 결과
# 디코딩(decoding)
oe.inverse_transform(df_oe.iloc[:,2:4])
↳ 결과
LabelEncoder
- 범주형 데이터를 정수로 인코딩
- 하나의 컬럼(종속변수, 타겟)에만 사용 가능
from sklearn.preprocessing import LabelEncoder

# 데이터프레임 복사
df_le = df.copy()

# LabelEncoder는 하나의 변수에 대해서만 변환 가능
# LabelEncoder 객체 생성과 fit을 동시에 적용
health_le = LabelEncoder().fit(df.health)
df_le['health'] = health_le.transform(df.health)
df_le
↳ 결과
# fit_transform() 메서드를 사용하여 한번에 인코딩 수행가능

# 데이터프레임 복사
df_le = df.copy()

# LabelEncoder 객체 생성과 fit을 동시에 적용
df_le['health'] = LabelEncoder().fit_transform(df.health)
df_le
↳ 결과
TargetEncoder 적용
- 범주형 데이터를 특정한 컬럼(타겟)의 값의 크기와 비례한 숫자로 인코딩
from sklearn.preprocessing import TargetEncoder
# 데이터프레임 복사
df_te = df.copy()
# TargetEncoder에 대한 객체 생성
# smooth는 정밀도를 조정하고 target_type은 인코딩 타입을 지정
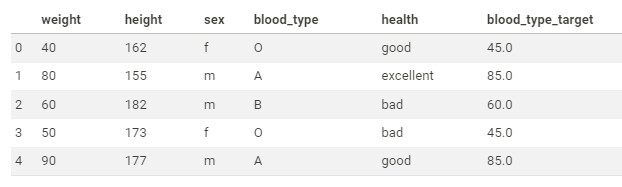
te = TargetEncoder(smooth=0, target_type='continuous')
# 데이터로 te 학습
# 타겟을 weight라고 가정하고 blood_type을 인코딩
# blood_type_target은 weight와 비례하여 인코딩된 값
# 인코딩이 되는 값은 2차원으로 변환해야 함
te.fit(df['blood_type'].values.reshape(-1, 1), df.weight)
# 학습된 결과
print(f'{te.categories_=}')
# 학습된 결과를 적용하여 새로운 컬럼 삽입
df_te['blood_type_target'] = te.transform(df['blood_type'].values.reshape(-1, 1))
df_te↳ 결과
2.2 범주형 데이터 → 이진 데이터
원핫인코딩(One-Hot-Encoding)
- 하나의 컬럼에 있는 범주형 데이터를 여러개의 이진수 컬럼(수치형 데이터)로 인코딩
- one-of-K 인코딩이라고도 함
from sklearn.preprocessing import OneHotEncoder

# 데이터프레임 복사
df_ohe = df.copy()

# OneHotEncoder에 대한 객체 생성 후 fit
ohe = OneHotEncoder().fit(df_ohe[['blood_type']])

# 학습된 결과
print(f'{ohe.categories_=}')

# 학습된 결과를 적용하여 새로운 컬럼 삽입
# OneHotEncoder는 결과를 sparse matrix로 반환하므로 toarray()를 통해 ndarray로 변환
df_ohe[ohe.categories_[0]] = ohe.transform(df_ohe[['blood_type']]).toarray()
df_ohe
↳ 결과
Dummy encoding
- Pandas에서 제공하는 get_dummies는 One-hot encoding과 동일한 기능
- 여러 컬럼을 한 번에 변환 가능
- 회귀분석에서 범주형 변수를 고려할 때 사용
pd.get_dummies(df, columns=['sex', 'blood_type'], drop_first=False)↳ 결과

2.3 연속 수치형 데이터 → 이진 데이터
Binerizer
from sklearn.preprocessing import Binarizer
# 데이터 불러오기
df_bin = df.copy()
# Binarizer 객체 생성과 fit, transform을 동시에 적용
# Binarizer는 수치형 변수에 대해서만 변환 가능
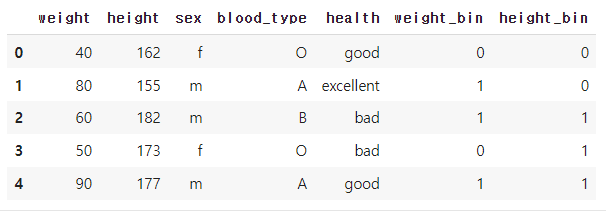
df_bin['weight_bin'] = Binarizer(threshold=50).fit_transform(df.weight.values.reshape(-1,1))
df_bin['height_bin'] = Binarizer(threshold=170).fit_transform(df.height.values.reshape(-1,1))
df_bin↳ 결과
LabelBinerizer
- 연속형 데이터를 이진수 컬럼으로 인코딩
- 하나의 컬럼(종속변수, 타겟)에만 사용 가능
from sklearn.preprocessing import LabelBinarizer
# 데이터프레임 복사
df_lb = df.copy()
# LabelBinarizer 객체 생성과 fit을 적용
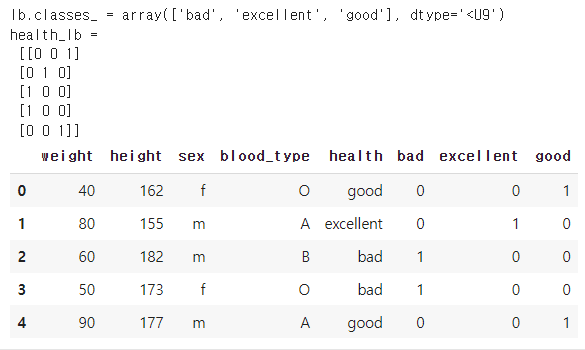
lb = LabelBinarizer().fit(df.health)
# lb.classes_ : LabelBinarizer가 인코딩한 클래스 확인
print(f'{lb.classes_ = }')
# lb.transform() : 인코딩 변환
health_lb = lb.transform(df.health)
print('health_lb = \n', health_lb)
# 인코딩된 데이터를 데이터프레임으로 변환
df_lb[lb.classes_] = health_lb
df_lb↳ 결과
MultiLabelBinerizer
- multi-class(여러개의 범주가 있는) 데이터를 이진수 컬럼으로 인코딩
- 하나의 컬럼(종속변수, 타겟)에만 사용 가능
from sklearn.preprocessing import MultiLabelBinarizer
# 데이터프레임 복사
df_mlb = df.copy()
# multi-class를 위한 컬럼 추가
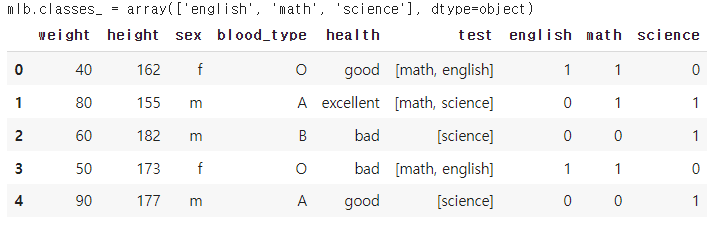
df_mlb['test'] = [['math', 'english'], ['math', 'science'], ['science'], ['math', 'english'],
['science']] # target: test, categorical, multi-class
df_mlb↳ 결과

# MultiLabelBinarizer 객체를 생성하고 fit() 메소드를 호출하여 클래스를 인코딩
mlb = MultiLabelBinarizer().fit(df_mlb.test)

# classes_ 속성을 사용하면 어떤 클래스가 인코딩되었는지 확인 가능
print(f'{mlb.classes_ = }')

# 인코딩된 데이터를 데이터프레임으로 변환
df_mlb[mlb.classes_] = mlb.transform(df_mlb.test)
df_mlb
↳ 결과
3 범주화
3.1 범주화 (Discritization)
- 연속형 변수를 구간별로 나누어 범주형 변수로 변환하는 것
- quantization 또는 binning이라고도 함
K-bins discretization
from sklearn.preprocessing import KBinsDiscretizer
# 데이터프레임 복사
df_kbd = df.copy()
# KBinsDiscretizer 객체 생성과 fit을 적용
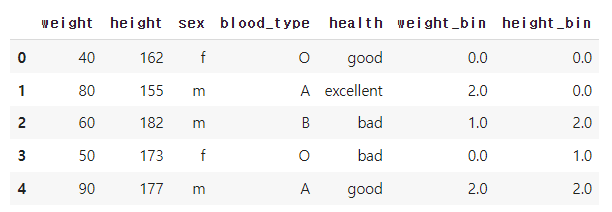
kbd = KBinsDiscretizer(n_bins=3, encode='ordinal').fit(df[['weight', 'height']])
# kbd.transform() : 인코딩 변환
# 인코딩된 데이터를 데이터프레임으로 변환
df_kbd[['weight_bin', 'height_bin']] = kbd.transform(df[['weight', 'height']])
df_kbd↳ 결과
응용 사례
2.2의 원핫인코딩(One-Hot-Encoding) 응용
# 필요한 패키지 임포트
import numpy as np
import pandas as pd
from sklearn.preprocessing import LabelEncoder
from sklearn.preprocessing import OneHotEncoder
from sklearn.compose import ColumnTransformer, make_column_transformer
# pandas로 데이터프레임 생성
df = pd.DataFrame([
[2,1,'male','A',3],
[3,2,'female','C',5],
[3,4,'male','B',7],
[5,5,'female','A',10],
[7,5,'female','B',12],
[2,5,'male','A',7],
[9,2,'male','C',13]
], columns=['hours', 'attendance', 'sex', 'cate', 'score'])
from sklearn.preprocessing import OneHotEncoder
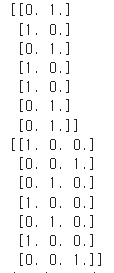
ohe = OneHotEncoder(sparse=False) # OneHotEncoder에 대한 객체를 생성
ohe.fit(df[['sex']]) # 위에서 객체 생성후 fit
print(ohe.transform(df[['sex']])) # 학습된 결과를 적용하여 새로운 컬럼 삽입
'''
[[0. 1.]
[1. 0.]
[0. 1.]
[1. 0.]
[1. 0.]
[0. 1.]
[0. 1.]]
'''
ohe.fit(df[['cate']])
print(ohe.transform(df[['cate']]))
'''
[[1. 0. 0.]
[0. 0. 1.]
[0. 1. 0.]
[1. 0. 0.]
[0. 1. 0.]
[1. 0. 0.]
[0. 0. 1.]]
'''
↳ 결과

나의 기록장