
AWS S3 설정
1. S3 버킷 생성
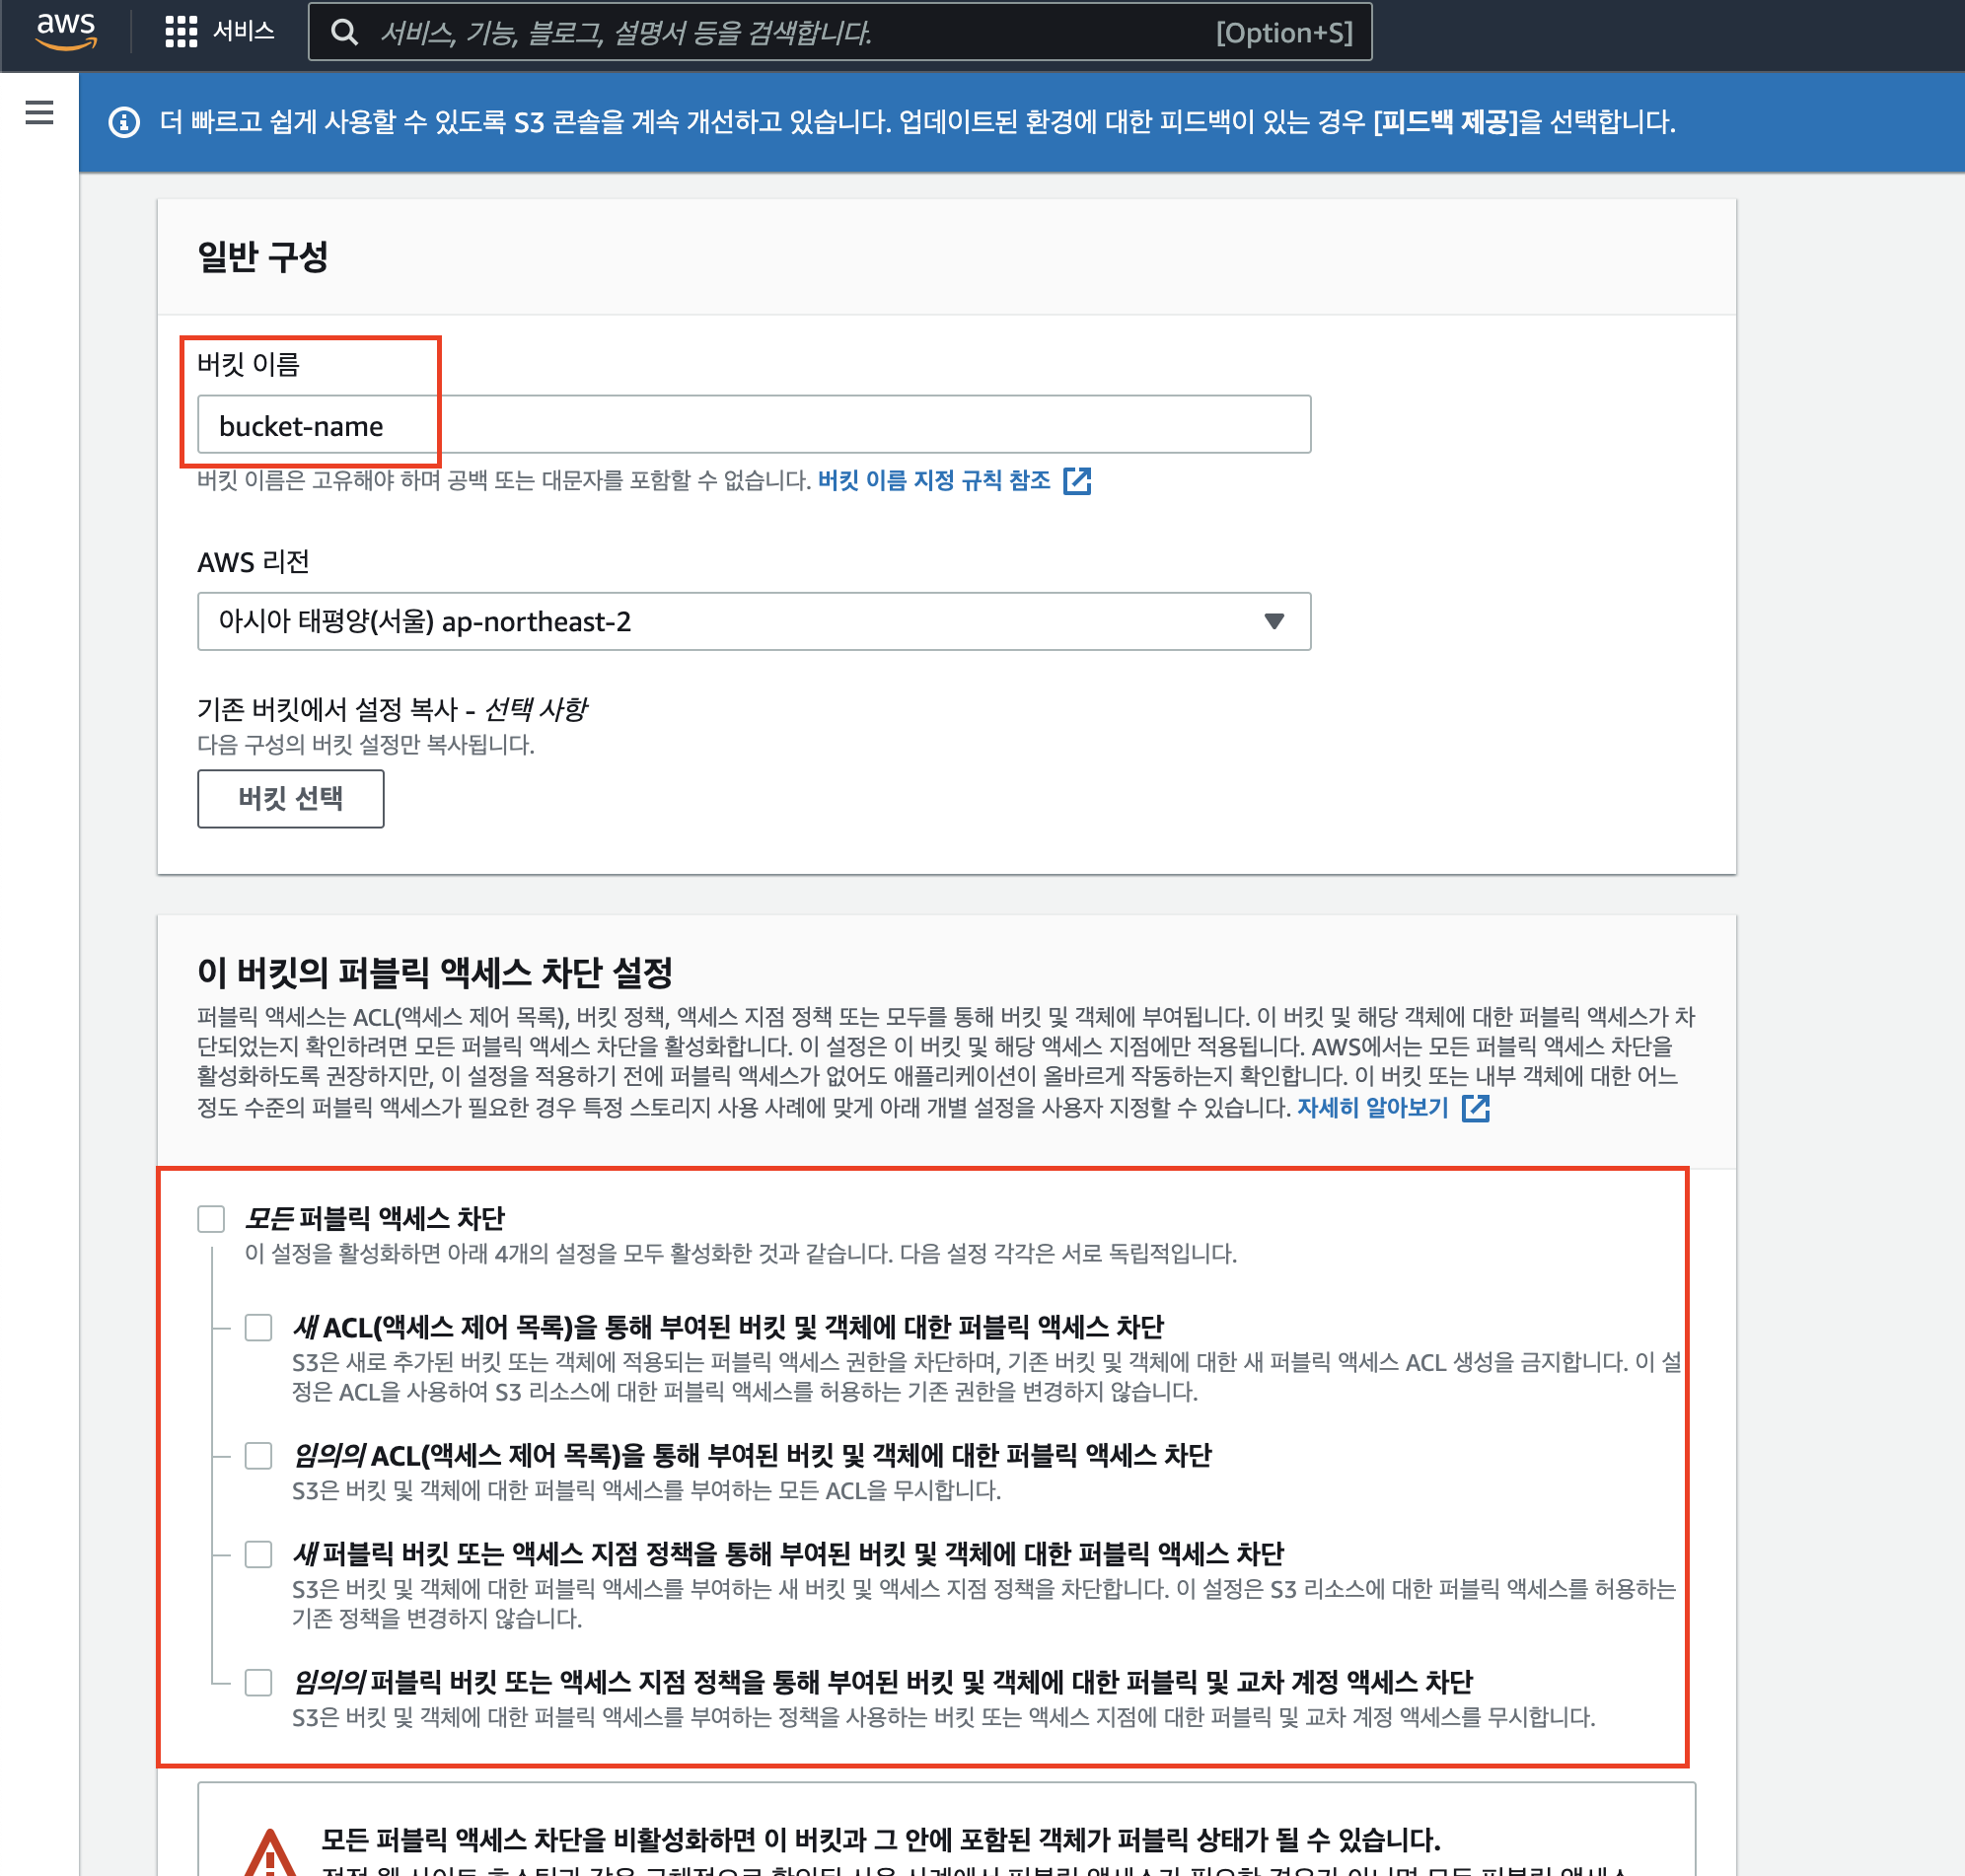
AWS Console > S3 서비스 > 버킷 만들기로 이동합니다. 이어지는 창에서 생성할 버킷 이름을 입력하고, 모든 퍼블릭 엑세스 차단을 풀어준 후 버킷을 생성합니다.
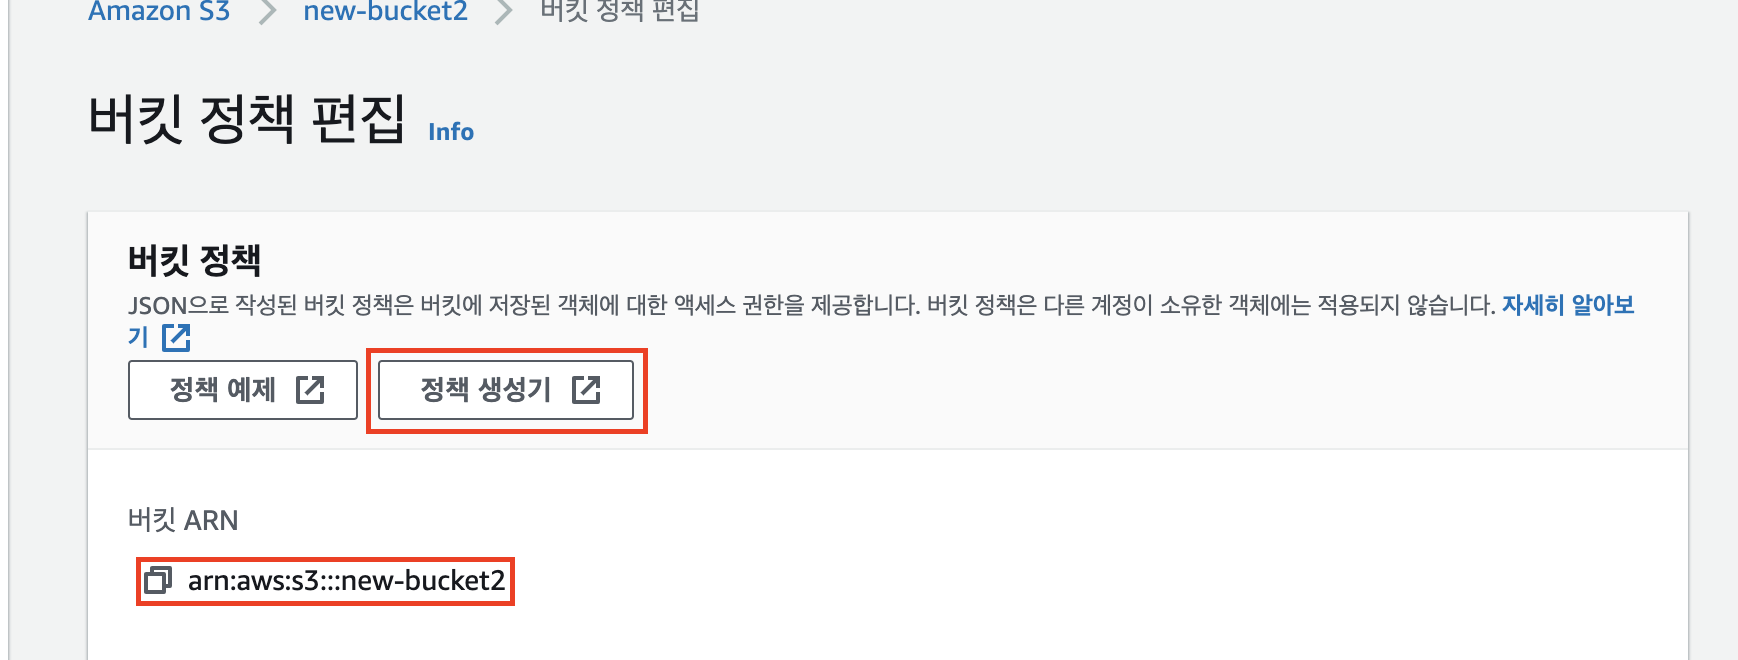
생성된 버킷의 설정 > 권한 탭 > 버킷 정책 > 편집으로 이동해서 버킷 ARN을 복사한 뒤 정책생성기를 클릭합니다.

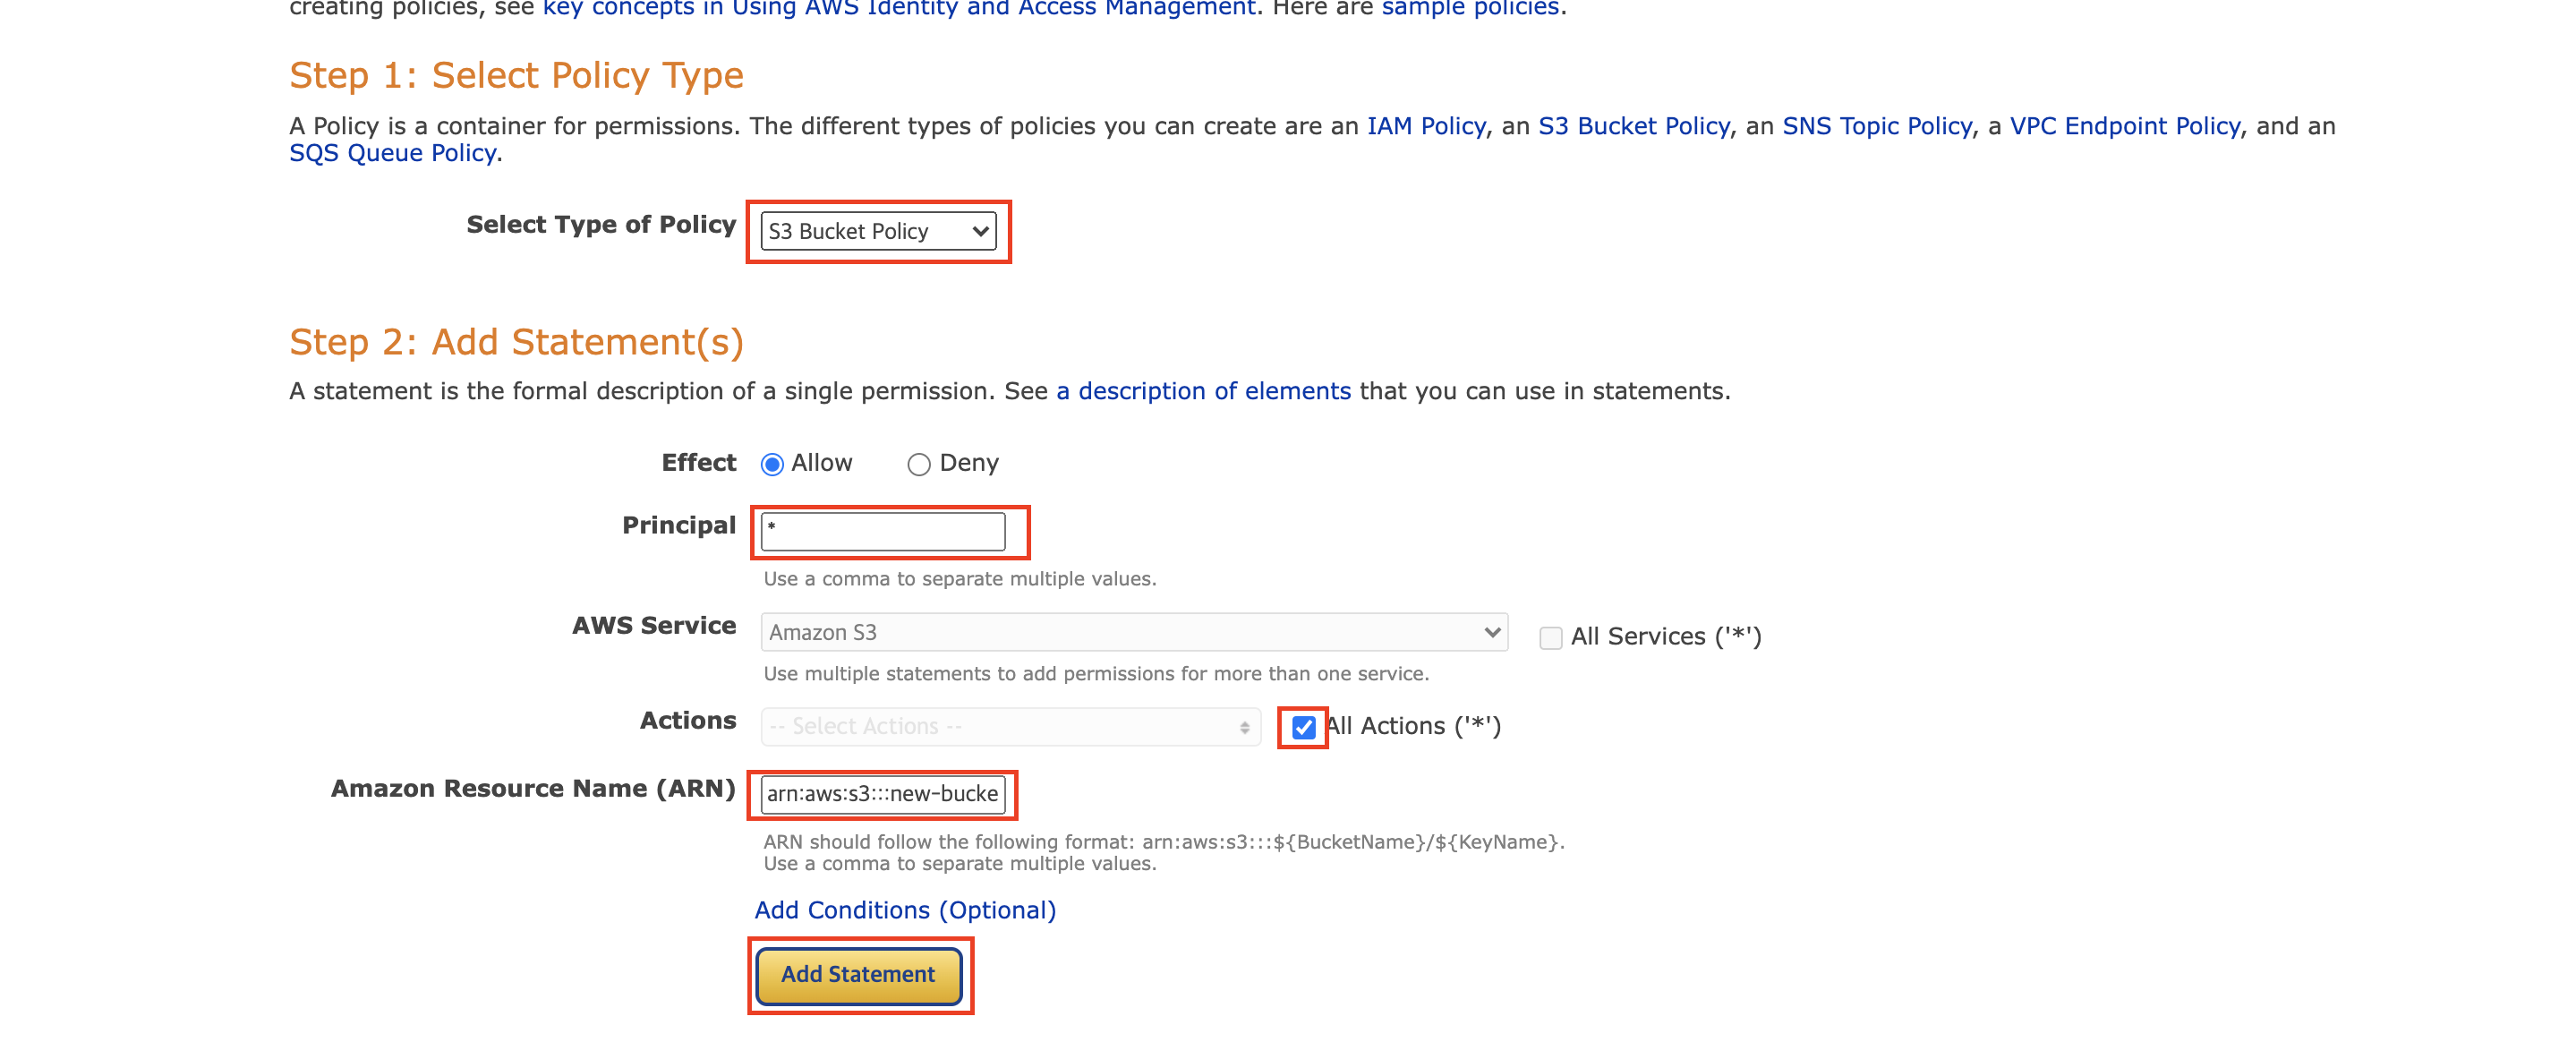
정책 생성 창에서 세팅을 맞춰준 뒤 Add Statement > Generete Policy를 눌러 생성된 정책을 복사합니다.
- Type of Policy: S3 Bucket Policy
- principal: *
- Actions: *로 모든 기능을 허용할 수도, GetObject, PutObject 등 필요한 기능만 지정할 수도 있습니다.
- ARN: 복사해둔 bucket ARN 을 입력해줍니다.

복사한 정책은 S3콘솔로 돌아와 버킷 정책에 붙여넣기한 뒤 변경사항을 저장해줍니다.

2. IAM (Identity and Access Management) 추가
S3에 접근하기 위해서는 IAM 사용자에게 S3 접근 권한을 줘야합니다.
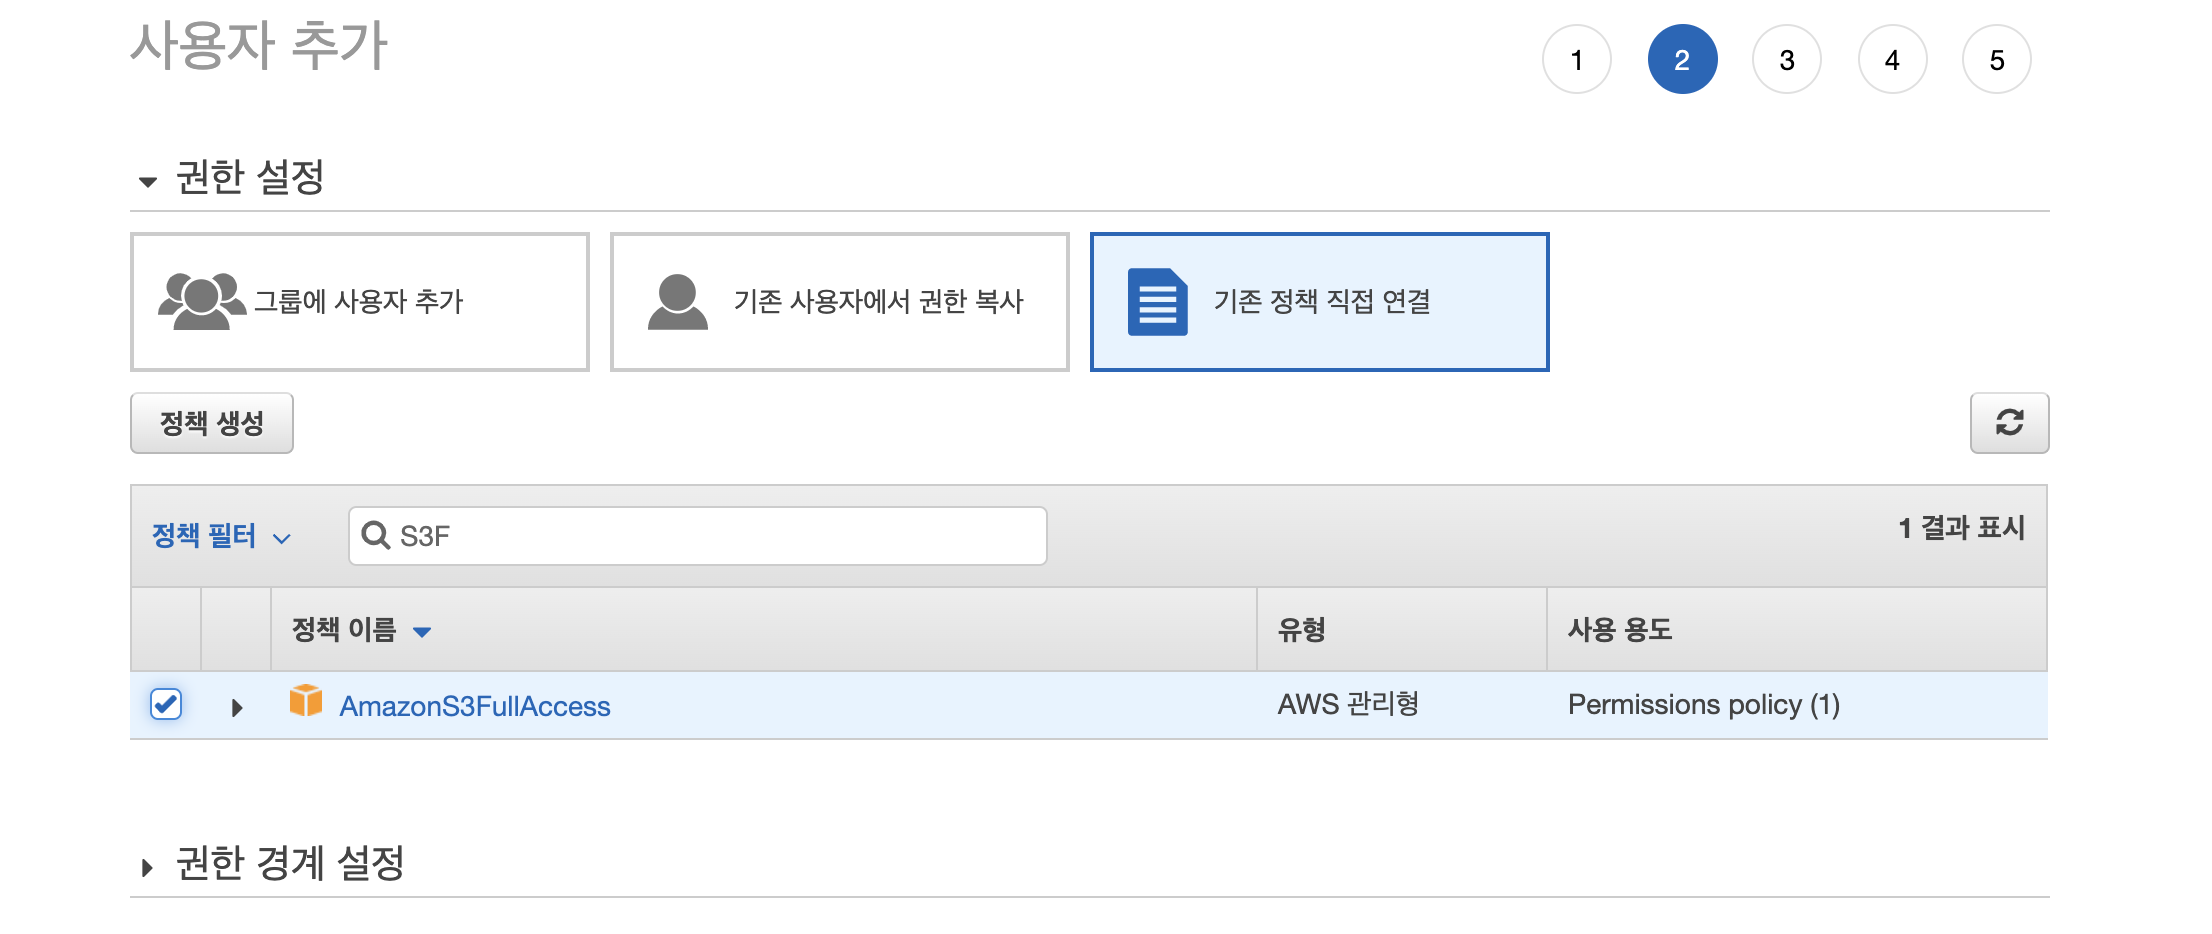
IAM 서비스 > 사용자 > 사용자 추가로 이동해서 사용자 이름을 입력하고 엑세스키 유형을 선택해줍니다. 권한은 기존 정책 > AmazonS3FullAccess를 선택해 S3 권한이 있는 사용자를 추가합니다.
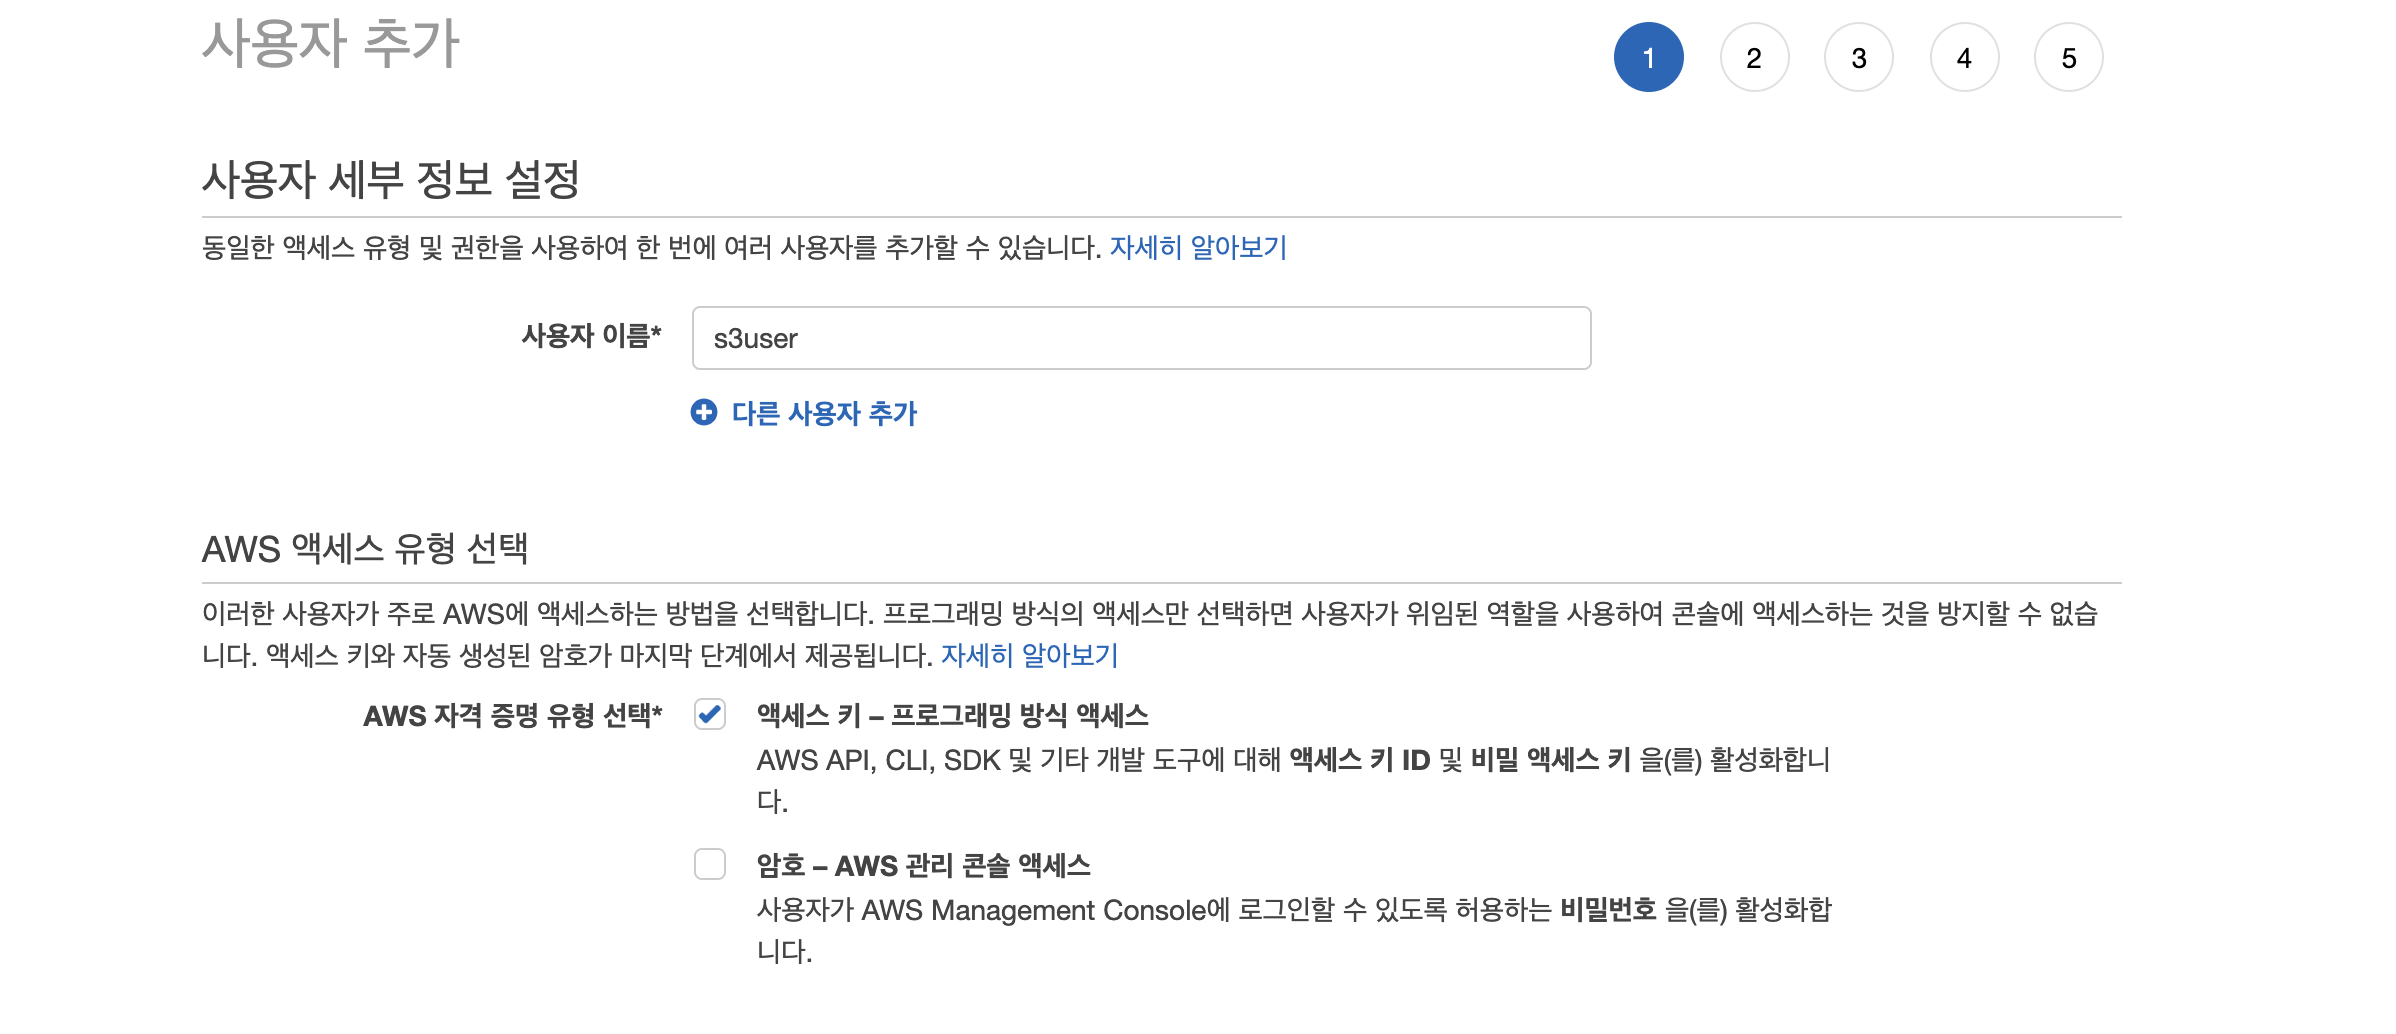
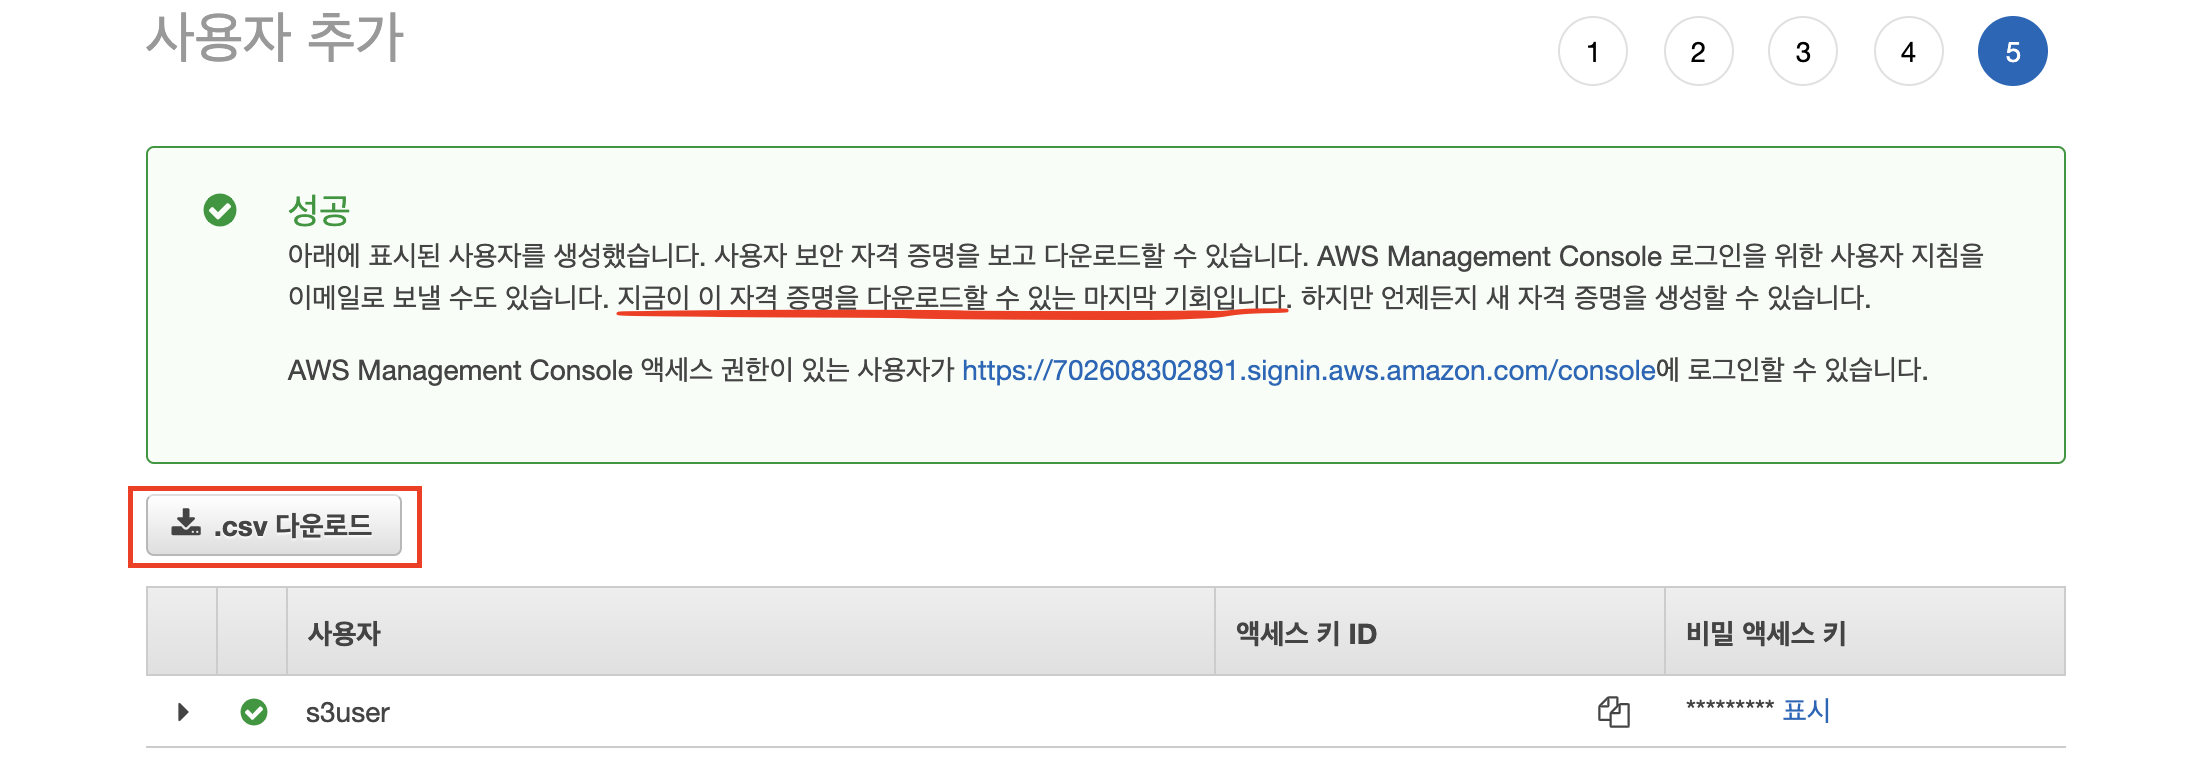
태그는 선택사항이니 필요한 경우 추가하시면 됩니다. 사용자 생성이 완료되면 Access-key와 Secret-key를 발급해주는데, 생성 직후에만 볼 수 있는 것이니 .cvs 파일로 저장해두시는 것을 권장합니다.
SpringBoot 설정
의존성 추가
mvnrepository에서 디펜던시를 추가해줍니다.
<!-- S3 -->
<dependency>
    <groupId>org.springframework.cloud</groupId>
    <artifactId>spring-cloud-starter-aws</artifactId>
    <version>2.2.6.RELEASE</version>
</dependency>
application-s3.properties 추가
cloud.aws.stack.auto=false
cloud.aws.region.static=ap-northeast-2
cloud.aws.credentials.access-key=[access-key 입력]
cloud.aws.credentials.secret-key=[secret-key 입력]
cloud.aws.s3.bucket=[기본 버킷주소 등록]application.properties에 추가해줘도 되지만, 저는 따로 설정파일을 생성해 주입해줬습니다.
구현
S3 설정 등록
S3Config.java
@Configuration
public class S3Config {
    @Value("${cloud.aws.credentials.access-key}")
    private String accessKey;
    @Value("${cloud.aws.credentials.secret-key}")
    private String secretKey;
    @Value("${cloud.aws.region.static}")
    private String region;

    @Bean
    public AmazonS3Client amazonS3Client() {
        BasicAWSCredentials awsCreds = new BasicAWSCredentials(accessKey,secretKey);
        return (AmazonS3Client) AmazonS3ClientBuilder.standard()
                    .withRegion(region)
                    .withCredentials(new AWSStaticCredentialsProvider(awsCreds))
                    .build();
    }
}
파일 업로드 클래스 생성
파일을 올릴 클래스를 생성합니다. 업로드할때 파일이 로컬에 없으면 다음과 Unable to calculate MD5 hash: [파일명] (No such file or directory) 에러가 발생하기 때문에, convert로 입력받은 파일을 로컬에 저장하고 upload로 S3 버킷에 업로드하게 됩니다.
S3Uploader.java
@Component
@RequiredArgsConstructor
public class S3Uploader {
    private final AmazonS3Client amazonS3Client;
    @Value("${cloud.aws.s3.bucket}")
    private String bucket;

    public String uploadFiles(MultipartFile multipartFile, String dirName) throws IOException {
        File uploadFile = convert(multipartFile)  // 파일 변환할 수 없으면 에러
                .orElseThrow(() -> new IllegalArgumentException("error: MultipartFile -> File convert fail"));
        return upload(uploadFile, dirName);
    }

    public String upload(File uploadFile, String filePath) {
        String fileName = filePath + "/" + UUID.randomUUID() + uploadFile.getName();   // S3에 저장된 파일 이름
        String uploadImageUrl = putS3(uploadFile, fileName); // s3로 업로드
        removeNewFile(uploadFile);
        return uploadImageUrl;
    }

    // S3로 업로드
    private String putS3(File uploadFile, String fileName) {
        amazonS3Client.putObject(new PutObjectRequest(bucket, fileName, uploadFile).withCannedAcl(CannedAccessControlList.PublicRead));
        return amazonS3Client.getUrl(bucket, fileName).toString();
    }

    // 로컬에 저장된 이미지 지우기
    private void removeNewFile(File targetFile) {
        if (targetFile.delete()) {
            System.out.println("File delete success");
            return;
        }
        System.out.println("File delete fail");
    }

    // 로컬에 파일 업로드 하기
    private Optional<File> convert(MultipartFile file) throws IOException {
        File convertFile = new File(System.getProperty("user.dir") + "/" + file.getOriginalFilename());
        if (convertFile.createNewFile()) { // 바로 위에서 지정한 경로에 File이 생성됨 (경로가 잘못되었다면 생성 불가능)
            try (FileOutputStream fos = new FileOutputStream(convertFile)) { // FileOutputStream 데이터를 파일에 바이트 스트림으로 저장하기 위함
                fos.write(file.getBytes());
            }
            return Optional.of(convertFile);
        }
        return Optional.empty();
    }
}
Controller 작성
파일은 MultipartFile로 입력받습니다. 여러 개의 파일이 들어오면 S3uploader에서 단일 파일로 파싱해 로컬에 저장하고, 저장된 파일을 업로드 후 로컬에서 삭제합니다.
S3Controller.java
@RequiredArgsConstructor
@RestController
public class S3Controller {
    private final S3Uploader s3Uploader;

    @PostMapping("/{userId}/image")
    public ResponseEntity<UserResponseDto> updateUserImage(@RequestParam("images") MultipartFile multipartFile) {
        try {
            s3Uploader.uploadFiles(multipartFile, "static");
        } catch (Exception e) { return new ResponseEntity(HttpStatus.BAD_REQUEST); }
        return new ResponseEntity(HttpStatus.NO_CONTENT);
    }