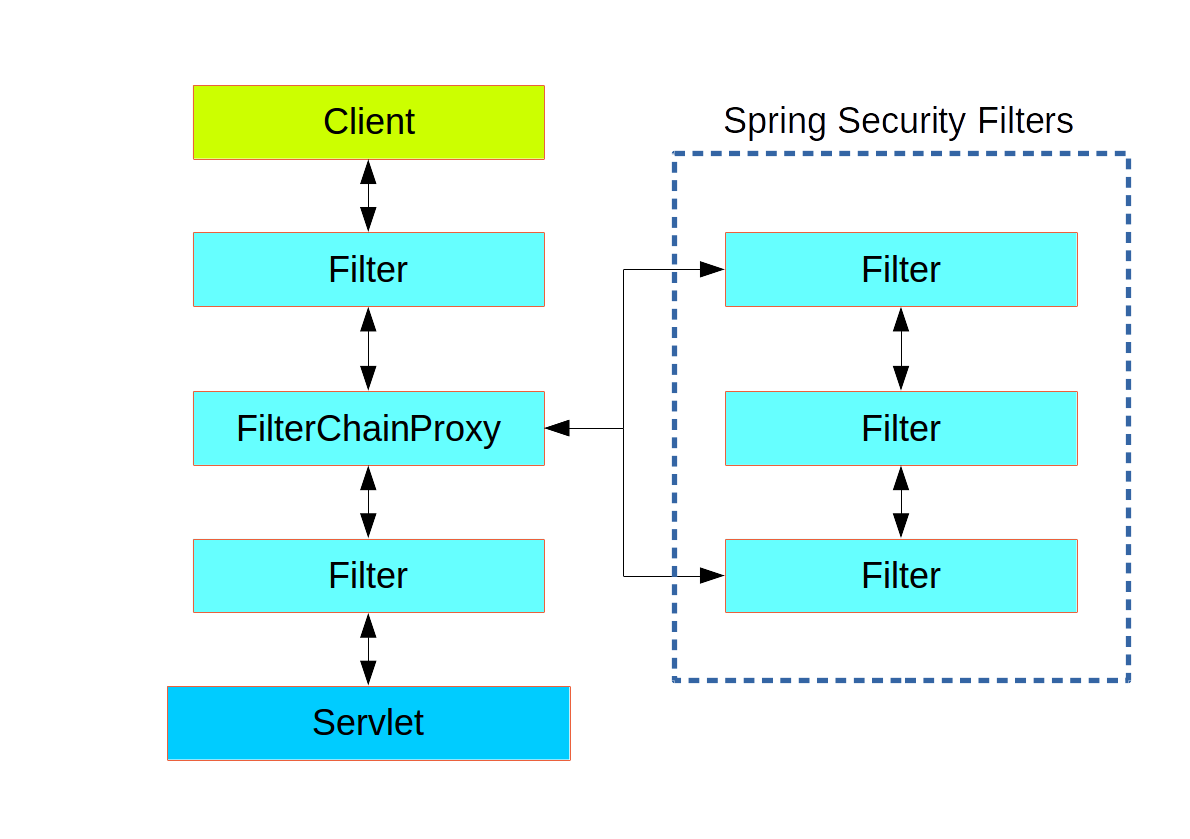
1. Spring Security 란?
Spring Security는 스프링 기반의 어플리케이션 보안을 담당하는 프레임워크입니다. Spring Security를 사용하면 사용자 인증, 권한, 보안처리를 간단하지만 강력하게 구현 할 수 있습니다.
- 사용자 권한에 따른 URI 접근 제어
- DB와 연동 하는 Local strategy 로그인
- 쿠키를 이용한 자동 로그인
- 패스워드 암호화
Spring Security는 FilterChainProxy라는 이름으로 내부에 여러 Filter들이 동작하고 있습니다. 이 Filter를 이용해서 기본적인 기능을 구현 및 커스텀 할 수 있습니다.

2. 설정
2.1. 의존성 추가
pom.xml파일에 다음 코드를 추가해줍니다.
<dependency>
	<groupId>org.springframework.boot</groupId>
	<artifactId>spring-boot-starter-security</artifactId>
</dependency>
2.2. Spring Security 설정하기
설정은 WebSecurityConfigurerAdapter 클래스를 상속받아 오버라이딩하는 방식으로 진행할 수 있습니다.
전체 코드를 위부터 쭉 훑으며 설명하겠습니다.
// WebSecurityConfig.java
@Configuration
@EnableWebSecurity
@EnableGlobalMethodSecurity(prePostEnabled = true)
public class WebSecurityConfig extends WebSecurityConfigurerAdapter {

	@Override
    public void configure(WebSecurity webSecurity) throws Exception {
        // static 디렉터리의 하위 파일 목록은 인증 무시 ( = 항상통과 )
        webSecurity.ignoring().antMatchers("/css/**", "/js/**", "/image/**", "/lib/**");
    }

	@Override
	protected void configure(HttpSecurity httpSecurity) throws Exception{
		httpSecurity
		// h2-console 옵션 disable
        .csrf().disable().headers().frameOptions().disable()
        .and().authorizeRequests()
			.antMatchers("/","/oauth2/**","/signin/**","/login/**","console/**","/h2-console/**")
			.permitAll()
		// 인증된 사용자만 접근 가능
		.anyRequest().authenticated()
		.and().oauth2Login().defaultSuccessUrl("/").userInfoEndpoint().userService(customOAuthUserService)
		.and().exceptionHandling()
		// 인증 없이 페이지에 접근할 경우 리다이렉트
		.authenticationEntryPoint(new LoginUrlAuthenticationEntryPoint("/signin"))
		.and().logout().logoutSuccessUrl("/");
	}

}
Annotation
| @Configuration | 해당 클래스를 Configuration으로 등록합니다. |
| @EnableWebSecurity | Spring Security를 활성화 시킵니다. |
| @EnableGlobalMethodSecurity(prePostEnabled = true) | Controller에서 특정 페이지에 특정 권한이 있는 유저만 접근을 허용할 경우 @PreAuthorize 어노테이션을 사용하는데, 해당 어노테이션에 대한 설정을 활성화시키는 어노테이션입니다. (필수는 아닙니다.) |
WebSecurity / HttpSecurity
- websecurity
WebSecurity는 FilterChainProxy를 생성하는 필터입니다. 다양한 Filter 설정을 적용할 수 있습니다.
위 코드에서는 ignorin을 통해 정적 자원에 대해서는 security 인증 대상에서 제외시켰습니다. - httpsecurity
리소스(URL) 접근 권한과 Login, Logout 성공/실패에 따른 후속조치 등 인증 전체 흐름에 필요한 http 요청을 설정할 수 있습니다.
인증 로직을 커스텀하기위한 커스텀 필터와 기타 csrf, 강제 https 호출 등등 또한 설정이 가능합니다.
antMatchers
다음은 antMatchers() 로 지정할 수 있는 항목들입니다.
| hasRole() or hasAnyRole() | 특정 권한을 가지는 사용자만 접근할 수 있습니다. |
| hasAuthority() or hasAnyAuthority() | 특정 권한을 가지는 사용자만 접근할 수 있습니다. |
| hasIpAddress() | 특정 아이피 주소를 가지는 사용자만 접근할 수 있습니다. |
| permitAll() or denyAll() | 접근을 전부 허용하거나 제한합니다. |
| rememberMe() | 리멤버 기능을 통해 로그인한 사용자만 접근할 수 있습니다. |
| anonymous() | 인증되지 않은 사용자만 접근할 수 있습니다. |
| authenticated() | 인증된 사용자만 접근할 수 있습니다. |
Role은 역할이고 Authority는 권한이지만 사실은 표현의 차이입니다.
Role은 “ADMIN”으로 표현하고 Authority는 “ROLE_ADMIN”으로 표기합니다.
antMatcher와 mvcMatchers
일반적으로mvcMatcher는antMatcher보다 안전합니다. 따라서 더 일반적이며 일부 가능한 구성 실수를 처리 할 수도 있습니다.
antMatchers("/secured")는 정확한 /secured URL과만 일치하고,
mvcMatchers("/secured")는 /secured와 /secured/, /secured.html, /secured.xyz 등 과도 일치합니다.
anyRequests
설정된 값들 이외 나머지 URL들을 나타냅니다.
여기서는 authenticated()을 추가하여 나머지 URL들은 모두 인증된(로그인한) 사용자들에게만 허용하게 됩니다.
oauth2Login
OAuth 2 로그인 기능에 대한 여러 설정의 진입점입니다.
defaultSuccessUrl
정상적으로 OAuth 2 인증에 성공했을 경우 이동하는 페이지를 설정합니다.userInfoEndpoint
OAuth 2 로그인 성공 이후 사용자 정보를 가져올 때의 설정들을 담당합니다.userService
소셜 로그인 성공 시 후속 조치를 진행할 UserService 인터페이스의 구현체를 등록합니다.
리소스 서버(즉, 소셜 서비스들)에서 사용자 정보를 가져온 상태에서 추가로 진행하고자 하는 기능을 명시할 수 있습니다.
OAuth2 외에도 formLogin()을 통한 Form을 이용한 로그인도 설정할 수 있습니다.
위에서는 아주 간단한 기능한 기능만 구현했지만 Spring Security는 매우 방대하기 때문에, 한번쯤 공식 문서를 읽어보면 좋을 것 같습니다.
Reference
https://devuna.tistory.com/59
https://kimchanjung.github.io/programming/2020/07/02/spring-security-02/
https://stackoverflow.com/questions/50536292/difference-between-antmatcher-and-mvcmatcher
https://bamdule.tistory.com/53
https://m.blog.naver.com/kimnx9006/220638156019
