💻테스트 환경
- 설치가 안되어 있으신 분들은 설치를 먼저 해주세요!
Cisco Packet Tracer 누르시면 설치 링크로 이동합니다!
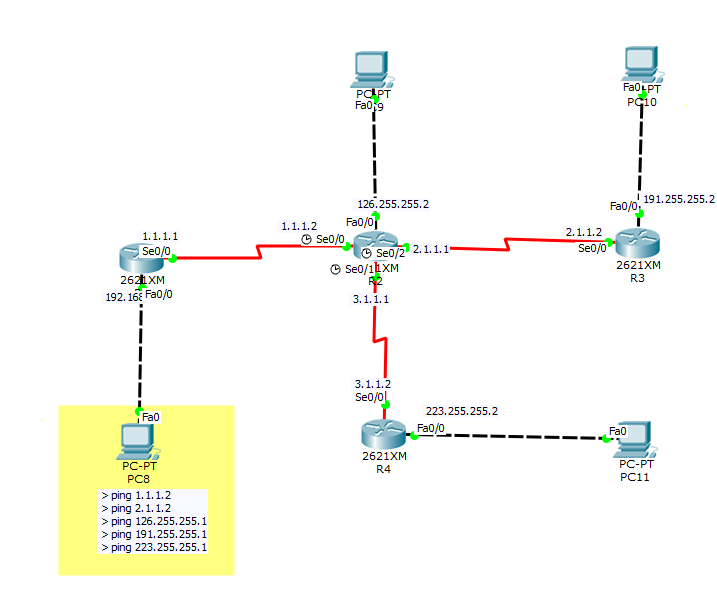
💻테스트 구성
🖥기본 라우터 설정
- 우선 서로 통신이 되기 위해서는 기본적으로 각 PC에 IP Address, Subnet Mask, Default Gateway / Router Interface 마다 정보를 할당해주어야 합니다. 아래 사진들을 참고해주세요!
- PC 네트워크는 아래 참고용 사진처럼 설정해주시고 Default Gateway는 각 라우터의 Fa0/0의 IP 정보를 넣어주세요

🛑Default gateway는 외부망과 연결되어 있는 라우터 주소입니다. 외부에서 들어오는 모든 패킷은 라우터에 설정된 Default gateway를 통해서 나가게 됩니다. (출입문 역할)위 구성도 같은 경우에는 PC에서 나오는 패킷이 Fa0/0 Default gateway를 통해서 각 목적지로 나가게 됩니다.
- Router Interface 설정을 해줄 차례입니다.
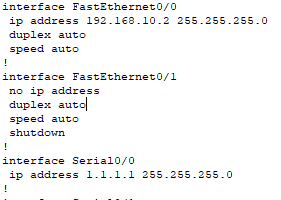
💻R1 Interface 설정코드를 입력Router>enable Router#conf t Router(config)# #위와 같은 상태에서 명령어를 치셔야 해요. Router(config)#int fa0/0 #interface Fa0/0 으로 접근하는 명령어 Router(config-if)#ip add 192.168.10.2 255.255.255.0 #interface Fa0/0에 IP주소 설정 (Default gateway 설정) Router(config-if)#no shutdown #interface Fa0/0 활성화 Router(config-if)#exit #interface Fa0/0 나가기 Router#show run (router에 입력한 명령어 확인)
※다른 router들도 각 port별 정보만 바꿔서 같은 방식으로 설정 해주시면 됩니다.
🖥정적 라우팅 설정
🟢정적 라우팅의 명령어의 구성
※ip route [destination_network][subnet_mask] [next_hopaddress][distance]
- destination_network
(목적지의 IP 주소를 입력하는 부분 입니다. 라우팅은 대역대의 연결이기 때문에 해당 네트워크 주소의 모든 IP를 찾을 수 있도록 네트워크 주소를 입력합니다.)- subnet_mask
(목적지 네트워크의 subnet_mask를 지정 합니다.)- next_hopaddress
(출발지와 목적지 사이에 위치한 경로의 한 부분 입니다. 목적지 네트워크로 가기위해 필요한 주소이며 자신의 반대편 라우터의 입구라고 생각하면 됩니다.)- distance
(라우팅 정보의 가치로서 커지면 커질수록 가치가 떨어지게 되며, 명시하지 않아도 된다.디폴트 값은 1)
라우터 R1의 정적 라우팅 설정 명령어
#정적 라우팅 명령어
Router(config)#ip route 126.0.0.0 255.0.0.0 1.1.1.2
Router(config)#ip route 191.255.0.0 255.255.0.0 1.1.1.2
Router(config)#ip route 223.255.255.0 255.255.255.0 1.1.1.2
Router(config)#ip route 2.0.0.0 255.255.255.0 1.1.1.2
Router(config)#ip route 3.0.0.0 255.255.255.0 1.1.1.2

Router(config)#end

Router#sh ip route (라우팅 확인 명령어)
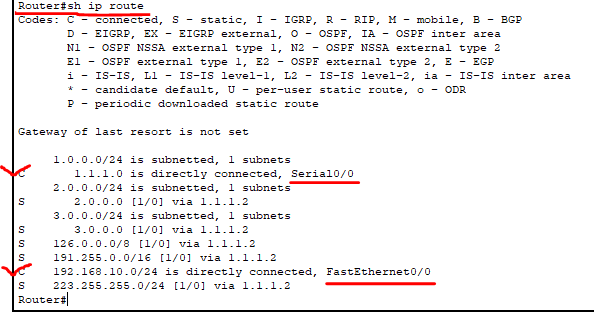
연결 상태를 보시면 입력한 명령어 모두 정적 라우팅 상태로 연결되어 있는 것을 볼 수 있습니다.
모든 라우터에 명령어 입력을 끝내셨다면 최종적으로 각각 라우터의 라우팅 상태에는 아래와 같아야 합니다
R1
     1.0.0.0/24 is subnetted, 1 subnets
C       1.1.1.0 is directly connected, Serial0/0
     2.0.0.0/24 is subnetted, 1 subnets
S       2.0.0.0 [1/0] via 1.1.1.2
     3.0.0.0/24 is subnetted, 1 subnets
S       3.0.0.0 [1/0] via 1.1.1.2
S    126.0.0.0/8 [1/0] via 1.1.1.2
S    191.255.0.0/16 [1/0] via 1.1.1.2
C    192.168.10.0/24 is directly connected, FastEthernet0/0
S    223.255.255.0/24 [1/0] via 1.1.1.2

R2
     1.0.0.0/24 is subnetted, 1 subnets
C       1.1.1.0 is directly connected, Serial0/0
     2.0.0.0/24 is subnetted, 1 subnets
C       2.1.1.0 is directly connected, Serial0/2
     3.0.0.0/24 is subnetted, 1 subnets
C       3.1.1.0 is directly connected, Serial0/1
C    126.0.0.0/8 is directly connected, FastEthernet0/0
S    191.255.0.0/16 [1/0] via 2.1.1.2
S    192.168.10.0/24 [1/0] via 1.1.1.1
S    223.255.255.0/24 [1/0] via 3.1.1.2

R3
     1.0.0.0/24 is subnetted, 1 subnets
S       1.0.0.0 [1/0] via 2.1.1.1
     2.0.0.0/24 is subnetted, 1 subnets
C       2.1.1.0 is directly connected, Serial0/0
     3.0.0.0/24 is subnetted, 1 subnets
S       3.0.0.0 [1/0] via 2.1.1.1
S    126.0.0.0/8 [1/0] via 2.1.1.1
C    191.255.0.0/16 is directly connected, FastEthernet0/0
S    192.168.10.0/24 [1/0] via 2.1.1.1
S    223.255.255.0/24 [1/0] via 2.1.1.1

R4
     1.0.0.0/24 is subnetted, 1 subnets
S       1.0.0.0 [1/0] via 3.1.1.1
     2.0.0.0/24 is subnetted, 1 subnets
S       2.0.0.0 [1/0] via 3.1.1.1
     3.0.0.0/24 is subnetted, 1 subnets
C       3.1.1.0 is directly connected, Serial0/0
S    126.0.0.0/8 [1/0] via 3.1.1.1
S    191.255.0.0/16 [1/0] via 3.1.1.1
S    192.168.10.0/24 [1/0] via 3.1.1.1
C    223.255.255.0/24 is directly connected, FastEthernet0/0
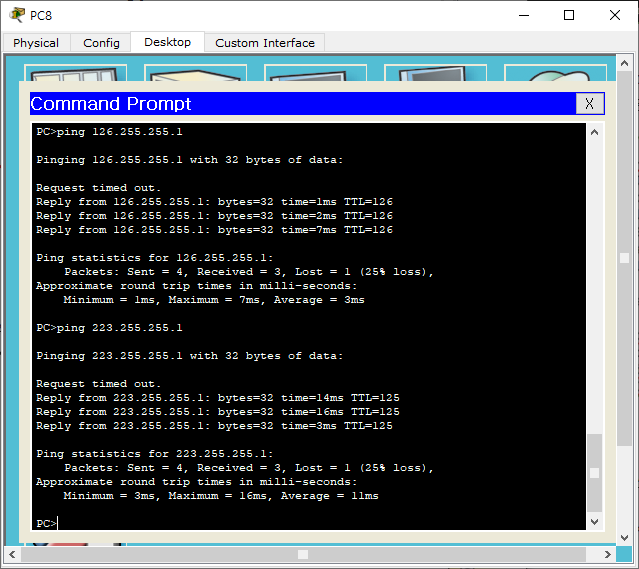
마지막 PC 1번에서 ping test를 하셔서 정상적으로 핑이 간다면 제대로 설정이 된 것입니다.

클라우드 SE 꿈나무 🔰