📌Layout이란?
사전적으로 찾아봤을 때 레이아웃은 다음과 같이 나온다.

출처: https://terms.naver.com/entry.naver?docId=1087845&cid=40942&categoryId=33074
디자인, 광고 ,편집에서 문자, 그림 ,사진 등을 제한된 공안 안에서 효과적으로 배열하는 일이다.
안드로이드에서는 어제 배운 수 많은 컴포넌트를 이용해 배열할 수있다. 레이아웃을 이용해 사람들에게 흥미를 유발하고 가독성을 높혀 사용하려는 기능이나 구성 요소등이 쉽게 보여야 한다.
레이아웃의 기본 조건으로 주목성, 가독성, 명쾌성, 조형성, 창조성이 있다.
안드로이드 App에서 Layout이 어떠한 구조로 되어있는지 개발자 문서를 통해서 알아보도록 하겠습니다.
공식 문서상에서 레이아웃은 앱에서 사용자 인터페이스를 위한 구조를 정의한다고 합니다. View 와 ViewGroup 객체의 계층 구조를 사용해 빌드가 됩니다.

출처 : https://developer.android.com/guide/topics/ui/declaring-layout?hl=ko
안드로이드상에서 레이아웃의 종류로는 Linear, Relative, Grid, Table, Frame, Constraint 가 있다.
LinearLayout
번역하면 선형이라는 의미를 갖는 선형 레이아웃이다. 여러 하위 요소를 하나의 가로 방향 또는 세로 방향 행으로 정리하는 레이아웃이다.
android:orientation 속성을 이용해 가로(horizontal), 세로(vertical)를 정할 수 있다.
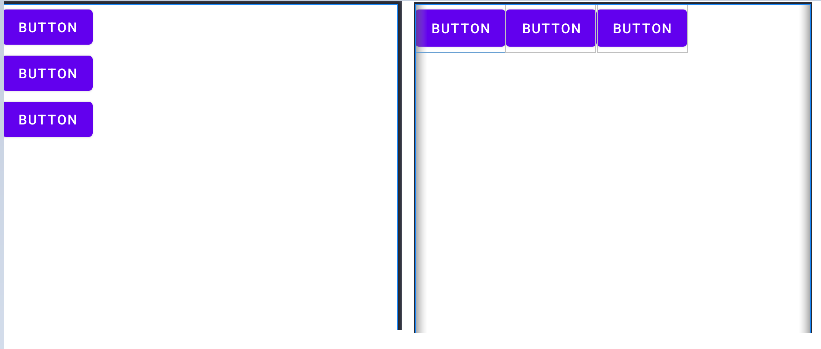
왼쪽 화면이 세로(vertical) , 오른쪽 화면이 가로(horizontal)그 밖에도 개별 하위 요소에 가중치를 할당할 수 있습니다. 뷰가 화면에서 얼마만큼 공간을 차지해야 하느냐에 따라 뷰에 중요도값을 할당 하는 레이아웃 가중치입니다. android:layout_weight 속성을 사용합니다.
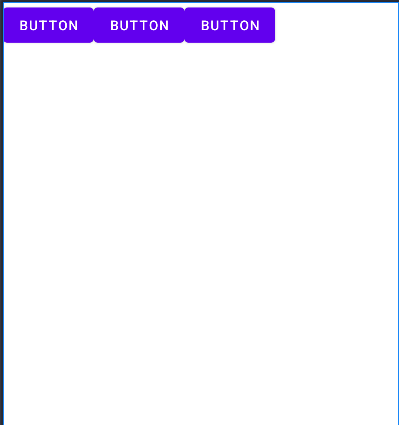
이 속성을 사용해 보도록 하겠습니다. 먼저 다음과 같이 버튼 3개를 horizontal 속성을 줘서 아래 그림과 같이 실행화면이 나왔습니다.
<?xml version="1.0" encoding="utf-8"?>
<LinearLayout xmlns:android="http://schemas.android.com/apk/res/android"
xmlns:app="http://schemas.android.com/apk/res-auto"
xmlns:tools="http://schemas.android.com/tools"
android:layout_width="match_parent"
android:layout_height="match_parent"
android:orientation="horizontal"
tools:context=".MainActivity">
<Button
android:id="@+id/button"
android:layout_width="wrap_content"
android:layout_height="wrap_content"
android:text="Button" />
<Button
android:id="@+id/button2"
android:layout_width="wrap_content"
android:layout_height="wrap_content"
android:text="Button" />
<Button
android:id="@+id/button3"
android:layout_width="wrap_content"
android:layout_height="wrap_content"
android:text="Button" />
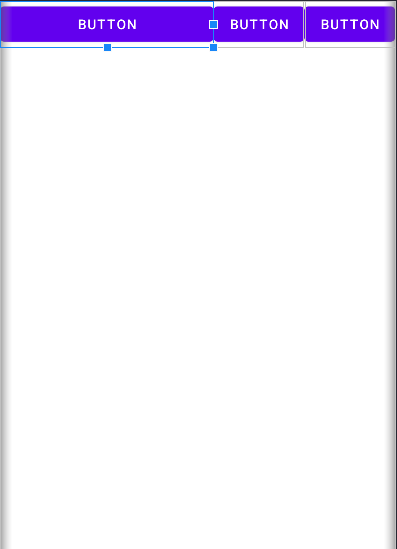
</LinearLayout>코드는 다음과 같이 되어 있으며 첫번째 버튼에 가중치 1를 주면 첫번 째 버튼이 나머지 여백 부분을 다 차지하게 됩니다. 공식문서 상으로 가중치는 0으로 기본값이 되어 있다 합니다.
<?xml version="1.0" encoding="utf-8"?>
<LinearLayout xmlns:android="http://schemas.android.com/apk/res/android"
    xmlns:app="http://schemas.android.com/apk/res-auto"
    xmlns:tools="http://schemas.android.com/tools"
    android:layout_width="match_parent"
    android:layout_height="match_parent"
    android:orientation="horizontal"

    tools:context=".MainActivity">


    <Button
        android:id="@+id/button"
        android:layout_width="0dp"
        android:layout_weight="1"
        android:layout_height="wrap_content"
        android:text="Button" />

    <Button
        android:id="@+id/button2"
        android:layout_width="wrap_content"
        android:layout_height="wrap_content"
        android:text="Button" />

    <Button
        android:id="@+id/button3"
        android:layout_width="wrap_content"
        android:layout_height="wrap_content"
        android:text="Button" />
</LinearLayout>
📌RelativeLayout이란?
관련있는,상대적인 뜻은 가진 Relative Layout은 상대 위치에 하위 뷰를 표시하는 뷰 그룹입니다.Relative Layout은 중첩된 뷰 그룹을 없애고 레이아웃 계층 구조를 평면으로 유지하여 성능을 개선하므로 사용자 인터페이스 설계에 유용한 유틸리티입니다. 여러 개의 중첩된 LinearLayout 그룹을 사용한다면 단일 RelativeLayout으로 대체할 수 있습니다.

이미지출처 : https://developer.android.com/guide/topics/ui/layout/relative?hl=ko
뷰의 위치 지정 방법
android:layout_above: 기준 뷰의 위쪽에 배치한다.
android:layout_alignBaseline: 기준뷰와 텍스트 기준선을 정렬한다.
android:layout_alignBottom: 기준 뷰와 아랫부분을 정렬한다.
android:layout_alignEnd: 기준 뷰의 의 끝을 하위 뷰의 끝에 맞춤.
이 밖에도 많은 속성들이 있는데 아래 공식문서를 통해 한번 쭉 읽어보고 필요한 속성들을 사용해 보기 바랍니다.
https://developer.android.com/reference/android/widget/RelativeLayout.LayoutParams?hl=ko
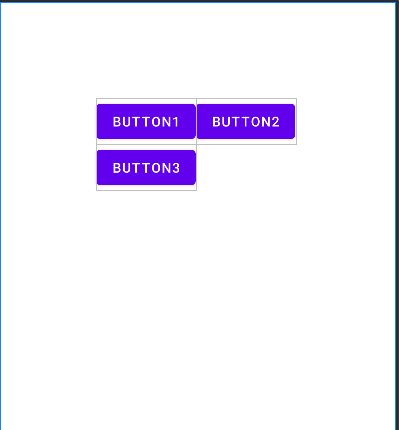
실습
먼저 버튼 3개를 만들어 button1을 기준으로 button2는 button1에 붙이고 button3은 button1 밑에 배치하겠습니다. 보기 편하도록 marginTop,marginStart를 100dp씩 줘서 여백을 주었습니다.
<?xml version="1.0" encoding="utf-8"?>
<RelativeLayout xmlns:android="http://schemas.android.com/apk/res/android"
    xmlns:app="http://schemas.android.com/apk/res-auto"
    xmlns:tools="http://schemas.android.com/tools"
    android:layout_width="match_parent"
    android:layout_height="match_parent"
    tools:context=".MainActivity">


    <Button
        android:id="@+id/button"
        android:layout_marginTop="100dp"
        android:layout_marginStart="100dp"
        android:layout_width="wrap_content"
        android:layout_height="wrap_content"
        android:text="Button1" />

    <Button
        android:id="@+id/button2"
        android:layout_width="wrap_content"
        android:layout_height="wrap_content"
        android:layout_toRightOf="@id/button"
        android:layout_alignTop="@id/button"
        android:text="Button2" />

    <Button
        android:id="@+id/button3"
        android:layout_width="wrap_content"
        android:layout_height="wrap_content"
        android:layout_alignLeft="@id/button"
        android:layout_below="@id/button"
        android:text="Button3" />
</RelativeLayout>
📌FrameLayout이란?
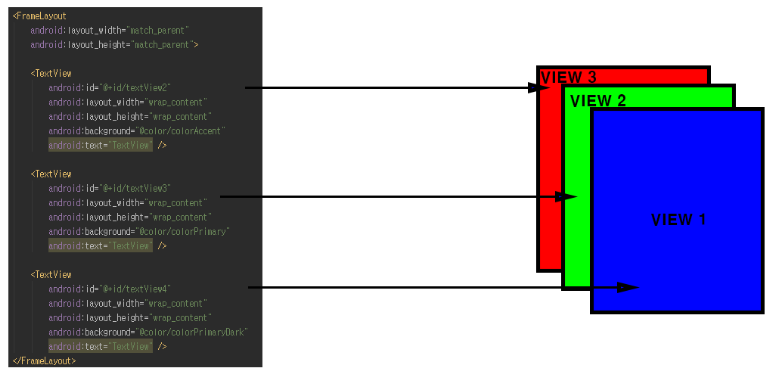
틀, 액자라는 뜻을 가진 Frame Layout은 여러 개의 뷰를 카드를 쌓듯이 중첩하여 출력하는 레이아웃이다. 앞에서 나온 LinearLayout 이나 RelativeLayout 처럼 가로세로 설정이나 상대위치를 조절하는 속성이 없으며 단순히 카드를 쌓듯이 겹쳐서 출력하는 레이아웃이다.
실습
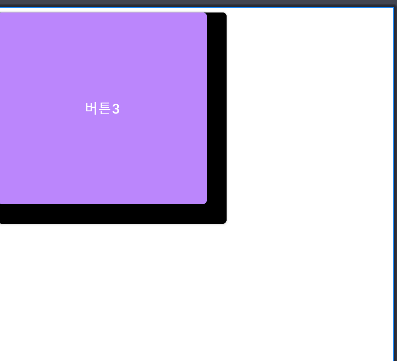
먼저 버튼 3개를 만들었습니다. 버튼 3개를 만들어 버튼 1에는 검은색을 입히고 padding값을 100dp를 주었습니다. 버튼2는 청록색을 입히고 padding값을 90dp를 주었습니다. 버튼3은 보라색을 입히고 선언을 했을 때 먼저 선언하면 앞으로 가는지 뒤로 가는지 알기 위해 버튼2와 똑같이 padding 값을 90dp를 주었습니다. 그 결과 버튼2가 먼저 선언했지만 버튼3이 앞에 배치하는 걸 확인했습니다.
<?xml version="1.0" encoding="utf-8"?>
<FrameLayout xmlns:android="http://schemas.android.com/apk/res/android"
    xmlns:app="http://schemas.android.com/apk/res-auto"
    xmlns:tools="http://schemas.android.com/tools"
    android:layout_width="match_parent"
    android:layout_height="match_parent"
    tools:context=".MainActivity">

    <Button
        android:layout_width="wrap_content"
        android:layout_height="wrap_content"
        android:padding="100dp"
        android:backgroundTint="@color/black"
        android:text="버튼1"/>

    <Button
        android:layout_width="wrap_content"
        android:layout_height="wrap_content"
        android:padding="90dp"
        android:backgroundTint="@color/teal_700"
        android:text="버튼2"/>

    <Button
        android:layout_width="wrap_content"
        android:layout_height="wrap_content"
        android:padding="90dp"
        android:backgroundTint="@color/purple_200"
        android:text="버튼3"/>


</FrameLayout>
FramLayout은 visibility 속성을 이용하면 여러 개를 겹쳐놓은 상태에서 특정한 순간이 되면 하나의 뷰만 출력되게 할 수 있다.
사용방법은 뷰에 android:visibility="invisible"를 적어주고 코틀린 파일에서 ViewBinding을 통해 android:visibility="invisible" 보이지 않는다는 속성을 android:visibility="visible" 코드를 통해 속성 값을 바꿀 수 있습니다.
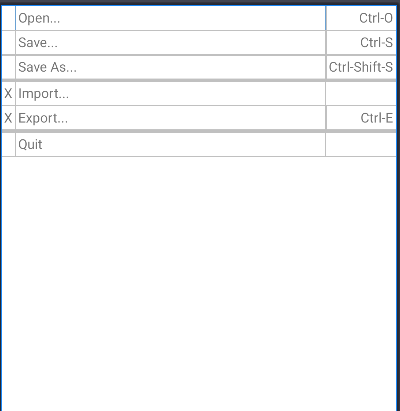
📌TableLayout이란?
여기서 Table이란 뜻은 행과 열로 구성된 표를 의미합니다. 즉, TableLayout은 행과 열으로 구성되는 테이블 형태의 화면이 보여지는 레이아웃입니다.
이미지출처:https://developer.android.com/guide/topics/ui/layout/grid?hl=ko
사용법은 다음과 같다 코드는 안드로이드 공식문서에서 가져왔습니다.
<TableLayout xmlns:android="http://schemas.android.com/apk/res/android"
    android:layout_width="match_parent"
    android:layout_height="match_parent"
    android:stretchColumns="1">

    <TableRow>
        <TextView
            android:layout_column="1"
            android:text="Open..."
            android:padding="3dip" />
        <TextView
            android:text="Ctrl-O"
            android:gravity="right"
            android:padding="3dip" />
    </TableRow>

    <TableRow>
        <TextView
            android:layout_column="1"
            android:text="Save..."
            android:padding="3dip" />
        <TextView
            android:text="Ctrl-S"
            android:gravity="right"
            android:padding="3dip" />
    </TableRow>

    <TableRow>
        <TextView
            android:layout_column="1"
            android:text="Save As..."
            android:padding="3dip" />
        <TextView
            android:text="Ctrl-Shift-S"
            android:gravity="right"
            android:padding="3dip" />
    </TableRow>

    <View
        android:layout_height="2dip"
        android:background="#FF909090" />

    <TableRow>
        <TextView
            android:text="X"
            android:padding="3dip" />
        <TextView
            android:text="Import..."
            android:padding="3dip" />
    </TableRow>

    <TableRow>
        <TextView
            android:text="X"
            android:padding="3dip" />
        <TextView
            android:text="Export..."
            android:padding="3dip" />
        <TextView
            android:text="Ctrl-E"
            android:gravity="right"
            android:padding="3dip" />
    </TableRow>

    <View
        android:layout_height="2dip"
        android:background="#FF909090" />

    <TableRow>
        <TextView
            android:layout_column="1"
            android:text="Quit"
            android:padding="3dip" />
    </TableRow>
</TableLayout>
코드를 하나씩 뜯어서 분석해 보면 먼저 stretchColumns 코드는 stretch(늘이다) + Columns(열) 이라는 단어 그래도 열의 너비를 늘려줍니다. 이 코드를 지우면 다음과 같이 달라붙게 됩니다.
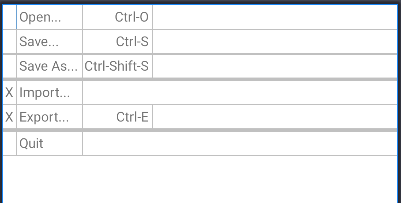
<TableRow>,</TableRow> 통해 행을 추가 할 수 있으며 이 코드에서는 총 6행 입니다. <TableRow>안으로 들어오면 <TextView>가 있으며 이건 열을 의미합니다. <TextView> 두 개가 있으므로 2열입니다. 물론 4행은 3열이고 6행은 1열입니다.
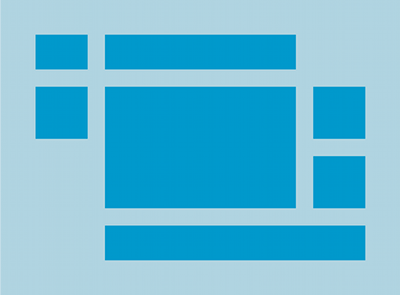
📌GridLayout이란?
그리드는 격자라는 뜻을 가지고 있어 GridLayout는 격자 레이아웃입니다. 마찬가지로 행 과 열로구성되어 화면을 만듭니다. 앞에 나온 TableLayout과 유사합니다. TableLayout과 차이점이라면 TableLayout은 행을 일일이 계싼해서 TableRow를 지정해야 하는데, GridLayout에서는 방향과 개수만 설정하면 알아서 행이 결정됩니다.
GridLayout은 LinearLayout처럼 orientation 속성으로 가로나 세로 방향을 설정할 수 있으며 다른점이라면 LinearLayout와 다르게 자동으로 줄바꿈이 이루어집니다.
사용방법은 다음과 같이 버튼 4개로 4개의 행을 만들었습니다.
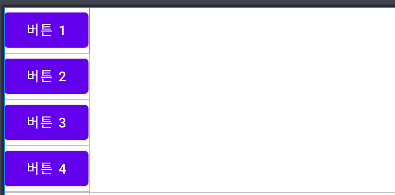
<GridLayout xmlns:android="http://schemas.android.com/apk/res/android"
    android:layout_width="match_parent"
    android:layout_height="match_parent"
    android:orientation="vertical">

    <Button android:text="버튼 1"/>
    <Button android:text="버튼 2"/>
    <Button android:text="버튼 3"/>
    <Button android:text="버튼 4"/>


</GridLayout>
여기서 버튼3을 0행 1열로 옮겨 보도록 하겠습니다.

<GridLayout xmlns:android="http://schemas.android.com/apk/res/android"
    android:layout_width="match_parent"
    android:layout_height="match_parent"
    android:orientation="vertical">

    <Button android:text="버튼 1"/>
    <Button android:text="버튼 2"/>
    <Button android:text="버튼 3"
        android:layout_row="0"
        android:layout_column="1"/>
    <Button android:text="버튼 4"/>


</GridLayout>
버튼 속성 안에서 android:layout_row, android:layout_column를 이용해 특정 뷰의 위치 조정이 가능 합니다.
이 밖에도 특정 뷰의 크기를 늘리거나 위치를 바꿀 수 있는 방버이 있습니다. 바로 android:layout_gravity을 이용하면 됩니다. 예를 들어 버튼4의 길이를 크게 하고 싶으면 android:layout_gravity="fill" 을 적어주면 되고 버튼 3의 위치를 오른쪽에 붙이고 싶으면
android:layout_gravity="end"를 적어주면 됩니다.
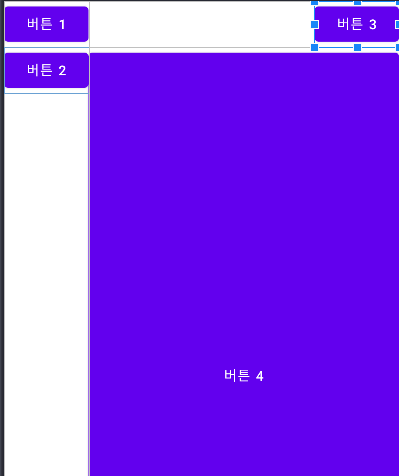
<?xml version="1.0" encoding="utf-8"?>
<GridLayout xmlns:android="http://schemas.android.com/apk/res/android"
    android:layout_width="match_parent"
    android:layout_height="match_parent"
    android:orientation="vertical">

    <Button android:text="버튼 1"/>
    <Button android:text="버튼 2"/>
    <Button
        android:text="버튼 3"
        android:layout_row="0"
        android:layout_column="1"
        android:layout_gravity="end"/>
    <Button android:text="버튼 4"
        android:layout_gravity="fill"/>


</GridLayout>
📌constraintlayout이란?
제약이란 뜻을 가진 constraintlayout은 뷰에 제약조건을 걸어 뷰의 위치를 배치할 수 있다.
먼저 위치를 지정하는 방법은
수평 축: 왼쪽, 오른쪽, 시작 및 끝 측면
세로 축: 위쪽, 아래쪽 및 텍스트 기준선
으로 잡아 제약 조건을 걸어주면 됩니다. 예를 들어 B를 A에 붙일려면 다음과 같이 제약 조건을 걸어 주면된다.

먼저 저는 버튼 1개를 만들어 부모 레이아웃 위,아래,시작,끝을 제약 조건을 걸어 중앙에 위치 하도록 하였습니다.

<androidx.constraintlayout.widget.ConstraintLayout xmlns:android="http://schemas.android.com/apk/res/android"
    android:layout_width="match_parent"
    android:layout_height="match_parent"
    xmlns:app="http://schemas.android.com/apk/res-auto"
    android:orientation="vertical">


    <Button
        android:layout_width="wrap_content"
        android:layout_height="wrap_content"
        app:layout_constraintStart_toStartOf="parent"
        app:layout_constraintEnd_toEndOf="parent"
        app:layout_constraintTop_toTopOf="parent"
        app:layout_constraintBottom_toBottomOf="parent"
        android:text="안녕하세요"/>


</androidx.constraintlayout.widget.ConstraintLayout>
여기서 버튼 1개를 추가하여 안녕하세요 버튼 오른쪽에 배치하도록 하겠습니다.
먼저 안녕하세요 버튼에 id를 부여하겠습니다. 그 후 버튼 1개를 추가해 두 번째 버튼 앞 부분을 첫 번째 버튼 뒤에 붙혔습니다. 그리고 첫번째버튼 상단과 하단에 제약 조건을 걸어 첫 번째 버튼 옆에 두번째 버튼을 붙혔습니다.
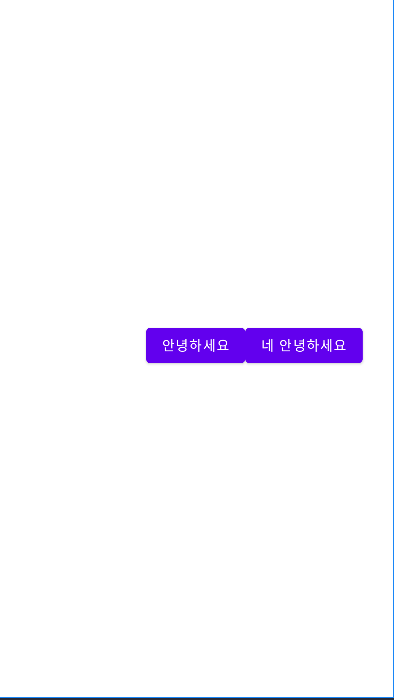
<?xml version="1.0" encoding="utf-8"?>
<androidx.constraintlayout.widget.ConstraintLayout xmlns:android="http://schemas.android.com/apk/res/android"
    android:layout_width="match_parent"
    android:layout_height="match_parent"
    xmlns:app="http://schemas.android.com/apk/res-auto"
    android:orientation="vertical">


    <Button
        android:id="@+id/hello"
        android:layout_width="wrap_content"
        android:layout_height="wrap_content"
        app:layout_constraintStart_toStartOf="parent"
        app:layout_constraintEnd_toEndOf="parent"
        app:layout_constraintTop_toTopOf="parent"
        app:layout_constraintBottom_toBottomOf="parent"
        android:text="안녕하세요"/>

    <Button
        android:id="@+id/hello2"
        android:text="네 안녕하세요"
        android:layout_width="wrap_content"
        android:layout_height="wrap_content"
        app:layout_constraintStart_toEndOf="@id/hello"
        app:layout_constraintBottom_toBottomOf="@id/hello"
        app:layout_constraintTop_toTopOf="@id/hello"/>

</androidx.constraintlayout.widget.ConstraintLayout>
만약 너무 붙어 있는게 싫다면 margin을 주어 여백을 주면 됩니다. 마찬가지로 두 번째 버튼에서 앞부분에 20dp margin을 주면 다음과 같이 여백을 줄 수 있습니다.

<?xml version="1.0" encoding="utf-8"?>
<androidx.constraintlayout.widget.ConstraintLayout xmlns:android="http://schemas.android.com/apk/res/android"
    android:layout_width="match_parent"
    android:layout_height="match_parent"
    xmlns:app="http://schemas.android.com/apk/res-auto"
    android:orientation="vertical">


    <Button
        android:id="@+id/hello"
        android:layout_width="wrap_content"
        android:layout_height="wrap_content"
        app:layout_constraintStart_toStartOf="parent"
        app:layout_constraintEnd_toEndOf="parent"
        app:layout_constraintTop_toTopOf="parent"
        app:layout_constraintBottom_toBottomOf="parent"
        android:text="안녕하세요"/>

    <Button
        android:id="@+id/hello2"
        android:text="네 안녕하세요"
        android:layout_width="wrap_content"
        android:layout_height="wrap_content"
        android:layout_marginStart="20dp"
        app:layout_constraintStart_toEndOf="@id/hello"
        app:layout_constraintBottom_toBottomOf="@id/hello"
        app:layout_constraintTop_toTopOf="@id/hello"/>

</androidx.constraintlayout.widget.ConstraintLayout>
Chain이란 속성도 있습니다. Chain은 뷰 간의 상호 참조 연결을 할 때, 뷰들을 어떤 방식으로 연결 시켜 표현 할지 결정합니다. 종류는 3가지가 있으며 CHAIN_SPREAD, CHAIN_SPREAD_INSIDE, CHAIN_PACKED가 있습니다.
app:layout_constraintHorizontal_chainStyle="spread"
app:layout_constraintHorizontal_chainStyle="spread_inside"
app:layout_constraintHorizontal_chainStyle="packed"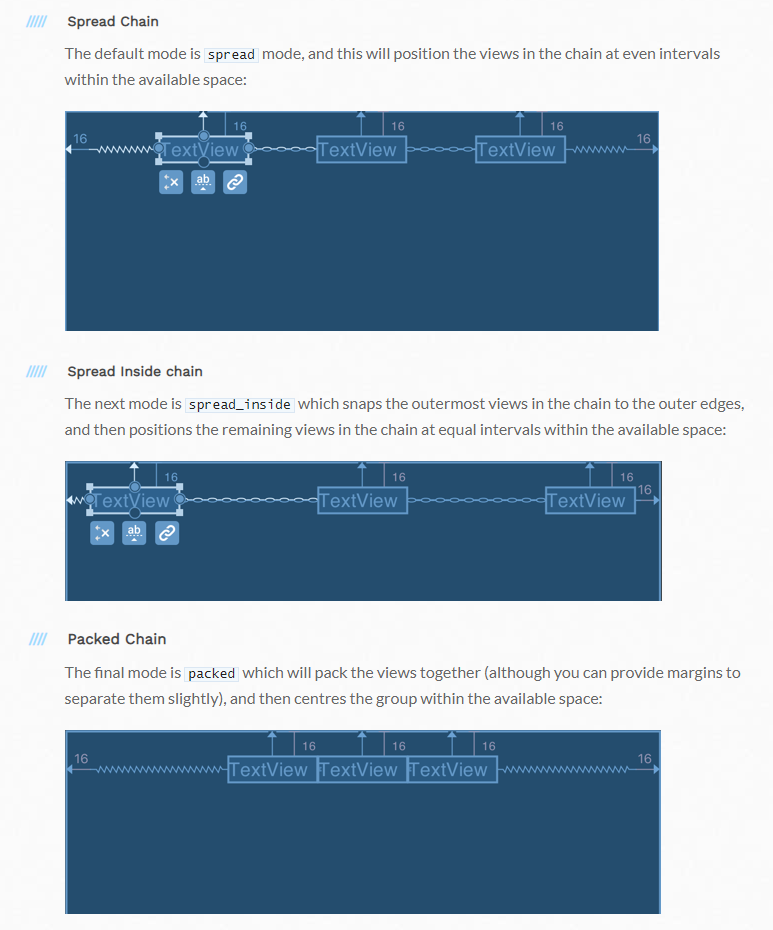
이미지출처: https://constraintlayout.com/basics/create_chains.html
ConstraintLayout 공식문서내용: https://developer.android.com/reference/android/support/constraint/ConstraintLayout
후기
레이아웃은 사용자가 App을 사용할 때 사용자에게 보여지는 부분입니다. 사용자가 사용하기 편하도록 혹은 적합하게 배치를 고려해서 좀 더 효율적으로 배치할 수 있도록 고민을 할 필요성을 느꼈습니다. 오늘은 6가지의 Layout을 공부하고 정리하였습니다. 오늘 공부하고 정리한 내용이 나중에 레이아웃을 만들때 분명히 도움이 된다고 생각합니다.
아직 부족함이 느껴지지만 토이프로젝트를 통해 이 부족함을 채워 나가도록 하겠습니다.