요구사항
- 경기 시작 30분 전부터 경기 리더 화면에서 QR 코드를 띄울 수 있다.
- 참가 인원들은 이 QR 코드를 촬영하여 출석 체크를 한다.
오픈 소스인 zxing 을 사용하였다. 코드가 간결해서 사용하기 쉬웠다!
build.gradle 파일에 의존성을 추가해준다.
	implementation group: 'com.google.zxing', name: 'javase', version: '3.5.0'
	implementation group: 'com.google.zxing', name: 'core', version: '3.5.0'
createQr(User user, Long matchId)
QR 코드를 생성하여 바이트 형식으로 반환하는 메서드
public ResponseEntity<byte[]> createQr(User user, Long matchId) throws Exception {
Match match = matchRepository.findById(matchId).get();
int width = 200;
int height = 200;
long time = differenceTime(match);
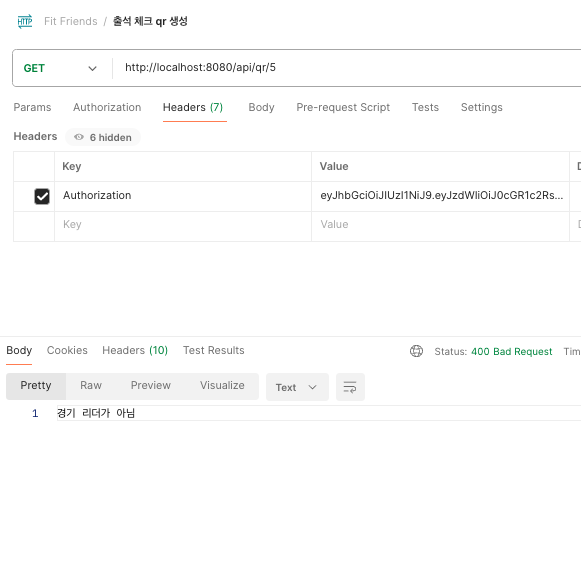
if (match.getUser().getUserId() != user.getUserId()){
return ResponseEntity.badRequest()
.body("경기 리더가 아님".getBytes(StandardCharsets.UTF_8));
}
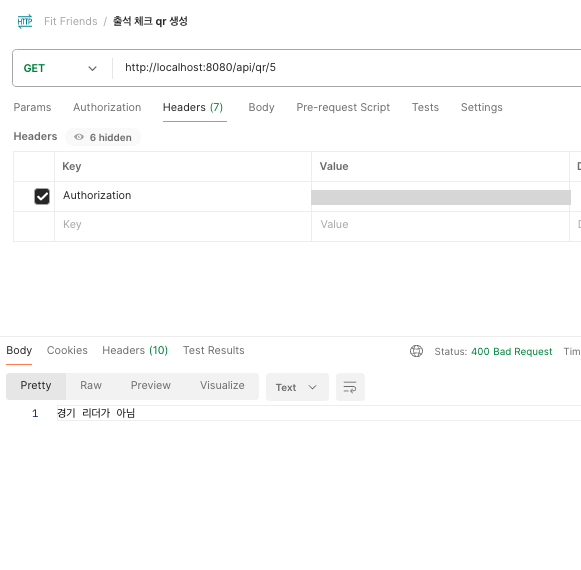
else if (time > 30 * 60000 || time < -10 * 60000) {
return ResponseEntity.badRequest().body("출석 체크 가능 시간이 아님".getBytes(StandardCharsets.UTF_8));
}
String url = "http://localhost:8080/api/attendance/"+matchId;
BitMatrix encode = new MultiFormatWriter().encode(url, BarcodeFormat.QR_CODE, width, height);
ByteArrayOutputStream out = new ByteArrayOutputStream();
MatrixToImageWriter.writeToStream(encode, "PNG", out);
return ResponseEntity.ok()
.contentType(MediaType.IMAGE_PNG)
.body(out.toByteArray());
}- if문부터 먼저 보면 match 를 등록한 유저, 즉 경기 리더인지를 먼저 확인한 후 아니면 badRequest로 처리한다.
❓ 근데 반환타입이 ResponseEntity<byte[]> 일 때 오류를 String 으로 반환하고 싶으면 어떻게 해야하려나.. 저번부터 궁금했는데 귀찮아서 나중에 찾아볼 예정 ...^^ - 다음 제약조건은 출석체크 가능 시간에 관한 것인데 if문 위에서 현재 시간과 경기 예정 시간을 비교해서 차이값을 초 단위로 반환하는
differenceTime메서드의 결과를time변수에 담아두었다. 경기 시작 시간 30분 전에서 경기 시작 후 10분 사이가 아니라면 출석체크가 불가능하므로 badRequest로 처리한다.
✅ differenceTime() 은 다음과 같다.
    private long differenceTime(Match match) throws ParseException {
        String now= LocalDateTime.now().format(DateTimeFormatter.ofPattern("yyyy-MM-dd HH:mm:ss")).toString();
        String matchTime= match.getStartTime().toString();

        DateFormat format = new SimpleDateFormat("yyyy-MM-dd HH:mm:ss");

        Date d1 = format.parse(now);
        Date d2 = format.parse(matchTime);
        long sec = (d2.getTime() - d1.getTime()) / 1000;
        long min = (d2.getTime() - d1.getTime()) / 60000;
        long hour = (d2.getTime() - d1.getTime()) / 3600000;
        long days = sec / (24*60*60);

        return sec + min + hour + days;
    }
이제 모두 조건을 만족하면 qr코드를 생성한다!
- String
url에는 QR코드 스캔을 통해 이동할 url을 담아준다.
- 사실 내가 원했던 이상적인 방법은 QR코드를 스캔해서 이동하게될 url이 바로 출석 체크 api로 연결되어서 출석 체크가 완료되는 것인데BitMatrix객체에서 구현할 수는 있는건지 감이 도통 안와서.. 일단 프론트쪽에서 다시 POST로 요청을 줄 url을 전달하는 방식으로 했고 프론트에선 response로 받은걸 다시 api 요청을 해주면 된다. 조금.. 번거로운 것 같다 BitMatrix객체는width,height, 바코드 포맷 중QR_CODE, 그리고 위에서 지정한url을 담아 생성한다.
qrToAttendance()
경기 참가 인원이 생성된 qr 코드를 스캔한 후에 출석체크를 처리가 되는 메서드
    public ResponseEntity<String> qrToAttendance(Long matchId, String userEmail) throws Exception {
        Match match = matchRepository.findById(matchId).get();
        Optional<Participation> participation = participationService.findByMatchAndUser(matchId, userEmail);

        long time = differenceTime(match);


        if (time > 30 * 40 || time < -10 * 40) {
            return ResponseEntity.badRequest().body("출석 체크 가능 시간이 아님");

        }
         else if (participation.get().isAttendance()) {
            return ResponseEntity.badRequest().body("이미 출석 체크 완료");
        } else {
            return participationService.checkAttendance(matchId, userEmail);
        }
}- 여기서도 qr생성 메서드와 같이 시간 제약 조건에 따라 처리한다.
- 어차피 qr코드 생성 자체가 안되면 출석 체크 시도도 할 수 없지만?.. 시간 내에 생성한 qr코드를 캡처한 후에 나중에 스캔하는 경우도 있을 수 있기 때문에 여기서도 시간 제약 조건을 추가해줘야 하긴하다. - 또한 이미 출석 체크가 완료된 경우에도 badRequest 로 처리한다.
- 모든 조건을 만족하면 participationService의
checkAttendance메서드를 통해 출석체크를 해준다.
checkAttendance()
    @Transactional
    public ResponseEntity<String> checkAttendance(Long matchId, String userEmail) {
        try {
            Match match = matchRepository.findById(matchId).get();
            User user = userRepository.findByEmail(userEmail).get();
            Participation participation = participationRespository.findByMatchAndUser(match, user).get();
            participation.setAttendance(true);
            int attendanceCount = match.getAttendanceCnt();
            match.setAttendanceCnt(attendanceCount + 1);
            return ResponseEntity.ok().body("출석 체크 완료");
        }catch (Exception e){
            return ResponseEntity.badRequest().body("출석 체크 실패");
        }
}participation.setAttendance(true);➡️ 유저의 participation (개인 경기 참가 정보)
의 출석 여부를 true 로 세팅해주고
 int attendanceCount = match.getAttendanceCnt();
 match.setAttendanceCnt(attendanceCount + 1);
➡️ match (경기 참가 공통 정보)
의 출석인원 수를 1 증가시켜준다.
걱정했던 기능이었는데 생각해보다 순탄하게 잘 끝냈다! 👍
실행결과
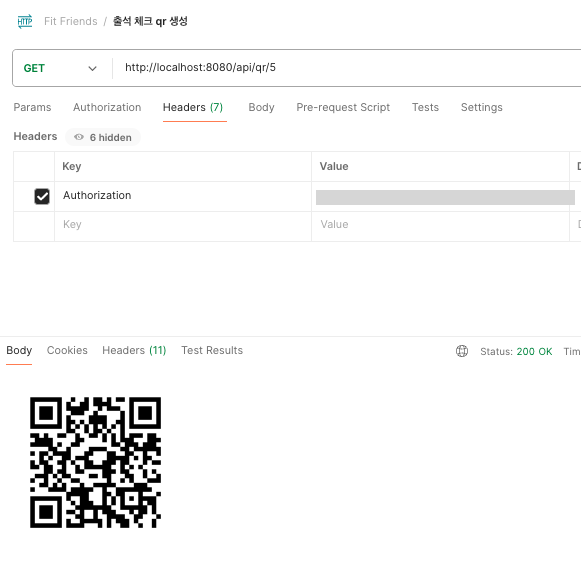
- 성공!
- 경기리더가 아닐 경우

- 출석 가능 시간이 아닐 경우
다음 할 일
- 출석률, 승률 등을 기반으로 회원 페이지에서 사용할 api를 구현

👩🏻💻