YOLO v8 Onnx --> 추론
이전 글에서 yolov8n.pt 파일을 yolov8n.onnx로 변환했다. 이제 해당 파일을 안드로이드에 넣고, 실시간으로 추론하는 코드를 작성하면 된다.
✔ 1. onnx파일과 라벨링된 txt파일을 안드로이드 폴더에 추가한다.
-
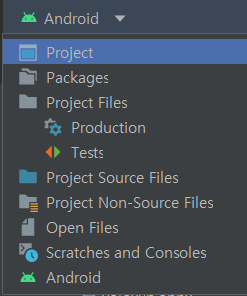
안드로이드 프로젝트에서 우측 상단의 안드로이드 버튼을 눌러 Project로 변경한다.
-
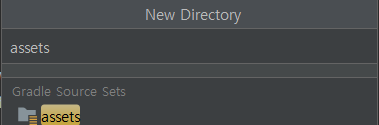
.app -> src -> main 폴더 우클릭 후 assets 파일을 생성한다.
-
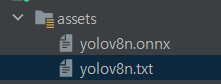
assets 폴더에 다운받은 yolov8n.onnx 파일과 라벨링 txt 파일을 추가한다.
txt 파일은 처음 보았을 수도 있지만 그냥 아래와 같이 coco dataset을 한줄로 적은 파일이다.
person
bicycle
car
motorcycle
airplane
bus
train
truck
boat
traffic light
fire hydrant
stop sign
parking meter
bench
bird
cat
dog
horse
sheep
cow
elephant
bear
zebra
giraffe
backpack
umbrella
handbag
tie
suitcase
frisbee
skis
snowboard
sports ball
kite
baseball bat
baseball glove
skateboard
surfboard
tennis racket
bottle
wine glass
cup
fork
knife
spoon
bowl
banana
apple
sandwich
orange
broccoli
carrot
hot dog
pizza
donut
cake
chair
couch
potted plant
bed
dining table
toilet
tv
laptop
mouse
remote
keyboard
cell phone
microwave
oven
toaster
sink
refrigerator
book
clock
vase
scissors
teddy bear
hair drier
toothbrush- 다시 우측상단의 Project를 Android로 변환시키면 된다.
✔ 2. onnx 파일 추론을 도울 라이브러리를 추가한다.
app 수준의 gradle에 dependencies에 아래 코드를 추가한다.
    // https://mvnrepository.com/artifact/com.microsoft.onnxruntime/onnxruntime-android
    implementation 'com.microsoft.onnxruntime:onnxruntime-android:1.12.1'
주석처리된 주소가 onnxruntime 라이브러리가 있는 주소이다. 저기에 들어가서 현재 최신버전의 라이브러리를 추가하면 된다.
✔ 3. DataProcess 클래스 메서드에서 asset 파일을 불러오는 코드를 추가한다.
fun loadModel() {
        // onnx 파일 불러오기
        val assetManager = context.assets
        val outputFile = File(context.filesDir.toString() + "/" + FILE_NAME)

        assetManager.open(FILE_NAME).use { inputStream ->
            FileOutputStream(outputFile).use { outputStream ->
                val buffer = ByteArray(4 * 1024)
                var read: Int
                while (inputStream.read(buffer).also { read = it } != -1) {
                    outputStream.write(buffer, 0, read)
                }
            }
        }
}

fun loadLabel() {
        // txt 파일 불러오기
        BufferedReader(InputStreamReader(context.assets.open(LABEL_NAME))).use { reader ->
            var line: String?
            val classList = ArrayList<String>()
            while (reader.readLine().also { line = it } != null) {
                classList.add(line!!)
            }
            classes = classList.toTypedArray()
        }
}
assets 안에 있는 파일은 바로 쓸 수 없다. 이렇게 각자 onnx 파일과 txt 파일을 불러와서 사용하면 된다. 이전 글에서 부터 보면 알겠지만 DataProcess라는 클래스에는 context가 없다. 따라서 입력 변수로 context를 추가해주고, 메인 액티비티에서 생성할 때, context를 입력변수에 추가해주면 된다.
class DataProcess(val context: Context) {
}

class MainActivity : AppCompatActivity() {
    private val dataProcess = DataProcess(context = this)
}
위와 같이 수정해주면 된다.
이후 메인 액티비티에서 loadModel 메서드와 loadLabel 메서드를 실행하면 된다.
private fun load(){
        dataProcess.loadModel() // onnx 모델 불러오기
        dataProcess.loadLabel() // coco txt 파일 불러오기
    }
✔ 4. OrtSession 객체 생성
private lateinit var ortEnvironment: OrtEnvironment
private lateinit var session: OrtSession

private fun load() {
        dataProcess.loadModel() // onnx 모델 불러오기
        dataProcess.loadLabel() // coco txt 파일 불러오기

        ortEnvironment = OrtEnvironment.getEnvironment()
        session = ortEnvironment.createSession(
            this.filesDir.absolutePath.toString() + "/" + DataProcess.FILE_NAME,
            OrtSession.SessionOptions()
        )

    }
메인 액티비티에서 만든 load 메서드에 아래 session 객체를 얻는 코드를 추가한다. SessionOptions은 기본 옵션을 추가한 것이다.
✔ 5. 추론
이전 글에서 사용했던 imageProcess 메서드에 추론하는 코드를 추가 작성하면 된다.
private fun imageProcess(imageProxy: ImageProxy) {
        val bitmap = dataProcess.imageToBitmap(imageProxy)
        val floatBuffer = dataProcess.bitmapToFloatBuffer(bitmap)
        val inputName = session.inputNames.iterator().next() // session 이름
        //모델의 요구 입력값 [1 3 640 640] [배치 사이즈, 픽셀(RGB), 너비, 높이], 모델마다 크기는 다를 수 있음.
        val shape = longArrayOf(
            DataProcess.BATCH_SIZE.toLong(),
            DataProcess.PIXEL_SIZE.toLong(),
            DataProcess.INPUT_SIZE.toLong(),
            DataProcess.INPUT_SIZE.toLong()
        )
        val inputTensor = OnnxTensor.createTensor(ortEnvironment, floatBuffer, shape)
        val resultTensor = session.run(Collections.singletonMap(inputName, inputTensor))
        val outputs = resultTensor.get(0).value as Array<*> // [1 84 8400]
        val results = dataProcess.outputsToNPMSPredictions(outputs)
}
이전 글부터 봐왔다면 알겠지만, cameraX 라이브러리를 통해 카메라에서 이미지를 받아오고 비트맵으로 변환하고 640x640의 비트맵으로 변환한다.
이후 buffer에 비트맵의 RGB값을 담은 후 추론하면 결과가 나온게 된다.
사전 훈련된 모델이 아닌 사설 모델을 사용하고 싶다면 https://netron.app/ 사이트에서 모델의 입출력 배열을 확인하면 된다.
우리 모델의 앞부분은 [1 3 640 640] 형태인걸 확인할 수 있다.
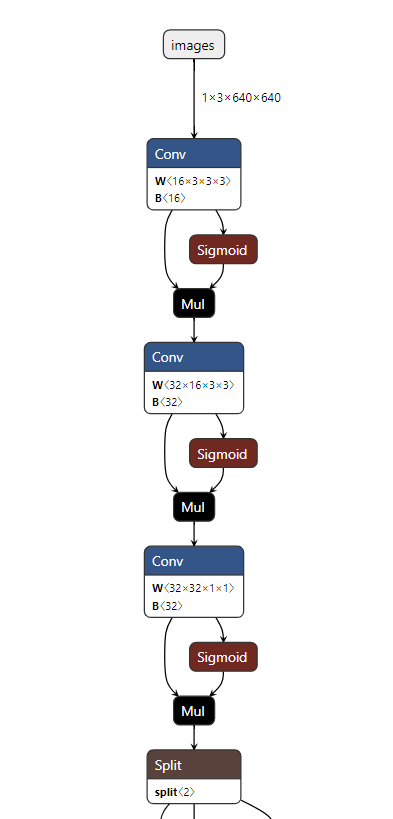
아래 부분은 [1 84 8400] 형태인 것을 확인할 수 있다.
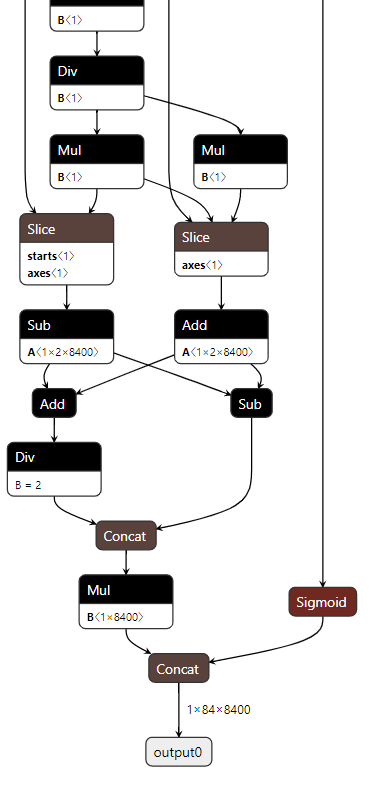
yolov8은 v5와 비교해서 출력 배열이 변했다.
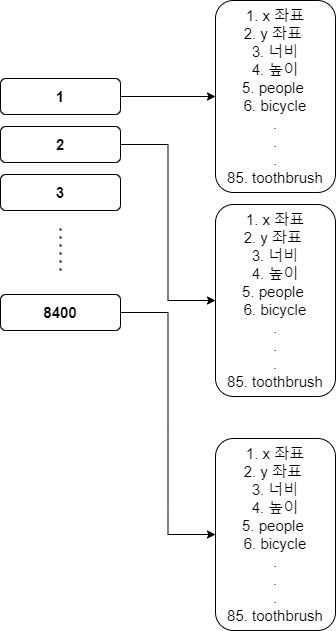
간단히 설명하자면 [1 84 8400] 에서 1 = 배치 사이즈, 84는 라벨링 개수와 좌표값이다. 84 => 0 1 2 3 == x y w h , 4 ~ 84는 coco data의 클래스에 대한 확률 값이다. 마지막 8400은 8400개의 후보군이다. 우리는 8400개의 후보군에 대해서 각 84개의 데이터에서 가장 높은 클래스를 가진 값의 xywh를 구하고, NMS 처리를 통해서 비슷한 사각형을 제거할 예정이다.
✔ 6. NMS
위의 코드까지 했다면 추론의 결과값이 [1 84 8400]의 형태인 것을 알게된다. 우리는 8400개의 후보군에 대해 각 최대 확률값을 가진 클래스를 전부 사진에 그리면 한 개의 사진에 대해 8400개의 사각형을 그린 그림이 완성되게 된다.
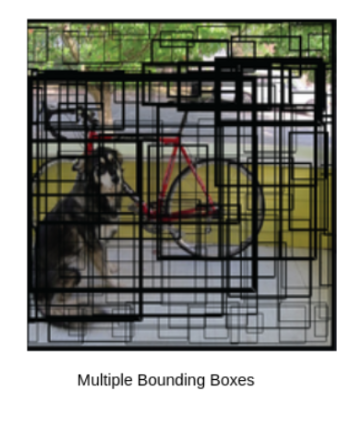
위의 사진이 그 예시이다.
따라서 우린 8400개의 후보군에서 각각 최대 확률을 가진 클래스를 구하고 해당 클래스가 가진 사각형을 겹치는 부분을 제거하는 코드를 추가할 것이다. (비 최대 억제 NMS)
우선 data들을 모아 놓을 데이터 클래스를 선언한다.

1. 검출된 객체의 클래스 인덱스 값 (ex 0 = people)
2. 객체의 확률값 (confidence)
3. 객체의 좌표값 (xyxy) 순서이다.
dataProcess 클래스의 내부에 작성한 메서드이다.
nms 처리를 하는 메소드이다.
아래 사진을 보고 이해하면 쉬울듯 하다.
fun outputsToNPMSPredictions(outputs: Array<*>): ArrayList<Result> {
        val confidenceThreshold = 0.45f
        val results = ArrayList<Result>()
        val rows: Int
        val cols: Int

        (outputs[0] as Array<*>).also {
            rows = it.size
            cols = (it[0] as FloatArray).size
        }

        //배열의 형태를 [84 8400] -> [8400 84] 로 변환
        val output = Array(cols) { FloatArray(rows) }
        for (i in 0 until rows) {
            for (j in 0 until cols) {
                output[j][i] = ((((outputs[0]) as Array<*>)[i]) as FloatArray)[j]
            }
        }

        for (i in 0 until cols) {
            var detectionClass: Int = -1
            var maxScore = 0f
            val classArray = FloatArray(classes.size)
            // label 만 따로 빼서 1차원 배열을 만든다.(0~3은 좌표값임)
            System.arraycopy(output[i], 4, classArray, 0, classes.size)
            // label 중에서 가장 큰 값을 선정한다.
            for (j in classes.indices) {
                if (classArray[j] > maxScore) {
                    detectionClass = j
                    maxScore = classArray[j]
                }
            }

            //만약 80개의 coco dataset 중 가장 큰 확률값이 특정값을 (현재는 45% 확률) 넘어서면 해당 값을 저장한다.
            if (maxScore > confidenceThreshold) {
                val xPos = output[i][0]
                val yPos = output[i][1]
                val width = output[i][2]
                val height = output[i][3]
                //사각형은 화면 밖으로 나갈 수 없으니 화면을 넘기면 최대 화면 값을 가지게 한다.
                val rectF = RectF(
                    max(0f, xPos - width / 2f),
                    max(0f, yPos - height / 2f),
                    min(INPUT_SIZE - 1f, xPos + width / 2f),
                    min(INPUT_SIZE - 1f, yPos + height / 2f)
                )
                val result = Result(detectionClass, maxScore, rectF)
                results.add(result)
            }
        }
        return nms(results)
    }


private fun nms(results: ArrayList<Result>): ArrayList<Result> {
        val list = ArrayList<Result>()

        for (i in classes.indices) {
            //1.클래스 (라벨들) 중에서 가장 높은 확률값을 가졌던 클래스 찾기
            val pq = PriorityQueue<Result>(50) { o1, o2 ->
                o1.score.compareTo(o2.score)
            }
            val classResults = results.filter { it.classIndex == i }
            pq.addAll(classResults)

            //NMS 처리
            while (pq.isNotEmpty()) {
                // 큐 안에 속한 최대 확률값을 가진 class 저장
                val detections = pq.toTypedArray()
                val max = detections[0]
                list.add(max)
                pq.clear()

                // 교집합 비율 확인하고 50%넘기면 제거
                for (k in 1 until detections.size) {
                    val detection = detections[k]
                    val rectF = detection.rectF
                    val iouThresh = 0.5f
                    if (boxIOU(max.rectF, rectF) < iouThresh) {
                        pq.add(detection)
                    }
                }
            }
        }
    return list
}

// 겹치는 비율 (교집합/합집합)
private fun boxIOU(a: RectF, b: RectF): Float {
        return boxIntersection(a, b) / boxUnion(a, b)
}

//교집합
private fun boxIntersection(a: RectF, b: RectF): Float {
        // x1, x2 == 각 rect 객체의 중심 x or y값, w1, w2 == 각 rect 객체의 넓이 or 높이
        val w = overlap(
            (a.left + a.right) / 2f, a.right - a.left,
            (b.left + b.right) / 2f, b.right - b.left
        )
        val h = overlap(
            (a.top + a.bottom) / 2f, a.bottom - a.top,
            (b.top + b.bottom) / 2f, b.bottom - b.top
        )

        return if (w < 0 || h < 0) 0f else w * h
}

//합집합
private fun boxUnion(a: RectF, b: RectF): Float {
        val i: Float = boxIntersection(a, b)
        return (a.right - a.left) * (a.bottom - a.top) + (b.right - b.left) * (b.bottom - b.top) - i
}

//서로 겹치는 부분의 길이
private fun overlap(x1: Float, w1: Float, x2: Float, w2: Float): Float {
        val l1 = x1 - w1 / 2
        val l2 = x2 - w2 / 2
        val left = max(l1, l2)
        val r1 = x1 + w1 / 2
        val r2 = x2 + w2 / 2
        val right = min(r1, r2)
        return right - left
}
위의 메서드는 아래의 내용에 맞게 작성하였다.
-
8400개의 후보군에서 각 후보군의 가장 높은 확률을 가진 클래스를 가져온다.
-
만약 해당 클래스의 확률 값이 특정 값 (confidenceThreshold) 을 넘긴다면, 그 클래스의 인덱스값, 확률값, 그리고 xyxy 좌표값을 저장한다. (result 클래스)
-
이렇게 생성된 최대 8400개의 result 객체에 대해 좌표값을 비교해서 특정 값 (IoU threshold) 을 넘기면 겹치는 객체라 판단하여 겹치는 부분만 있는 클래스로 변경한다. (여러개의 result 객체를 하나로 합침. 기준이 되는 객체는 confidence(확률 값)이 제일 큰 result 객체를 저장)
전체 코드는 아래와 같다.
//메인 액티비티
import ai.onnxruntime.OnnxTensor
import ai.onnxruntime.OrtEnvironment
import ai.onnxruntime.OrtSession
import android.content.pm.PackageManager
import android.os.Bundle
import android.view.WindowManager
import android.widget.Toast
import androidx.appcompat.app.AppCompatActivity
import androidx.camera.core.*
import androidx.camera.lifecycle.ProcessCameraProvider
import androidx.camera.view.PreviewView
import androidx.core.app.ActivityCompat
import java.util.*
import java.util.concurrent.Executors

class MainActivity : AppCompatActivity() {
    private lateinit var previewView: PreviewView
    private lateinit var ortEnvironment: OrtEnvironment
    private lateinit var session: OrtSession

    private val dataProcess = DataProcess(context = this)

    companion object {
        const val PERMISSION = 1
    }

    override fun onCreate(savedInstanceState: Bundle?) {
        super.onCreate(savedInstanceState)
        setContentView(R.layout.activity_main)
        previewView = findViewById(R.id.previewView)

        // 자동 꺼짐 해제
        window.addFlags(WindowManager.LayoutParams.FLAG_KEEP_SCREEN_ON)

        // 권한 허용
        setPermissions()

        // onnx 파일 && txt 파일 불러오기
        load()

        // 카메라 켜기
        setCamera()

    }

    private fun setCamera() {
        //카메라 제공 객체
        val processCameraProvider = ProcessCameraProvider.getInstance(this).get()

        //전체 화면
        previewView.scaleType = PreviewView.ScaleType.FILL_CENTER

        // 전면 카메라
        val cameraSelector =
            CameraSelector.Builder().requireLensFacing(CameraSelector.LENS_FACING_BACK).build()

        // 16:9 화면으로 받아옴
        val preview = Preview.Builder().setTargetAspectRatio(AspectRatio.RATIO_16_9).build()

        // preview 에서 받아와서 previewView 에 보여준다.
        preview.setSurfaceProvider(previewView.surfaceProvider)

        //분석 중이면 그 다음 화면이 대기중인 것이 아니라 계속 받아오는 화면으로 새로고침 함. 분석이 끝나면 그 최신 사진을 다시 분석
        val analysis = ImageAnalysis.Builder().setTargetAspectRatio(AspectRatio.RATIO_16_9)
            .setBackpressureStrategy(ImageAnalysis.STRATEGY_KEEP_ONLY_LATEST).build()

        analysis.setAnalyzer(Executors.newSingleThreadExecutor()) {
            imageProcess(it)
            it.close()
        }

        // 카메라의 수명 주기를 메인 액티비티에 귀속
        processCameraProvider.bindToLifecycle(this, cameraSelector, preview, analysis)
    }

    private fun imageProcess(imageProxy: ImageProxy) {
        val bitmap = dataProcess.imageToBitmap(imageProxy)
        val floatBuilder = dataProcess.bitmapToFloatBuffer(bitmap)
        val inputName = session.inputNames.iterator().next() // session 이름
        //모델의 요구 입력값 [1 3 640 640] [배치 사이즈, 픽셀(RGB), 너비, 높이], 모델마다 크기는 다를 수 있음.
        val shape = longArrayOf(
            DataProcess.BATCH_SIZE.toLong(),
            DataProcess.PIXEL_SIZE.toLong(),
            DataProcess.INPUT_SIZE.toLong(),
            DataProcess.INPUT_SIZE.toLong()
        )
        val inputTensor = OnnxTensor.createTensor(ortEnvironment, floatBuilder, shape)
        val resultTensor = session.run(Collections.singletonMap(inputName, inputTensor))
        val outputs = resultTensor.get(0).value as Array<*> // [1 84 8400]
        val results = dataProcess.outputsToNPMSPredictions(outputs)

    }

    private fun load() {
        dataProcess.loadModel() // onnx 모델 불러오기
        dataProcess.loadLabel() // coco txt 파일 불러오기

        ortEnvironment = OrtEnvironment.getEnvironment()
        session = ortEnvironment.createSession(
            this.filesDir.absolutePath.toString() + "/" + DataProcess.FILE_NAME,
            OrtSession.SessionOptions()
        )
    }

    override fun onRequestPermissionsResult(
        requestCode: Int,
        permissions: Array<out String>,
        grantResults: IntArray
    ) {
        if (requestCode == PERMISSION) {
            grantResults.forEach {
                if (it != PackageManager.PERMISSION_GRANTED) {
                    Toast.makeText(this, "권한을 허용하지 않으면 사용할 수 없습니다", Toast.LENGTH_SHORT).show()
                    finish()
                }
            }
        }
        super.onRequestPermissionsResult(requestCode, permissions, grantResults)
    }

    private fun setPermissions() {
        val permissions = ArrayList<String>()
        permissions.add(android.Manifest.permission.CAMERA)

        permissions.forEach {
            if (ActivityCompat.checkSelfPermission(this, it) != PackageManager.PERMISSION_GRANTED) {
                ActivityCompat.requestPermissions(this, permissions.toTypedArray(), PERMISSION)
            }
        }
    }
}
// DataProcess 클래스
import android.content.Context
import android.graphics.Bitmap
import android.graphics.RectF
import androidx.camera.core.ImageProxy
import java.io.BufferedReader
import java.io.File
import java.io.FileOutputStream
import java.io.InputStreamReader
import java.nio.FloatBuffer
import java.util.*
import kotlin.math.max
import kotlin.math.min
class DataProcess(val context: Context) {
lateinit var classes: Array<String>
companion object {
const val BATCH_SIZE = 1
const val INPUT_SIZE = 640
const val PIXEL_SIZE = 3
const val FILE_NAME = "yolov8n.onnx"
const val LABEL_NAME = "yolov8n.txt"
}
fun imageToBitmap(imageProxy: ImageProxy): Bitmap {
val bitmap = imageProxy.toBitmap()
return Bitmap.createScaledBitmap(bitmap, INPUT_SIZE, INPUT_SIZE, true)
}
fun bitmapToFloatBuffer(bitmap: Bitmap): FloatBuffer {
val imageSTD = 255.0f
val buffer = FloatBuffer.allocate(BATCH_SIZE * PIXEL_SIZE * INPUT_SIZE * INPUT_SIZE)
buffer.rewind()
val area = INPUT_SIZE * INPUT_SIZE
val bitmapData = IntArray(area) //한 사진에서 대한 정보, 640x640 사이즈
bitmap.getPixels(
bitmapData,
0,
bitmap.width,
0,
0,
bitmap.width,
bitmap.height
) // 배열에 정보 담기
//배열에서 하나씩 가져와서 buffer 에 담기
for (i in 0 until INPUT_SIZE - 1) {
for (j in 0 until INPUT_SIZE - 1) {
val idx = INPUT_SIZE * i + j
val pixelValue = bitmapData[idx]
// 위에서 부터 차례대로 R 값 추출, G 값 추출, B값 추출 -> 255로 나누어서 0~1 사이로 정규화
buffer.put(idx, ((pixelValue shr 16 and 0xff) / imageSTD))
buffer.put(idx + area, ((pixelValue shr 8 and 0xff) / imageSTD))
buffer.put(idx + area * 2, ((pixelValue and 0xff) / imageSTD))
//원리 bitmap == ARGB 형태의 32bit, R값의 시작은 16bit (16 ~ 23bit 가 R영역), 따라서 16bit 를 쉬프트
//그럼 A값이 사라진 RGB 값인 24bit 가 남는다. 이후 255와 AND 연산을 통해 맨 뒤 8bit 인 R값만 가져오고, 255로 나누어 정규화를 한다.
//다시 8bit 를 쉬프트 하여 R값을 제거한 G,B 값만 남은 곳에 다시 AND 연산, 255 정규화, 다시 반복해서 RGB 값을 buffer 에 담는다.
}
}
buffer.rewind() // position 0
return buffer
}
fun loadModel() {
// onnx 파일 불러오기
val assetManager = context.assets
val outputFile = File(context.filesDir.toString() + "/" + FILE_NAME)
assetManager.open(FILE_NAME).use { inputStream ->
FileOutputStream(outputFile).use { outputStream ->
val buffer = ByteArray(4 * 1024)
var read: Int
while (inputStream.read(buffer).also { read = it } != -1) {
outputStream.write(buffer, 0, read)
}
}
}
}
fun loadLabel() {
// txt 파일 불러오기
BufferedReader(InputStreamReader(context.assets.open(LABEL_NAME))).use { reader ->
var line: String?
val classList = ArrayList<String>()
while (reader.readLine().also { line = it } != null) {
classList.add(line!!)
}
classes = classList.toTypedArray()
}
}
fun outputsToNPMSPredictions(outputs: Array<*>): ArrayList<Result> {
val confidenceThreshold = 0.45f
val results = ArrayList<Result>()
val rows: Int
val cols: Int
(outputs[0] as Array<*>).also {
rows = it.size
cols = (it[0] as FloatArray).size
}
//배열의 형태를 [84 8400] -> [8400 84] 로 변환
val output = Array(cols) { FloatArray(rows) }
for (i in 0 until rows) {
for (j in 0 until cols) {
output[j][i] = ((((outputs[0]) as Array<*>)[i]) as FloatArray)[j]
}
}
for (i in 0 until cols) {
var detectionClass: Int = -1
var maxScore = 0f
val classArray = FloatArray(classes.size)
// label 만 따로 빼서 1차원 배열을 만든다.(0~3은 좌표값임)
System.arraycopy(output[i], 4, classArray, 0, classes.size)
// label 중에서 가장 큰 값을 선정한다.
for (j in classes.indices) {
if (classArray[j] > maxScore) {
detectionClass = j
maxScore = classArray[j]
}
}
//만약 80개의 coco dataset 중 가장 큰 확률값이 특정값을 (현재는 45% 확률) 넘어서면 해당 값을 저장한다.
if (maxScore > confidenceThreshold) {
val xPos = output[i][0]
val yPos = output[i][1]
val width = output[i][2]
val height = output[i][3]
//사각형은 화면 밖으로 나갈 수 없으니 화면을 넘기면 최대 화면 값을 가지게 한다.
val rectF = RectF(
max(0f, xPos - width / 2f),
max(0f, yPos - height / 2f),
min(INPUT_SIZE - 1f, xPos + width / 2f),
min(INPUT_SIZE - 1f, yPos + height / 2f)
)
val result = Result(detectionClass, maxScore, rectF)
results.add(result)
}
}
return nms(results)
}
private fun nms(results: ArrayList<Result>): ArrayList<Result> {
val list = ArrayList<Result>()
for (i in classes.indices) {
//1.클래스 (라벨들) 중에서 가장 높은 확률값을 가졌던 클래스 찾기
val pq = PriorityQueue<Result>(50) { o1, o2 ->
o1.score.compareTo(o2.score)
}
val classResults = results.filter { it.classIndex == i }
pq.addAll(classResults)
//NMS 처리
while (pq.isNotEmpty()) {
// 큐 안에 속한 최대 확률값을 가진 class 저장
val detections = pq.toTypedArray()
val max = detections[0]
list.add(max)
pq.clear()
// 교집합 비율 확인하고 50%넘기면 제거
for (k in 1 until detections.size) {
val detection = detections[k]
val rectF = detection.rectF
val iouThresh = 0.5f
if (boxIOU(max.rectF, rectF) < iouThresh) {
pq.add(detection)
}
}
}
}
return list
}
// 겹치는 비율 (교집합/합집합)
private fun boxIOU(a: RectF, b: RectF): Float {
return boxIntersection(a, b) / boxUnion(a, b)
}
//교집합
private fun boxIntersection(a: RectF, b: RectF): Float {
// x1, x2 == 각 rect 객체의 중심 x or y값, w1, w2 == 각 rect 객체의 넓이 or 높이
val w = overlap(
(a.left + a.right) / 2f, a.right - a.left,
(b.left + b.right) / 2f, b.right - b.left
)
val h = overlap(
(a.top + a.bottom) / 2f, a.bottom - a.top,
(b.top + b.bottom) / 2f, b.bottom - b.top
)
return if (w < 0 || h < 0) 0f else w * h
}
//합집합
private fun boxUnion(a: RectF, b: RectF): Float {
val i: Float = boxIntersection(a, b)
return (a.right - a.left) * (a.bottom - a.top) + (b.right - b.left) * (b.bottom - b.top) - i
}
//서로 겹치는 부분의 길이
private fun overlap(x1: Float, w1: Float, x2: Float, w2: Float): Float {
val l1 = x1 - w1 / 2
val l2 = x2 - w2 / 2
val left = max(l1, l2)
val r1 = x1 + w1 / 2
val r2 = x2 + w2 / 2
val right = min(r1, r2)
return right - left
}
}//Result 클래스
import android.graphics.RectF
data class Result(val classIndex: Int, val score: Float, val rectF: RectF)
다음 글은 마지막 글로 추론된 결과값을 가지고 화면에 띄우는 코드를 작성하면 된다.
