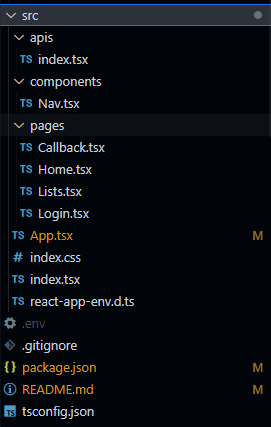
클라이언트 기본 구조
- 구글 로그인 되면
Lists페이지로 넘어감
가장 간단하게 이것만 먼저 테스트 해봅니다
TypeScript create-react-app 생성
yarn create react-app client --template typescriptyarn create 로 client 폴더에 react-app을 생성합니다
  "dependencies": {
    "@types/node": "^16.7.13",
    "@types/react": "^17.0.20",
    "@types/react-dom": "^17.0.9",
    "@types/styled-components": "^5.1.22",
    "axios": "^0.26.0",
    "qs": "^6.10.3",
    "react": "^17.0.2",
    "react-dom": "^17.0.2",
    "react-router-dom": "^6.2.1",
    "react-scripts": "5.0.0",
    "styled-components": "^5.3.3",
    "typescript": "^4.4.2"
  },
  "scripts": {
    "start": "react-scripts start",
    "build": "react-scripts build"
  },
package.json 내용입니다
패키지를 설치하고 실행 스크립트를 정리했습니다
{
  "compilerOptions": {
    "target": "es5",
    "lib": [
      "dom",
      "dom.iterable",
      "esnext"
    ],
    "allowJs": true,
    "skipLibCheck": true,
    "esModuleInterop": true,
    "allowSyntheticDefaultImports": true,
    "strict": true,
    "forceConsistentCasingInFileNames": true,
    "noFallthroughCasesInSwitch": true,
    "module": "esnext",
    "moduleResolution": "node",
    "resolveJsonModule": true,
    "isolatedModules": true,
    "noEmit": true,
    "jsx": "react-jsx"
  },
  "include": [
    "src"
  ]
}tsconfig.json은 위와 같습니다
파일 구조

API 요청을 따로 관리하기 위한 apis 폴더,
컴포넌트들을 넣을 components 폴더,
각 페이지를 관리할 pages 폴더,
그리고 그 페이지들이 들어가 있는 App.tsx 및 index.tsx
파일이 있습니다
index.tsx
import React from 'react';
import ReactDOM from 'react-dom';
import { BrowserRouter } from 'react-router-dom';
import './index.css';
import App from './App';

ReactDOM.render(
  <React.StrictMode>
    <BrowserRouter>
      <App />
    </BrowserRouter>
  </React.StrictMode>,
  document.getElementById('root')
);
라우팅을 위한 react-router-dom의 BrowserRouter가
<App />을 감싸고 있습니다
index.css
* {
  box-sizing: border-box;
}

body {
  margin: 0;
  font-family: -apple-system, BlinkMacSystemFont, 'Segoe UI', 'Roboto', 'Oxygen',
    'Ubuntu', 'Cantarell', 'Fira Sans', 'Droid Sans', 'Helvetica Neue',
    sans-serif;
  -webkit-font-smoothing: antialiased;
  -moz-osx-font-smoothing: grayscale;
  display: flex;
  flex-direction: column;
  align-items: center;
}

main {
  width: 100%;
}
전체 태그는 box-sizing: border-box;
나머지는 기본 설정에 가운데 정렬을 위한 설정을 추가했습니다
App.tsx
import { useState } from 'react';
import { Routes, Route } from 'react-router-dom';
import styled from 'styled-components';

import Nav from './components/Nav';
import Home from './pages/Home';
import Login from './pages/Login';
import Callback from './pages/Callback';
import Lists from './pages/Lists';

const Container = styled.div`
  width: 100vw;
  min-width: 320px;
  max-width: calc(960px + 2rem);
  min-height: 720px;
  padding: 5rem 1rem 0 1rem;
  display: flex;
`;

function App() {
  const [isLogin, setIsLogin] = useState(!!localStorage.getItem("isLogin"));
  return (
    <Container>
      <Nav />
      <main>
        <Routes>
          <Route path='/' element={<Home isLogin={isLogin} />} />
          <Route path='/login' element={<Login />} />
          <Route
            path='/callback'
            element={<Callback isLogin={isLogin} setIsLogin={setIsLogin} />}
          />
          <Route path='/lists' element={<Lists />} />
        </Routes>
      </main>
    </Container>
  );
}

export default App;
로그인 정보를 localStorage에서 가져와서 관리하기로 했습니다
쓰면서 느끼는 점인데 useState를 여기서 사용할 필요가 없지 않나 싶습니다
바꿔보고 수정하겠습니다
페이지의 최소, 최대 너비를 설정하고
Nav를 고려한 padding 설정을 해줍니다
라우팅은 일단 /, /login, /callback, /lists만 해둡니다
Home.tsx
import { useEffect } from "react";
import { useNavigate } from "react-router-dom";

const Home = (props: any) => {
  const { isLogin } = props
  const navigate = useNavigate()

  useEffect(() => {
    if (!isLogin) {
      navigate('/login')
    } else {
      navigate('/lists')
    }
  })

  return (
    <div>
      Home
    </div>
  )
}

export default Home;
정말 간단하게
로그인 되어있다면 /lists로
로그인 안 되어있다면 /login으로 보내는 페이지 입니다
props로 App.tsx의 상태를 내려받았는데
위 페이지를 수정하면 여기도 같이 수정하겠습니다
Login.tsx
import styled from 'styled-components';

const Container = styled.div`
  height: 50vh;
  min-height: 720px;
  display: flex;
  justify-content: center;
  align-items: center;
`

const LoginLink = styled.a`
  font-size: 3rem;
  font-weight: 700;
  text-decoration: none;
`

const Login = () => {
  return (
    <Container>
      <LoginLink href={`${process.env.REACT_APP_API_URL}/users/auth`}>GOOGLE LOGIN</LoginLink>
    </Container>
  )
}

export default Login;
서버로 구글 로그인 URL을 요청하고
그쪽으로 이동하기 위한 내용입니다
로그인 과정을 거치고 Callback 페이지로 돌아옵니다
(GCP에서 돌아올 페이지로 설정)
Callback.tsx
import { useEffect } from 'react';
import { useNavigate, useLocation } from 'react-router-dom';
import axios from 'axios';
import QueryString from 'qs';
// import styled from 'styled-components';

const Callback = (props: any) => {
  const { isLogin, setIsLogin } = props;
  const location = useLocation();
  const navigate = useNavigate();
  const code = QueryString.parse(location.search, {
    ignoreQueryPrefix: true,
  }).code;

  useEffect(() => {
    if (isLogin) {
      setTimeout(() => navigate('/lists'), 3000);
    }
  // eslint-disable-next-line
  }, [isLogin]);

  useEffect(() => {
    axios
      .post(
        `${process.env.REACT_APP_API_URL}/users/login`,
        { code },
        { withCredentials: true }
      )
      .then((result) => {
        setIsLogin(true);
        localStorage.setItem('isLogin', 'true')
      });
  // eslint-disable-next-line
  }, []);

  return <div>구글 계정으로 로그인 중입니다</div>;
};

export default Callback;
구글 로그인 후 돌아오는 페이지 주소의 쿼리를 파싱하여
인증코드를 얻어내고 서버로 보내줍니다
서버에서는 인증코드를 이용해 구글 유저 정보를 얻어
accessToken을 만들고 cookie에 담아 보내줍니다
서버에서 응답이 오면 클라이언트 Callback 페이지에서는
로그인 상태를 true로 바꾸고 /lists로 이동시켜줍니다
이어서
로그인 정보 관리 리팩토링
List 페이지 구현
