HTTP multipart/form-data란?
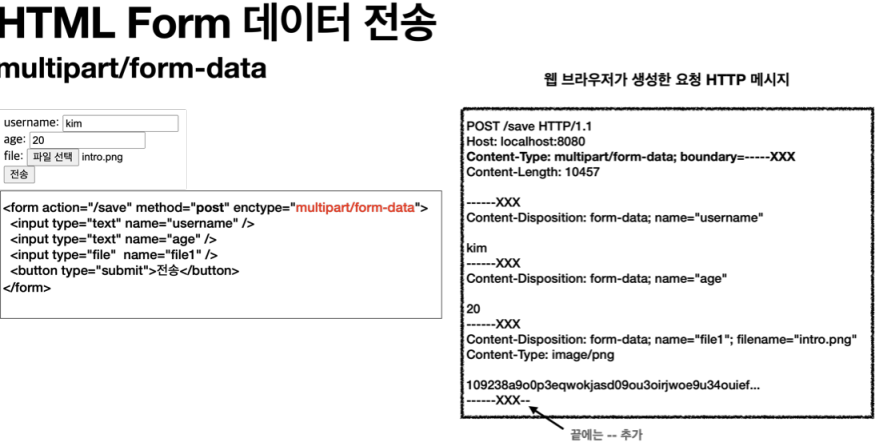
multipart/form-data 방식은 다른 조율의 여러 파일과 폼의 내용을 함께 전송할 수 있다. 상단 이미지를 보면 Contetn-Disposition이라는 항목별 헤더가 추가되어있고, 여기에 부가 정보가 있다. 그러니까 이렇게 각각의 항목을 구분해서 한 번에 전송하는 것이다.
spring.servlet.multipart.enabled=true를 켜면 스프링 부트는 서블릿 컨테이너에게 멀티 파트 데이터를 처리하라고 설정한다. 즉, 스프링의 DispatcherServlet에서 MultipartResolver를 실행하는 것이다. 이 리졸버는 멀티파트 요청인 경우 서블릿 컨테이너가 전달하는 일반적인 HttpServletRequest를 MultipartHttpServletRequest로 변환해서 반환한다. 이때 MultipartResolver는 멀티파트 요청인 경우 서블릿 컨테이너가 전달하는 일반적인 HttpServletRequest를 MultipartHttpServletRequest로 변환해서 반환한다.(얘는 HttpServletRequest의 자식 인터페이스)
스프링이 제공하는 기본 멀티파트 리졸버는 MultipartHttpServletRequest 인터페이스를 구현한 StandardMultipartHttpServletRequest를 반환한다. 이제 컨트롤러에서 HttpServletRequest 대신에 MultipartHttpServletRequest를 주입받을 수 있는데, 이것을 사용하면 멀티파트와 관련된 여러가지 처리를 편리하게 할 수 있다.
👉 근데 그냥 이후에 배우는 MultipartFile이라는 것을 사용하는 것이 더 편함
서블릿과 파일 업로드
실제 파일을 서버에 업로드해보겠다. 이를 위해서는 실제 파일이 저장되는 경로가 필요하다. 실제로 폴더를 만들고 application.properties에 이렇게 경로를 입력해두어야한다. file.dir = 경로
이를 이용한 컨트롤러 내용은 다음과 같다.
@Slf4j
@Controller
@RequestMapping("/servlet/v2")
public class ServletUploadControllerV2 {
    @Value("${file.dir}")
    private String fileDir;


    @GetMapping("/upload")
    public String newFile(){
        return "upload-form";
    }

    @PostMapping("/upload")
    public String saveFileV1(HttpServletRequest request) throws ServletException, IOException {
        log.info("request={}", request);
        String itemName = request.getParameter("itemName");
        log.info("itemName={}", itemName);
        Collection<Part> parts = request.getParts();
        log.info("parts={}",parts);

        // part 쓰기
        for (Part part : parts) {
            log.info("=== PART ===");
            log.info("name={}",part.getName());
            Collection<String> headerNames = part.getHeaderNames();
            for (String headerName : headerNames) {
                log.info("header {}:{}", headerName, part.getHeader(headerName));
            }
            // 편의 메서드
            // content-Disposition
            log.info("submitted File name={}", part.getSubmittedFileName());
            log.info("size={}", part.getSize());
            // 데이터 읽기
            InputStream inputStream = part.getInputStream();
            String body = StreamUtils.copyToString(inputStream, StandardCharsets.UTF_8);
            log.info("body={}", body);

            // 파일에 저장하기
            if(StringUtils.hasText(part.getSubmittedFileName())){
                String fullPath = fileDir+part.getSubmittedFileName();
                log.info("파일 저장 fullPath={}", fullPath);
                part.write(fullPath);
            }
        }
        return "upload-form";

    }
}
여기서 @Value는 application.properties의 값을 읽어오기 위한 애노테이션
위의 코드를 통해 멀티파트 형식은 전송 데이터를 하나하나 Part로 나눠서 전송하는 것을 알아낼 수 있다. 이를 이용하기 위한 주요 메소드로는
part.getSubmittedFileName() : 클라이언트가 전달한 파일 명
part.getInputStream() : Part의 전송 데이터 읽기
part.write(): part를 통해 전송된 데이터를 저장
itemName=상품A + file=스크린샷.png를 전송했다고 가정해보면, 출력 결과는 다음과 같이 나온다.
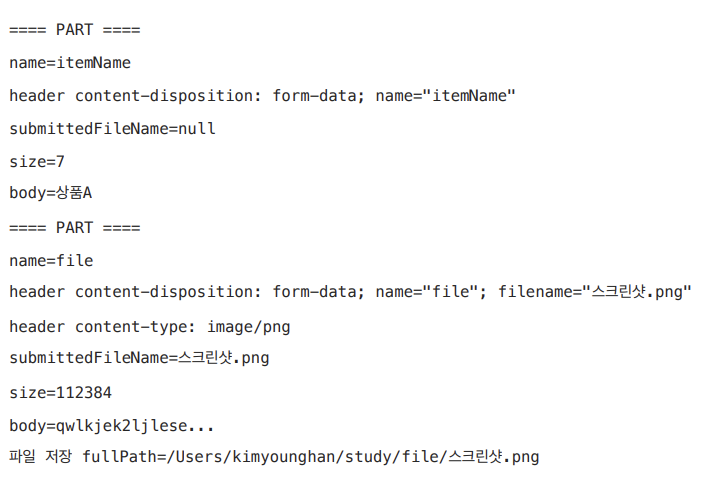
👉 하지만 여기서 더 발전해야만하는 이유는 : 서블릿이 제공하는 Part는 편하지만 HttpServletRequest를 사용해야하고, 파일 부분만 구분하려면 여러가지 추가 코드가 필요하다는 단점이 필요하기 때문이다.
스프링과 파일 업로드
스프링은 MultipartFile이라는 인터페이스를 이용해서 멀티파트 파일을 지원한다. 즉, 서블릿을 이용한 파일 업로드 과정을 보다 편리하게 바꿔준 것이다.
스프링을 이용한 파일 업로드 컨트롤러는 아래와 같다.
@Slf4j
@Controller
@RequestMapping("/spring")
public class SpringUploadController {
@Value("${file.dir}")
private String fileDir;
@GetMapping("/upload")
public String newFile(){
return "upload-form";
}
@PostMapping("/upload")
public String saveFile(@RequestParam String itemName,
@RequestParam MultipartFile file, HttpServletRequest request) throws IOException{
log.info("request={}", request);
log.info("itemName={}", itemName);
log.info("multipartFile={}", file);
if(!file.isEmpty()){
String fullPath = fileDir+file.getOriginalFilename();
log.info("파일 저장 fullPath = {}", fullPath);
file.transferTo(new File(fullPath));
}
return "upload-form";
}
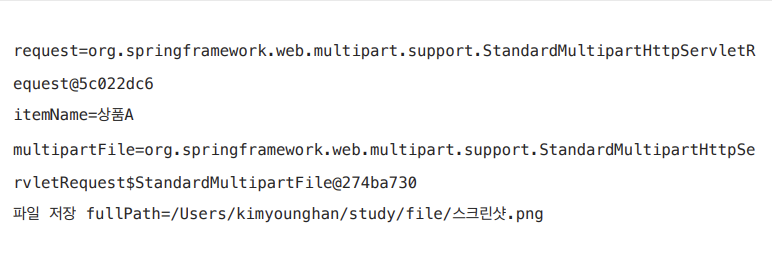
}이런 MultipartFile의 주요 메서드는 아래와 같다.
file.getOriginalFilename() : 업로드 파일 명
file.transferTo() : 파일 저장
이를 이용한 결과는 다음과 같다.
예제로 구현하는 파일 업로드와 다운로드
실제 파일이나 이미지를 업로드, 다운로드 할 때 고려해야할 몇 가지가 있는데, 이를 예제로 알아보고자 한다.
요구사항
상품을 관리(상품 이름+첨부파일 하나+이미지 파일 여러개)
첨부파일을 업로드 다운로드 할 수 있다.
업로드한 이미지를 웹 브라우저에서 확인할 수 있다.
Item -> 상품 도메인
@Data
public class Item{
	private Long id;
    private String itemName;
    private UploadFile attachFile;
    private List<UploadFile> imageFiles;
}
ItemRepository
@Repository
public class ItemRepository{
	private final Map<Long, Item> store = new HashMap<>();
    private long sequence = 0L;

    public Item save(Item item){
    	item.saveId(++sequence);
        store.put(item.getId(), item);
        return item;
    }
    public Item findById(Long id){ return store.get(id);}
 }
UploadFile -> 업로드 파일 정보 보관
@Data
public class UploadFile{
	private String uploadFileName;
    private String storeFileName;

    public UploadFile(String uploadFileName, String storeFileName){
    	this.uploadFileName = uploadFileName;
        this.storeFileName = storeFileName;
       }
 }
FilStore -> 파일 저장 관련 업무 처리
public class FileStore {
    @Value("${file.dir}")
    private String fileDir;

    public String getFullPath(String filename){
        return fileDir+filename;}

    // 여러개 업로드 해야하는 경우 사용
    public List<UploadFile> storeFiles(List<MultipartFile> multipartFiles) throws IOException {
        List<UploadFile> storeFileResult = new ArrayList<>();
        for (MultipartFile multipartFile : multipartFiles) {
            if(!multipartFile.isEmpty()){
                storeFileResult.add(storeFile(multipartFile));
            }
        }
        return storeFileResult;
    }

    // 멀티파트 파일을 서버에 저장하는 역할 담당.
    public UploadFile storeFile(MultipartFile multipartFile) throws IOException {
        if(multipartFile.isEmpty()) return null;

        String originalFilename = multipartFile.getOriginalFilename(); // 사용자가 업로드한 파일명 가져옴
        String storeFileName = createStoreFileName(originalFilename);
		// 실제로 파일을 저장하는 코드
        multipartFile.transferTo(new File(getFullPath(storeFileName)));
        return new UploadFile(originalFilename, storeFileName);
    }

    private String createStoreFileName(String originalFilename) {
        // 확장자 가져오기
        String ext = extractExt(originalFilename);
        // 서버에 저장하는 파일명
        String uuid = UUID.randomUUID().toString();
        // uuid에 확장자 붙여주면 저장할 파일 이름이 된다.
        String storeFileName = uuid + "." + ext;
        return storeFileName;
    }

    private String extractExt(String originalFilename) {
        int pos = originalFilename.lastIndexOf(".");
        String ext = originalFilename.substring(pos + 1);
        return ext;
    }

}
ItemForm
@Data
public class ItemForm{
	private Long itemId;
    private String itemName;
    private List<MultipartFile> imageFiles; // 이미지 다중 업로드 위함
    private MultipartFile attachFile;
}
ItemController
@Slf4j
@Controller
@RequiredArgsConstructor
public class ItemController {
    private final ItemRepository itemRepository;
    private final FileStore fileStore;

    ...

    @PostMapping("/items/new")
    public String saveItem(@ModelAttribute ItemForm form, RedirectAttributes redirectAttributes) throws IOException {
        UploadFile attachFile= fileStore.storeFile(form.getAttachFile());
        List<UploadFile> storeImageFiles = fileStore.storeFiles(form.getImageFiles());

        // DB에 저장
        // form에는 아이템도 있었기 때문
        Item item = new Item();
        item.setItemName(form.getItemName());
        item.setAttachFile(attachFile);
        item.setImageFiles(storeImageFiles);
        itemRepository.save(item);

        redirectAttributes.addAttribute("itemId", item.getId());
        return "redirect:/items/{itemId}";
    }

...

    @ResponseBody
    @GetMapping("/images/{filename}")
    public Resource downloadImage(@PathVariable String filename) throws MalformedURLException {
        return new UrlResource("file:"+fileStore.getFullPath(filename));
    }

    // 파일을 다운로드 할 떄 실행한다.
    // id를 요청했다고 가정.
    @GetMapping("/attach/{itemId}")
    public ResponseEntity<Resource> downlaodAttach(@PathVariable Long itemId) throws MalformedURLException {
        Item item = itemRepository.findById(itemId);
        String storeFileName = item.getAttachFile().getStoreFileName();
        String uploadFileName = item.getAttachFile().getUploadFileName();

        UrlResource resource = new UrlResource("file:" + fileStore.getFullPath(storeFileName));

        String encodedUploadFileName = UriUtils.encode(uploadFileName, StandardCharsets.UTF_8);
        String contentDisposition = "attachment; filename=\""+ uploadFileName +"\"";
        log.info("uploadFileName={}", uploadFileName);
        return ResponseEntity.ok()
                .header(HttpHeaders.CONTENT_DISPOSITION, contentDisposition)
                .body(resource);
    }
}
ResponseEntity
: client의 HttpRequest에 대한 응답 데이터를 포함하는 클래스.
UrlResource
: 반환 타입인 Resource 인터페이스를 상속받은 클래스로서 file: 뒤에 파일의 경로명을 붙여주면 실제 경로에 저장된 파일을 찾아온다.
UrlUtils.encode
: Encode all characters that are either illegal, or have any reserved meaning, anywhere within a URI, as defined in RFC 3986.
파일 다운로드시에는 고객이 업로드한 파일 이름으로 다운로드 하는 것이 좋다. 이때는 Content-Disposition 헤더에 attachment; filename="업로드 파일명" 값을 주면 된다.