Android Multi Module Clean Architecture with Hilt, Ktor Client (1)
프로젝트 개요
Clean Architecture 기반의 간단한 프로젝트를 만들어보겠습니다.
Hilt를 이용한 Dependency Injection, Ktor Client를 이용한 Http 통신을 하겠습니다.
https://unsplash.com 의 api를 사용하겠습니다.
본 포스팅에서는 아래와 같은 내용을 다루도록 하겠습니다.
1. Clean Architecutre 적용
2. Hilt를 이용한 DI 적용
Clean Architecutre 적용
 1
1
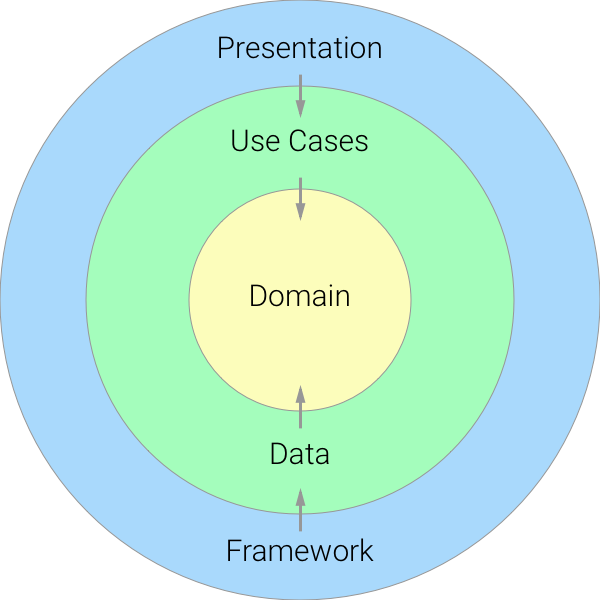
Clean Architecutre 라고 하면 가장 먼저 떠오르는 원 이미지입니다.
위의 구조를 우리는 Presentation Layer에 MVVM 패턴을 적용시켜 다음과 같은 구조를 띄게 하겠습니다.
 2
2
따라서, Presentation Module, Domain Module, Data Module 총 세 가지 모듈을 프로젝트에 적용하겠습니다.
Domain Module (Kotlin pure library)
Add Dependency
implementation "org.jetbrains.kotlinx:kotlinx-coroutines-core:$coroutine_core_version"
implementation "androidx.paging:paging-common:${paging_version}"
implementation group: 'javax.inject', name: 'javax.inject', version: '1'
먼저, Domain Module부터 보겠습니다.
Domain Module에서 생성해야 할 것들은 크게 세 가지가 있습니다.
Repository Interface
Data Layer에서 사용할 Repository의 Abstraction 입니다.
왜, 이런 Abstraction이 필요하냐 함은 SOLID의 원칙 중 하나인 DIP(Dependency Inversion Principle)을 충족시키기 위함입니다. 이와 관련한 내용은 좋은 자료가 많으니 더 자세히 다루지는 않겠습니다.
코드를 보겠습니다.
interface UnsplashRepository {
    fun getSearchResultOfPage(query: String, page: Int): Flow<Result<List<UnsplashPhoto>>>

    fun getSearchResult(query: String): Flow<PagingData<UnsplashPhoto>
}
PagingData가 Android 종속적이지만, domain module에서 androidx paging common 라이브러리를 주입해주었기 때문에 사용이 가능합니다.
Use Case
@Singleton
class GetSearchResultUseCase @Inject constructor(
    private val unsplashRepository: UnsplashRepository
) {

    operator fun invoke(query: String) = unsplashRepository.getSearchResult(query)
}
실제 사용자가 하는 일련의 행동들을 나타냅니다.
JSR-330의 Inject Annotation을 이용하여 Repository를 주입시켜 줍니다.
여기에 대한 내용은 이 포스팅을 참고해주시기 바랍니다.
Entity
data class UnsplashPhoto(
    val id: String,
    val description: String?,
    val urls: UnsplashPhotoUrls,
    val user: UnsplashUser
) {

    data class UnsplashPhotoUrls(
        val raw: String,
        val full: String,
        val regular: String,
        val small: String,
        val thumb: String,
    )

    data class UnsplashUser(
        val name: String,
        val username: String
    )
}
sealed class Result<T> {
class Success<T>(val data: T, val code: Int) : Result<T>()
class Loading<T> : Result<T>()
class ApiError<T>(val message: String, val code: Int) : Result<T>()
class NetworkError<T>(val throwable: Throwable) : Result<T>()
class NullResult<T> : Result<T>()
}상태 관리를 위한 Result 클래스와 사용할 데이터 객체를 정의해줍니다.
Data Module (Android Library)
Add Dependency
implementation "org.jetbrains.kotlinx:kotlinx-coroutines-core:$coroutine_core_version"
implementation "org.jetbrains.kotlinx:kotlinx-coroutines-android:$coroutine_android_version"

implementation "com.google.dagger:hilt-android:$hilt_version"
kapt "com.google.dagger:hilt-android-compiler:$hilt_version"

implementation "com.google.code.gson:gson:$gson_version"

implementation "androidx.paging:paging-runtime-ktx:$paging_version"
데이터 모듈에서 생성해야 할 것들은 크게 다음과 같습니다.
Repository Implementations
class KtorUnsplashRepositoryImpl @Inject constructor(
    private val unsplashService: UnsplashService
) : UnsplashRepository {

    override fun getSearchResultOfPage(
        query: String,
        page: Int
    ): Flow<Result<List<UnsplashPhoto>>> = flow {
        val response = unsplashService.searchPhotos(query, page)
        emit(ResponseMapper.responseToPhotoList(response))
    }

    override fun getSearchResult(query: String) =
        Pager(
            config = PagingConfig(
                pageSize = 20,
                maxSize = 100,
                enablePlaceholders = false
            ),
            pagingSourceFactory = { UnsplashPhotoPagingSource(unsplashService, query) }
        ).flow
}
class UnsplashPagingSource constructor(
private val unsplashService: UnsplashService,
private val query: String
) : PagingSource<Int, UnsplashPhoto>() {
override fun getRefreshKey(state: PagingState<Int, UnsplashPhoto>): Int? {
return state.anchorPosition
}
override suspend fun load(params: LoadParams<Int>): LoadResult<Int, UnsplashPhoto> {
val position = params.key?: 1
val response = unsplashService.searchPhotos(query, position, params.loadSize)
return try {
response as Result.Success
LoadResult.Page(
data = response.data.results,
prevKey = if (position == 1) null else position - 1,
nextKey = if (position == response.data.totalPages) null else position + 1
)
} catch (e: Exception) {
LoadResult.Error(e)
}
}
}Entity
data class UnsplashResponse(
    val results: List<UnsplashPhoto>,
    @SerializedName("total_pages")
    val totalPages: Int
)
Gson 라이브러리의 직렬화 규칙을 사용해줍니다.
Mapper
object ResponseMapper {

    fun responseToPhotoList(response: Result<UnsplashResponse>): Result<List<UnsplashPhoto>> {
        return when(response) {
            is Result.Success -> Result.Success(response.data.results, response.code)
            is Result.ApiError -> Result.ApiError(response.message, response.code)
            is Result.NetworkError -> Result.NetworkError(response.throwable)
            is Result.NullResult -> Result.NullResult()
            is Result.Loading -> Result.Loading()
        }
    }
}
Data Source로 부터 받은 데이터를 Domain Layer의 데이터 객체로 맵핑해줍니다.
Module (optional Hilt)
@Module
@InstallIn(SingletonComponent::class)
object DataModule {

    @Singleton
    @Provides
    fun provideKtorHttpClient(): HttpClient {
        return HttpClient(OkHttp) {
			// 2.0 이상
			install(ContentNegotiation) {
				gson()
			}
			// 2.0 이하
            install(JsonFeature) {
                GsonSerializer()
            }
            install(Logging) {
                logger = Logger.DEFAULT
                level = LogLevel.ALL
            }
        }
    }
}

@Module
@InstallIn(SingletonComponent::class)
interface RepositoryModule {

    @Binds
    @Singleton
    fun bindUnsplashService(ktorUnsplashService: KtorUnsplashService): UnsplashService

    @Binds
    @Singleton
    fun bindUnsplashRepository(unsplashRepositoryImpl: KtorUnsplashRepositoryImpl): UnsplashRepository
}
Ktor Client를 생성하는 내용은 추후에 다루도록 하겠습니다.
Data Sources
interface UnsplashService {

    suspend fun searchPhotos(query: String, page: Int, perPage: Int): Result<UnsplashResponse>
}
Ktor Client를 이용한 Http 통신만을 사용할 예정이기 때문에 Remote Data Source 만 생성합니다.
Presentation Layer
View
@AndroidEntryPoint
class GalleryFragment : Fragment() {
    private val galleryViewModel: GalleryViewModel by viewModels()

    lifecycleScope.launch {
        galleryViewModel.searchResult.flowWithLifecycle(lifecycle).collect {

        }
    }
}
ViewModel의 데이터를 처리하는 부분입니다.
ViewModel
@HiltViewModel
class GalleryViewModel @Inject constructor(
	getSearchResult: GetSearchResultUseCase,
) : ViewModel() {

	val searchResult = getSearchResult(DEFAULT_QUERY)
		.cachedIn(viewModelScope)

	companion object {
		const val DEFAULT_QUERY = "cats"
	}
}
Domain Layer의 Use Case를 이용해 원하는 데이터를 받는 코드입니다.
End
다음 포스팅에서는 Ktor Client를 생성하여 프로젝트에 적용하겠습니다.
코드 : https://github.com/TaehoonLeee/multi-module-clean-architecture
References
1: https://antonioleiva.com/clean-architecture-android/
2: https://tech.olx.com/clean-architecture-and-mvvm-on-ios-c9d167d9f5b3


설명이 친절해서 보기 좋네요ㅋㅋㅋ
좋은 글 감사합니다~