1. 시큐리티의 개요
01. 시큐리티
- 허가된 사용자만이 특정 웹 페이지에 접근할 수 있도록 제한하는 보안 기능
- 사용자가 권한이 없는 데이터에 접근하는 것을 막거나 웹 공격자가 전송데이터를 중간에 가로채는 것을 방지하는 등 중요한 역할
- 인증(authentication)
- 사용자가 웹 브라우저를 사용하여 웹 페이지에 접근할 때 JSP 컨테이너는 요청된 페이지에 보안 제약이 있는지 확인하고 사용자에게 사용자의 이름과 암호를 확인하여 수행
- 권한 부여(authorization)
- 특정 사용자가 해당 페이지에 접근할 수 있는지 확인하여 승인
02. 시큐리티 처리 방법

03. 웹 서버에 역할과 사용자 구성하기
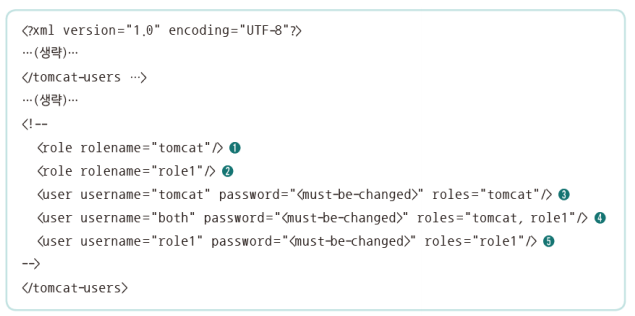
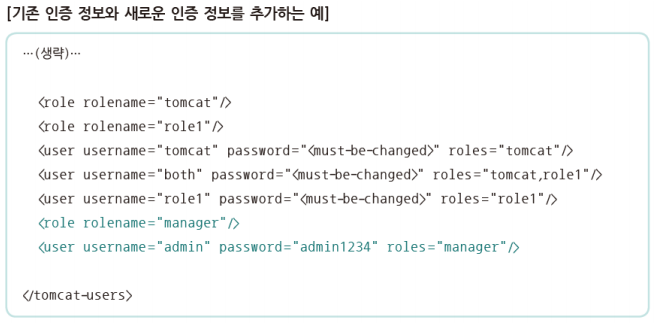
- /설치된 톰캣의 루트/conf/폴더 내의 tomcat-users.xml 파일
- 2개의 역할 (1)tomcat, (2)role1을 가지고
- 3개의 사용자 (3)tome, (4)both, (5)role1이 서로 다른 역할에 매핑
2. 선언적 시큐리티 처리
01. 선언적 시큐리티(declarative security)
- 웹 애플리케이션 배포 설명자 web.xml 파일에 보안 구성을 작성하여 수행하는 방식
- 웹 애플리케이션의 보안을 당성하기 위해 별도의 코드를 작성할 필요 없이 web.xml파일에 보안 구성을 작성하여 사용자가 웹 페이지에 접근할 수 있게 함
- web.xml 파일에는 보안 역할, 보안 제약 사항, 인증 처리 등을 설정하여 보안을 구성
02. 시큐리티 역할 선정하기
- <security-role>은 웹 애플리케이션에 사용하는 역할을 나열하는 요소
- web.xml 파일에 구성

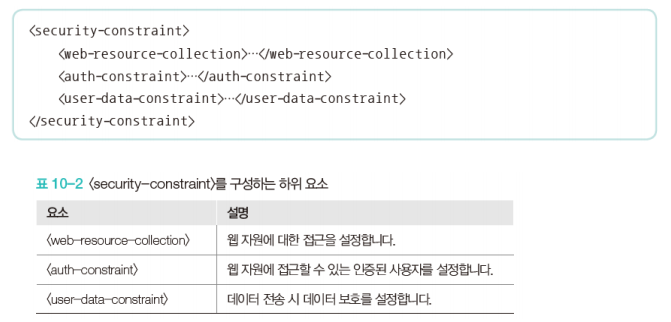
03. 시큐리티 제약 사항 설정하기
- 사용자의 요청 URL에 대한 접근 권한을 정의하는데 사용
- web.xml 파일에 접근 권한 내용을 구성
04. 시큐리티 제약 사항 설정하기
- <web-resource-collection> 요소
- 웹 자원에 대한 접근을 설명하는 요소
- <url-pattern>, <http-method>, <webresource-name> 등의 하위 요소로 구성


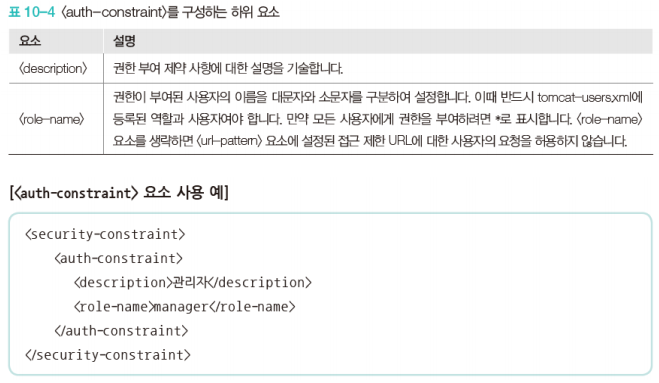
05. <auth-constraint> 요소
- 권한이 부여된 사용자만이 웹 자원에 접근할 수 있도록 이름을 설정하는 요소로 형식은 다음과 같음
- <auth-constraint> 요소에는 <web-resource-collection> 요소의 <urlpattern>과 <http-method>에 설정된 경로에 접근할 수 있는 권한이 부여된 사용자의 이름을 지정
- <auth-constraint> 요소를 생략하면 웹 서버는 사용자 인증을 요구하지 ㅇ낳고 사용자의 요청을 승인

06. 시큐리티 제약 사항 설정하기
- <user-data-constraint> 요소
- 클라이언트와 서버 간에 데이터를 전송할 때 데이터를 보호하는 방법을 설정하는 요소
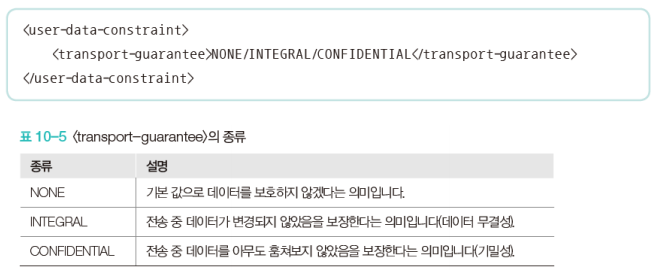

- 클라이언트와 서버 간에 데이터를 전송할 때 데이터를 보호하는 방법을 설정하는 요소
07. 시큐리티 인증 설정하기
- 인증 처리를 위한 로그인 페이지나 오류 페이지를 호출하는 데 사용
- web.xml 파일에 인증 관련 내용을 구성

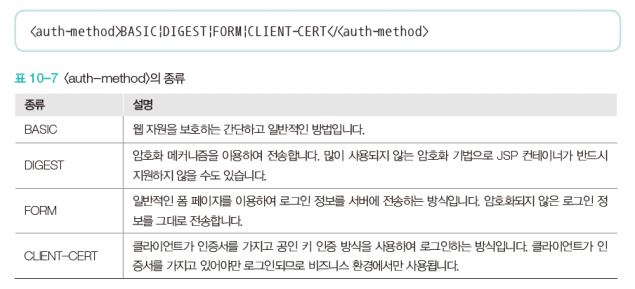
- <auth-method> 요소
- 웹 애플리케이션의 인증 처리 기법을 설정하는 요소
- 인증 처리 기법은 BASIC, DIGEST, FORM, CLIENT-CERT 등으로 이 중 하나를 <auth-method> 요소에 설정


- <realm-name> 요소
- 기본 인증의 영역 이름을 설정하는 요소
- <realm-name> 요소에 설정된 영역 이름은 대개 웹 브라우저의 로그인 대화 상자에 표시
- <realm-name> 요소는 FORM 기반 인증이나 다른 인증 방법에 필요하지 않기 때문에 아무런 영향을 미치지 않지만, <login-config> 요소에 대한 설명 속성이 없으므로 데이터를 문선화하는 데 일반적으로 사용

- <form-login-config> 요소
- 인증 처리를 위한 로그인 및 오류 페이지를 설정하는 요소
- <auth-method> 요소가 FORM 기반 인증 처리 기법으로 설덩되었을 때 사용
- <form-loginpage>, <form-error-page> 등의 하위 요소로 구성됨
- 로그인 및 오류 페이지의 경로는 웹 애플리케이션 이름(이클립스에서 프로젝트 이름에 해당됨)을 기준으로 설정


예제 01.
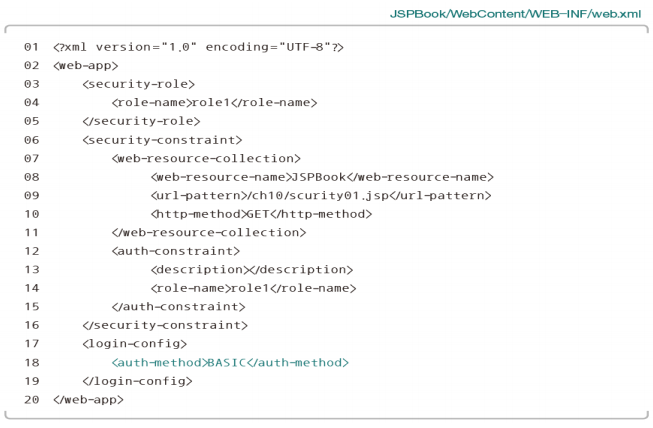
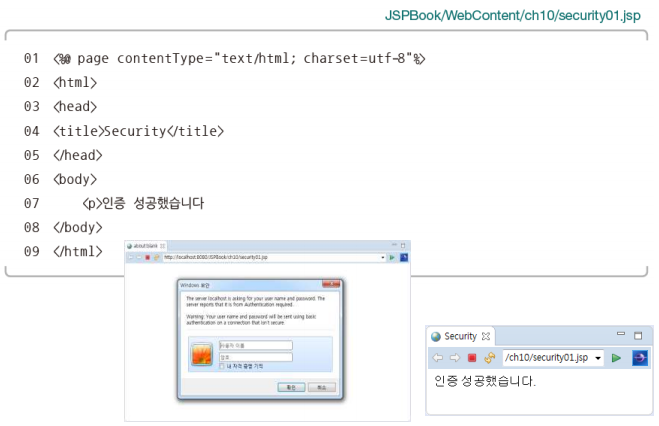
- 기본 인증 처리 방법으로 보안처리하기

<?xml version="1.0" encoding="UTF-8"?>
<!-- Licensed to the Apache Software Foundation (ASF) under one or more contributor
	license agreements. See the NOTICE file distributed with this work for additional
	information regarding copyright ownership. The ASF licenses this file to
	You under the Apache License, Version 2.0 (the "License"); you may not use
	this file except in compliance with the License. You may obtain a copy of
	the License at http://www.apache.org/licenses/LICENSE-2.0 Unless required
	by applicable law or agreed to in writing, software distributed under the
	License is distributed on an "AS IS" BASIS, WITHOUT WARRANTIES OR CONDITIONS
	OF ANY KIND, either express or implied. See the License for the specific
	language governing permissions and limitations under the License. -->
<tomcat-users version="1.0" xmlns="http://tomcat.apache.org/xml"
	xmlns:xsi="http://www.w3.org/2001/XMLSchema-instance"
	xsi:schemaLocation="http://tomcat.apache.org/xml tomcat-users.xsd">
	<!-- NOTE: By default, no user is included in the "manager-gui" role required
		to operate the "/manager/html" web application. If you wish to use this app,
		you must define such a user - the username and password are arbitrary. -->
	<!-- NOTE: The sample user and role entries below are wrapped in a comment
		and thus are ignored when reading this file. Do not forget to remove <!..
		..> that surrounds them. -->

	<role rolename="tomcat" />
	<role rolename="role1" />
	<user username="tomcat" password="tomcat1234" roles="tomcat" />
	<user username="both" password="both1234" roles="tomcat,role1" />
	<user username="role1" password="role1234" roles="role1" />

</tomcat-users>
<?xml version="1.0" encoding="UTF-8"?>
<web-app>
<security-role>
<role-name>role1</role-name>
</security-role>
<security-constraint>
<web-resource-collection>
<web-resource-name>JSPBook</web-resource-name>
<url-pattern>/ch10/security01.jsp</url-pattern>
<http-method>GET</http-method>
</web-resource-collection>
<auth-constraint>
<description></description>
<role-name>role1</role-name>
</auth-constraint>
</security-constraint>
<login-config>
<auth-method>BASIC</auth-method>
</login-config>
</web-app><%@ page language="java" contentType="text/html; charset=UTF-8"
pageEncoding="UTF-8"%>
<!DOCTYPE html>
<html>
<head>
<meta http-equiv="Content-Type" content="text/html; charset=UTF-8">
<title>Insert title here</title>
</head>
<body>
<p>인증 성공 했습니다
</body>
</html>예제 02.
- 폼 기반 인증 방법으로 보안 처리하기
- 실행은 예제01에서 만든 security01.jsp에서 실행
<?xml version="1.0" encoding="UTF-8"?>
<web-app>
	<security-role>
		<role-name>role1</role-name>
	</security-role>
	<security-constraint>
		<web-resource-collection>
			<web-resource-name>JSPBook</web-resource-name>
			<url-pattern>/ch10/security01.jsp</url-pattern>
			<http-method>GET</http-method>
		</web-resource-collection>
		<auth-constraint>
			<description></description>
			<role-name>role1</role-name>
		</auth-constraint>
	</security-constraint>
	<login-config>
		<auth-method>FORM</auth-method>
		<form-login-config>
			<form-login-page>/ch10/login.jsp</form-login-page>
			<form-error-page>/ch10/login_failed.jsp</form-error-page>
		</form-login-config>
	</login-config>
</web-app>
<%@ page language="java" contentType="text/html; charset=UTF-8"
pageEncoding="UTF-8"%>
<!DOCTYPE html>
<html>
<head>
<meta http-equiv="Content-Type" content="text/html; charset=UTF-8">
<title>Insert title here</title>
</head>
<body>
<form name="loginForm" action="j_security_check" method="post">
<p> 사용자명 : <input type="text" name="j_username"> </p>
<p> 비밀번호 : <input type="password" name="j_password"> </p>
<p> <input type="submit" value="전송"> </p>
</form>
</body>
</html><%@ page language="java" contentType="text/html; charset=UTF-8"
pageEncoding="UTF-8"%>
<!DOCTYPE html>
<html>
<head>
<meta http-equiv="Content-Type" content="text/html; charset=UTF-8">
<title>Insert title here</title>
</head>
<body>
<p>인증 실패했습니다</p>
</body>
</html>3. 프로그래밍적 시큐리티 처리
01. 프로그래밍적 시큐리티(programmatic security)
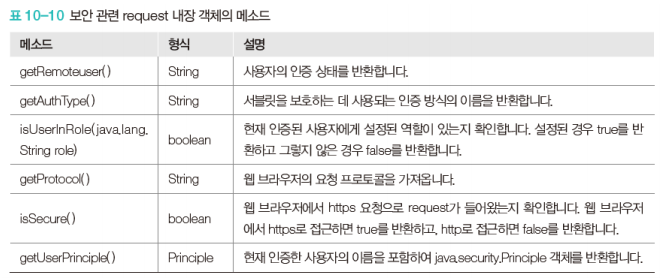
- 웹 애플리케이션의 보안을 위해 코드를 작성하여 사용자의 권한 부여를 처리하는 방식
- 선언적 시큐리티의 보안으로 충분하지 않을 때 request 내장 객체의 메소드를 사용하여 사용자를 승인하는 방법

예제 03.
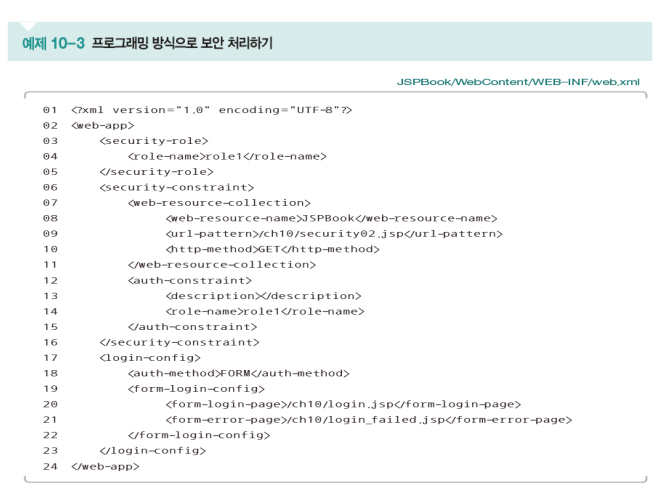
- 프로그래밍 방식으로 보안 처리하기

<?xml version="1.0" encoding="UTF-8"?>
<web-app>
	<security-role>
		<role-name>role1</role-name>
	</security-role>
	<security-constraint>
		<web-resource-collection>
			<web-resource-name>JSPBook</web-resource-name>
			<url-pattern>/ch10/security02.jsp</url-pattern>
			<http-method>GET</http-method>
		</web-resource-collection>
		<auth-constraint>
			<description></description>
			<role-name>role1</role-name>
		</auth-constraint>
	</security-constraint>
	<login-config>
		<auth-method>FORM</auth-method>
		<form-login-config>
			<form-login-page>/ch10/login.jsp</form-login-page>
			<form-error-page>/ch10/login_failed.jsp</form-error-page>
		</form-login-config>
	</login-config>
</web-app>
<%@ page language="java" contentType="text/html; charset=UTF-8"
pageEncoding="UTF-8"%>
<!DOCTYPE html>
<html>
<head>
<meta http-equiv="Content-Type" content="text/html; charset=UTF-8">
<title>Insert title here</title>
</head>
<body>
<p> 사용자명 : <%=request.getRemoteUser() %></p>
<p> 인증밥법 : <%=request.getAuthType() %></p>
<p> 인증한 사용자명이 역할명 "tomecat"에 속하는 사용자인가요? : <%=request.isUserInRole("tomcat") %></p>
<p> 인증한 사용자명이 역할명 "role1"에 속하는 사람인가요? : <%=request.isUserInRole("role1") %></p>
</body>
</html>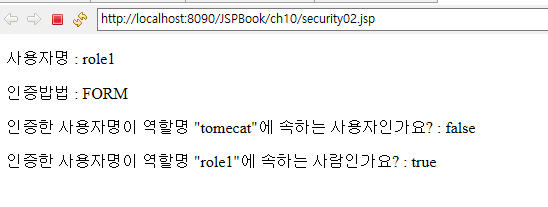
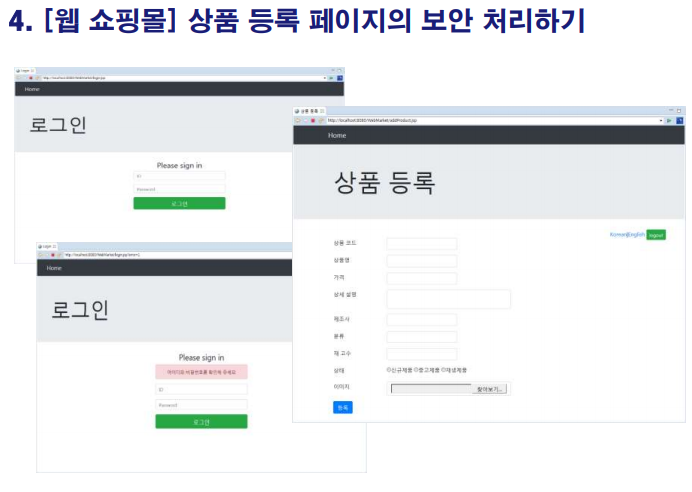
4. 웹 쇼핑몰 상품 등록 페이지의 보안 처리하기



좋은 정리 감사합니다 잘보고 갑니다! 혹시 자료를 사용하게된다면 출처를 남기겠습니다