
javascript는 prototype 기반 언어이다. 그래서 상속을 구현하기 위해 사람들이 여러 방법을 고안 했다. 그 중에 하나가 Bridge라는 다리 역할을 해주는 생성자들 만들어서 하는 방법이다.
Bridge 만들어 상속하기
Bridge 생성자를 만들어 상속하는 방법은 더글라스 크락포드가 고안한 방법이다. 클로저를 활용하여 상속을 해주는 함수를 만들어 상속한다. 만약 bridge를 만들지 않고 만들 경우에는 몇가지 side effect가 존재한다.
Bridge를 사용하지 않고 만드는 방법을 한 번 보자.
function Person(name, age) {
  this.name = name || '이름 없음';
  this.age = age || '나이 없음';
}

Person.prototype.sayHello = function () {
  console.log(`나의 이름은 ${this.name}이고 나이는 ${this.age}입니다.`);
};

function Student(name, age, grade) {
  this.name = name;
  this.age = age;
  this.grade = grade;
}

Student.prototype = new Person();
Student.prototype.consturctor = Student;
const geonwoo = new Student('문건우', 26, 4);

geonwoo.sayHello();
console.dir(geonwoo);
이런 식으로 만들 수 있을 것이다. Student의 prototype에 new Person()을 해줌으로써
Person instance의 __proto__ 를 타고 Person.prototype의 sayHello를 사용할 수 있다. 하지만 이 방법에는 문제가 있다. 바로 이것이다.

이제 내가 age나 name을 해당 instance로부터 지우려고 할 때 발생하는 문제이다. age를 지웠는데도 __proto__를 통해 '나이 없음'이 출력 되게 될 것이다. 내가 원하지 않은 값이 나오게 되는 것이다. 그래서 고안한 방법이 Bridge 생성자를 이용한 방법이다.
function createExtendsFunction() {
  function bridge() {}

  return function (superClass, subClass) {
    bridge.prototype = superClass.prototype;
    subClass.prototype = new bridge();
    subClass.prototype.constructor = subClass;
    subClass.prototype.SuperClass = superClass;
  };
}
const extendsFunction = createExtendsFunction();

function Person(name, age) {
  this.name = name || '이름 없음';
  this.age = age || '나이 없음';
}

Person.prototype.sayHello = function () {
  console.log(`나의 이름은 ${this.name}이고 나이는 ${this.age}입니다.`);
};

function Student(name, age, grade) {
  this.SuperClass(name, age);
  this.grade = grade;
}

extendsFunction(Person, Student);

const geonwoo = new Student('문건우', 26, 4);

geonwoo.sayHello();
bridge를 활용할 수 있는 함수를 만들어 사용한다. bridge의 prototype에 superClass의 prototype을 연결하고, 상속되기 원하는 생성자의 prototype에 new bridge를 통해 연결 하도록한다. bridge에는 아무 프로퍼티도 없기 때문에 아까와 같은 일이 벌어지지 않는다.
Object.create를 사용하는 방법
Object.create는 ES5에 추가되었다. 그래서 더 이상 bridge를 사용하지 않고 Object.create를 통해 상속을 구현할 수 있다.
function Person(name, age) {
  this.name = name || '이름 없음';
  this.age = age || '나이 없음';
}

Person.prototype.sayHello = function () {
  console.log(`나의 이름은 ${this.name}이고 나이는 ${this.age}입니다.`);
};

function Student(name, age, grade) {
  Person.call(this, name, age);
  this.grade = grade;
}

Student.prototype = Object.create(Person.prototype);
Student.prototype.constructor = Student;

const geonwoo = new Student('문건우', 26, 4);

geonwoo.sayHello();
Object.create를 통해 첫번째 인자를 prototype으로 가지는 객체를 생성할 수 있다. 그러한 객체를 생성하고 constructor를 연결 해주면 끝난다. Student 생성자에는 SuperClass.call을 사용해 this를 자신으로 변경하여 호출해주면 끝난다.
class의 extends를 사용하는 방법
class의 extends를 사용하는 방법은 아주 쉽다. 다른 언어와 똑같이 생각하면 된다.
class Person {
constructor(name, age) {
this.name = name;
this.age = age;
}
sayHello() {
console.log(`나의 이름은 ${this.name}이고 나이는 ${this.age}입니다.`);
}
}
class Student extends Person {
constructor(name, age, grade) {
super(name, age);
this.grade = grade;
}
}
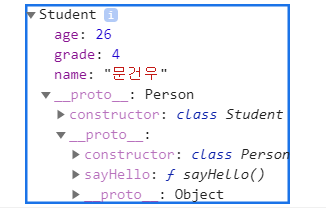
const geonwoo = new Student('문건우', 26, 4);
geonwoo.sayHello();
이렇게 하면 된다. 그러면 이런 깔끔한 결과를 볼 수 있다.
결론
상속을 구현하는 방법에는 여러가지가 있따. 최신에 나온 것일 수록 편한 방법이다. 때문에 굳이 위의 방식을 사용해서 구현할 필요는 없다. 하지만 면접 등에서 충분히 물어볼 수 있는 내용들이고 내부적으로 저런 방식으로 구현되어 있는 코드들도 많을 것이기 때문에 알아두면 확실히 도움이 될 것이다.