
# 시작하는 글
OPCUA 방식으로 Server와 Client를 연동 실습을 해볼 것입니다.
실습에 사용하는 언어는 JS, TS이 될 것입니다.
각각의 언어로 테스트를 할 것이고 UI Tool도 사용하여 가시적으로 결과를 확인해 볼 예정입니다..
참고한 파일:
node-opcua github - creating a simple server
node-opcua github - creating a simple Client

"Node-opcua is the OPC-UA stack running on NodeJS.
Why NodeJS ?
Because nodeJs is a great framework to design asynchronous applications."
# UI Tool(UaExpert)
본인에게 맞는 설정을 잘 알아야 하는데.. 어렵네요 ㅠㅠ 헤딩해가며 공부하는 방법 뿐입니다!
참고: UaExpert
-
설치

-
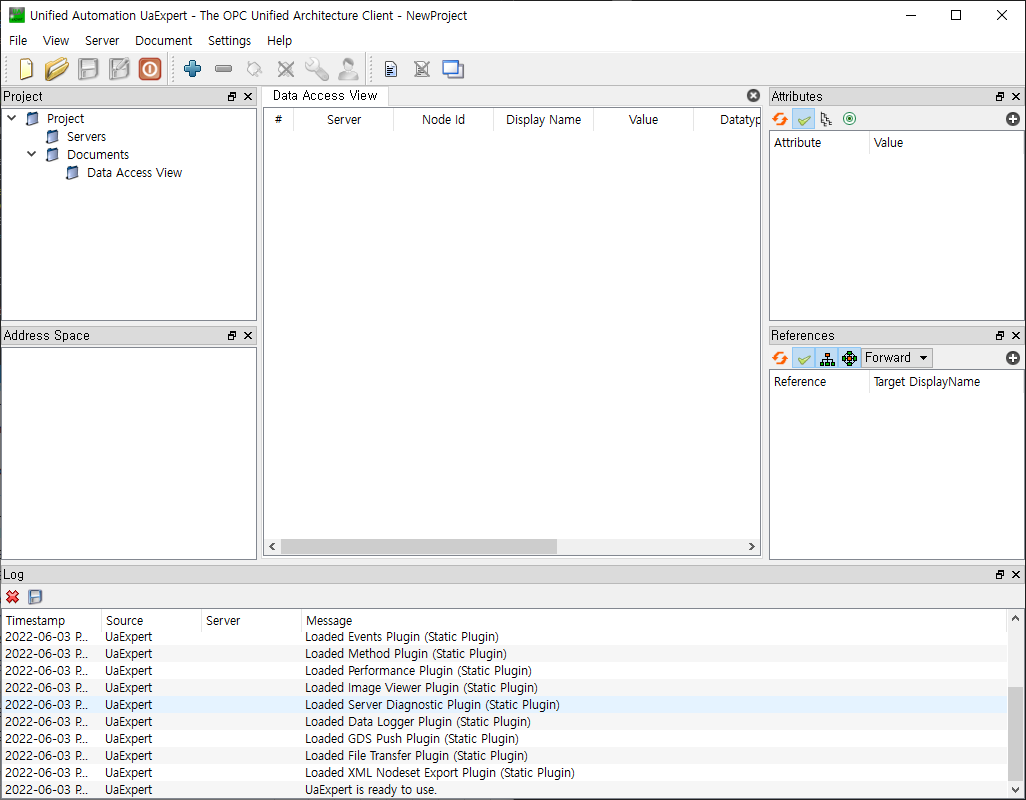
실행
최초 실행시 Application 인증서 세팅을 해야합니다.
참조: https://documentation.unified-automation.com/uaexpert/1.4.0/html/installation.html
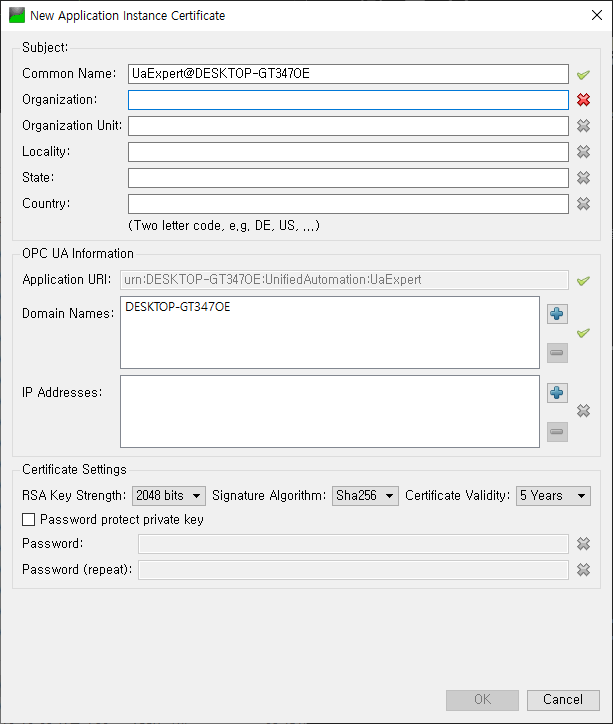
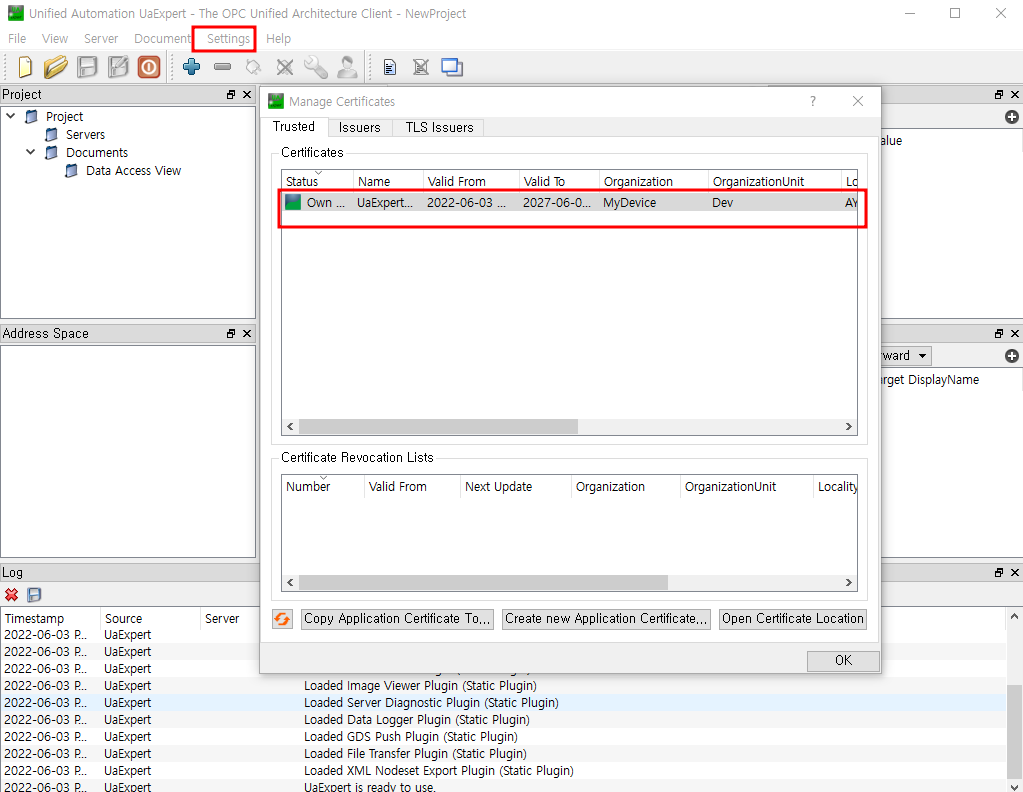
세팅한 인증서는 나중에 여기서 수정할 수 있습니다.
- Node 연결
Node 연결 부분은 다음 챕터인 JS Server 부분을 먼저 실행시키고 이어서 하면 되겠습니다.
Project tab에서 Server 우클릭하면 나오는Add버튼을 클릭
custom discovery 아래의 +부분을 더블클릭 하여 server를 추가
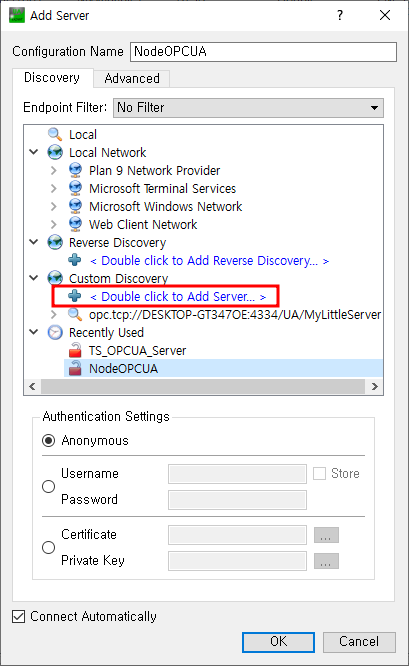
URL형식: opc.tcp://<hostname\>:4334/UA/MyLittleServer
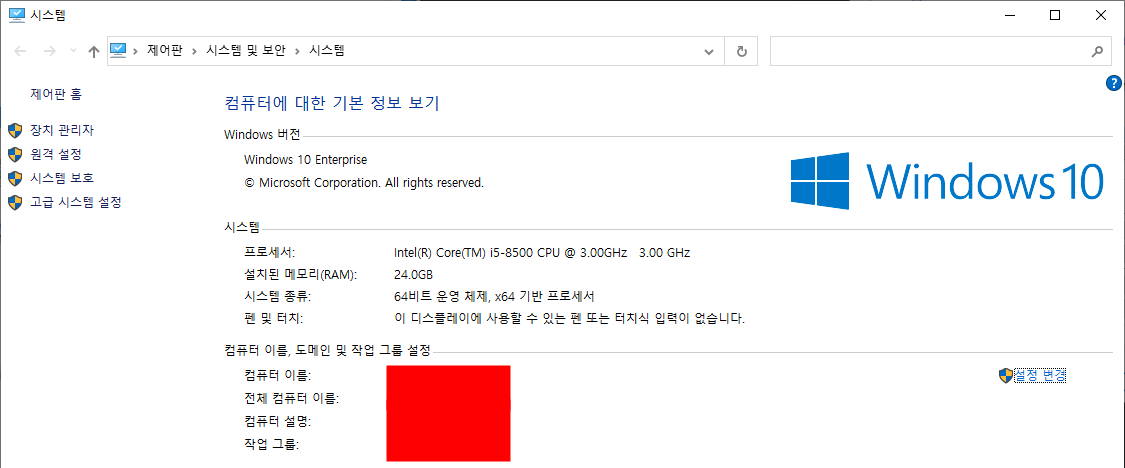
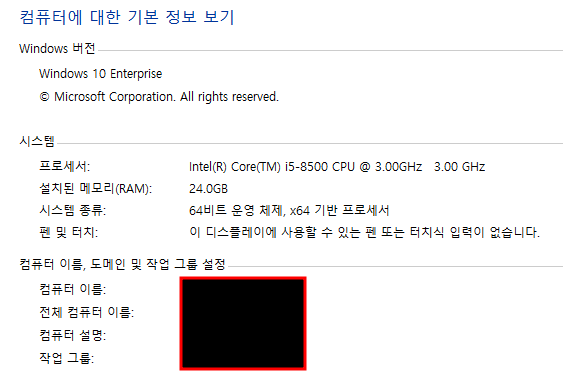
hostname은 컴퓨터 이름을 입력하면 됩니다.꺽쇠 괄호를 빼고 통째로 입력

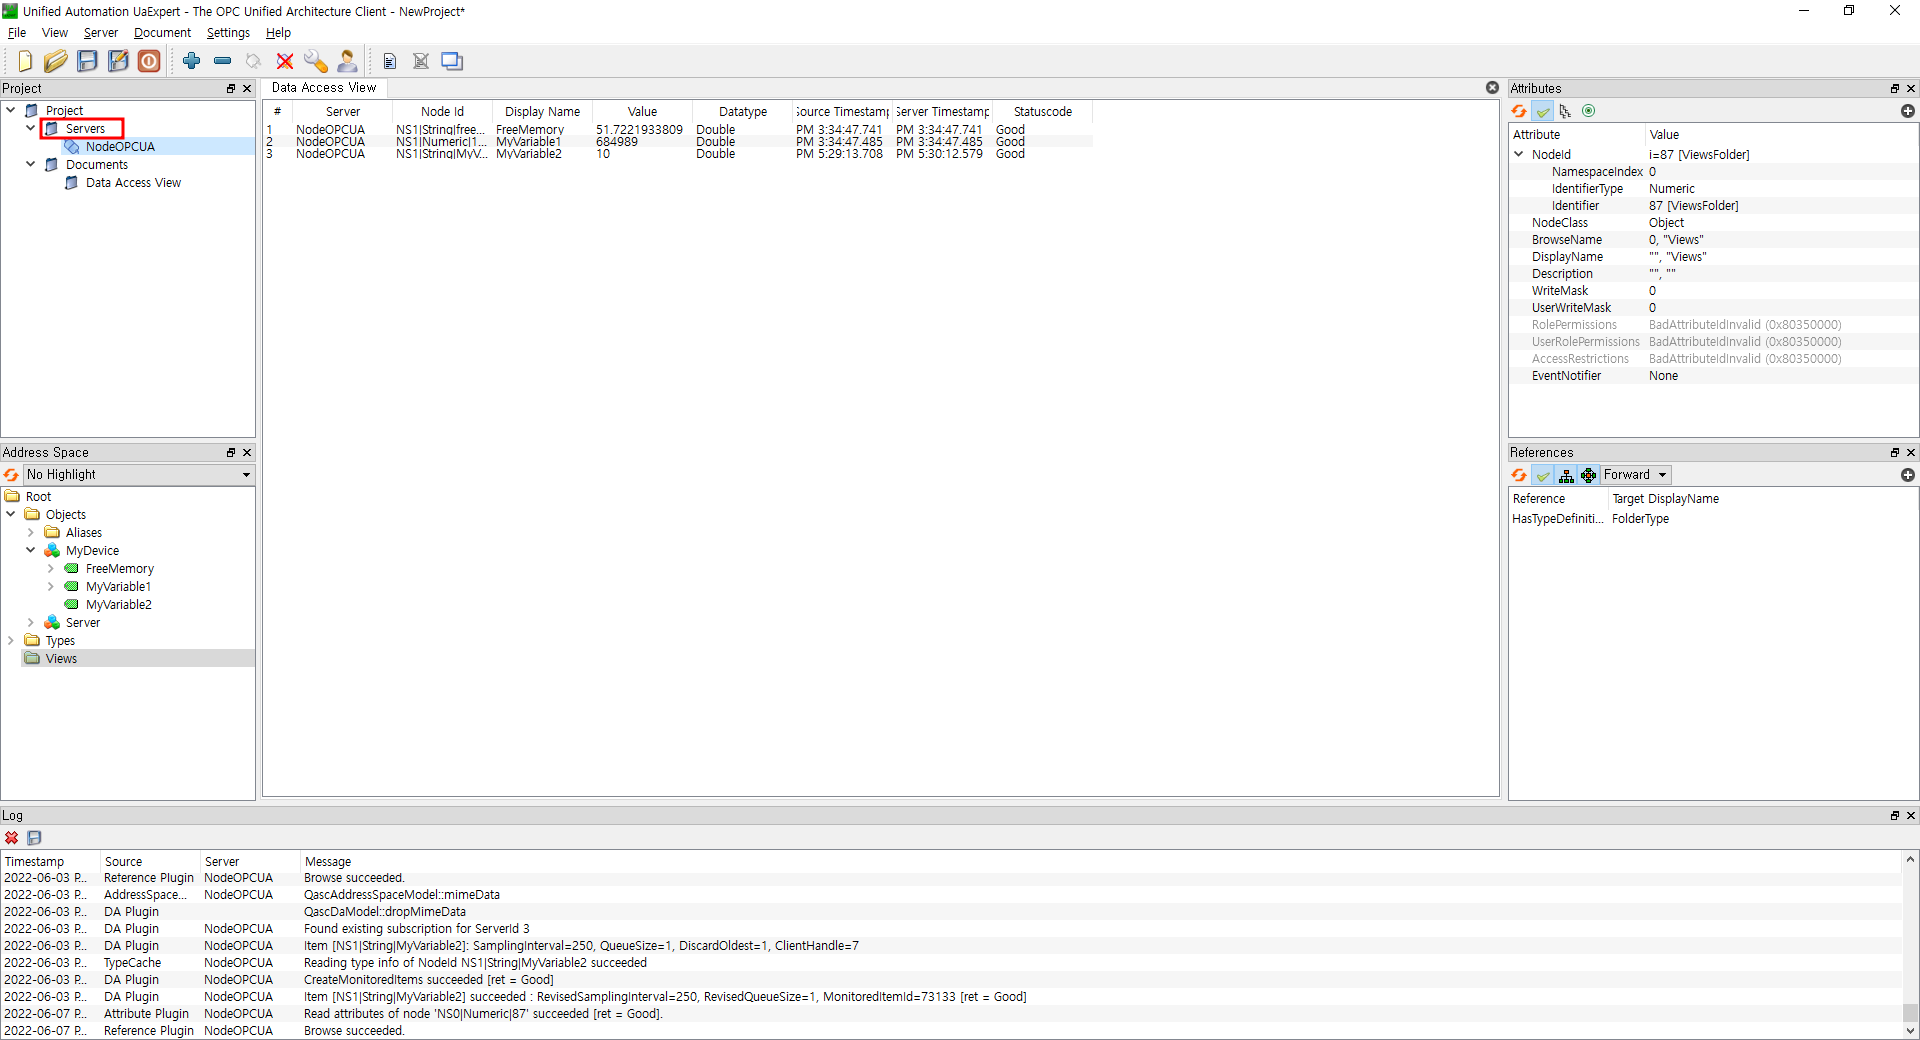
이렇게 세팅을 해주면 main 화면 좌하단 부분의 Address Space에 node가 연결 된 것을 볼 수 있네요.
drag & drop 으로 노드에 해당하는 value를 확인 가능!

# JS Server, TS Client
최상위에 소개한 node-OPCUA github 레포에서 README.md를 읽고 천천히 따라해도 좋겠습니다.
일련의 환경설정 단계는 모두 생략하겠습니다. 아래에서 내용을 더 추가 하게 될텐데 필요시 추가하게 될지도요..~.~
## JS Server 준비
sample_server.js
본 실습의 목표는 3개의 Read/Write 변수를 갖는 OPCUA 서버를 만드는 것입니다.
아래와 같이 MyDevice라는 객체아래 변수를 갖게 됩니다.
    + RootFolder
        + Objects
            + MyDevice
                + MyVariable1
                + MyVariable2
                + percentageMemUsed
첫 번째 단계에서는 Linux or Max의 터미널 또는 Windows의 Git Bash cmd에서 shell을 실행하고 있다고 가정한다는데.. (git bash 사용하라는 거겠죠?)
### 준비
- (우선 node.js가 설치되어 있는지 확인은 필수 입니다. 미설치시 링크에서 설치하시면 되겠습니다.)
서버용 node project를 생성합니다.
   	$ mkdir myserver
    $ cd myserver
    $ npm init                      # create a package.json
    $ npm install node-opcua --save # add the node-opcua
이제는 sample_server.js 스크립트를 수정할 단계입니다.
### 서버 스크립트 (4단계 구성)
스크립트는 아래 4단계로 구성됩니다.
_"declaration"

_"server instantiation"

_"server initialisation"
각 순서대로 살펴 보겠습니다.
### 1. 선언 declaration
node-OPCUA sdk는 require문으로 어플리케이션에서 사용 가능합니다.
/*global require,setInterval,consle */
const opcua = require("node-opcua");
### 2. 서버 인스턴스화 server instantiation
참고: JS 인스턴스란?
OPCUAServer 인스턴스를 생성해야 합니다. 인스턴스 생성 시, 사용자에게 맞는 옵션내용을 작성하여 전달합니다.
//Let`s create an instance of OPCUAServer
const server = new opcua.OPCUAServer({
  port: 4334, // 서버의 listening socker의 port입니다.
  resourcePath: "/UA/MyLittleServer", // 이 경로는 endpoint 리소스 name에 추가됩니다.
  _"setting server info"
});
리소스 경로는 서버의 endpoin uri(Uniform Resorce Identifier)를 구성하는데 사용되겠습니다. 이번 실습에서 사용할 endpoint urn은 아래와 같이 될 것입니다.
opc.tcp://<hostname>:4334/UA/MyLittleServer<hostname>에는 실습자의 컴퓨터 이름 혹은 정규화된 도메인 이름으로 대체 되어야 합니다.
Client는 이 URN을 사용해서 서버에 연결해야 합니다.
### 3. 서버 정보 세팅 setting server info
서버 build info와 같은 추가 정보를 세팅할 수 있습니다.
//Let`s create an instance of OPCUAServer
const server = new opcua.OPCUAServer({
  port: 4334, // 서버의 listening socker의 port입니다.
  resourcePath: "/UA/MyLittleServer", // 이 경로는 endpoint 리소스 name에 추가됩니다.
  buildInfo: {
    productName: "MySampleServer1",
    buildNumber: "7658",
    buildDate: new Date(2014,5,2)
  }
});
### 4. 서버 초기화 server initialisation
서버가 생성될 때, 초기화가 같이 될 겁니다. 초기화하는 동안, 서버는 default 노드셋(nodeset)을 로딩하고 모든 표준 OPCUA 변수의 바인딩을 준비하게 됩니다.
initialze 메서드는 초기화 프로세스가 완료될 때 실행 될 'callback' 기능이 필요한 비동기 작업입니다.
callback은 실행하려는 post_initialisation 단계를 포함하는 함수라고 합니다.
function post_initialze() {
  console.log("initialized");
  _"post initialisation"
}
server.initialize(post_initialize);
#### post initialisation
서버가 초기화되면 변수를 사용하여 default 서버 namespace를 확장하는 것이 좋습니다.
최종적으로 받아보려는 변수를 사용하여 서버 default 주소 공간을 확장하는 함수를 만들 수 있습니다.
이 함수는 초기화 콜백 내부에서 호출 됩니다.
addressSpace는 서버가 외부로 노출시킬 객체(MyDevice) 모델을 커스터마이징에 사용합니다.
function post_initialze() {
  console.log("initialized");
  // 여기서부터
  function construct_my_address_space(server) {

    const addressSpace = server.engine.addressSpace;
    const namespace = addressSpace.getOwnNamespace();

    // declare a new object
    _"add a new object into the objects folder"

    // add some variables
    _"add some variables"
  }
  construct_my_address_space(server)
  _"start the server"
  // 여기까지
}
server.initialize(post_initialize);
#### add a new object into the objects folder
_"add a new object into the objects folder" 위치 참조
const device = namespace.addObject({
  organizedBy: addressSpace.rootFolder.objects,
  browseName: "MyDevice"
});
#### add some variables
- ① 서버 namespace내에 read-only 변수를 추가하려면
getter하는 함수만 필요로 합니다.(value.get()) 이 함수는 스캔할 변수의 값을 포함하는Variant를 return합니다.
_"add some variables"위치 참조
// 새로 생성된 폴더 MyDevice에 MyVariable1이라는 변수를 추가합니다.
let variable1 = 1;

// 500ms마다 변경되는 variable1 에뮬레이터(복사 출력기?)
setInterval(function(){ variable1+=1; }, 500);

namespace.addVariable({
  componentOf: device,
  browseName: "MyVariable1",
  dataType: "Double",
  value: {
    get: function () {
      return new opcua.Variant({dataType: opcua.DataType.Double, value: variable1 });
    }
  }
});- ② 위의 코드에서는 변수에 NodeId를 지정하지 않았습니다. 이경우 서버가 자동으로 새 nodeId를 할당하게 됩니다. fancy한 nodeId를 사용하여 더욱 포괄적인 read/write 변수를 만들어 보겠습니다.
// 새로 생성된 폴더 MyDevice에 MyVariable2이라는 변수를 추가합니다.
let variable2 = 10.0;

namespace.addVariable({
  componentOf: device,
  nodeId: "ns=1;b=1020FFAA", // namespace4에서 약간 불명확한 NodeId 입니다.
  browseName: "MyVariable2",
  dataType: "Double",
  value: {
    get: function () {
      return new opcua.Variant({dataType: opcua.DataType.Double, value: variable2 });
    },
    set: function (variant) {
      variable2 = parseFloat(variant.value);
      return opcua.StatusCodes.Good;
    }
  }
});- ③ 실행 중인 시스템에서 사용 가능한 메모리의 %를 받아올 변수를 생성할 수 있습니다. 이 값을 계산하는 작은 유틸리티 함수를 아래와 같이 작성하겠습니다.
const os = require("os");
/**
* 실행 중인 시스템에서 사용 가능한 메모리의 %을 return합니다.
* @return {double}
*/
function available_memory() {
  // var value = process.memoryUsage().heapUsed / 1000000;
  const percentageMemUsed = os.freemem() / os.totalmem() * 100.0;
  return percentageMemUsed;
}
메모리의 %값을 받아오는 함수를 만들었으니, 이번에도 namespace.addVariable를 사용해서 percentageMemUsed 변수를 노출 시킬 차례입니다.
namespace.addVariable({

  componentOf: device,

  nodeId: "s=free+memory", // nodeID 문자열
  browseName: "FreeMemory",
  dataType: "Double",
  value: {
    get: function () {
      return new opcua.Variant({dataType: opcua.DataType.Double, value: available_memory() });
    }
  }
});
#### start the server
서버가 생성되고 초기화되면 비동기식 start 메서드를 사용하여 서버가 모든 엔드포인트를 시작하고 client 수신을 시작하도록 합니다.
server.start(function() {
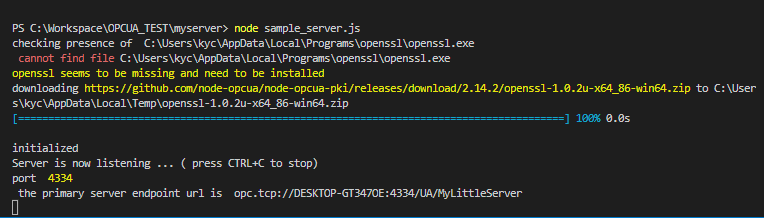
console.log("Server is now listening ... ( press CTRL+C to stop)");
console.log("port ", server.endpoints[0].port);
_"display endpoint url"
});#### display endpoint url
서버가 생성되고 구성되면 endpoint url을 검색할 수 있습니다.
const endpointUrl = server.endpoints[0].endpointDescriptions()[0].endpointUrl;
console.log(" the primary server endpoint url is ", endpointUrl );
### 실행 방법
터미널에서 cli 입력
node sample_server.js
## TS Client 실행
sample_client_ts.ts
이번에는 OPCUA client를 생성하여 서버의 변수를 모니터링을 할 것입니다.
### 준비
- node.js 8 혹은 그 이상의 버전이 필요합니다. 필요하시면 이 링크를 참조해주세요.
- client는 TS기반이기 때문에 typescript 3 혹은 그 이상의 버전이 필요합니다.
먼저 client를 위한 node project를 만들어 보겠습니다.
    $ mkdir sample_client_ts
    $ cd sample_client_ts
    $ npm init                      # creates a package.json
$ npm install node-opcua-client --savesample_client_ts.ts파일을 생성하고 작성 시작하겠습니다.
### 클라이언트 스크립트 (4단계 구성)
스크립트는 아래 4단계로 구성됩니다.
_"declaration"
_"client instantiation"
_"setting up a series of asynchronous oerations"
### 1.선언 declaration
inport {
  OPCUAClient,
    MessageSecurityMode, SecurityPolicy,
    AttributeIds,
    makeBrowsePath,
    ClientSubscription,
    TimestampsToReturn,
    MonitoringParametersOptions,
    ReadValueIdLike,
    ClientMonitoredItem,
    DataValue
} from "node-opcua";
### 2.클라이언트 인스턴스화 client instantiation
서버에 연결하기 위해서는, 클라이언트는 hostname, port 그리고 OPCUA endpoint으로 구성된 서버의 정확한 URI를 지정해야 합니다. ***opc.tcp://opcuademo.sterfive.com:26543***
위 URI에서 opcuademo.sterfive.com은 컴퓨터 이름 or 서버가 실행 중인 시스템의 정규화된 도메인 이름으로 대체 되어야 합니다.
### 3.일련의 비동기 작업 세팅 setting up a series of asynchronous operations
기본적으로 node-opcua client는 계속해서 endpoint에 연결을 시도하게 됩니다. 연결 전략에 해당하는 connectionsStrategy를 사용자 정의로 수정가능합니다. 아래와 같이 작성하면 한 번의 연결 재시도 실패 후, 연결이 실패하도록 설정할 수 있습니다.
const connectionStrategy = {
initialDelay: 1000,
maxRetry: 1
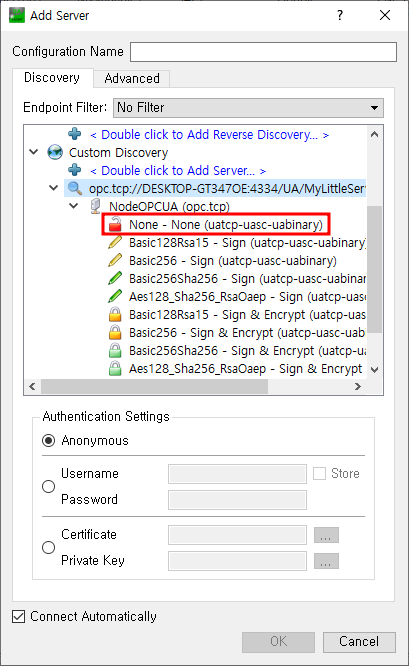
}securityMode를 None으로, securityPolicy를 None으로 설정하여 비보안 연결로 하겠습니다.
const options = {
  applicationsNme: "MyClient",
  connectionStrategy: connectionStrategy,
  securityMode: MessageSecurityMode.None,
  securityPolicy: SecurityPolicy.None,
  endpoint_must_exist: false,
};
const client = OPCUAClient.create(options);
// const endpointUrl = "opc.tcp://opcuademo.sterfive.com:26543";
const endpointUrl = "opc.tcp://localhost:26543";
실제 기능에 대한 placeholder와 client 수명 주기의 일반 스케줄을 위한 골격을 설정할 겁니다.(무슨 소리지?!) async.series 함수는 정의된 순서대로 모든 작업을 실행하므로 예를 들어 세션을 만들기 전에 연결이 확립되었다고 가정할 수 있습니다.
모든 작업이 완료되면 client의 연결이 끊어집니다.
Note: 이 방법을 사용하는 것이 좋은 이유에 대해 이해가 안될 경우 async.series의 cookbook을 참고하시기 바랍니다.
asnyc function main() {
  try {
    // step 1: connect to
    _"Connection"

    // step 2: createSession
	_"create session"

    // step 3: browse
    _"browsing the root folder"

    // step 4: read a variable with readVariableValue
    _"read a variable with readVariableValue"

    // step 5: install a subscription and install a monitored item for 10 seconds
    _"install a subscription"

    // step 6: finding the nodiId of a node by Browse name
    _"finding the nodeId of a node by Browse name"

    // close session
    _"closing session"

    // disconncting
    _"disconnecting"
  }	catch(err) {
    console.log("An error has occured: ", err);
  }
}
main();
#### Connection
await client.connect(endpointUrl);
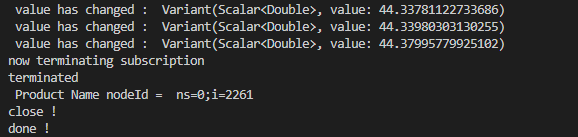
console.log("connected !");#### disconnecting
await client.disconnect();
console.log("done !");
#### create session
const session = await client.creatSession();
console.log("session created !");
#### closing session
await session.close();#### browsing the root folder
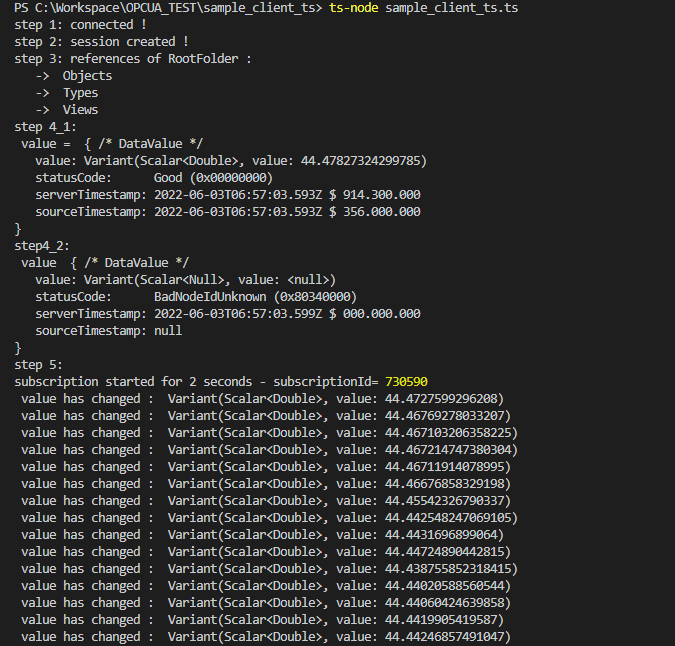
RootFolder를 탐색하여 모든 자식 노드 목록을 받을 수 있고, browseResult의 references 객체로 모든 속성에 접근이 가능합니다. 이제 모든 노드의 browseName을 출력해 보겠습니다.
const browseResult = await session.browse("RootFolder");

console.log("references of RootFolder :");
for(const reference of browseResult.references) {
  console.log( "   -> ", reference.browseName.toString());
}
#### read a variable with read
특정 VariableType 노드를 읽기 위해, 두 개의 매개변수 nodeId, attributeId를 사용해 ReadValueId 객체를 구성하여 read 함수에 우리가 행하려는 작업을 전달합니다.
첫 번째는 정확한 노드를 전달하고, 두 번째는 우리가 얻고자 하는 속성을 전달합니다.
SDK에서 제공하는 possible values는 AttributeIds 목록에서 열거됩니다. 각각의 필드에는 OPCUA 표준으로 정의된 OPCUA 호환 AttributeId가 포함됩니다.
const maxAge = 0;
const nodeToRead = {
  nodeId: "ns=3;s=Scalar_Simulation_Sting",
  attributeId: AttributeIds.Vaule
};
const dataValue = await session.read(nodeToRead, maxAge);
console.log(" value ", dataValue.toString());
#### read a variable with readVariableValue
readVariableValue함수를 통해 nodeId로 변수 값에 직접 접근하는 것도 가능합니다. 보다 간소화된 접근 함수들은 SDK reference를 참조 하시면 됩니다.
const dataValue2 = await session.readVariableValue("ns=3;s=Scalar_Simulation_Double");
console.log(" value = ", dataValue2.toString());
#### finding the nodiId of a node by Browse name
만약 nodeId를 알 수 없다면, 탐색을 통해 확인할 수 있습니다.
const browsePath = makeBrowsePath("RootFolder", "/Objects/Server.ServerStatus.BuildInfo.ProductName");

const result = await session.translateBrowsePath(browsePath);
const productNameNodeId = result.targets[0].targetId;
console.log(" Product Name nodeId = ", productNameNodeId.toString());
#### install a subscription
OPCUA는 변경 사항을 폴링하는 대신 객체에 대한 구독을 허용합니다. 매개변수 객체를 사용하여 the_session에서 구독을 만듭니다. 이후 구독이 종료되고 "started"과 같은 여러 구독 이벤트에 연결되는 시간 제한을 정의합니다. 실제 모니터 객체를 정의할 때 모니터링하려는 attributeId와 nodeId를 다시 사용합니다. 모니터 객체는 이벤트 시스템에 대한 hook를 다시 허용합니다.
const subscription = ClientSubscription.create(session, {
  requestedPublishingInterval: 1000,
  requestedLifetimeCount: 100,
  requestedMaxKeepAliveCount: 10,
  maxNotificationsPerPublish: 100,
  publishingEnabled: true,
  priority: 10
});

subscription.on("started", function() {
  console.log("subscription started for 2 seconds - subscriptionId=", subscription.subscriptionId);
}).on("keepalive", function() {
  console.log("keepalive");
}).on("termiated", function() {
  console.log("terminated");
});

// install monitored item

const itemToMonitor: ReadValueIdLike = {
  nodeId: "ns=3;s=Scalar_Simulation_Float",
  attributeId: AttributeIds.Value
};
cosnt parameters: MonitoringParametersOptions ={
  samplingInterval: 100,
  discardOldest: true,
  queueSize: 10
};

const monitoredItem = ClientMonitoredItem.create(
  subscription,
  itemToMonitor,
  parameters,
  TimestampsToReturn.Both
  );

monitoredItem.on("changed", (dataValue: DataValue) => {
  console.log(" value has changed : ", dataValue.value.toString());
});

async function timeout(ms: number) {
  return new Promise(resolve => setTimeout(resolve, ms));
}
await timeout(10000);

console.log("now terminating subscription");
await subscription.terminate();
### 실행방법
- 터미널에서 cli 입력
ts-node sample_client_ts.ts
client 파일을 실행시켰더니 명령어 사용 에러가 발생했다.
PS C:\Workspace\OPCUA_TEST\sample_client_ts> ts-node sample_client_ts.ts
ts-node : 이 시스템에서 스크립트를 실행할 수 없으므로 C:\Users\kyc\AppData\Roaming\npm\ts-node.ps1 파일을 로드할 수 없습니
다. 자세한 내용은 about_Execution_Policies(https://go.microsoft.com/fwlink/?LinkID=135170)를 참조하십시오.
위치 줄:1 문자:1
+ ts-node sample_client_ts.ts
+ ~~~~~~~
    + CategoryInfo          : 보안 오류: (:) [], PSSecurityException
해결 방법
1. 관리자 권환으로 PowerShell 실행
2.Get-ExecutionPolicycli 입력
Restrincted 라는 결과처럼 현재 권한 상태를 알 수 있다.
3.Set-ExecutionPolicy RemoteSignedcli 입력
Y입력
4.Get-ExecutionPolicycli 입력하여 변경된 상태 확인


- 권한 변경 후 client 시작
# 마치며
nodejs에서 제공하는 opcua모듈을 사용해 보았습니다. 구조는 보면 볼수록 어렵지 않다고 생각됩니다. 다만 제 기준에서 바로 이해 안가는 로직과 개념들이 있어 여러번 정독했네요.
Server에서 변수와 폴더를 생성하고 설정한 endPoint에 Client가 접근하여 모니터링 하는 방식으로 보입니다.(배우는 중이라 개념적으로 자신감이 떨어지는건 어쩔 수 없군요! 더 분발하겠습니다.)
PY을 사용해 opcua 프로토콜 방식을 사용할 수도 있을 것 같습니다. 구글이나 유튜브에 정보가 넘치더라구요! 영어공부는 덤으로 되겠습니다.
또한, Server endPoint에 직접적인 접근이 아닌 Pub/Sub 방식으로도 구현이 가능할 것 같습니다.
최상단에서 소개한 node-OPCUA 사이트에 Pub/Sub방식도 안내하고 있습니다.
Node-OPCUA goes PubSub - Episode 1
시간이 된다면 다음글은 Pub/Sub 방식을 이용한 모니터링을 해보도록하겠습니다.