
# 시작하는 글
이전글에서 실습했던 Client가 Server endPoint의 접근이 아닌 Pub/Sub 방식으로 모니터링할 수 있는데 nodejs에서 예제를 안내하고 있습니다.
참으로 친절하지 않을 수 없습니다.
# Node-OPCUA goes PubSub - Episode 1
NodeOPCUA는 이제 공식 OPCUA 사양의 Part14에 따라 Pub/Sub을 지원한다고 합니다.
NodeOPCUA-공식 OPCUA 사양 Part14
깊은 이해를 위해 Part14를 추가 참조하면 좋겠습니다.
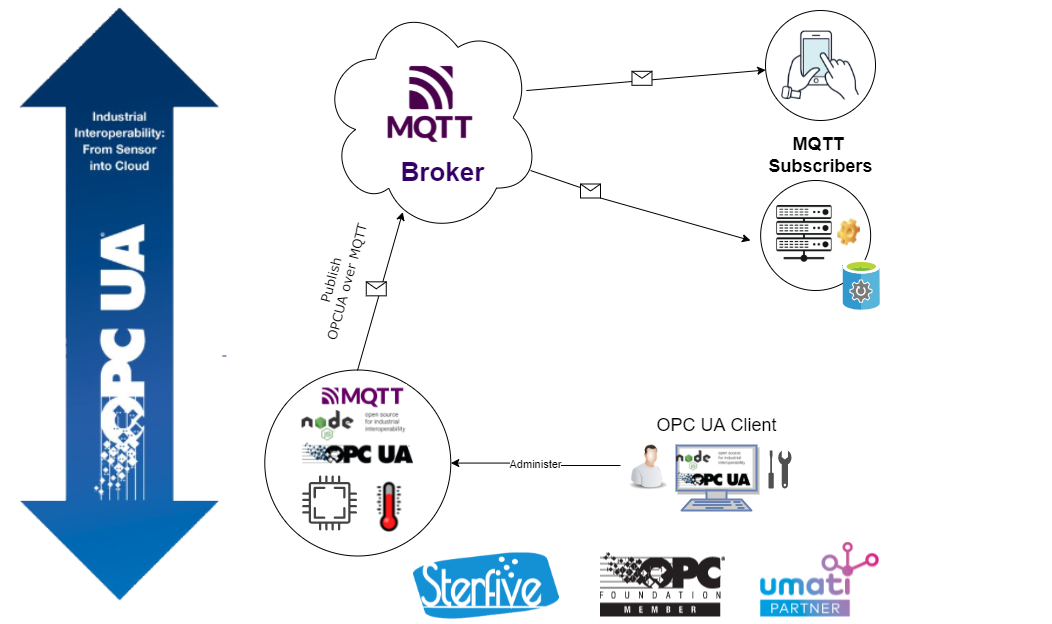
이번 글에서는 기존 OPCUA 서버를 확장하는 방식으로 진행하게 됩니다. 즉, 센서 값을 외부 MQTT 브로커로 스트리밍 하는 Pub/Sub 발행자로 전환할 예정입니다.
가정해본 다면, 데이터 분석을 위해 IoT Edge 장치가 클라우드로 데이터를 발행하게 하는 시나리오가 되겠습니다.
이글을 읽으시는 분들 중 Node-OPCUA 프로그래밍에 이미 익숙하다면, 간단한 OPCUA 서버를 만드는 방법을 이미 알고 계실 겁니다.
이번에는 NodeJS가 이미 설치되어 있다고 가정하고 진행하겠습니다. 공식 사이트에서는 3단계로 간단하게 전환작업을 마칠 수 있다고 말 합니다.
(혹시 모르시다면 이전글을 참고해주시기 바랍니다.)
그럼 NodeJS project를 생성하고 진행해 보도록 하겠습니다.
mkdir my-publishing-opcua-server
cd my-publishing-opcua-server
npm init -y
npm install node-opcua
이어서 작성했었던 server.js 파일을 수정합니다.
# the server
사이트에서는 아래와 같이 안내하고 있으나, DataType is not defined 라는 에러가 발생하게 됩니다.
class 추가 호출이 필요합니다.
어떤 에러가 발생하는지 궁굼하다면 첫 번째 호출문만 사용해서 server.js를 실행시키면 알아볼 수 있습니다.^^const { OPCUAServer } = require("node-opcua"); ↓ const { OPCUAServer,DataType,... } = require("node-opcua");
server.js
const { OPCUAServer } = require("node-opcua");
_"some additionnal imports"

(async() => {
  try {
    const server = new OPCUAServer({
      port: 26543
    });

    await server.initialize();

    _"add a temperature sensor"

    _"enable pub-sub service"

    await server.start();
    console.log("server started at ", server.getEndpointUrl());
  } catch(err) {
    console.log(err);
    process.exit(1);
  }
})();
_"constructing the configuration parameters"
## add a temperature sensor
온도 변수가 있는 센서를 생성하겠습니다.
아래 그림은 센서 옵션을 나타내는 OPCUA 모델 다이어그램 입니다.
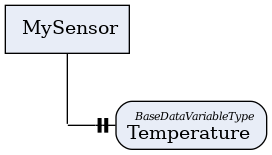
센서 인스턴스를 생성하는 JS 코드는 간단합니다.
const namespace = server.engine.addressSpace.getOwnNamespace();

const sensor = namespace.addObject({
  browseName: "MySensor",
  organizedBy: server.engine.addressSpace.rootFolder.objects
});

const temperature = namespace.addVariable({
  browseName: "Temperature",
  nodeId: "s=Temperature",
  componentOf: sensor,
  dataType: "Double",
  value: { dataType: DataType.Double, value: 0 }
});

// 참고: 온도 변수 nodeId는 `"ns=1;s=Temperature"`로 세팅 되었다.


_"simulate the temperature variation."
## simulate the temperature variation
분명 온도 값을 사용하기로 했지만, 여기에는 연결된 실물의 센서는 없지요. 그래서 사인그래프 공식을 응용하여 온도 생성기를 만들겠습니다.
setInterval(() => {
  const value = 19 + 5 * Math.sin(Date.now() / 10000) + Math.random()*0.2;
  temperature.setValueFromSource({ dataType: "Double", value });
}, 100);
## run the server
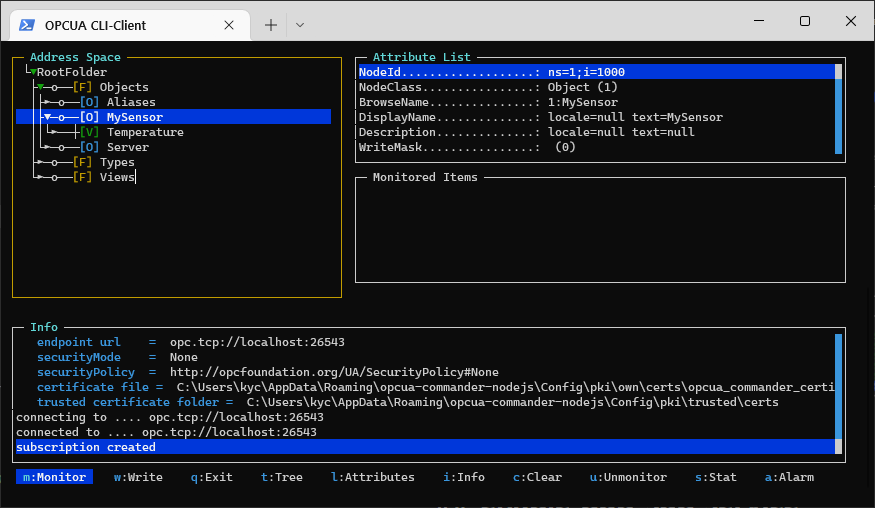
이제 서버를 시작하고 OPCUA 클라이언트를 사용하여 온도 값을 확인할 수 있습니다.
$ node server.js
opcua-commander를 사용해서 값을 모니터링 할 수 있습니다. 이경량 OPCUA 클라이언트는 콘솔에서 작동하며 GUI 프레임워크가 필요하지 않습니다.
$ npx -y opcua-commander -e opc.tcp://localhost:26543/RootFolder/Objects/MySensor/Temperature 변수로 이동하여 변경 사항을 확인할 수 있습니다.
## Adding PUB SUB support
이제 OPCUA Pub/Sub 사양을 사용하여 MQTT 브로커에 온도를 발행하려고 합니다. MQTT는 데이터 발행자가 거의 모든 데이터 유형을 관련 구독자에게 보낼 수 있도록 하는 generic Pub-Sub 프로토콜입니다. 매우 유연하고 편리하지만 구독자에게 전달되는 데이터 payload 형식을 적용하는 데 의존하지 않습니다. MQTT PUB/SUB를 통해 OPCUA를 사용하는 경우 payload는 JSON 객체 또는 이진 Blob일 수 있습니다. 또한 헤더, 메타데이터, 풍부한 콘텐츠 가능성 메시지 서명 및 암호화와 함께 표준 방식으로 구성됩니다. 여기서는 OPCUA JSON payload에 중점을 둘 것입니다. 두 가지 유형의 OPCUA JSON 인코딩이 가능합니다. 첫 번째는 일반(OPCUA가 아닌) 응용 프로그램에서 사용하는 데 사용할 수 있습니다. 두 번째 형식은 변형 유형과 같이 전송된 데이터 유형에 대한 추가 메타 정보를 포함합니다. 이 형식은 MQTT를 통해 두 개의 OPCUA 애플리케이션(클라이언트 또는 서버)을 동기화하는 데 사용할 수 있습니다. (이 부분은 다음 글에서 다시 다루도록 하겠습니다.)
우선은 서버에 Pub/Sub 확장을 추가하고, MQTT JSON 발행자를 생성하고, 온도 값을 게시하는 dataSetWriter를 만드는 데 집중하겠습니다.
node-opcua pubsub 서버 확장을 추가하려면 초기 단계가 필요합니다.
먼저node-opcua-pubsub-server 및 node-opcua-pubsub-expander모듈을 프로젝트로 가져옵니다 .
$ npm install node-opcua-pubsub-server node-opcua-pubsub-expander여기서 많이 헤맸는데, 가이드는 단순하게 두 종류의 모듈만 설치하고 호출할 것을 안내합니다. 문제는 import를 한 후에 어떻게 사용해야 하는지에 대한 내용이 전혀 없습니다... 그래서 그냥 server.js를 실행 시키면
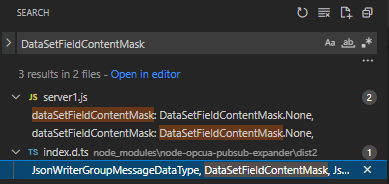
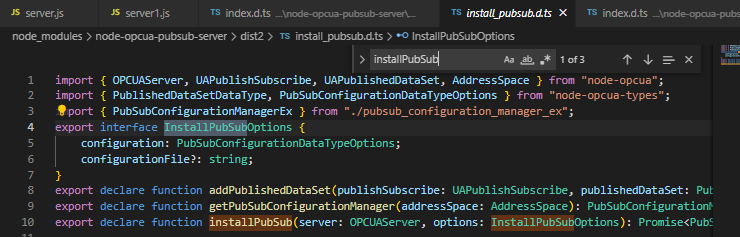
DataSetFieldContentMask is not define라는 에러만 맞닥뜨릴 뿐입니다. 맨땅에 해딩을 했는데, vscode에서ctrl+shift+f키로 전체 검색을 진행했습니다.
아래 결과와 같이node-opcua-pubsub-expander모듈에서 그토록 찾아 헤매던 class를 확인할 수 있었습니다. 모듈에 대한 index.d.ts파일을 켜놓은 상태에서만 검색이 되는것 같습니다.
아래 와 같이 모듈을 호출하고, 추가적인 수정방법은 각 파트에서 설명하겠습니다.
const pubsubServer = require('node-opcua-pubsub-server');
const pubsubExpander = require('node-opcua-pubsub-expander');
## enable pub-sub service
이제 installPubSub 유틸리티를 호출하여 OPCUA 서버를 Pub/Sub (준비) 발행자로 전환할 수 있습니다. 이 함수(기능)는 주소 공간의 표준 Server 객체 아래에 PublishSubscribe 객체를 생성하는 다소 무거운 작업을 수행하고 필요한 모든 메서드와 서비스를 바인딩합니다.
뭔말이고
출처: TCPschool.com-바인딩
바인딩(binding)
바인딩(binding)이란 프로그램에 사용된 구성 요소의 실제 값 또는 프로퍼티를 결정짓는 행위를 의미합니다.
예를 들어 함수를 호출하는 부분에서 실제 함수가 위치한 메모리를 연결하는 것도 바로 바인딩입니다.
이러한 바인딩은 크게 다음과 같이 구분할 수 있습니다.
1. 정적 바인딩(static binding) : 실행 시간 전에 일어나고, 실행 시간에는 변하지 않은 상태로 유지되는 바인딩임.
2. 동적 바인딩(dynamic binding) : 실행 시간에 이루어지거나 실행 시간에 변경되는 바인딩임.
이러한 동적 바인딩은 늦은 바인딩(late binding)이라고도 불립니다.
하지만 PHP에서는 정적 바인딩과 동적 바인딩의 중간 정도 수준인 늦은 정적 바인딩(LSB)을 제공하고 있습니다.
이제 await server.initialize(); 을 추가하겠습니다.
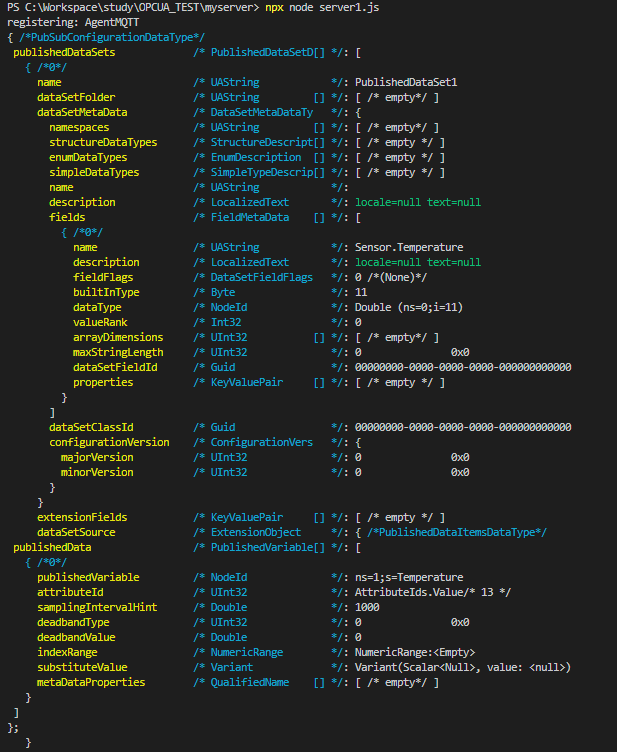
const configuration = getPubSubConfiguration();
console.log(configuration.toString());
//
await installPubSub(server, {
    configuration,
});
수정진행은 본 게시물의 역순으로 진행되고 있습니다.
installPubSub is not defined라는 에러가 발생하고 터미널에는 마치 명령어--help와 도 같은 결과가 나왔습니다.

지금까지 한번도 사용하지 않았던pubsubServer모듈이 눈에 띕니다. 그리고 내부에서installPubSub함수를 찾을 수 있었습니다.
수정하겠습니다.await pubsubServer.installPubSub(server, {성공했습니다..!! 이제 맨 마지막 파트인 # MQTT setting을 봐주시기 바랍니다.

## construct the configuration parameters
발행자 및 관련 데이터 세트를 완전히 구성하려면 매개변수 세트를 제공해야 합니다. 데이터 세트는 payload에 발행되어질 변수를 뜻합니다.
설정 객체를 생성하는 getPubSubConfigruation 함수를 분석해 보겠습니다.
이 함수는 Pub/Sub 구성이 포함된 PubSubConfigurationDataType 객체를 반환합니다. 설정(configuration)은 연결 및 발행된 데이터 세트를 뜻합니다.
function getPubSubConfiguration()
{
  _"create the connection"
  const connection = createConnection();

  _"create the published dataset";
  const publishedDataSet = createPublishedDataSet();

  return new PubSubConfigurationDataType({
    connections: [connection],
    publishedDataSets: [publishedDataSet] });
}PubSubConfiguration은 연결 및 발행된 데이터 세트를 뜻합니다.
연결(connection)에는 사용된 Pub/Sub 전송 프로토콜과 관련된 특정 매개변수와 브로커 또는 broadcasting system 필요한 다양한 매개변수가 포함됩니다.
발행된 데이터 세트는 payload 콘텐츠(content)에 담기고, 발행된 변수를 서버 주소 공간(address space)의 해당하는 OPCUA 변수와 연결하기 위한 매핑 정보를 제공합니다.
우리는 앞으로 OPCUA JSON MQTT 연결과 단일 데이터 세트를 정의해야 합니다.
PubSubConfigurationDataType에도 not defined 에러가 있습니다. 이상한점이 있습니다. node쪽에서 버전up을 했는지는 몰라도node-opcua-pubsub-expander모듈 내부에PubSubConfigurationDataType라는 class는 없고MyPubSubConfigurationDataType으로 extends되어 있습니다.
테스트해보면 My글자를 안 붙이고는it is not a constructor라는 에러가 나오는 걸 알 수 있습니다.
일단 extends된 것을 확인했으니 My로 수정해서 계속 진행하겠습니다.return new pubsubExpander.MyPubSubConfigurationDataType({수정을 완료하니 configuration datatype을 출력할 수 있게 되었습니다.


## create the connection
OPCUA MQTT JSON 전송은 transportProfileUri를 Transport.MQTT_JSON 형식으로 설정해야 합니다.
PubSubConnection에는 발행하려는 MQTT브로커의 주소가 포함되어 있습니다. 데모에서는 "mqtt:broker.hivemq.com:1883"에서 Hivemq가 제공하는 공개 데모 브로커를 사용합니다.
function createConnection() {

    const mqttEndpoint = "mqtt:broker.hivemq.com:1883";

    _"create the writer group";
    const connection = new MyMqttJsonPubSubConnectionDataType({
        enabled: true,
        name: "Connection1",
        transportProfileUri: Transport.MQTT_JSON,
        address: {
            url: mqttEndpoint,
        },
        writerGroups: [writerGroup],
        readerGroups: []
    });
    return connection;
}
PubSubConnection에는 데이터 스트림의 MQTT topic을 설명하기 위해 하나의 dataSetWriter 정의도 필요합니다. 또한 각 JSON 메세지에 제공될 메타데이터를 형성하는 추가 플래그가 포함되어 있습니다. dataSetWriter는 WriterGroups에 할당되어야 합니다.
실행하다보면 여기에도 not defined 에러가 발생할겁니다. 그런데 다른 것과 다르게 index.d.ts를 켜놓 상태에서도 검색이 안됩니다.
왜냐하면 pubsubExpander 모듈안에 export시킨 다른 library 에 있기 때문입니다. 참 어렵네요. 저도 많은 것을 뜯어보고 알아가고 있습니다.
MyMqttJsonPubSubConnectionDataType를 수정해줍니다.pubsubExpander.MyMqttJsonPubSubConnectionDataType
Transport is not defined가 발생하셨나요? 하지만 Transport는 검색이 잘 안됩니다. transportProfileUri는 찾았습니다. 역시 Expander 모듈입니다. ㅎㅎ 수정하겠습니다.transportProfileUri: pubsubExpander.Transport.MQTT_JSON,
## create the writer group
WriterGroups에는 이 그룹에 속한 모든 dataSetWriter에게 공통적인 messageSettings 및 transportSettings와 같은 추가 매개변수가 포함됩니다.
발행 간격에 대한 정보도 포함되어 있습니다.
publishingInterval은 JSON 메세지가 브로커에 발행되는 간격(비율)을 나타냅니다.
_"create the dataset writer"
const writerGroup = {
dataSetWriters: [dataSetWriter],
enabled: true,
publishingInterval: 1000,
name: "WriterGroup1",
messageSettings: {
networkMessageContentMask: JsonNetworkMessageContentMask.PublisherId,
},
transportSettings: {
requestedDeliveryGuarantee: BrokerTransportQualityOfService.AtMostOnce,
},
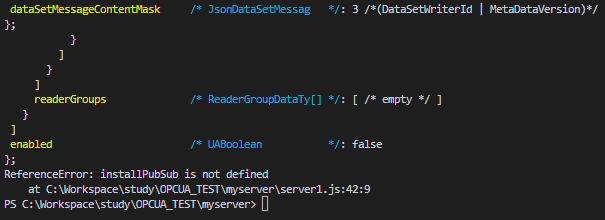
};여기서 실행하면
JsonDataSetMessageContentMask is not defined및BrokerTransortQuantityOfService is not defined가 발생합니다. 수정해 주겠습니다.pubsubExpander.JsonDataSetMessageContentMask.andpubsubExpander.BrokerTransortQuantityOfService
저는 ## create the dataset writer 먼저 수정했습니다.
## create the dataset writer
dataSetWriter는 추가적인 메세지 설정 매개변수를 포함합니다.
dataSetName : 보낼 데이터를 생성하는 발행된 dataSet의 name입니다.
queueName : 발행하려는 mqtt topic이 포함되어 있습니다.
stervfive-opcua-demo/json/data/temperature-sensor1.
const dataSetWriter = {
    dataSetFieldContentMask: DataSetFieldContentMask.None,
    dataSetName: "PublishedDataSet1",
    dataSetWriterId: 1,
    enabled: true,
    name: "dataSetWriter1",
    messageSettings: {
        dataSetMessageContentMask:
            JsonDataSetMessageContentMask.DataSetWriterId |
            JsonDataSetMessageContentMask.MetaDataVersion,
    },
    transportSettings: {
        queueName: "stervfive-opcua-demo/json/data/temperature-sensor1",
    },
};
dataSetName: "PublsihedDataSet1"은 아래 정의된 PublishedDataSet1이라는 발행된 데이터 집합에서 수집할 데이터를 발행하도록 데이터 집합에 명령합니다.
dataSetFieldContentMask: DataSetFieldContentMask.None이렇게 사용하면 실행시 is not defined를 경험하게 됩니다. 이렇게 고쳐줍니다.dataSetFieldContentMask: pubsubExpander.DataSetFieldContentMask.None,
이상태로 실행을 하게 되면Cannot find module 'node-opcua-file-transfer에러가 발생합니다.
아래 cli를 설치합니다.npm install node-opcua-file-transfer이 다음 실행하면
JsonDataSetMessageContentMask is not defined가 발생합니다. 동일하게 수정해줍니다.pubsubExpander.JsonDataSetMessageContentMask.
## create the published dataset
PublishedDataSet : payload 메세지의 내용과 해당 OPCUA 변수입니다.
dataSetMetaData.fields 배열은 payload 메세지에 노출된 속성 목록을 포함합니다.
우리의 경우 노출시킬 변수가 하나만 있습니다. 속성 이름을 지정해 보겠습니다.
가이드 처럼 "Sensor.Temperature"로 하겠습니다.
또 이 것이 Double 형 값임을 지정해줘야 합니다.
dataSetSource.publishedData 배열은 dataSetMetaData.fields에서와 같은 수의 요소를 포함합니다.
dataSetSource.publishedData의 각 요소는 데이터 세트 속성을 attributeId 및 publishedVariable매개변수를 사용하여 서버 주소 공간의 해당 OPCUA 변수에 매핑하는데 사용됩니다.
또한, samplingIntervalHint 매개변수에서 제안된 샘플링 간격을 나타냅니다. 우리의경우 모니터링할 변수의 nodeId는 "ns=1;s=Temperature" 입니다.
function createPublishedDataSet() {
const publishedDataSet = {
name: "PublishedDataSet1",
dataSetMetaData: {
fields: [
{
name: "Sensor.Temperature",
builtInType: DataType.Double,
dataType: resolveNodeId("Double"),
},
],
},
dataSetSource: new PublishedDataItemsDataType({
publishedData: [
{
attributeId: AttributeIds.Value,
samplingIntervalHint: 1000,
publishedVariable: `ns=1;s=Temperature`,
},
],
}),
};
return publishedDataSet;
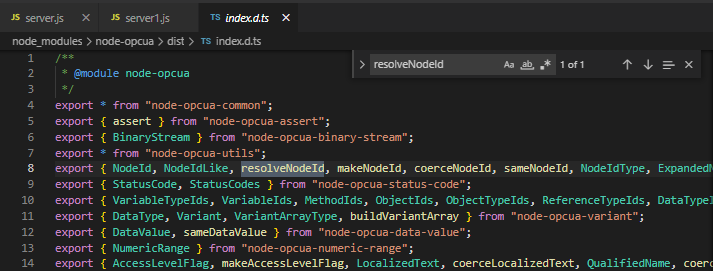
}또 실행하다보면 resolveNodeId is not defined 에러가 발생합니다. 우리는 지금 3개의 모듈을 사용 중입니다. 하나씩 열어서 검색해보겠습니다. 마침
node-opcua모듈에서 바로 확인 할 수 있었습니다.
수정하겠습니다.const { OPCUAServer, DataType, resolveNodeId } = require("node-opcua");
PublishedDataItemDataType도 not defined 에러가 있습니다. 수정하겠습니다.pubsubExpander.PublishedDataItemsDataType
AttributeIds도 not defiend 에러가 있습니다.
수정하겠습니다.const { OPCUAServer, DataType, resolveNodeId, AttributeIds } = require("node-opcua");
## starting the server
이제 서버를 실행 시킬 수 있습니다.
$ npx node server.js## 부록
Subscribing to the OPCUA PubSub topic
We can now verify that a MQTT client can subscribe to the published data. Let visit the HiveMQ’s public WebSocket client page at http://www.hivemq.com/demos/websocket-client/ .
and add a topic subscription to our topic: stervfive-opcua-demo/json/data/temperature-sensor1.
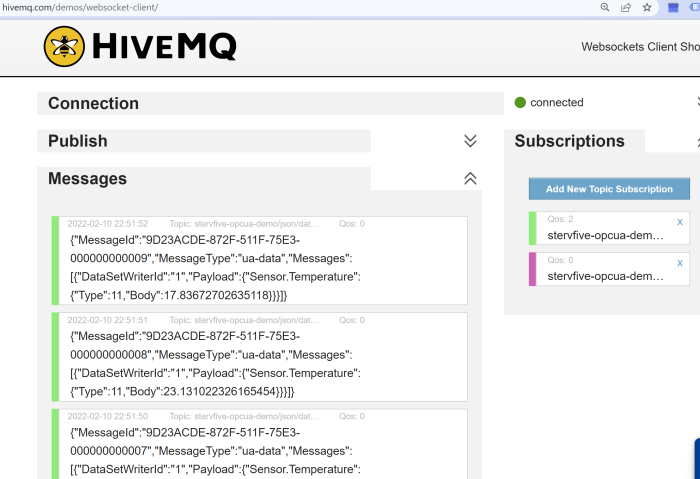
Here we go ! the data stream is up and running. It’s time to collect the flow of data to feed our data lake and produce the data we need for your predictive maintenance application.
Conclusion
We have demonstrated how to add PubSUb support to a node-opcua server application and created a data stream that publishes a sensor value to an MQTT broker by using a standardized OPCUA JSON payload.
Our next article will explore the PublishSubscribe object in the server address space. This object exposes the PubSub configuration of the OPC-UA server. It’s used to modify the connection parameters or the payload shape; dynamically, while the server is running.
The node-opcua-pubsub-* modules demonstrated here are developed by sterfive. They are published under a dual-license. The public version is suitable for evaluation in your proof of concept. The professional edition can be subscribed to from www.sterfive.com and comes with complete source code, unit tests, an extended license, professional support. It is suitable for industrial grade applications. contact us for more information
references:
the “Node-OPCUA by example” book
the Node-OPCUA membership subscription
HiveMQ’s public demo MQTT broker
HiveMQ public WebCient
Eclipse Mosquitto
Gyphy
# MQTT Setting
가이드에서는 HiveMQ’s public WebSocket client page를 안내하고 있습니다만, 제가 익숙치 않은 관계로 평소 사용하던 tool로 테스트 해보겠습니다. 저는 MQTTBox를 사용했습니다.
-
MQTT CLIENT SETTING

-
Topic 세팅 및 Sub 시작!
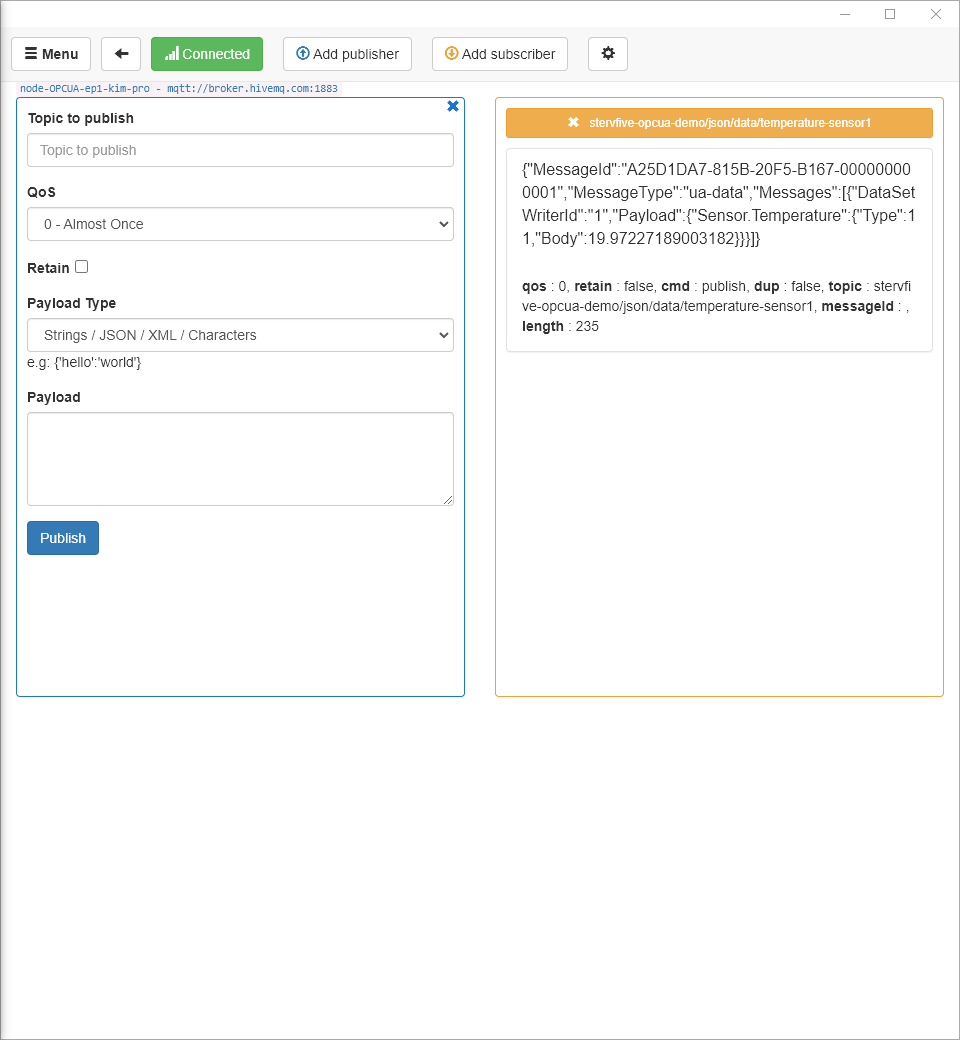
정상작동 하는것을 확인했습니다!
# 마치며
이전글에 비해 상당히 애먹은 실습이었습니다.
simple server를 배웠다면 이정도 수준의 응용은 기본적으로 요구되나 봅니다..
주니어 개발자의 벽이 얼마나 높은지를 절실하게 느끼게 되는 실습이었습니다. ㅠㅠ
C#이나 다른 언어를 사용했다면 더 많은 리소스로 실습을 할 수 있었을 거라 예상합니다.
하지만 저는 node-opcua를 꼭 사용해야 했던 터라 될 때까지 파고들었습니다.
그 끝은 다행히도 공식사이트에 대한 신뢰를 보답받은 느낌입니다.^^
node분들이 더 열심히 일해주시기를 간절히 바래봅니다 ㅎㅎ.
시간이 된다면 다음은 Client 파일을 따로 생성해 Sub 해보도록 하겠습니다.
수고하셨습니다.