
Fragment란?
사전적 의미로 Fragment란 조각을 의미한다.

피자!
우리가 앱을 개발하다보면 액티비티에 부분적인 화면을 추가하고 싶을 때가 있다. 특히, 한 액티비티에서 여러 화면이 전환되게 만들고 싶을 때 이를 도와줄 수 있는 것이 Fragment이다.
특징
1. 프래그먼트의 특징
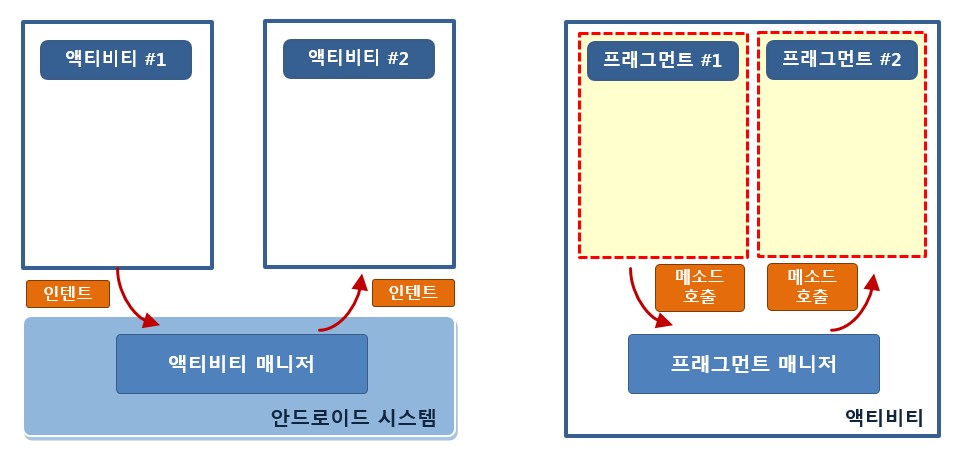
Fragment는 기본적으로 액티비티 위에서 동작하기 때문에 비슷한 구조와 특징을 갖고있다. 액티비티간 이동은 시스템에서 Intent로 하듯이, Fragment는 Fragment Manager를 통해 이동한다.
이때 Fragment는 Activity위에서 동작하기 때문에 Intent가 아닌 메소드 호출을 통해 이동하게된다.
2. 프래그먼트의 사용법
Fragment도 액티비티와 마찬가지로 xml파일과 class파일 쌍으로 구성되며 name을 통해 불러오거나 FragmentManager를 통해 불러올 수 있다. 또한 Fragment는 자체적으로 inflate해주는 setContentView가 없으므로 직접 inflate된 뷰 객체를 반환해줘야 한다.
사용법
Fragment도 액티비티처럼 기본적으로 xml파일과 소스코드파일 하나로 구성되며 setContentView()함수가 없기때문에 직접 inflate하여 view를 불러와야 한다. 우선은 Fragment 2개와 Activity 1개를 만들어준다.
<?xml version="1.0" encoding="utf-8"?>
<RelativeLayout
    xmlns:android="http://schemas.android.com/apk/res/android"
    android:layout_width="match_parent"
    android:layout_height="match_parent"
    android:background="#F44336">

    <TextView
        android:id="@+id/textView"
        android:layout_width="wrap_content"
        android:layout_height="wrap_content"
        android:textSize="40sp"
        android:textColor="#FFFFFF"
        android:text="Fragment 1" />

</RelativeLayout>
↑ fragment_main.xml
간단하게 textView만 띄워주었다.
class MainFragment : Fragment() {

    override fun onCreateView(
    inflater: LayoutInflater,
    container: ViewGroup?,
    savedInstanceState: Bundle?
    ) : View? {
        val rootView = inflater.inflate(R.layout.fragment_main, container, false)

        return rootView
    }
}
↑ MainFragment
Fragment를 상속받아 onCreateView()함수를 override해준다. 그리고 앞서 말했듯 뷰를 inflate해준 뷰 객체를 반환해준다.
<FrameLayout
    android:layout_width="match_parent"
    android:layout_height="match_parent"
    android:layout_below="@id/button" >

    <fragment
        android:id="@+id/fragment_main"
        android:layout_width="match_parent"
        android:layout_height="match_parent"
        android:name="com.juhy.myapplication.MainFragment" />

</FrameLayout>
↑ activity_main.xml
fragment를 띄울 Activity를 넣어준뒤, name에 만든 프래그먼트를 넣어준다.
class MainActivity : FragmentActivity() {
    override fun onCreate(savedInstanceState: Bundle?) {
        super.onCreate(savedInstanceState)
        setContentView(R.layout.activity_main)
    }
}
만약 프래그먼트를 코드에서 넣어주고 싶다면 FragmentManager를 통해 넣어주면 된다.
class MainActivity : FragmentActivity() {

    override fun onCreate(savedInstanceState: Bundle?) {
        super.onCreate(savedInstanceState)
        setContentView(R.layout.activity_main)

        val button = findViewById<Button>(R.id.button);
        button.setOnClickListener{
            val fragment1 = MainFragment()
	    supportFragmentManager()
               .beginTransaction()
               .add(R.id.framelayout, fragment1)
               .commit()
        }
    }
}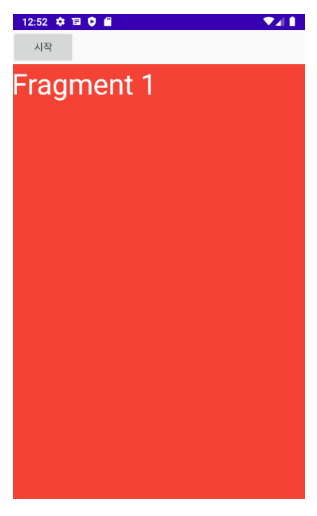
실행하면 잘 나오는걸 볼 수 있다.
Activity에서 Fragment로 전환하기
매우 간단하다. 우선 위의 방법대로 Fragment2와 MainActivity에 버튼을 만들어준뒤 버튼 클릭이벤트에 위에서 사용한 코드를 넣어주면 된다.
class MainActivity : FragmentActivity() {

    override fun onCreate(savedInstanceState: Bundle?) {
        super.onCreate(savedInstanceState)
        setContentView(R.layout.activity_main)

        val fragment_main = MainFragment()
        val fragment_menu = MenuFragment()

        val button_main = findViewById<Button>(R.id.button_main)
        val button_menu = findViewById<Button>(R.id.button_menu)

        button_main.setOnClickListener{
                supportFragmentManager()
                .beginTransaction()
                .replace(R.id.framelayout, fragment_main)
                .commit()
            }


        button_menu.setOnClickListener{
                supportFragmentManager()
                .beginTransaction()
                .replace(R.id.framelayout, fragment_menu)
                .commit()
        }
    }
}
이 때 add가 아닌 replace를 해주면 된다.
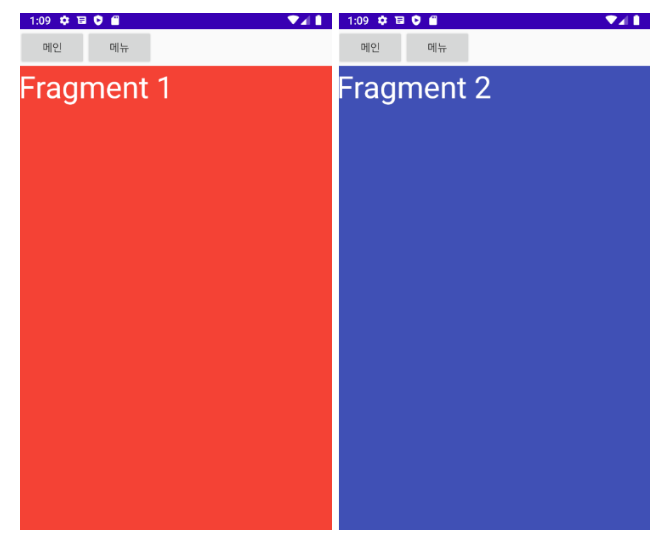
위 사진처럼 정상적으로 잘 작동되는 것을 볼 수 있다.
Fragment to Fragment
이 글을 쓰게된 본격적인 이유다. 앞서 Activity에서 Fragment로 전환할 때와 다르게 Fragment에서 Fragment로 전환하는 것은 이동할 Fragment가 자신의 하위레벨이 아니기 때문에 직접 제어가 불가능하다. 따라서 상위 레벨인 Activity에서 제어해줘야 한다.
fun changeFragment(index: Int){
    when(index){
        1 -> {
        supportFragmentManager()
        .beginTransaction()
        .replace(R.id.framelayout, fragment_main)
        .commit()
        }

        2 -> {
        supportFragmentManager()
        .beginTransaction()
        .replace(R.id.framelayout, fragment_menu)
        .commit()
        }
    }
}
↑ 상위 Activity에선 하위 Fragment를 이동시켜줄 함수를 정의한다.
class MainFragment : Fragment() {

    fun onCreateView(inflater: LayoutInflater , container: ViewGroup? , savedInstanceState Bundle?): View? {
        val rootView = inflater.inflate(R.layout.fragment_main, container, false)

        val mActivity = activity as MainActivity
        val btn_change = rootView.findViewById(R.id.button_change);
        btn_change.setOnClickListener{
                activity.changeFragment(2)
	}
        return rootView
    }
}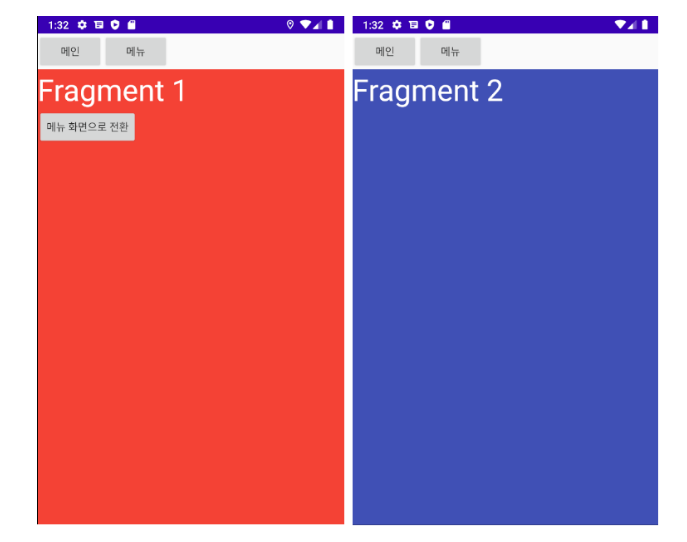
잘 전환되는걸 볼 수 있다.
소소한 팁을 적자면 현 소스코드에선 피치못할
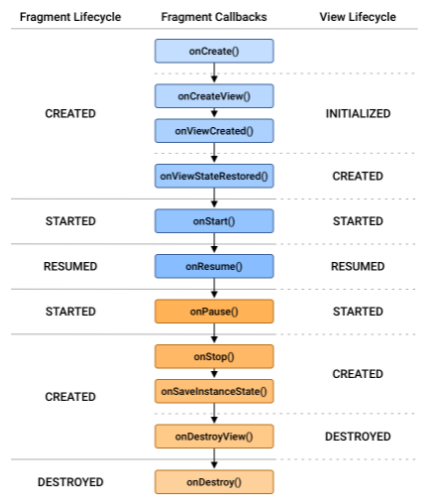
(귀찮아서)이유로 UI 참조 및 이벤트 선언을 onCreateView에 적었지만 아래에 나와있는 Fragment생명주기를 보면 onViewCreated가 onCreateView의 콜백이므로 onViewCreated에 이벤트를 작성해주는 것이 옳다. 아주 가끔 뷰 객체가 생성되지 않는 경우도 있기 때문에 되도록이면 콜백을 받는 onViewCreated에서 View의 초기값을 설정해주거나, adapter를 설정하거나, 이벤트를 정의하거나 해주면 된다.
출처
Fragment사용법
의외로 잘 모르는 Fragment의 Lifecycle
different between onCreateView and onViewCreated