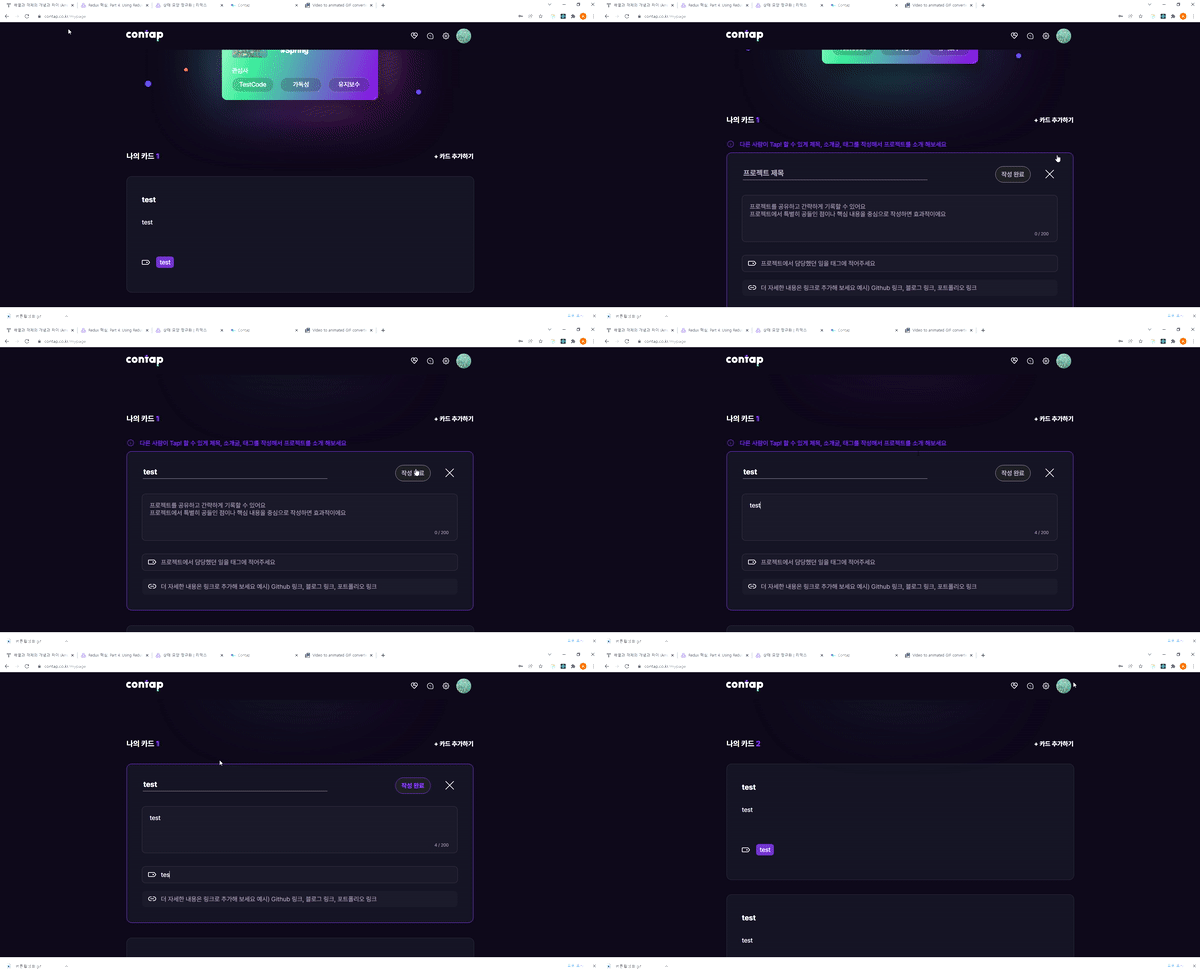
작성 버튼 활성화 적용
카드 추가하는 화면에서 가이드문구는 비활성화일 경우에만 보이고 활성화가 되면 가이드문구는 사라지며, 작성완료 가능 -> 디자이너님의 요청으로 작성 버튼 활성화 방식 적용
// 제목, 설명, 태그가 모두 작성되야 활성화가 된다는 의미
 const activation = title !== '' && desc !== '' && tagsStr !== '';

 // activation이 false일 경우 즉, 비활성화일 경우 가이드 문구가 보임
  {!activation && (
        <div style={{ display: 'flex', marginBottom: '12px' }}>
          <div style={{ marginRight: '16px' }}>
            <InfoLight />
          </div>
          <Text regular20 color={ColorStyle.PrimaryPurple}>
            다른 사람이 Tap! 할 수 있게 제목, 소개글, 태그를 작성해서 프로젝트를
            소개 해보세요
          </Text>
        </div>
      )}

     ...생략...

          <AddBtn
              onClick={addCardBack}
              activation={activation}
            >
              <Text
                bold20
                color={activation ? ColorStyle.PrimaryPurple : ColorStyle.Gray300}
              >
                작성 완료
              </Text>
            </AddBtn>

     ...생략...

const AddBtn = styled.div`
  width: 111px;
  height: 50px;
  border-radius: 30px;
  border: 1px solid
  // components의 props인 activation을 전달받아서 사용!
    ${({ activation }) =>
      activation ? ColorStyle.PrimaryPurple : ColorStyle.Gray300};
  font-size: ${FontScale.Body1_20};
  font-family: ${FontFamily};
  font-weight: 700;
  margin-right: 36px;
  margin-bottom: 40px;
  background: ${ColorStyle.BackGround300};
  p {
    cursor: pointer;
    text-align: center;
    line-height: 50px;
  }
  &:hover {
    background-color: ${({ activation }) =>
      activation ? ColorStyle.PrimaryPurple : ColorStyle.BackGround300};
    border: 1px solid
      ${({ activation }) =>
        activation ? ColorStyle.PrimaryPurple : ColorStyle.Gray300};
    transition: 0.3s;
    p {
      color: ${({ activation }) =>
        activation ? ColorStyle.Gray500 : ColorStyle.Gray300};
    }
  }
조건부 스타일링 : styled-components는 Component의 props를 전달받아 사용하는 것이 가능하다. 템플릿 리터럴 내에서 javascript를 사용하는 것과 같은 형식이며, 내부에서 선언된 함수는 props를 파라미터로 실행된다.
 위 사진을 보면 가이드문구는 필수사항을 모두 작성했을때 없어지고 작성완료도 가능해지는걸 확인할 수 있다.
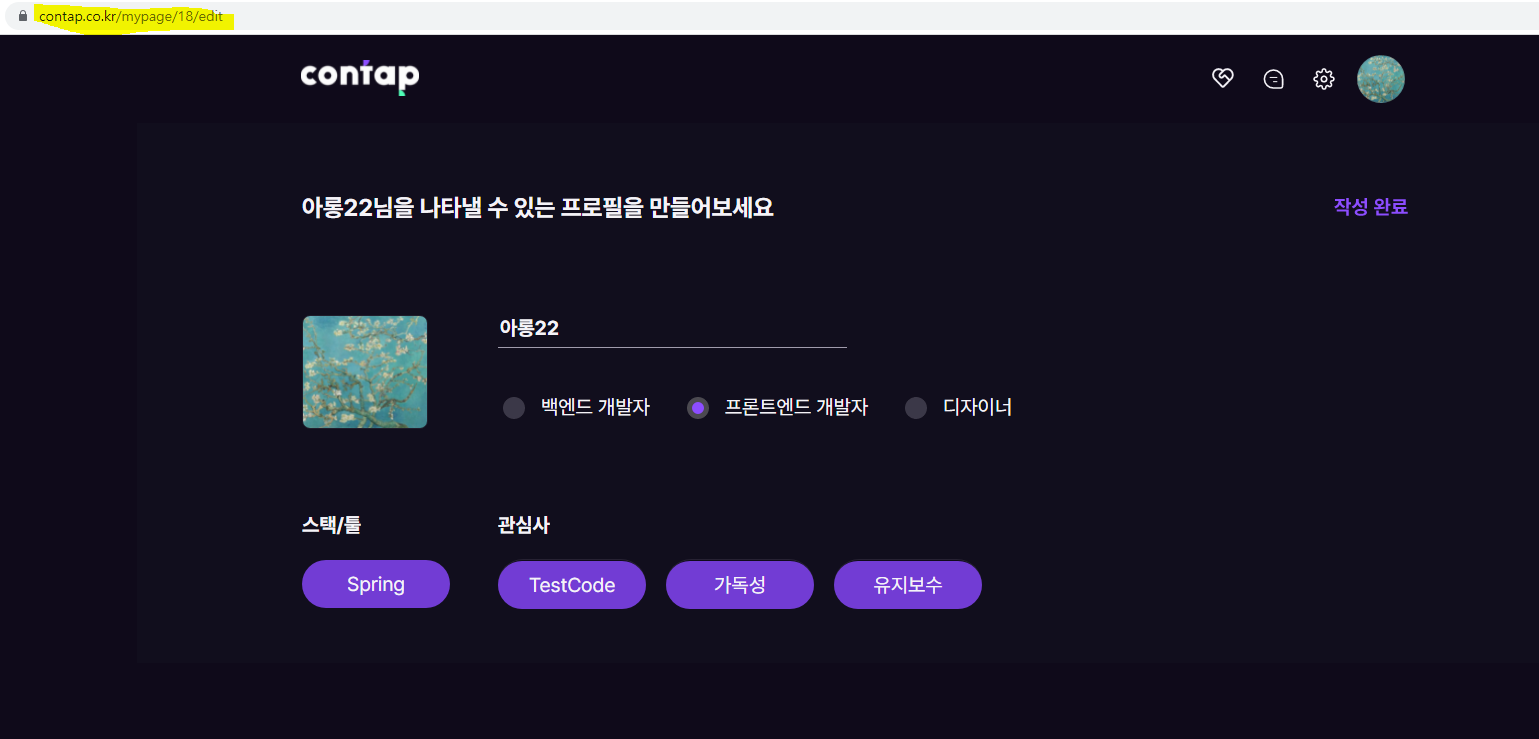
마이페이지 프로필 수정 url 변경
원래는 path="/edit" 이였는데 프로필을 수정하는 userId가 url에 들어가도록 추가했다.
// App.js
   <PrivateRoute
       path="/mypage/:userId/edit"
       component={CardEdit}
       exact
    />
// cardEdit pages
import { useParams } from 'react-router-dom';
const params = useParams();
const userId = params.userId;useParams로 생각보다 간단하게 해당 userId값을 넣을 수 있었다. 😆
 위 사진처럼 프로필 수정하기 페이지 url에서 중간에 18이라는 userId값이 잘 들어간 걸 확인 할 수 있다.
useParams란?
리액트 라우터의 API이며, useParams는 URL 매개변수의 키/값 쌍의 개체를 반환한다. 현재 의 match.params에 액세스하는 데 사용한다.
React Router 주요 구성 요소
React Router에는 세 가지 기본 범주의 구성 요소가 있다.
<BrowserRouter>및<HashRouter>와 같은 라우터<Route>및<Switch>와 같은 경로 일치자- 및 탐색(예:
<Link>,<NavLink>및<Redirect>)
또한 탐색 구성 요소를 "route changers"로 생각하고 싶다. 웹 애플리케이션에서 사용하는 모든 구성 요소는 react-router-dom에서 가져와야 한다.(아래 import 코드 참고)
import { BrowserRouter, Route, Link } from "react-router-dom";라우터란?
모든 React Router 애플리케이션의 핵심에는 라우터 구성 요소가 있어야 한다. 웹 프로젝트의 경우 react-router-dom은 <BrowserRouter> 및 <HashRouter> 라우터를 제공한다. 둘의 주요 차이점은 URL을 저장하고 웹 서버와 통신하는 방식이다.
- A
<BrowserRouter>는 일반 URL 경로를 사용한다. 일반적으로 가장 보기 좋은 URL이지만 서버를 올바르게 구성해야 한다. 특히 웹 서버는 React Router에 의해 클라이언트 측에서 관리되는 모든 URL에서 동일한 페이지를 제공해야 한다. Create React App은 개발 단계에서 이를 즉시 지원하며 프로덕션 서버를 구성하는 방법에 대한 지침도 함께 제공된다.
<HashRouter>는 URL의 해시 부분에 현재 위치를 저장하므로 URL은 http://example.com/#/your/page와 유사하다. 해시는 서버로 전송되지 않으므로 특별한 서버 구성이 필요하지 않는다.
라우터를 사용하려면 요소 계층의 루트에서 렌더링되었는지 확인해라. 일반적으로 다음 과 같이 라우터에서 최상위 요소를 래핑한다.
import React from "react";
import ReactDOM from "react-dom";
import { BrowserRouter } from "react-router-dom";

function App() {
  return <h1>Hello React Router</h1>;
}

ReactDOM.render(
  <BrowserRouter>
    <App />
  </BrowserRouter>,
  document.getElementById("root")
);
P.S. 참고 :
https://v5.reactrouter.com/web/api/Hooks/useparams
https://v5.reactrouter.com/web/guides/primary-components
https://dkje.github.io/2020/10/13/StyledComponents/
오늘은 styled-components에서 props로 전달 받아서 조건부 스타일링을 하는것이 가능하다는 것을 배웠으며, url에서 userId값을 넣는걸 적용하면서 라우터에 대해서도 공식문서를 통해 공부하게됐다.😀
