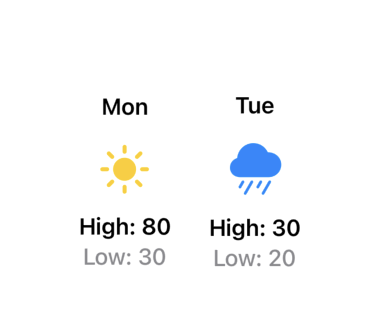
이 내용은 Apple 공식 SwiftUI 튜토리얼을 따라 실습한 내용입니다.
📁 프로젝트 파일 구조
Tutorial/
├── TutorialApp.swift        # @main 진입점
└── ContentView.swift        # DateInfo 구조체 + 날씨 UI
🧱 데이터를 담는 구조체 (Struct)
뷰에서 사용하는 데이터를 구조체로 정의하면 재사용성과 가독성이 높아진다.
struct DateInfo: View {
    let days: String    // 요일 (Mon, Tue, ...)
    let isRainy: Bool   // 비 여부
    let high: Int       // 최고 기온
    let low: Int        // 최저 기온

    var body: some View { ... }
}
View프로토콜을 채택한 구조체는body를 통해 UI를 표현한다.
let프로퍼티로 선언하면 외부에서 초기화 시 값을 주입받는다.
🔁 연산 프로퍼티 (Computed Property)
저장된 값을 직접 리턴하는 게 아니라, 조건에 따라 계산해서 반환하는 프로퍼티.
var iconName: String {
    isRainy ? "sun.max.fill" : "cloud.rain.fill"
}

var iconColor: Color {
    isRainy ? Color.yellow : Color.blue
}
연산 프로퍼티를 쓰면
body안에 분기 로직을 넣지 않아도 된다 — 코드가 깔끔해진다.
❓ 삼항 연산자 (Ternary Operator)
조건 ? 참일 때 값 : 거짓일 때 값isRainy ? "sun.max.fill" : "cloud.rain.fill"
// isRainy가 true면 "sun.max.fill"
// isRainy가 false면 "cloud.rain.fill"Swift의 삼항 연산자는
if/else한 줄 버전. 값을 반환해야 할 때 자주 쓰인다.
🖊 문자열 보간 (String Interpolation)
변수 값을 문자열 안에 직접 삽입하는 문법.
Text("High: \(high)")   // "High: 80"
Text("Low: \(low)")     // "Low: 30"
\(변수명)형태로 사용. Swift에서 가장 기본적인 문자열 합성 방법.
🎨 Font.Weight로 글자 굵기 조절
Text("High: \(high)")
    .fontWeight(Font.Weight.semibold)   // 반굵게

Text("Low: \(low)")
    .fontWeight(Font.Weight.medium)     // 중간 굵기
    .foregroundStyle(Color.secondary)   // 회색 계열 보조 색상
Font.Weight 종류 (가벼운 순)
| Weight | 설명 |
|---|---|
.ultraLight | 가장 얇음 |
.thin | 얇음 |
.light | 가벼움 |
.regular | 기본 |
.medium | 중간 |
.semibold | 반굵게 |
.bold | 굵게 |
.heavy | 두껍게 |
.black | 가장 두껍게 |
🎨 Color.secondary
.foregroundStyle(Color.secondary)
Color.secondary는 시스템이 자동으로 정하는 보조 색상 (보통 회색).
다크모드/라이트모드 대응이 자동으로 된다 — 하드코딩 색상보다 권장.
📋 전체 코드
struct ContentView: View {
    var body: some View {
        HStack {
            DateInfo(days: "Mon", isRainy: true,  high: 80, low: 30)
            DateInfo(days: "Tue", isRainy: false, high: 30, low: 20)
        }
    }
}

struct DateInfo: View {
    let days: String
    let isRainy: Bool
    let high: Int
    let low: Int

    var iconName: String {
        isRainy ? "sun.max.fill" : "cloud.rain.fill"
    }
    var iconColor: Color {
        isRainy ? Color.yellow : Color.blue
    }

    var body: some View {
        VStack {
            Text(days)
                .font(Font.headline)
            Image(systemName: iconName)
                .foregroundStyle(iconColor)
                .font(Font.largeTitle)
                .padding(5)
            Text("High: \(high)")
                .fontWeight(Font.Weight.semibold)
            Text("Low: \(low)")
                .fontWeight(Font.Weight.medium)
                .foregroundStyle(Color.secondary)
        }
        .padding(10)
    }
}
✅ 핵심 정리
| 개념 | 내용 |
|---|---|
구조체 + View | UI와 데이터를 하나의 단위로 묶기 |
| 연산 프로퍼티 | 조건 로직을 body 밖으로 분리 |
| 삼항 연산자 | 조건에 따른 값 반환 한 줄로 표현 |
문자열 보간 \() | 변수를 문자열 안에 직접 삽입 |
Color.secondary | 다크모드 자동 대응 보조 색상 |
✅ 다음에 배울 것
ForEach로 데이터 배열을 리스트로 렌더링@State로 뷰 내부 상태 관리ObservableObject로 뷰 외부 데이터 바인딩

Asher입니다. 하지만 Joon이라고도 불리는