1. 목표
linux에 webserver를 설치해보자
2. 네트워크 설정
192.168.10.100/24 로 IP 설정


3. HTTP 서버 설정
http demon 패키지 설치
dnf install -y httpd
방화벽에 http 허용 규칙 추가
firewall-cmd --add-service=http
firewall-cmd --add-service=http --permanent

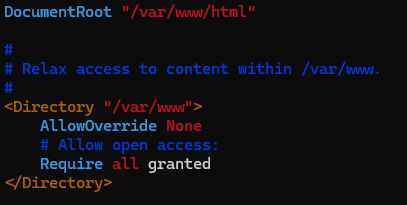
http 설정 파일 확인
vim /etc/httpd/conf/httpd.confhttp 접속 시 /var/www/html 에 있는 파일을 호출
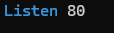
http 통신을 할 port 번호 설정
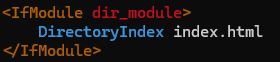
http 접속 시 기본적으로 호출할 파일명
http demon 실행
systemctl enable --now httpd

5. DB 연결
php와 DB 사용을 위한 패키지 설치
dnf install -y php php-mysqlnd
semanage 설정을 통해 http 통신을 통해 db에 접근이 가능하도록 변경
dnf install -y policycoreutils-python-utils
semanage boolean -m --on httpd_can_network_connect_db
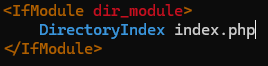
/etc/httpd/conf/httpd.conf에서 연결할 파일을 index.php로 수정
만약 이미 httpd가 켜져있다면 재시작을 통해 설정을 적용
systemctl restart httpd
index.php 내용
<?php
// 오류 보고 설정
ini_set('display_errors', 1);
ini_set('display_startup_errors', 1);
error_reporting(E_ALL);
// "this is webserver1" 출력
echo "this is webserver1\n";
// 데이터베이스 연결 설정
$server_addr = "192.168.10.20";
$user_name = "web_user";
$password = "123";
$db_name = "student";
$connection = mysqli_connect($server_addr, $user_name, $password, $db_name);
// 연결 오류 확인
if (!$connection) {
    die("Connection failed: " . mysqli_connect_error());
}
// 데이터 조회 쿼리 실행
$query = "SELECT * FROM student";
$rst = mysqli_query($connection, $query);
// 쿼리 오류 확인
if (!$rst) {
    die("Query failed: " . mysqli_error($connection));
}
// 결과 출력
if (mysqli_num_rows($rst) > 0) {
    while ($i = mysqli_fetch_assoc($rst)) {
        echo "id: " . htmlspecialchars($i["student_id"]) . " | name: " . htmlspecialchars($i["name"]) . " | age: " . htmlspecialchars($i["age"]) . "\n";
    }
} else {
    echo "No records found.\n";
}
// 연결 종료
mysqli_close($connection);
?>
4. 결과
해당 webserver IP로 curl 요청을 보내면 intex.php로 DB 내용이 호출되는 것을 확인할 수 있음!
DB 로드밸런서를 호출하도록 설정해서 호출할 때마다 db1과 db2의 내용을 번갈아가면서 나옴


hi