스프링mvc
- mvc기반을 두어 스프링 프레임워크처럼 결합도가 낮고 유연한 웹 기반 애플리케이션 만들기 가능
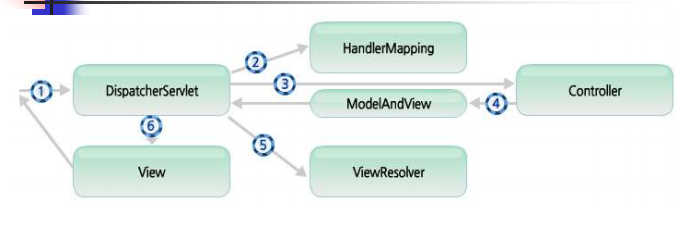
스프링 mvc 주요 구성 요소 및 처리 흐름
- DispatcherServlet : 클라이언트의 요청을 전달 받음. 컨트롤러에게 요청을 전달. 컨트롤러의 리턴 값을 뷰에 전달
- HandlerMapping : 클라이언트의 요청 URL을 어떤 컨트롤러가 처리할지 결정.
- Controller : 요청을 처리한 뒤, 결과를 디스패쳐서블릿에 알려줌.
- ModelAndView : 컨트롤러가 처리한 결과 정보 및 뷰 선택에 필요한 정보를 담음.
- ViewResolver : 컨트롤러의 처리 결과를 보여줄 뷰 결정
- View : 처리 결과 화면을 생성함
사용법
1. web.xml에 DispatcherServlet 맵핑
3. controller 작성
2. Spring에 HandMapping,Controller, ViewResolver 등록
4. view 작성
- web.xml 맵핑12345678910111213<servlet><servlet-name>dispatcher</servlet-name><servlet-class>org.springframework.web.servlet.DispatcherServlet</servlet-class><init-param><param-name>contextConfigLocation</param-name><param-value>/WEB-INF/dispatcher-servlet.xml</param-value></init-param></servlet><servlet-mapping><servlet-name>dispatcher</servlet-name><url-pattern>*.do</url-pattern></servlet-mapping>
cs
-
라이브러리에 있는 DispatcherServlet을 등록후 *.do 모든.do요청에 동작하도록 설정
-
이용하여 DispatcherServlet 객체에게 초기화 파라미터 정보 알려줌. 이때 파라미터는 contextConfigLocation이며 value는 설정 파일 위치를 지정하면 됨.
-
만약 정보 안알려 주면 기본적으로 WEB-INF 폴더에 있는 서블릿명-servlet.xml 파일을 인식함. 이 경우 로딩된 설정 파일에 모든 spring MVC 관련 클래스들을 Bean으로 등록해야함.
-
한글 인코딩을 추가 할 경우 밑의 코드를 포함시키면 됨.
12345678910111213<filter><filter-name>encodingFilter</filter-name><filter-class>org.springframework.web.filter.CharacterEncodingFilter</filter-class><init-param><param-name>encoding</param-name><param-value>utf-8</param-value></init-param></filter><filter-mapping><filter-name>encodingFilter</filter-name><url-pattern>/*</url-pattern></filter-mapping>cs
- Controller 클래스
-
스프링에서 제공하는 Controller 인터페이스를 implements하여 구현
123456789101112131415161718192021public class LoginController implements Controller {public ModelAndView handleRequest(HttpServletRequest request,HttpServletResponse response) throws Exception {//1. 사용자 입력정보(id, password)추출String id = request.getParameter("id");String pwd = request.getParameter("password");//2. DB 연동UserDAO dao = new UserDAO();UserVO user = dao.getUser(id, pwd);//3. 적절한 화면으로 이동ModelAndView mav = new ModelAndView();if(user != null){mav.addObject("message", "로그인 성공");mav.addObject("userVo", user);mav.setViewName("loginResult");}else{mav.addObject("message", "로그인 실패");mav.setViewName("login");}return mav;}cs -
ModelAndView 객체는 Model 정보와 View 정보를 담고 있음(뷰는 논리적 이름을 디스패쳐서블릿으로 돌려보냄. 디스패쳐서블릿은 뷰 리졸버에게 논리적 뷰 이름을 실제 뷰에 매핑하도록 요청함.)
디스패쳐서블릿
12345678910111213141516171819202122232425<!-- HandlerMapping --><bean id="handlerMapping"class="org.springframework.web.servlet.handler.SimpleUrlHandlerMapping"><property name="mappings"><props><prop key="/hello.do">helloController</prop></props></property></bean><!-- Controller --><bean id="helloController"class="com.mymall.test.controller.HelloController"></bean><!-- ViewResolver --><bean id="viewResolver"class="org.springframework.web.servlet.view.InternalResourceViewResolver"><property name="prefix"><value>/WEB-INF/view/</value></property><property name="suffix"><value>.jsp</value></property></bean>cs -
handlerMapping
hello.do라는 요청에 대해서 hellowController라는 이름의 controller가 요청을 처리하도록 매핑 -
Controller
윗윗 코드를 Bean으로 등록한 것
handlerMapping과 동일한 이름으로 id 등록해야함. -
veiwResolber
jsp를 view로 사용할 경우 InternalResourceViewResolver사용
이것은 접두사와 접미사를 지정하면 이를 이용하여 view 정보를 완성함.
예) 모델뷰에서 뷰 이름을 login으로 설정하면
이것에 의해 "WEB-INF/view/login.jsp가 됨.
어노테이션
-
xml을 최소화 하기위한 설정 지원
-
@Controller
1 - Controller 클래스 상속 필요 없음(POJO로 구현 가능하다는 의미)
2 - implements와 handleRequest 안해도 됨.
3 - bean등록 자동으로 해줌 -
@RequestMapping
1 - 메소드 설정 할때 요청 URI와 적절하게 매핑
2 - handlerMapping을 대신함.
3 - 요청 방식에 따라 메소드 get, post로 설정
4 - 클라이언트의 요청이 동일한 URI면 @controller 다음에 쓰는 것도 가능(중복경로 까지만 지정 가능)123456789101112131415161718192021222324252627282930313233343536@Controllerpublic class LoginController {@RequestMapping(value="/login.do", method=RequestMethod.GET)public String loginView(HttpServletRequest request,HttpServletResponse response) {}@RequestMapping(value="/login.do", method=RequestMethod.POST)public String login(HttpServletRequest request,HttpServletResponse response) {}}@Controller@RequestMapping("/login.do")public class LoginController {@RequestMapping(method=RequestMethod.GET)public String loginView(HttpServletRequest request,HttpServletResponse response) {}@RequestMapping(method=RequestMethod.POST)public String login(HttpServletRequest request,HttpServletResponse response) {}}@Controller@RequestMapping("/board")public class DetailController {@RequestMapping("/countUpdate.do")public String countUpdate(@RequestParam(defaultValue = "0") int no,Model model) {}}cs
클라이언트 요청 처리
-
사용자로부터 아이디와 비밀번호 입력 받아서 /login.do로 매핑된 Controller 호출 하는 경우
자바빈을 이용하여 구현 가능
(UserVO의 멤버변수와 파라미터 id속성 값은 동일 해야함)12345678910111213141516171819202122232425262728293031323334@Controllerpublic class LoginController {@RequestMapping("/login.do")public String login(HttpServletRequest request) {String id = request.getParameter("id");String password = request.getParameter("password");UserVO vo = new UserVO();vo.setId(id);vo.setPassword(password);int n = userService.insertUser(vo);}}@Controllerpublic class LoginController {@RequestMapping("/login.do")public String login(@RequestParam String id, @RequestParam String password)throws Exception {UserVO vo = new UserVO();vo.setId(id);vo.setPassword(password);int n = userService.insertUser(vo);}}@Controllerpublic class LoginController {@RequestMapping("/login.do")public String login(@ModelAttribute UserVO vo) throws Exception {int n = userService.insertUser(vo);}}cs -
반대로 jsp에서 Command객체를 사용하러면 Command 클래스 이름을 첫글자는 소문자로 해서 접근 가능. 만약 다른 이름으로 변경 하고자 한다면
1234@RequestMapping("/login.do")public String login(@ModelAttribute("myuser") UserVO user) throws Exception {}cs -
Command 객체에는 없는 파라미터의 경우
@RequestParam 매개변수 이용
(null값 처리 해줘야함. 로직으로 안에서 만들거나 매개변수로 줄때 기본값 부여) -
@RequestParam 매개변수의 경우 기본적으로 필수 파라미터로 해당 파라미터가 존재하지 않을 경우 잘못된 요청을 의미하는 400에러를 전송함.
따라서 필수가 아닌 경우 required 속성 값을 false로 지정1234567891011121314151617181920212223242526272829GetUserListController.java]@Controllerpublic class getUserListController {@RequestMapping("/getUserList.do")public String getUserList(@RequestParam("searchCondition") String searchCondition,@RequestParam("searchKeyword") String searchKeyword){System.out.println("검색 조건 : " + searchCondition);System.out.println("검색 단어 : " + searchKeyword);return null;}}@RequestMapping("/getUserList.do")public String getUserList(@RequestParam String searchCondition,@RequestParam String searchKeyword){}@RequestMapping("/getUserList.do")public String getUserList(String searchCondition, String searchKeyword){}@RequestMapping("/getUserList.do")public String getUserList(@RequestParam(value="searchCondition", required=false, defaultValue="NAME") String searchCondition,@RequestParam(value="searchKeyword", defaultValue="") String searchKeyword){return null;}cs -
극히 드물게 Command객체나 @RequestParam 보다 서블릿 API를 사용하는 것이 편리 할때가 있다(HttpServletRequest)
1 - HttpSession 의 생성을 직접 제어해야 하는 경우
2 - 컨트롤러에서 쿠키를 생성해야 하는 경우
3 - 서블릿 API 사용을 선호하는 경우
-
@CookieValue를 이용해 쿠키 값을 파라미터로 받아올수 있다.
(쿠키가 없을 경우 500에러 발생하니 required, defaultValue 이용)123456@RequestMapping("/cookie/view.do")public String view(@CookieValue(value = "auth", defaultValue = "0") String authValue) {System.out.println("auth 쿠키: " + authValue);return "cookie/view";}cs -
@RequestHeader을 이용하여 헤더정보(host, user-agent, Accept-Language등)을 파라미터로 받기 가능(이것도 없으면 500)
Controller의 리턴 타입
-
ModelAndView
- Model과 View 정보가 저장된 객체1234567891011public ModelAndView login(@ModelAttribute UserVO vo, HttpServletRequest request) {UserDAO dao = new UserDAO();UserVO user = dao.getUser(vo);ModelAndView mav = new ModelAndView();if(user != null){mav.setViewName("getUserList");}else{mav.setViewName("login");}return mav;}
cs - 특정 화면으로 Redirect 하고자 하는경우
(접두사 없는 경우 기본적으로 Forwarding)1234567891011public ModelAndView login(@ModelAttribute UserVO vo, HttpServletRequest request) {UserDAO dao = new UserDAO();UserVO user = dao.getUser(vo);ModelAndView mav = new ModelAndView();if(user != null){mav.setViewName("redirect:/getUserList.do");}else{mav.setViewName("login");}return mav;}cs
- Model과 View 정보가 저장된 객체
-
String
- View 정보를 정확한 이름으로 설정
-
Model
- View에 전달할 객체들을 담고 있는 객체
-
Map
- View에 전달할 정보가 저장된 Map객체 리턴. 이때 View 이름은 요청 URL을 통해서 자동으로 결정
-
View
- 객체를 직접 리턴. 해당 View 객체를 이용해서 뷰를 생성함
-
void
- 메서드가 직접 응답을 처리한다고 가정한다
그렇지 않을 경우 요청 URL로 부터 결정된 뷰를 보여준다.
- 메서드가 직접 응답을 처리한다고 가정한다
컨트롤러 클래스 자동 스캔
- xml 설정에서 <context:component-scan> 태크 이용하여 자동 로딩 가능 - mysite.spring.chap06.controller 패키지로 시작하는 모든 패키지의 클래스들을 스캔함 => 각 Controller 의 @Controller 어노테이션이 인식됨 => Controller클래스가 자동으로 빈으로 등록됨12<context:component-scan base-package="mysite.spring.chap06.controller" />
cs 알아서 모든 컨트롤러를 위에처럼 등록해준다는 뜻12<bean id="helloController2"class="com.mysite.controller.HelloController2" />cs
DispatcherServlet 설정과 ApplicationContext 관계
-
web.xml 파일에 한 개 이상의 디스패쳐 설정 가능하며 각 디스패쳐는 한개의 WebApplicationContext를 가짐.
또한 각 디스패쳐가 공유할 수 있는 빈 설정 가능1234567891011121314151617181920212223242526272829<servlet><servlet-name>dispatcher</servlet-name><servlet-class>org.springframework.web.servlet.DispatcherServlet</servlet-class><init-param><param-name>contextConfigLocation</param-name><param-value>/WEB-INF/main.xml/WEB-INF/bbs.xml</param-value></init-param></servlet><servlet><servlet-name>front</servlet-name><servlet-class>org.springframework.web.servlet.DispatcherServlet</servlet-class><init-param><param-name>contextConfigLocation</param-name><param-value>/WEB-INF/front.xml</param-value></init-param></servlet><servlet><servlet-name>rest</servlet-name><servlet-class>org.springframework.web.servlet.DispatcherServlet</servlet-class><init-param><param-name>contextConfigLocation</param-name><param-value>/WEB-INF/rest.xml</param-value></init-param></servlet>cs 위에서 front와 rest는 각각 별도의 WebApplicationContext를 생성함
(서로 빈 객체 사용 불가능)
서로 공용 빈을 사용하고 싶다면 front와 rest의 컨텍스트가 동일한 부모를 가지면 됨.123456789101112131415161718192021<!-- 부모 애플리캐이션컨텍스트(root)에서 설정파일을 통한 bean 공유 --><context-param><param-name>contextConfigLocation</param-name><param-value>/WEB-INF/service.xml, /WEB-INF/persistence.xml</param-value></context-param><!-- 리스너를 이용하여 설정 --><listener><listener-class>org.springframework.web.context.ContextLoaderListener</listener-class></listener><!-- 자식 애플리케이션 컨텍스트 --><servlet><servlet-name>front</servlet-name><servlet-class>org.springframework.web.servlet.DispatcherServlet</servlet-class></servlet><!-- 자식 애플리케이션 컨텍스트 --><servlet><servlet-name>rest</servlet-name><servlet-class>org.springframework.web.servlet.DispatcherServlet</servlet-class></servlet>cs 위의 소스를 통해 자식 컨텍스트는 루트 컨텍스트가 제공하는 빈을 사용할 수 있다. 이때 루트컨텍스트가 파라미터를 명시하지 않으면 기본적으로 /WEB-INF/applicationContext.xml을 설정 파일로 사용한다.
만약 src/main/resources 위치(클래스패스에)한 파일로부터 설정 정보(파라미터)를 읽어오고 싶다면 classpath:패키지명/.xml을 사용한다.12345678<context-param><param-name>contextConfigLocation</param-name><param-value>classpath:config/service.xmlclasspath:common.xml/WEB-INF/config/message_conf.xml</param-value></context-param>cs