What is React Test?
Code you write to verify the behavior of your application.
어플리케이션이 제대로 동작하는지 확인하려 쓰는 코드입니다.
Why write tests?
Documentation 문서화
Tests are a specifications for how our code should work.
테스트는 우리의 코드가 어떻게 작동하는지 알려줄 수 있습니다.
Consistency 일관성
Verify that engineers are following best practices and conventions for your team.
엔지니어로 하여금 팀의 규칙을 지키고, 알맞게 일하고 있는지 확인할 수 있습니다.
Comfort & Confidence 편안함과 자신감
A strong test suite is like a warm blanket.
견실한 테스트는 포근한 이불처럼 편안하게 해줍니다.
Productivity 생산성
We write tests because it allows us to ship quality code faster.
테스트를 작성하면 좋은 품질의 코드를 더 빨리 생산할 수 있습니다.
Types of Tests
- End-to-End: E2E Test라고 불리는 이 테스트는 사용자의 입장에서 테스트 해보는 것입니다. 말 뜻대로 처음부터 끝까지 기능들이 제대로 작동하는지 점검합니다.
- Integration: 여러 단위의 유닛들이 같이 작동하는지 확인합니다.
- Unit: 각 함수들과 컴포넌트들이 의도된대로 작동하는지 확인합니다.
- Static: 코드를 작성하는동안 오류와 오타를 잡아냅니다.
Rendering Components for Testing
import React from "react";
import "./styles.css";

export const App = () => {
  const [items, setItems] = React.useState([]);
  const [text, setText] = React.useState("");

  const handleChange = (e) => setText(e.target.value);

  const handleSubmit = (e) => {
    e.preventDefault();

    if (!text.length) {
      return;
    }

    const newItem = {
      text,
      id: Date.now()
    };

    setText("");
    setItems(items.concat(newItem));
  };

  return (
    <div>
      <h1>TODOS</h1>

      <ul>
        {items.map((item) => (
          <li key={item.id}>{item.text}</li>
        ))}
      </ul>

      <form onSubmit={handleSubmit}>
        <label htmlFor="new-todo">What needs to be done?</label>
        <br />
        <input id="new-todo" value={text} onChange={handleChange} />
        <button>Add #{items.length + 1}</button>
      </form>
    </div>
  );
};
위와 같은 컴포넌트를 테스트 해보겠습니다.
// App.test.js

import React from "react";
import ReactDOM from "react-dom";

import { App } from "./App";

test("it works", () => {
  const root = document.createElement("div");
  ReactDOM.render(<App />, root);

  expect(root.querySelector("h1").textContent).toBe("TODOSs");
  expect(root.querySelector("label").textContent).toBe(
    "What needs to be done?"
  );
  expect(root.querySelector("button").textContent).toBe("Add #1");
});
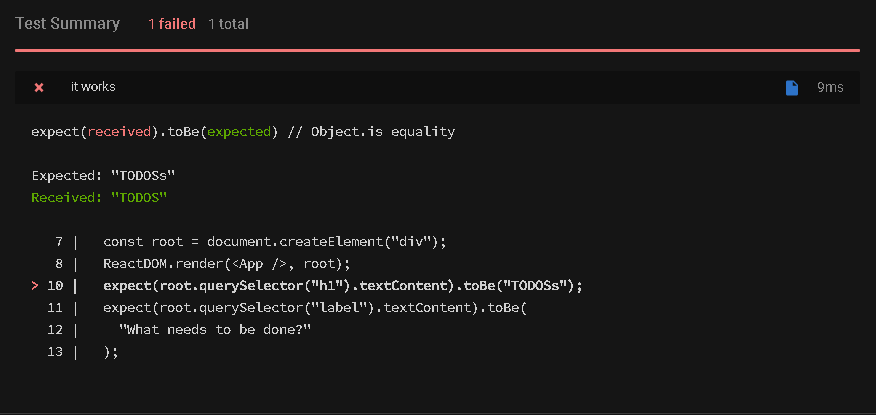
expect(root.querySelector("h1").textContent).toBe("TODOSs");만약 우리가 코드 작성 중 오타가 생기더라도 이렇게 testing을 통해 잡아낼 수 있습니다.
Use DOM testing library for querying the dom
// App.test.js

import React from "react";
import ReactDOM from "react-dom";
import { within } from "@testing-library/dom";

import { App } from "./App";

test("it works", () => {
  const root = document.createElement("div");
  ReactDOM.render(<App />, root);

  const { getByText, getByLabelText } = within(root);

  // expect(getByText("TODOS")).not.toBeNull();
  // expect(getByLabelText("What needs to be done?")).not.toBeNull();
  // expect(getByText("Add #1")).not.toBeNull();

  // Above code can be shortend to
  getByText("TODOS");
  getByLabelText("What needs to be done?");
  getByText("Add #1");
});
getByText,getByLabelText를 사용해 전에 사용했던 코드를 좀 더 짧고, 깔끔하게 정리할 수 있습니다.
Rendering and Testing with React Testing Library
렌더링과 테스팅이 어떻게 진행되는지 react testing library를 사용해 알아보겠습니다.
// App.test.js

import React from "react";
import { App } from "./App";

// In the place of the commented out code comes
// in testing-library/react
// import { render } from "@testing-library/react";

import ReactDOM from "react-dom";
import { within } from "@testing-library/dom";

const render = (component) => {
  const root = document.createElement("div");
  ReactDOM.render(component, root);

  return within(root);
};

test("it works", () => {
  const { getByText, getByLabelText } = render(<App />);

  getByText("TODOS");
  getByLabelText("What needs to be done?");
  getByText("Add #1");
});
일반 react app과 동일하게 ReactDOM으로 가상 DOM을 렌더링 합니다.
이후 필요한 요소를 찾아 test함수가 실행됩니다.
Simulating User Interaction
이제 실제 유저를 시뮬레이팅하여 클릭이나 입력등을 테스트해보겠습니다.
// App.test.js

import React from "react";
import { render, fireEvent } from "@testing-library/react";
import userEvent from "@testing-library/user-event";

import { App } from "./App";

test("it works", () => {
  const { getByText, getByLabelText } = render(<App />);

  getByText("TODOS");
  getByLabelText("What needs to be done?");
  getByText("Add #1");
});

// fireEvent
test("allows users to add items to their list", () => {
  const { getByText, getByLabelText } = render(<App />);

  const input = getByLabelText("What needs to be done?");
  const button = getByText("Add #1");

  // Simulate user events
  fireEvent.change(input, { target: { value: "Learn spanish" } });
  fireEvent.click(button);

  // Make assertion
  getByText("Learn spanish");
  getByText("Add #2");
});

// userEvent
test("user-events allows users to add...", () => {
  const { getByText, getByLabelText } = render(<App />);

  const input = getByLabelText("What needs to be done?");
  const button = getByText("Add #1");

  userEvent.type(input, "Learn spanish");
  userEvent.click(button);

  getByText("Learn spanish");
  getByText("Add #2");
});
기본적으로 fireEvent로 이벤트를 발생시켜 테스트 할 수 있습니다.
하지만 fireEvent가 발생시키는 이벤트는 현실 유저와는 좀 동떨어져 있습니다.
예를 들어 input 요소에 타이핑할 때 focus, keydown, keyup 등과 같은 이벤트들이 발생합니다.
fireEvent만을 사용해서 테스팅을 진행한다면 위 3개와 같은 이벤트들은 테스트 할 수 없습니다.
이 문제점을 해결하기 위해 userEvent를 사용합니다.
type()을 사용한다면, change 이벤트만 발생하는 것이 아닌,
focus, keydown, keyup과 같은 현실 유저가 발생시키는 이벤트도 발생합니다.
Testing Async Code
마지막으로 비동기 함수를 테스팅해보겠습니다.
//api.js

// Simulating api
export const api = {
  createItem: (url, newItem) => {
    return Promise.resolve(newItem);
  }
};


// App.test.js

import React from "react";
import { render, fireEvent, waitFor } from "@testing-library/react";

import { App } from "./App";
import { api } from "./api";

// Normally you can mock entire module using jest.mock('./api);
const mockCreateItem = (api.createItem = jest.fn());

test("allows users to add items to their list", async () => {
  const todoText = "Learn spanish";
  mockCreateItem.mockResolvedValueOnce({ id: 123, text: todoText });

  const { getByText, getByLabelText } = render(<App />);

  const input = getByLabelText("What needs to be done?");
  const button = getByText("Add #1");

  fireEvent.change(input, { target: { value: todoText } });
  fireEvent.click(button);

  await waitFor(() => getByText(todoText));

  expect(mockCreateItem).toBeCalledTimes(1);
  expect(mockCreateItem).toBeCalledWith(
    "/items",
    expect.objectContaining({ text: todoText })
  );
});
일반적으로 jest.mock(./api.js)을 사용하지만, 이해를 위해 mockCreateItem을 만들고, 진행하겠습니다.
mockResolvedValueOnce()를 통해 비동기 함수로 받아 올 데이터를 만들어줍니다.
waitFor()을 활용해서 todoText 값이 올 때까지 callback function을 실행하지 않아
비동기적으로 검사해야 하는 항목을 기다릴 수 있습니다.
출처: Intro to React Testing [Jest and React Testing Library Tutorial] 영상을 보고 번역하며 작성했습니다.
유저 이벤트 테스트 (@testing-library/user-event)