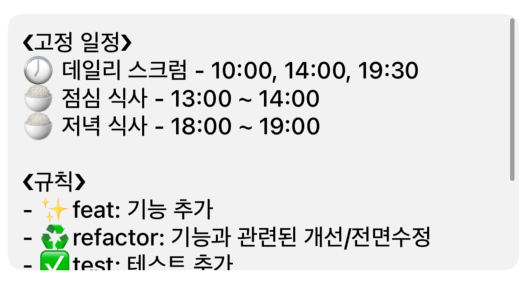
1. 미니프로젝트 - 자기소개 앱
📝 새로 알게된 것들
1) 코드 기반의 UINavigationController 설정하기
SceneDelegate의 수정 필요
class SceneDelegate: UIResponder, UIWindowSceneDelegate {
	var window: UIWindow?

    func scene(_ scene: UIScene, willConnectTo session: UISceneSession, options connectionOptions: UIScene.ConnectionOptions) {
    	guard let sindowScene = (scene as? UIWindowScene) else { return }
        window = UIWindow(windowScene: windowScene)

        let navigationController = UINavigationController(rootViewController: MainViewController())

        window?.rootViewController = navigationController
        window?.makeKeyAndVisible()
    }

    ...
}
→ 앱 진입 시 rootViewController를 navigationController로 설정
💡
AppDelegate와SceneDelegate의 차이
: iOS에서 멀티윈도우를 지원하게 되면서AppDelegate는 앱 자체의 생명주기,SceneDelegate는 화면(Scene)의 생명주기로 역할이 분리되었다.
보이는 화면을 제어하기 위해서는SceneDelegate를 사용!
2) ScrollView 사용하기
특정 구역에 스크롤이 가능하도록 하는 ScrollView 생성
let scrollView = UIScrollView()
scrollView.isScrollEnabled = true

scrollView.addSubview(teamInfoLabel)
NSLayoutConstraint.activate([
	// 스크롤뷰 위의 콘텐츠(teamInfoLabel) 위치 설정
	teamInfoLabel.topAnchor.constraint(equalTo: scrollView.contentLayoutGuide.topAnchor, constant: 10),
    teamInfoLabel.leadingAnchor.constraint(equalTo: scrollView.contentLayoutGuide.leadingAnchor, constant: 10),
    teamInfoLabel.trailingAnchor.constraint(equalTo: scrollView.contentLayoutGuide.trailingAnchor, constant: -10),
    teamInfoLabel.bottomAnchor.constraint(equalTo: scrollView.contentLayoutGuide.bottomAnchor, constant: -10),

    // 가로 스크롤 방지
    teamInfoLabel.widthAnchor.constraint(equalTo: scrollView.frameLayoutGuide.widthAnchor, constant: -24)
])
→ scrollView는 콘텐츠 크기가 스크롤뷰보다 클 경우에 스크롤이 나타남
teamInfoLabel.widthAnchor.constraint(equalTo: scrollView.frameLayoutGuide.widthAnchor, constant: -24)⇒ 콘텐츠의 가로 길이를 scrollView.frameLayoutGuide.widthAnchor보다 24 작게 설정하므로써 가로 스크롤이 생기는 것을 방지
⚠️오류: 스크롤뷰에 한 줄만 나타나는 현상 발생
→ UILabel의 라인 수 설정 필요!
func setLabels() {
	...

	teamInfoLabel.numberOfLines = 0 // 라인 수 제한 없음
    teamInfoLabel.lineBreakMode = .byWordWrapping // 단어 단위로 줄바꿈
    teamInfoLabel.text = """ ... """

    ...
}
➡︎ 정상적으로 텍스트 출력
⁉️ 코드 리뷰
튜터님의 코드 리뷰를 기반으로 코드를 개선하였다.
1) 인스턴스 선언부 가시성 향상
기존 코드
class MainViewController: UIViewController {
	let byr = Person(name: "ㅇㅇㅇ", vc: YRViewControler(), img: UIImage(resource: .byrAvatar), color: UIColor(red: 0.97, blue: 0.57, green: 0.38))

	...

}
💡 피드백
- 인스턴스
init이 길어질 경우 줄바꿈을 해주는 것이 좋음 - 리소스로 추가되어있는 이미지는 이미
UIImage이므로 길게 쓸 필요 없음 UIColor는#colorLiteral()을 통해 색깔로 바로 보이게 가능
변경 코드
class MainViewController: UIViewController {
	let byr = Person(
    	name: "ㅇㅇㅇ",
        vc: YRViewController(),
        img: .byrAvatar,
        color: #colorLiteral() // 실제 화면은 색상으로 보임
    )

    ...

}
→ 확실히 가시성이 향상되어 읽기 편해짐
2) addAction 사용하기
기존 코드
1️⃣ MainViewController
func set ButtonAction() {
	personalButtons.forEach {
    	$0.addTarget(self, action: #selector(navigateTo), for: .touchUpInside)
    }
}

@objc private func navigateTo(_ sender: UIButton) {
	guard let name = sender.currentTitle else { return }
    let vc = persons.filter { $0.name == name)[0].vc
    navigationController?.pushViewController(vc, animated: true)
}
2️⃣ YRViewController
func setButtonActions() {
	blogButton.addTarget(self, action: #selector(blogButtonPushed), for: .touchUpInside)
    petButton.addTarget(self, action: #selector(petButtonPushed), for: .touchUpInside)
}

@objc blogButtonPushed() {
	let url = URL(string: "https://velog.io/@bambu113/posts")
    let blogSafariView: SFSafariViewController = SFSafariViewController(url: url!)
    self.present(blogSafariView, animated: true , completion: nil)
}

@objc petButtonPushed() {
	let vc = PetCardViewController()
    vc.modalPresentationStyle = .overFullScreen
    vc.modalTransitionStyle = .crossDissolve
    self.present(vc, animated: true)
}
💡 피드백
addTarget은 비교적 옛날 방식 -#selector를 사용하기 위해서는@objc가 필요함
→objc는 동적 디스패칭으로, 런타임 과정에서 함수를 또 찾는다는 단점이 있음. 즉, 성능면에서 좋지 않음
⇒addAction이라는 기능이 있으니 활용해볼 것을 권장
변경 코드
1️⃣ MainViewController
: 변경 없음
→ 해당 코드는 sender.currentTitle을 이용하고 있음
⇒ addAction으로 불가능하지는 않지만, 코드가 번거로워지므로 sender를 받는 addTarget 함수를 유지
2️⃣ YRViewController
func setButtonActions() {
    let blogAction = UIAction { _ in
            ...
    }

    let petAction = UIAction { _ in
    	...
    }

    blogButton.addAction(blogAction, for: .touchUpInside)
    petButton.addAction(petAction, for: .touchUpInside)
}
→ addAction으로 수정
3) shadowPath를 통한 성능 향상
기존 코드
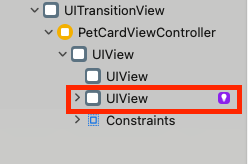
→ shadow를 적용한 View에 보라색 느낌표 - "shadowPath를 사용하여 성능을 향상하라"
💡 피드백
- shadow의 경우, 렌더링 시간이 생각보다 긺
→ shadowPath는 shadow의 캐시 역할 : 렌더링 시간을 줄여 성능 향상 가능
변경 코드
class IconButton: UIButton {
	init(icon: UIImage) {
    	...
    }

    // shadowPath 설정 코드 추가
    override func layoutSubviews() {
    	super.layoutSubviews()
        layer.shadowPath = UIBezierPath(
        roundedRect: bounds, cornerRadius: layer.cornerRadius
        ).cgPath
    }

    ...
}
→ layoutSubviews()는 뷰의 크기와 위치가 확정되거나 변경될 때 호출되는 메서드
➡︎ 이때 확정된 shadow의 위치를 shadowPath로 지정하므로써 추후 렌더링 시간을 축소
final class PetCardViewController: UIViewController {
	private var isShadowPathSet = false\

    private let shadowView: UIView = { ... }()

    ...

    override func viewDidLayoutSubviews() {
    	super.viewDidLayoutSubviews()

        guard !isShadowPathSet else { return }
        shadowView.layer.shadowPath = UIBezierPath(
        	roundedRect: shadowView.bounds, cornerRadius: shadowView.layer.cornerRadius
        	).cgPath
        isShadowPathSet = true
    }

    ...

}
→ ViewController의 속성에서 바로 선언된 경우, viewDidLayoutSubviews()에서 shadowPath를 설정해주었음
⇒ 보라색 느낌표가 사라짐!