redux-thunk
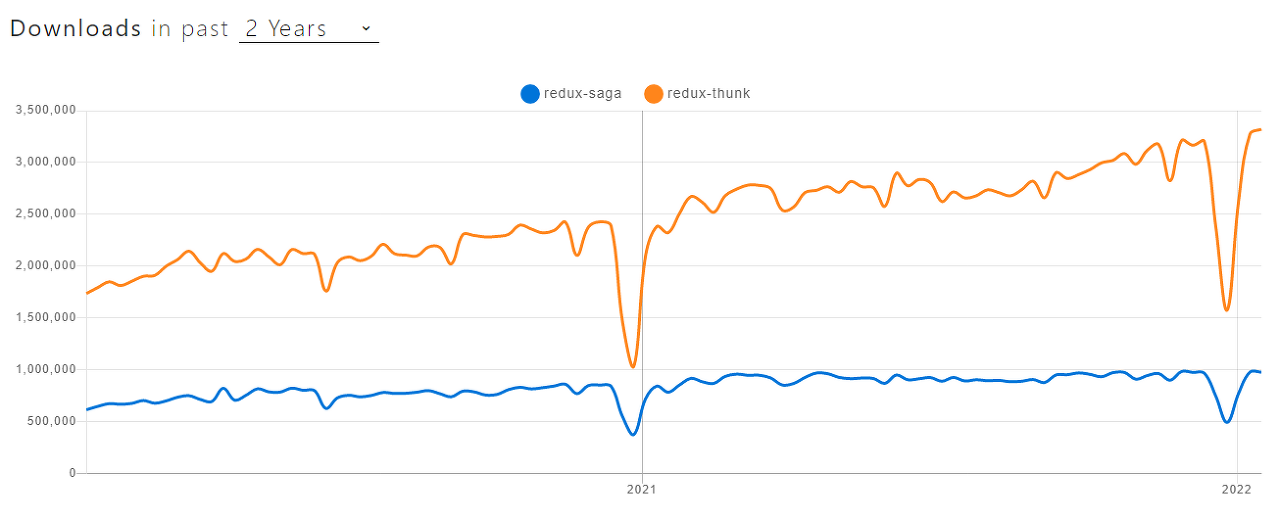
리덕스의 또 다른 미들웨어인 redux-thunk에 대해 알아보겠습니다. redux-thunk는 가장 많이 다운로드된 리덕스 미들웨어입니다. 그 다음으로 많이 사용되는 redux-saga도 꽤 많은 다운로드 수를 보여주고 있지만 redux-thunk에 비하면 1/3가량 밖에 되지 않는 숫자입니다.
redux-thunk는 비동기 처리를 관리해주는 리덕스 미들웨어입니다.
비동기 처리에 대해 다시 짚고 넘어가자면 어떤 명령이 실행되는 동안, 다음 코드들은 그 명령이 완료될 때까지 기다리지 않고, 작업을 수행하는 것을 말합니다.
thunk의 의미는 공식 깃허브에 올라와있는데, 특정 식을 함수로 래핑해 작업을 지연시키는 것을 의미합니다. 즉, 식은 정의해놓고 나중에 호출하고 계산함으로써 비동기 처리를 구현하는 미들웨어 라이브러리라고 볼 수 있습니다.
let x = 1 + 1;  //즉시 답이 나오는 식(코드)

const x = () => 1 + 1;  //이 함수를 thunk라고 부릅니다.
먼저 redux-thunk를 설치해줍니다.
yarn add redux-thunk실습에는 역시 지난 포스팅에서 만들었던 앱을 이용해서 진행하겠습니다. redux-logger와 마찬가지로 스토어 생성과정에서 redux-thunk를 적용합니다.
// ./src/index.js
import React from 'react';
import ReactDom from 'react-dom';
import {applyMiddleware, createStore} from 'redux';
import {Provider} from 'react-redux';
import './index.css';
import App from './App';
import rootReducer from './codes/middlewarePractice/modules/index';
import {createLogger} from 'redux-logger';
import ReduxThunk from 'redux-thunk';

const logger = createLogger();
const store = createStore(rootReducer, applyMiddleware(logger, ReduxThunk));

ReactDom.render(
    <Provider store={store}>
        <App/>
    </Provider>,
    document.getElementById('root'),
);
Thunk 생성 함수
본격적으로 redux-thunk를 사용해보겠습니다.
우선, 액션 생성 함수를 Thunk 함수로 만들어줍니다. 액션 생성 함수는 기존에는 액션 객체를 반환했었는데, 함수를 반환하도록 만들어줍니다. thunk 함수는 대표적 비동기 처리 함수인 setTimeout()을 이용해서 비동기적으로 동작시켜 보겠습니다.
// modules/colorChangerMW.js
import {createAction, handleActions} from 'redux-actions';

const SET_COLOR_BLACK = 'colorChangerMW/SET_COLOR_BLACK';
const SET_COLOR_BLUE = 'colorChangerMW/SET_COLOR_BLUE';
const SET_COLOR_RED = 'colorChangerMW/SET_COLOR_RED';

//액션 생성 함수
export const setColorBlack = createAction(SET_COLOR_BLACK);
//thunk 함수
export const setColorBlackAsync = () => dispatch => {
    setTimeout(() => {
        dispatch(setColorBlack());
    }, 1000);
}

export const setColorBlue = createAction(SET_COLOR_BLUE);
export const setColorBlueAsync = () => dispatch => {
    setTimeout(() => {
        dispatch(setColorBlue());
    }, 1000);
}

export const setColorRed = createAction(SET_COLOR_RED);
export const setColorRedAsync = () => dispatch => {
    setTimeout(() => {
        dispatch(setColorRed());
    }, 1000);
}

const initialState = {
    text: '검정',
    color: '#000',
};

const colorChangerMW = handleActions(
    {
        [SET_COLOR_BLACK]: (state, action) => ({
            text: '검정',
            color: '#000',
        }),
        [SET_COLOR_BLUE]: (state, action) => ({
            text: '파랑',
            color: '#00f',
        }),
        [SET_COLOR_RED]: (state, action) => ({
            text: '빨강',
            color: '#f00',
        }),
    },
    initialState
);

export default colorChangerMW;
다음으로는 컨테이너에서 호출하는 액션 생성 함수도 방금 만든 thunk 함수로 교체해 줍니다.
// containeer/ColorChangerContainer.js
import React from 'react';
import {connect} from 'react-redux';
import {setColorBlackAsync, setColorBlueAsync, setColorRedAsync} from '../modules/colorChangerMW';
import ColorChangerMW from '../components/ColorChangerMW';
import {bindActionCreators} from 'redux';

const ColorChangerContainer = ({text, color, setColorBlackAsync, setColorBlueAsync, setColorRedAsync}) => {
    return (
        <ColorChangerMW text={text} color={color}
                        onSetColorBlack={setColorBlackAsync}
                        onSetColorBlue={setColorBlueAsync}
                        onSetColorRed={setColorRedAsync}
                        />
    );
};

export default connect(
    state => ({
        text: state.colorChangerMW.text,
        color: state.colorChangerMW.color,
    }),
    dispatch => bindActionCreators(
        {
            setColorBlackAsync,
            setColorBlueAsync,
            setColorRedAsync,
        },
        dispatch
    ),
)(ColorChangerContainer);
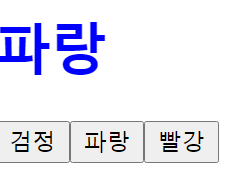
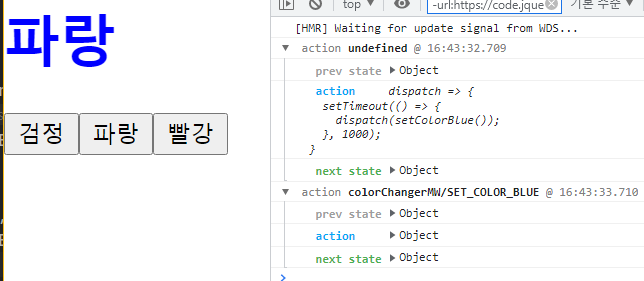
실행했을 때 1초 뒤에 글씨와 색상이 변한다면 성공입니다. 개발자 도구를 통해 지난시간에 연결해 두었던 redux-logger로 내용을 확인 해보겠습니다.
thunk 함수에 의해 첫 번째 액션으로 함수가 호출되고, 그 후에 객체 형태로 액션이 호출되었습니다.

