
1. Spring Security Filter Chain 이란?
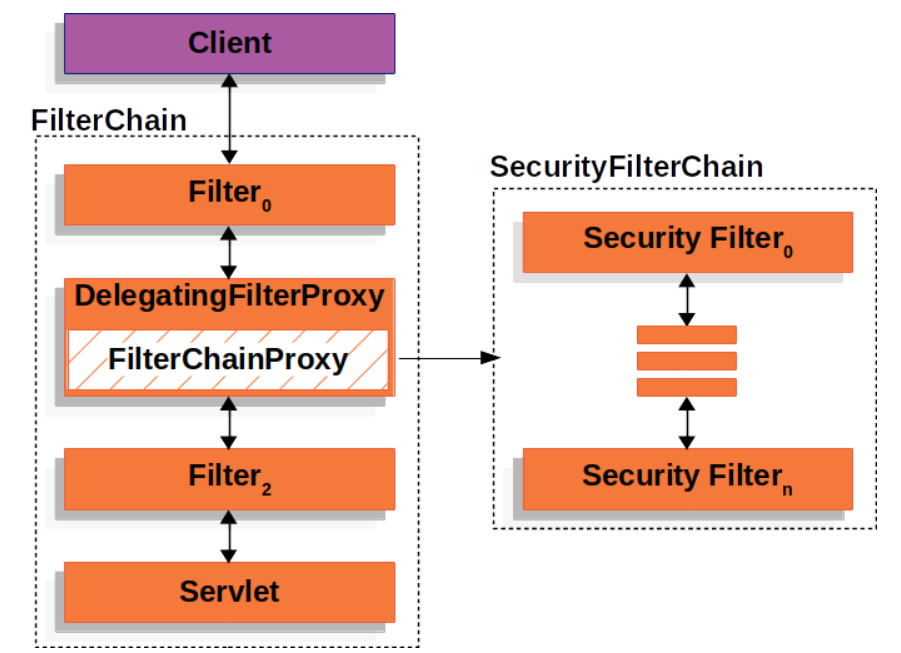
- Spring Security의 실제적인 구현은 서블릿 필터를 통해 이루어진다.
- 서블릿 필터는 웹 요청을 가로챈 후 전처리 또는 후처리를 수행하거나, 요청 자체를 리다이렉트 하기도 한다.
- FilterChainProxy 세부 내용은 WebSecurityConfigurerAdapter 추상 클래스를 상속하는 구현체에서 설정한다 (보통 @EnableWebSecurity 어노테이션도 함께 사용)
- 웹 요청은 이러한 필터 체인을 차례로 통과하게 되고,
- 웹 요청은 모든 필터를 통과하게 되지만, 모든 필터가 동작하는 것은 아니다.
- 각 필터는 웹 요청에 따라 동작 여부를 결정할 수 있고, 동작할 필요가 없다면 다음 필터로 웹 요청을 즉시 넘긴다.
- 요청을 처리하고 응답을 반환하면 필터 체인 호출 스택은 모든 필터에 대해 역순으로 진행한다.
- 보통 springSecurityFilterChain 이라는 이름으로 Bean 등록된다.
웹 요청은 어떻게 FilterChainProxy로 전달될까?
- 웹 요청은 DelegatingFilterProxy라는 객체를 통해 FilterChainProxy로 전달된다.
- 이 과정에서 DelegatingFilterProxy는 웹 요청을 필터 체인으로 넘겨주고, 필터 체인에서 보안 작업을 처리한 후 결과를 반환하게 된다.
- DelegatingFilterProxy Bean은 SecurityFilterAutoConfiguration 클래스에서 자동으로 등록됨
SecurityFilterAutoConfiguration.class
@Bean
@ConditionalOnBean(name = DEFAULT_FILTER_NAME)
public DelegatingFilterProxyRegistrationBean securityFilterChainRegistration(SecurityProperties securityProperties) {
    DelegatingFilterProxyRegistrationBean registration = new DelegatingFilterProxyRegistrationBean(DEFAULT_FILTER_NAME);
    registration.setOrder(securityProperties.getFilter().getOrder());
    registration.setDispatcherTypes(getDispatcherTypes(securityProperties));
    return registration;
}- DelegatingFilterProxyRegistrationBean 을 통해 DelegatingFilterProxy 인스턴스를 생성한다.
- 또한, DelegatingFilterProxy는 실제적으로 웹 요청을 처리할 Target Filter Bean을 지정해야한다.
- Target Filter Bean은 바로 앞에서 알아본 FilterChainProxy 이다.
FilterChainProxy를 구성하는 Filter 목록
Spring Security는 정말 다양한 필터 구현을 제공하고, 시큐리티를 잘 이해하고 활용한다는 것은 이들 Filter를 이해하고, 적절하게 사용한다는 것을 의미한다.
- ChannelProcessingFilter - 웹 요청이 어떤 프로토콜로 (http 또는 https) 전달되어야 하는지 처리
- SecurityContextPersistenceFilter - SecurityContextRepository를 통해 SecurityContext를 Load/Save 처리
- LogoutFilter - 로그아웃 URL로 요청을 감시하여 매칭되는 요청이 있으면 해당 사용자를 로그아웃 시킴
- UsernamePasswordAuthenticationFilter - ID/비밀번호 기반 Form 인증 요청 URL(기본값: /login) 을 감시하여 사용자를 인증함
- DefaultLoginPageGeneratingFilter - 로그인을 수행하는데 필요한 HTML을 생성함
- RequestCacheAwareFilter - 로그인 성공 이후 인증 요청에 의해 가로채어진 사용자의 원래 요청으로 이동하기 위해 사용됨
- SecurityContextHolderAwareRequestFilter - 서블릿 3 API 지원을 위해 HttpServletRequest를 HttpServletRequestWrapper 하위 클래스로 감쌈
- RememberMeAuthenticationFilter - 요청의 일부로 remeber-me 쿠키 제공 여부를 확인하고, 쿠키가 있으면 사용자 인증을 시도함
- AnonymousAuthenticationFilter - 해당 인증 필터에 도달할때까지 사용자가 아직 인증되지 않았다면, 익명 사용자로 처리하도록 함
- ExceptionTranslationFilter - 요청을 처리하는 도중 발생할 수 있는 예외에 대한 라우팅과 위임을 처리함
- FilterSecurityInterceptor - 접근 권한 확인을 위해 요청을 AccessDecisionManager로 위임
참고자료 - 스프링 시큐리티 공식 문서
2. Security Filter 자세히 알아보기
1) RequestCacheAwareFilter : 인증 요청에 의해 가로채어진 원래 요청으로 이동
익명 사용자가 보호 받는 리소스 (예: /me)에 접근할 경우, 접근 권한이 없기 때문에 AccessDecisionManager 에서 접근 거부 예외가 발생한다.
이때, ExceptionTranslationFilter 접근 거부 예외를 처리하고, 현재 사용자가 익명 사용자라면, 보호 받는 리소스로의 접근을 캐시처리하고, 로그인 페이지로 이동 시킨다.
ExceptionTranslationFilter.class
private void handleAccessDeniedException(HttpServletRequest request, HttpServletResponse response,
		FilterChain chain, AccessDeniedException exception) throws ServletException, IOException {
	Authentication authentication = SecurityContextHolder.getContext().getAuthentication();
	boolean isAnonymous = this.authenticationTrustResolver.isAnonymous(authentication);
	if (isAnonymous || this.authenticationTrustResolver.isRememberMe(authentication)) {
		if (logger.isTraceEnabled()) {
			logger.trace(LogMessage.format("Sending %s to authentication entry point since access is denied",
					authentication), exception);
		}
		sendStartAuthentication(request, response, chain,
				new InsufficientAuthenticationException(
						this.messages.getMessage("ExceptionTranslationFilter.insufficientAuthentication",
								"Full authentication is required to access this resource")));
	}
	else {
		if (logger.isTraceEnabled()) {
			logger.trace(
					LogMessage.format("Sending %s to access denied handler since access is denied", authentication),
					exception);
		}
		this.accessDeniedHandler.handle(request, response, exception);
	}
}

protected void sendStartAuthentication(HttpServletRequest request, HttpServletResponse response, FilterChain chain,
		AuthenticationException reason) throws ServletException, IOException {
	// SEC-112: Clear the SecurityContextHolder's Authentication, as the
	// existing Authentication is no longer considered valid
	SecurityContextHolder.getContext().setAuthentication(null);
	this.requestCache.saveRequest(request, response);						// 기존 요청을 캐시 처리하여 저장한다.
	this.authenticationEntryPoint.commence(request, response, reason);
}
RequestCacheAwareFilter.class
RequestCacheAwareFilter를 통해 위에서 살펴본 캐시된 요청을 처리할 수 있다.
캐시된 요청이 있다면 캐시된 요청을 처리하고, 캐시된 요청이 없다면 현재 요청을 처리한다.
@Override
public void doFilter(ServletRequest request, ServletResponse response, FilterChain chain)
		throws IOException, ServletException {
	HttpServletRequest wrappedSavedRequest = this.requestCache.getMatchingRequest((HttpServletRequest) request,
			(HttpServletResponse) response);
	chain.doFilter((wrappedSavedRequest != null) ? wrappedSavedRequest : request, response);
}
2) ChannelProcessingFilter : 전송 레이어 보안 적용
전송 레이어 보안을 위해 SSL 인증서를 생성하고, 이를 Spring Boot 웹 어플리케이션에 적용한다. 이제 웹 어플리케이션은 HTTPS 프로토콜을 통해 서비스 된다.
Http vs Https + SSL
- HTTP(Hyper Text Transfer Protocol)는 인터넷상에서 데이터를 주고 받기 위한 프로토콜
- 클라이언트와 서버가 주고 받는 데이터는 암호화되어 있지 않음
- 따라서, 악의적인 데이터 감청, 데이터 변조의 가능성이 있음
- HTTPS(HyperT ext Transfer Protocol Secure)는 HTTP 프로토콜의 암호화 버전
- 클라이언트와 서버가 주고 받는 모든 데이터는 암호화되어 있음
- 데이터 암호화를 위해 SSL(Secure Sockets Layer)을 사용
- SSL
- SSL은 Netscape가 개발했으며 SSL 3.0부터 TLS라는 이름으로 변경되었다.
- SSL 암호화를 위해 SSL 인증서가 필요하다.
- SSL 인증 방식
- 서버는 SSL인증서를 클라이언트에 전달함
- 클라이언트는 서버가 전달한 SSL 인증서를 검증하고, 신뢰할 수 있는 서버인지 확인함
- 신뢰할 수 있는 서버라면 SSL 인증서의 공개키를 이용해 실제 데이터 암호화에 사용될 암호화키를 암호화하여 서버에 전달함
Spring Security 전송 레이어 보안 설정
public class ChannelProcessingFilter extends GenericFilterBean {

	private ChannelDecisionManager channelDecisionManager;

	private FilterInvocationSecurityMetadataSource securityMetadataSource;

	// ...생략...

	@Override
	public void doFilter(ServletRequest req, ServletResponse res, FilterChain chain)
			throws IOException, ServletException {
		HttpServletRequest request = (HttpServletRequest) req;
		HttpServletResponse response = (HttpServletResponse) res;
		FilterInvocation filterInvocation = new FilterInvocation(request, response, chain);
		Collection<ConfigAttribute> attributes = this.securityMetadataSource.getAttributes(filterInvocation);
		if (attributes != null) {
			this.logger.debug(LogMessage.format("Request: %s; ConfigAttributes: %s", filterInvocation, attributes));
			this.channelDecisionManager.decide(filterInvocation, attributes);
			if (filterInvocation.getResponse().isCommitted()) {
				return;
			}
		}
		chain.doFilter(request, response);
	}
	// ...생략...
}- ChannelProcessingFilter 설정을 통해 HTTPS 채널을 통해 처리해야 하는 웹 요청을 정의할 수 있음
- FilterInvocationSecurityMetadataSource 클래스에 HTTPS 프로토콜로 처리해야 URL 정보가 담김
- 실제적인 처리를 ChannelDecisionManager 클래스로 위임함
+) HttpSecurity 클래스를 통해 ChannelProcessingFilter 세부 설정 가능
@Override
protected void configure(HttpSecurity http) throws Exception {
  http
       // HTTP 요청을 HTTPS 요청으로 리다이렉트
      .requiresChannel()
        .anyRequest().requiresSecure()
  ;
}
3) AnonymousAuthenticationFilter
해당 필터에 요청이 도달할때까지 사용자가 인증되지 않았다면, 사용자를 null 대신 Anonymous 인증 타입으로 표현한다.
사용자가 null 인지 확인하는것보다 어떤 구체적인 타입으로 확인할수 있도록 한다.
AnonymousAuthenticationFilter.class
@Override
public void doFilter(ServletRequest req, ServletResponse res, FilterChain chain) throws IOException, ServletException {
	if (SecurityContextHolder.getContext().getAuthentication() == null) {			// 인증되지 않은 사용자라면
		SecurityContextHolder.getContext().setAuthentication(createAuthentication((HttpServletRequest) req));  // createAuthentication() 호출
		if (this.logger.isTraceEnabled()) {
			this.logger.trace(LogMessage.of(() -> "Set SecurityContextHolder to "
					+ SecurityContextHolder.getContext().getAuthentication()));
		}
		else {
			this.logger.debug("Set SecurityContextHolder to anonymous SecurityContext");
		}
	}
	else {
		if (this.logger.isTraceEnabled()) {
			this.logger.trace(LogMessage.of(() -> "Did not set SecurityContextHolder since already authenticated "
					+ SecurityContextHolder.getContext().getAuthentication()));
		}
	}
	chain.doFilter(req, res);
}

protected Authentication createAuthentication(HttpServletRequest request) {			// Anonymous 인증 타입으로 표현
	AnonymousAuthenticationToken token = new AnonymousAuthenticationToken(this.key, this.principal, this.authorities);
	token.setDetails(this.authenticationDetailsSource.buildDetails(request));
	return token;
}
+) httpSecurity 클래스를 통해 AnonymousAuthenticationFilter 세부 설정 가능
@Override
protected void configure(HttpSecurity http) throws Exception {
  http
       // AnonymousAuthenticationFilter 세부 설정
       .anonymous()
           .principal("thisIsAnonymousUser")				// username 설정
           .authorities("ROLE_ANONYMOUS", "ROLE_UNKNOWN")	// 권한 설정
  ;
}
4) ExceptionTranslationFilter
FilterSecurityInterceptor 바로 위에 위치하며, FilterSecurityInterceptor 실행 중 발생할 수 있는 예외를 잡고 처리함
💡 주의사항
필터 체인 상에서 ExceptionTranslationFilter 의 위치를 주의해서 볼 필요가 있다.
ExceptionTranslationFilter는 필터 체인 실행 스택에서 자기 아래에 오는 필터들에서 발생하는 예외들에 대해서만 처리할 수 있다.
커스텀 필터를 추가해야 하는 경우 이 내용을 잘 기억하고, 커스텀 필터를 적당한 위치에 두어야 한다.
FilterSecurityInterceptor 실행 중 발생 가능한 AuthenticationException, AccessDeniedException 예외에 대한 처리를 담당한다.
- AuthenticationException 예외는 인증 관련 예외이며, 사용자를 로그인 페이지로 보냄
- AccessDeniedException 예외는 AccessDecisionManager에 의해 접근 거부가 발생했을 때 접근 거부 페이지를 보여주거나 사용자를 로그인 페이지로 보냄
AuthenticationEntryPoint
- 인증되지 않은 사용자 요청을 처리할때 핵심적인 역할을 수행한다.
- 보통 사용자를 로그인 요청 페이지로 포워딩하는 역할을 한다.
- 폼 기반 로그인 인증 외의 다른 인증 매커니즘을 처리해야 할때도 AuthenticationEntryPoint를 이용할 수 있다.
- 예를 들어 CAS 인증 처리가 필요하다면 CAS 포탈로 사용자를 이동시킴
- 서드 파티 시스템과 연동이 필요한 경우 AuthenticationEntryPoint를 직접 구현할 수도 있음
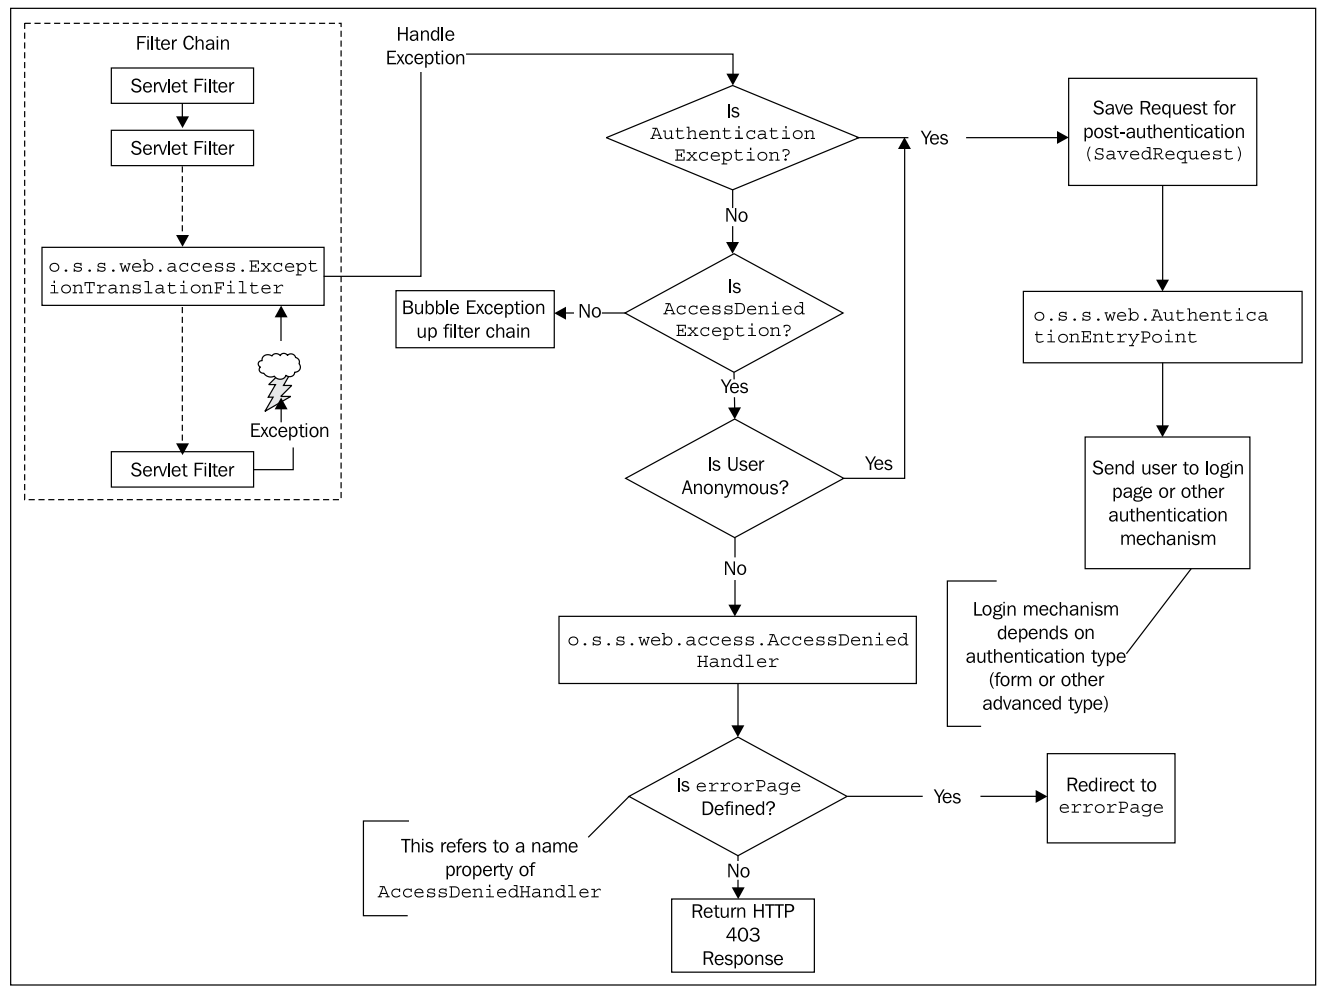
AccessDeniedException 예외에 대한 핸들러 설정 가능
기본 구현은 org.springframework.security.web.access.AccessDeniedHandlerImpl 클래스
구현 내용 - 접근 거부 요청에 대한 로깅 처리 및 HTTP 403 응답 생성
@Bean
public AccessDeniedHandler accessDeniedHandler() { //
return (request, response, e) -> {
/*
Authentication -> 인증 주체 즉, 사용자를 표현하는 객체
Authentication.getPrincipal() -> 인증 전, 인증 후 가리지 않고 사용자의 정보를 Object 타입으로 포괄적으로 표현
Authentication.isAuthenticated() -> 사용자가 인증되었는지 boolean 타입으로 확인 가능
*/
Authentication authentication = SecurityContextHolder.getContext().getAuthentication();
Object principal = authentication != null ? authentication.getPrincipal() : null;
log.warn("{} is denied", principal, e);
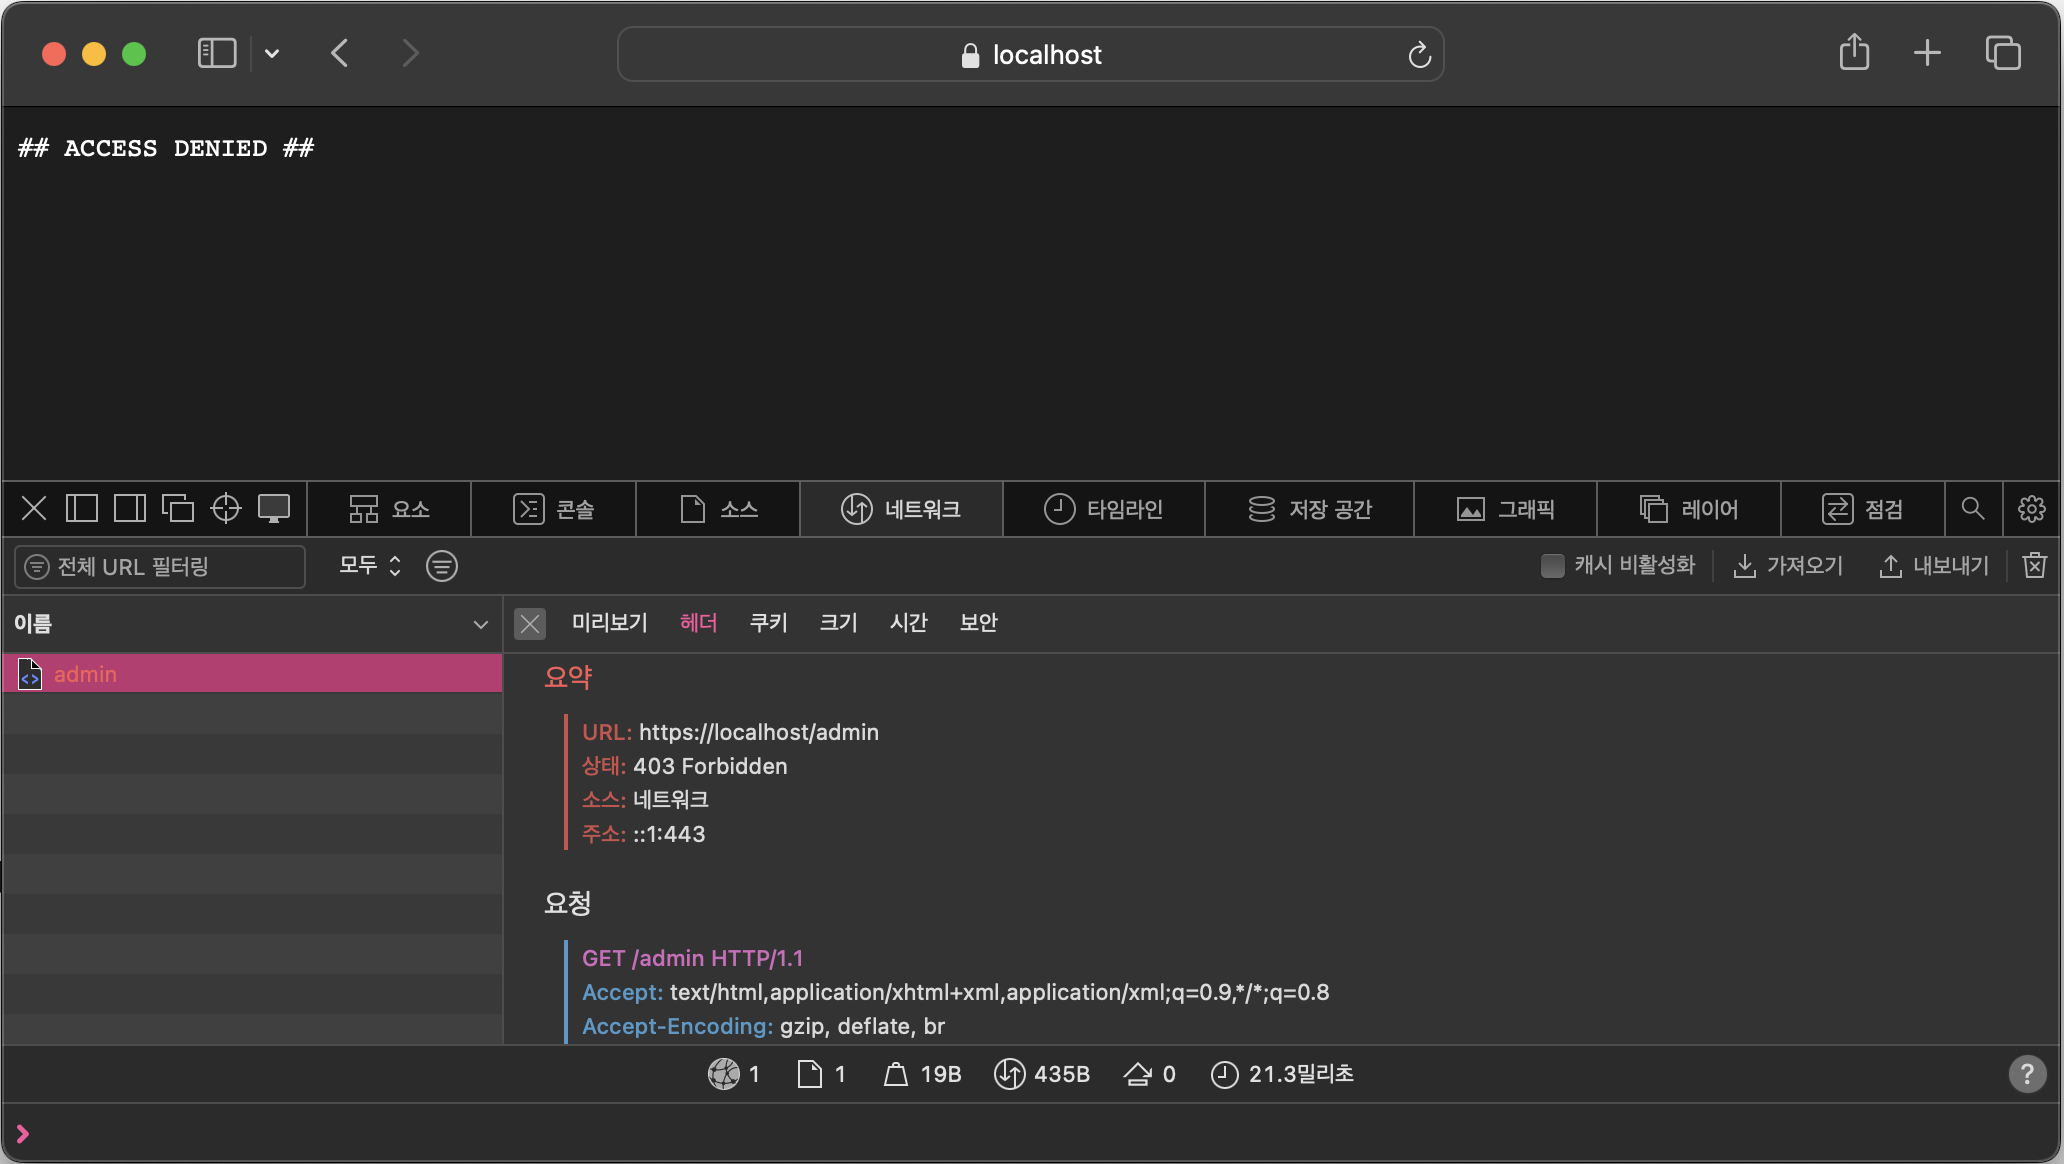
response.setStatus(HttpServletResponse.SC_FORBIDDEN);
response.setContentType("text/plain");
response.getWriter().write("## ACCESS DENIED ##");
response.getWriter().flush();
response.getWriter().close();
};
}아래 HttpSecurity 클래스의 exceptionHandling() 메소드를 통해 앞서 Bean으로 등록한 AccessDeniedHandler를 설정할 수 있다.
@Override
protected void configure(HttpSecurity http) throws Exception {
  http
       // 커스터마이징한 AccessDeniedHandler 추가
       .exceptionHandling()
            .accessDeniedHandler(accessDeniedHandler())
       ;
}
실행 화면
5) DefaultLoginPageGeneratingFilter
HTTP GET 요청에 대해 디폴트 로그인 페이지를 생성해주는 필터이다.
- 로그인 시 아이디/비밀번호/Remember-Me 등 파라미터 명을 변경 가능하다.
- 또한 로그인 페이지 자체를 커스텀 구현 가능하며, 이 경우 해당 필터는 비활성화된다.
커스텀 로그인 페이지 설정 예시
http
	// ... 생략 ...
	.formLogin()
		.loginPage("/mylogin")
		.permitAll()
	  .and()
  // ... 생략 ...
6) UsernamePasswordAuthenticationFilter
- 사용자 인증을 처리하기 위한 가장 대표적인 필터이다.
- 사용자 인증을 위한 정보(credentials)를 취합하고, Authentication 객체를 생성한다.
- UsernamePasswordAuthenticationFilter 구현에서는 로그인 아이디/비밀번호를 취합하고, Authentication 인터페이스 구현체 중 하나인UsernamePasswordAuthenticationToken 객체를 생성한다.
- 인증이 완료되지 않은 Authentication 객체는 AuthenticationManager 객체로 전달된다.
- 인증이 정상적으로 완료된다면 새롭게 만들어진 Authentication 객체를 반환한다.
- 여기서 새롭게 만들어진 Authentication 객체는 인증이 완료된 상태이고, GrantedAuthority 목록을 포함하고 있다.
UsernamePasswordAuthenticationFilter.class
@Override
public Authentication attemptAuthentication(HttpServletRequest request, HttpServletResponse response) throws AuthenticationException {
	if (this.postOnly && !request.getMethod().equals("POST")) {
		throw new AuthenticationServiceException("Authentication method not supported: " + request.getMethod());
	}
	String username = obtainUsername(request);
	username = (username != null) ? username : "";
	username = username.trim();
	String password = obtainPassword(request);
	password = (password != null) ? password : "";
	UsernamePasswordAuthenticationToken authRequest = new UsernamePasswordAuthenticationToken(username, password);
	// Allow subclasses to set the "details" property
	setDetails(request, authRequest);
	return this.getAuthenticationManager().authenticate(authRequest);
}
UsernamePasswordAuthenticationFilter 인증 흐름

7) HeaderWriterFilter : 응답 헤더에 보안 관련 헤더를 추가
관련 이슈에 대해 기본적인 방어 기능만 제공하는것으로 완벽하게 방어되진 않고, 브라우저마다 다르게 동작할 수 있으므로 유의해야 한다.
1. XContentTypeOptionsHeaderWriter — MIME sniffing 공격 방어
- 브라우서에서 MIME sniffing을 사용하여 Request Content Type 을 추측 할 수 있는데 이것은 XSS 공격에 악용될 수 있음
- 지정된 MIME 형식 이외의 다른 용도로 사용하고자 하는 것을 차단
X-Content-Type-Options: nosniff참고자료 - MIME 형식의 보안위협 완화: X-Content-Type-Options 헤더
2. XXssProtectionHeaderWriter — 브라우저에 내장된 XSS(Cross-Site Scripting) 필터 활성화
- XSS — 웹 상에서 가장 기초적인 취약점 공격 방법의 일종으로, 악의적인 사용자가 공격하려는 사이트에 스크립트를 넣는 기법을 말함
- 일반적으로 브라우저에는 XSS공격을 방어하기 위한 필터링 기능이 내장되어 있음
- 물론 해당 필터로 XSS공격을 완벽하게 방어하지는 못하지만 XSS 공격의 보호에 많은 도움이 됨
X-XSS-Protection: 1; mode=block참고자료 - X-XSS-Protection HTTP헤더
3. CacheControlHeadersWriter — 캐시를 사용하지 않도록 설정
- 브라우저 캐시 설정에 따라 사용자가 인증 후 방문한 페이지를 로그 아웃한 후 캐시 된 페이지를 악의적인 사용자가 볼 수 있음
Cache-Control: no-cache, no-store, max-age=0, must-revalidate
Pragma: no-cache
Expires: 0
4. XFrameOptionsHeaderWriter — clickjacking 공격 방어
- 웹 사용자가 자신이 클릭하고 있다고 인지하는 것과 다른 어떤 것을 클릭하게 속이는 악의적인 기법
- 보통 사용자의 인식 없이 실행될 수 있는 임베디드 코드나 스크립트의 형태
X-Frame-Options: DENY5. HstsHeaderWriter — HTTP 대신 HTTPS만을 사용하여 통신해야함을 브라우저에 알림
- HTTPS 설정 시 관련 헤더 추가됨
Strict-Transport-Security: max-age=31536000 ; includeSubDomains참고자료 - Strict-Transport-Security
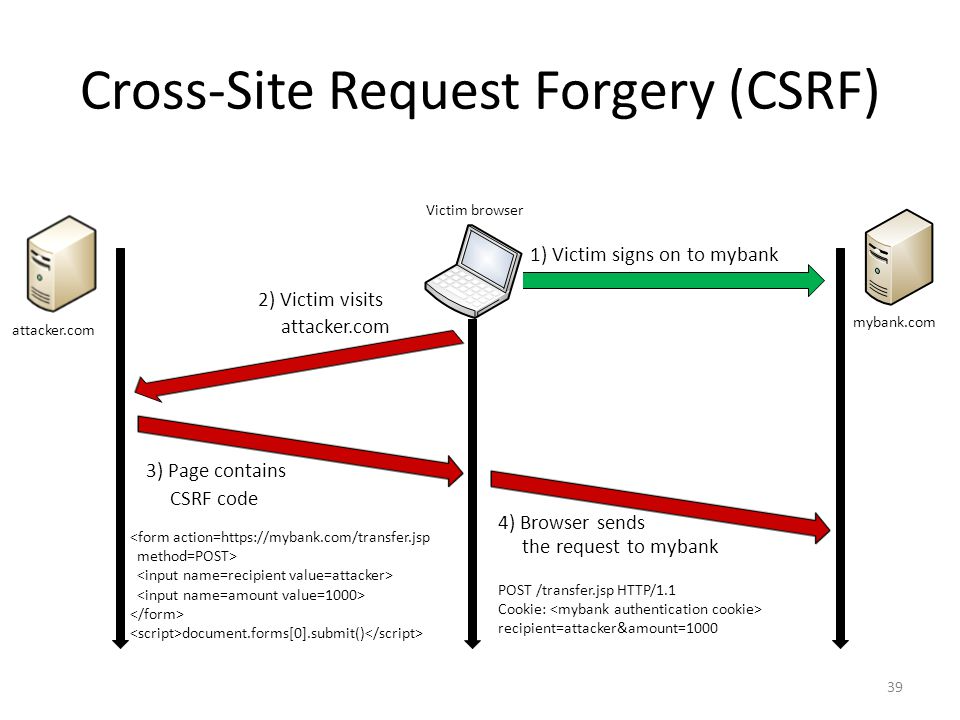
8) CsrfFilter
CSRF (Cross-site request forgery) 란
사용자가 자신의 의지와는 무관하게 공격자가 의도한 행위를 특정 웹사이트에 요청하게 하는 공격을 말한다.
+) XSS는 자바스크립트를 실행시키는 것이고, CSRF는 특정한 행동을 시키는 것으로, XSS과 CSRF는 다른 공격 기법
- CSRF를 통해 악의적인 공격자는 아래 2개 조건을 만족하면 사용자의 권한을 도용하여 중요 기능을 실행하는 것이 가능해진다.
- 위조 요청을 전송하는 서비스에 사용자가 로그인 상태
- 사용자가 해커가 만든 피싱 사이트에 접속
Csrf 방범 방법
- Referrer 검증 — Request의 referrer를 확인하여 domain이 일치하는지 확인
- CSRF Token 활용
- 사용자의 세션에 임의의 토큰 값을 저장하고 (로그인 완료 여부와 상관없음), 사용자의 요청 마다 해당 토큰 값을 포함 시켜 전송
- 리소스를 변경해야하는 요청(POST, PUT, DELETE 등)을 받을 때마다 사용자의 세션에 저장된 토큰 값과 요청 파라미터에 전달되는 토큰 값이 일치하는 지 검증
- 브라우저가 아닌 클라이언트에서 사용하는 서비스의 경우 CSRF 보호를 비활성화 할 수 있음
- 로그인 페이지를 보면 _csrf 라는 이름으로 hidden input이 있는것을 확인할 수 있다.

CsrfFilter.class
CsrfFilter는 요청이 리소스를 변경해야 하는 요청인지 확인하고, 맞다면 CSRF 토큰을 검증함 (기본적으로 활성화됨)
protected void doFilterInternal(HttpServletRequest request, HttpServletResponse response, FilterChain filterChain) throws ServletException, IOException {
	request.setAttribute(HttpServletResponse.class.getName(), response);
	CsrfToken csrfToken = this.tokenRepository.loadToken(request);
	boolean missingToken = (csrfToken == null);
	if (missingToken) {
		csrfToken = this.tokenRepository.generateToken(request);
		this.tokenRepository.saveToken(csrfToken, request, response);
	}
	request.setAttribute(CsrfToken.class.getName(), csrfToken);
	request.setAttribute(csrfToken.getParameterName(), csrfToken);
	if (!this.requireCsrfProtectionMatcher.matches(request)) {
		if (this.logger.isTraceEnabled()) {
			this.logger.trace("Did not protect against CSRF since request did not match "
					+ this.requireCsrfProtectionMatcher);
		}
		filterChain.doFilter(request, response);
		return;
	}
	String actualToken = request.getHeader(csrfToken.getHeaderName());
	if (actualToken == null) {
		actualToken = request.getParameter(csrfToken.getParameterName());
	}
	if (!equalsConstantTime(csrfToken.getToken(), actualToken)) {
		this.logger.debug(
				LogMessage.of(() -> "Invalid CSRF token found for " + UrlUtils.buildFullRequestUrl(request)));
		AccessDeniedException exception = (!missingToken) ? new InvalidCsrfTokenException(csrfToken, actualToken)
				: new MissingCsrfTokenException(actualToken);
		this.accessDeniedHandler.handle(request, response, exception);
		return;
	}
	filterChain.doFilter(request, response);
}
9 BasicAuthenticationFilter : Basic 인증 처리
HTTPS 프로토콜에서만 제한적으로 사용 (보통은 사용 X)
- HTTP 요청 헤더에 username과 password를 Base64 인코딩하여 포함
- "dXNlcjp1c2VyMTIz" Base64 decode — user:user123
Authorization: Basic dXNlcjp1c2VyMTIz - Form 인증과 동일하게 UsernamePasswordAuthenticationToken을 사용하고
- httpBasic() 메소드를 호출하여 활성화 시킨다. (기본 비활성화)
http.httpBasic()
10WebAsyncManagerIntegrationFilter
Spring MVC Async Request (반환 타입이 Callable) 처리에서 SecurityContext를 공유할수 있도록 하는 역할이다.
@GetMapping(path = "/asyncHello")
@ResponseBody
public Callable<String> asyncHello() {
  log.info("[Before callable] asyncHello started.");
  Callable<String> callable = () -> {
    Authentication authentication = SecurityContextHolder.getContext().getAuthentication();
    User principal = authentication != null ? (User) authentication.getPrincipal() : null;
    String name = principal != null ? principal.getUsername() : null;
    log.info("[Inside callable] Hello {}", name);
    return "Hello " +  name;
  };
  log.info("[After callable] asyncHello completed.");
  return callable;
}- 아래 실행 로그를 살펴보면, Callable 실행 로직이 다른 쓰레드에서 실행되었음에도 SecurityContext를 제대로 참조한걸 알 수 있다.
- MVC 핸들러 쓰레드 — XNIO-1 task-2
- Callable 실행 쓰레드 — task-1

SecurityContextCallableProcessingInterceptor.class
public final class SecurityContextCallableProcessingInterceptor extends CallableProcessingInterceptorAdapter {

	private volatile SecurityContext securityContext;

	//... 생략 ...

	@Override
	public <T> void beforeConcurrentHandling(NativeWebRequest request, Callable<T> task) {
		if (this.securityContext == null) {
			setSecurityContext(SecurityContextHolder.getContext());
		}
	}

	@Override
	public <T> void preProcess(NativeWebRequest request, Callable<T> task) {
		SecurityContextHolder.setContext(this.securityContext);
	}

	@Override
	public <T> void postProcess(NativeWebRequest request, Callable<T> task, Object concurrentResult) {
		SecurityContextHolder.clearContext();
	}

	//... 생략 ...

}- 앞에서 살펴본 바에 의하면,
SecurityContext는ThreadLocal<T>변수를 이용하고 있고, 따라서 다른 쓰레드에서는SecurityContext를 참조할수 없어야 한다. WebAsyncManagerIntegrationFilter는 MVC Async Request가 처리될 때, 쓰레드간SecurityContext를 공유할수 있게 해준다.SecurityContextCallableProcessingInterceptor클래스를 이용함beforeConcurrentHandling()— HTTP 요청을 처리하고 있는 WAS 쓰레드에서 실행- 해당 메소드 구현의
SecurityContextHolder.getContext()부분은ThreadLocal<T>l의SecurityContext정상적으로 참조한다. - 즉,
ThreadLocal<T>의SecurityContext객체를SecurityContextCallableProcessingInterceptor클래스 멤버변수에 할당한다.
- 해당 메소드 구현의
preProcess(),postProcess()— 별도 쓰레드에서 실행
- 단, 위 기능은 Spring MVC Async Request 처리에서만 적용되며 (즉, Controller 메소드)
@Async어노테이션을 추가한 Service 레이어 메소드에는 해당 되지 않는다.
SimpleService 의 메소드에서 SecurityContext 참조 결과가 null 이라는 것을 확인할 수 있다.
@Controller
public class SimpleController {

  public final Logger log = LoggerFactory.getLogger(getClass());

  private final SimpleService simpleService;

  public SimpleController(SimpleService simpleService) {
    this.simpleService = simpleService;
  }

	// ... 생략 ...
  @GetMapping(path = "/someMethod")
  @ResponseBody
  public String someMethod() {
    log.info("someMethod started.");
    simpleService.asyncMethod();
    log.info("someMethod completed.");
    return "OK";
  }

}

@Service
public class SimpleService {

  public final Logger log = LoggerFactory.getLogger(getClass());

  @Async
  public String asyncMethod() {
    Authentication authentication = SecurityContextHolder.getContext().getAuthentication();
    User principal = authentication != null ? (User) authentication.getPrincipal() : null;
    String name = principal != null ? principal.getUsername() : null;
    log.info("asyncMethod result: {}", name);
    return name;
  }

}
SecurityContextHolderStrategy 설정값을 기본값 MODE_THREADLOCAL 에서 MODE_INHERITABLETHREADLOCAL 으로 변경
- 다른 쓰레드(task-1)에서도
SecurityContext를 참조할 수 있게됨 SecurityContextHolderStrategy인터페이스 구현체를 기본값ThreadLocalSecurityContextHolderStrategy에서InheritableThreadLocalSecurityContextHolderStrategy으로 변경함SecurityContext저장 변수를ThreadLocal에서InheritableThreadLocal타입으로 변경하게됨InheritableThreadLocal— 부모 쓰레드가 생성한ThreadLocal변수를 자식 쓰레드에서 참조할 수 있음
public WebSecurityConfigure() {
  SecurityContextHolder.setStrategyName(SecurityContextHolder.MODE_INHERITABLETHREADLOCAL);
}
DelegatingSecurityContextAsyncTaskExecutor
MODE_INHERITABLETHREADLOCAL을 설정하여 이용하는 것은 그다지 권장할 만한 방법이 아님- Pooling 처리된
TaskExecutor와 함께 사용시ThreadLocal의 clear 처리가 제대로되지 않아 문제될 수 있음 (예 — ThreadPoolTaskExecutor) - Pooling 처리되지 않은
TaskExecutor와 함께 사용해야 함 (예 —SimpleAsyncTaskExecutor)
- Pooling 처리된
- 내부적으로 Runnable을
DelegatingSecurityContextRunnable타입으로 wrapping 처리함 DelegatingSecurityContextRunnable객체 생성자에서SecurityContextHolder.getContext()메소드를 호출하여SecurityContext참조를 획득
@Bean
public ThreadPoolTaskExecutor threadPoolTaskExecutor() {
    ThreadPoolTaskExecutor executor = new ThreadPoolTaskExecutor();
    executor.setCorePoolSize(3);
    executor.setMaxPoolSize(5);
    executor.setThreadNamePrefix("task-");
    return executor;
}

@Bean
public DelegatingSecurityContextAsyncTaskExecutor taskExecutor(ThreadPoolTaskExecutor delegate) {
    return new DelegatingSecurityContextAsyncTaskExecutor(delegate);
}
참고자료 - Using strategy MODE_INHERITABLETHREADLOCAL is dangerous with thread pools