1. 인증(Authentication)과 인가(Authorization)의 개념
웹 애플리케이션을 개발하다 보면 '인증'과 '인가'라는 용어를 자주 접하게 된다. 이 두 가지 개념은 보안 시스템에서 매우 중요한 부분으로, 쉽게 설명하자면 인증은 '누가 누구인지 확인하는 것', 인가는 '무엇을 할 수 있는지 확인하는 것'이다. 지금부터 이 두 가지 개념을 간단하게 알아보자.
인증(Authentication) 이란?
인증은 사용자의 신원을 확인하는 과정이다. 가장 기본적인 방식은 아이디와 패스워드를 입력하는 로그인 과정이다. 또한 최근에는 Google, Facebook과 같은 소셜 로그인(OAuth2.0)을 통해 인증하는 방식도 많이 사용된다.
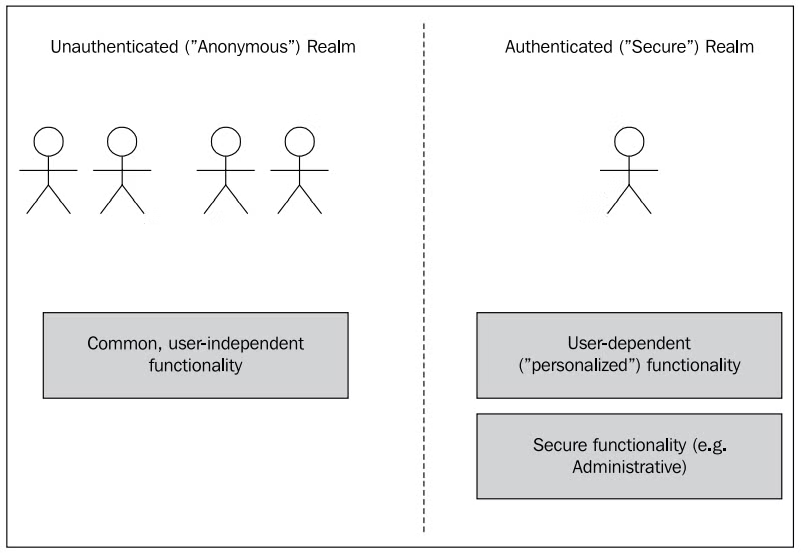
애플리케이션은 보통 인증된 영역과 인증되지 않은 영역으로 나뉜다.
- 인증되지 않은 영역(익명 영역): 사용자가 로그인하지 않고 접근할 수 있는 기능들이다. 민감한 정보를 노출하지 않고, 시스템의 상태를 변경하거나 데이터를 수정할 수 있는 기능은 제공되지 않는다.
- 인증된 영역: 사용자가 로그인하여 자신의 개인정보를 확인하거나 수정할 수 있는 곳이다.
인가(Authorization) 란?
인가란 인증된 사용자에게 적절한 권한을 부여하여 특정 기능을 수행하거나 데이터를 접근할 수 있게 허용하는 과정이다. 예를 들어, 관리자만이 중요한 데이터를 수정하거나 삭제할 수 있는 권한을 갖게 할 수 있다.
권한을 제대로 관리하지 않으면 중요한 데이터를 잘못된 사용자에게 노출시키거나, 사용자가 의도하지 않은 기능을 수행할 수 있어 보안 사고로 이어질 수 있다.
2. 스프링 시큐리티(SPRING SECURITY) 시작하기
Spring Security is a powerful and highly customizable authentication and access-control framework. It is the de-facto standard for securing Spring-based applications.
Spring Security is a framework that focuses on providing both authentication and authorization to Java applications. Like all Spring projects, the real power of Spring Security is found in how easily it can be extended to meet custom requirements
- 스프링 시큐리티(Spring Security)는 애플리케이션에 쉽게 보안 기능을 적용할 수 있는 강력한 프레임워크이다.
- 사용자 인증과 인가 처리를 기본으로 제공하며, 필요에 따라 다양한 보안 기능을 커스터마이징할 수 있다.
- 또한, 스프링 세션이나 OAuth와 같은 다른 스프링 프로젝트와 자연스럽게 통합이 가능하다.
의존성 추가
Spring Security를 프로젝트에 적용하기 위해서는 아래와 같은 의존성을 pom.xml 파일에 추가해야 한다.
<dependency>
	<groupId>org.springframework.boot</groupId>
	<artifactId>spring-boot-starter-security</artifactId>
</dependency>

<dependency>
  <groupId>org.springframework.security</groupId>
  <artifactId>spring-security-test</artifactId>
  <scope>test</scope>
</dependency>

<dependency>
  <groupId>org.thymeleaf.extras</groupId>
  <artifactId>thymeleaf-extras-springsecurity5</artifactId>
</dependency>- spring-boot-starter-security — spring security 모듈
- spring-security-test — security 테스트 모듈
- thymeleaf-extras-springsecurity5 - thymeleaf spring security 확장 모듈
WebSecurityConfig 클래스
이제 WebSecurityConfig 클래스를 작성해 보자. 이 클래스는 스프링 시큐리티의 핵심 설정을 담당하며, 인증과 인가 관련 규칙을 정의할 수 있다.
@Configuration
@EnableWebSecurity
public class WebSecurityConfig extends WebSecurityConfigurerAdapter {

    /*
    보통 정적인 페이지에 사용한다.
    지정된 antPath 경로에는 시큐리티 필터 체인을 태우지 않음. (전역 설정)
    필터는 다수의 필터로 구성되기 때문에 (비효율적인 이유), 불필요한 요청은 ignoring() 메서드를 통해 제외하도록 한다.
    */
    @Override
    public void configure(WebSecurity web) {
        web.ignoring().antMatchers("/assets/**");
    }

    @Override
    protected void configure(HttpSecurity http) throws Exception {
        http
        	/*
            spring security 는 "/me" 경로로 사용자가 들어왔을 때, "me" view 경로로 보내기 전 권한 여부를 파악하고
            스스로 login 페이지로 redirection 처리한다.
            */
            .authorizeRequests()
                .antMatchers("/me").hasAnyRole("USER", "ADMIN")
                .anyRequest().permitAll()
                .and()
            .formLogin()
                .defaultSuccessUrl("/")
                .permitAll();
    }
}@EnableWebSecurity어노테이션,WebSecurityConfigurerAdapter클래스WebSecurityConfigurerAdapter추상 클래스를 상속하는 구현체에@EnableWebSecurity어노테이션을 추가- 기본적인 Spring Security 설정이 자동으로 추가되며, 개별 설정을 override 할수 있음
WebSecurity클래스는 필터 체인 관련 전역 설정을 처리할 수 있는 API 제공ignoring()- Spring Security 필터 체인을 적용하고 싶지 않은 리소스에 대해 설정
- 일반적으로 정적 리소스(.html, .css, *.js 등)을 예외 대상으로 설정함
- 불필요한 서버 자원 낭비를 방지함
HttpSecurity클래스는 세부적인 웹 보안기능을 설정을 처리할 수 있는 API를 제공authorizeRequests(): 공개 리소스 또는 보호받는 리소스에 대한 세부 설정formlogin(): 로그인 폼 기능 세부 설정logout(): 로그아웃 기능 세부 설정rememberMe(): 자동 로그인 기능 세부 설정
3. 1주차 미션
미션 1: 기본 로그인 계정 추가하기
-
WebSecurityConfig클래스에서 configure(AuthenticationManagerBuilder auth) 메소드 override 하여 아래 계정을 추가한다.-
passwordEncoder는 NoOpPasswordEncoder로 사용함 (힌트: DelegatingPasswordEncoder)
-
기본 로그인 계정을 AuthenticationManagerBuilder 클래스를 통해 추가
-
username password role user user123 USER admin admin123 ADMIN
-
내가 작성한 코드
@Configuration
@EnableWebSecurity
public class WebSecurityConfig extends WebSecurityConfigurerAdapter {

    /*
    로그인 가능한 계정 추가
    Spring Security 5에서는 DelegatingPasswordEncoder 가 기본 PasswordEncoder 로 사용된다.
    DelegatingPasswordEncoder 클래스는 패스워드 해시 알고리즘별로 PasswordEncoder 를 제공하는 객체이다 (실제 Encoder 를 감싸는 객체)
    해시 알고리즘별 PasswordEncoder 선택을 위해 패스워드 앞에 prefix 를 추가해줘야 한다. (prefix 생략 시 bcrypt 적용)
    default -> {bcrypt}, passwordEncoder 사용 x -> {noop}, 나머지 -> {pbkdf2}, {sha256} 등등

    +) UserDetailsPasswordService 인터페이스 구현체를 통해 최초 로그인 1회 성공 시,
    {noop} 타입에서 → {bcrypt} 타입으로 PasswordEncoder 가 변경된다.
    +) DelegatingPasswordEncoder 사용이 필요 없다면 BCryptPasswordEncoder 클래스를 명시적으로 Bean 선언하자
    */
    @Override
    protected void configure(AuthenticationManagerBuilder auth) throws Exception {
        auth.inMemoryAuthentication()
                .withUser("user").password("{noop}user123").roles("USER")
                .and()
                .withUser("admin").password("{noop}admin123").roles("ADMIN");
    }
}- 스프링 시큐리티에서는 로그인 계정을 쉽게 추가할 수 있다.
- 이번 미션에서는
configure(AuthenticationManagerBuilder auth)메소드를 사용하여 메모리 상에 두 개의 계정을 추가한다. - 여기서
{noop}은 패스워드를 인코딩하지 않고 사용하겠다는 의미이다. 실제로는 보안상의 이유로 패스워드를 암호화하여 저장하는 것이 좋다.
미션 2: 로그아웃, Cookie 기반 자동 로그인 (Remember-Me) 기능 설정하기
- HttpSecurity 클래스의 logout() API를 통해 로그아웃 기능을 설정
- 로그아웃 처리 path
/logout - 로그아웃 성공 후 리다이렉션 path
/
- 로그아웃 처리 path
- HttpSecurity 클래스의 rememberMe() API를 통해 Cookie 기반 자동 로그인 기능을 설정
- 파라미터명 “remember-me”
- 자동 로그인 토큰 유효기간 5분
내가 작성한 코드
@Configuration
@EnableWebSecurity
public class WebSecurityConfig extends WebSecurityConfigurerAdapter {

    @Override
    protected void configure(HttpSecurity http) throws Exception {
        http
            /*
            spring security 는 "/me" 경로로 사용자가 들어왔을 때, "me" view 경로로 보내기 전 권한 여부를 파악하고
            스스로 login 페이지로 redirection 처리한다.
            */
            .authorizeRequests()
                .antMatchers("/me").hasAnyRole("USER", "ADMIN")
                .anyRequest().permitAll()
                .and()
            .formLogin()
                .defaultSuccessUrl("/")
                .permitAll()
                .and()
            /*
            "/logout" 경로로 접근 시 로그아웃 실행, "/" 로그아웃 성공 시 리다이렉션
            invalidateHttpSession(true) -> 로그아웃 시 해당 사용자의 세션을 invalidate
            clearAuthentication(true) -> 로그아웃된 사용자의 SecurityContext 의 Authentication 을 null 로 초기화
            +) 추가로 아래 설정은 전부 default 값임
            */
            .logout()
                .logoutRequestMatcher(new AntPathRequestMatcher("/logout"))
                .logoutSuccessUrl("/")
                .invalidateHttpSession(true)
                .clearAuthentication(true)
                .and()
            /*
            쿠키 기반 자동 로그인 활성화
            */
            .rememberMe()
                .rememberMeParameter("remember-me")
                .tokenValiditySeconds(300)
            ;
    }
}