본 게시물은 "생활코딩 - Webpack" 강의를 요약정리한 글입니다.
🔷 Webpack 들어가기
| Webpack?
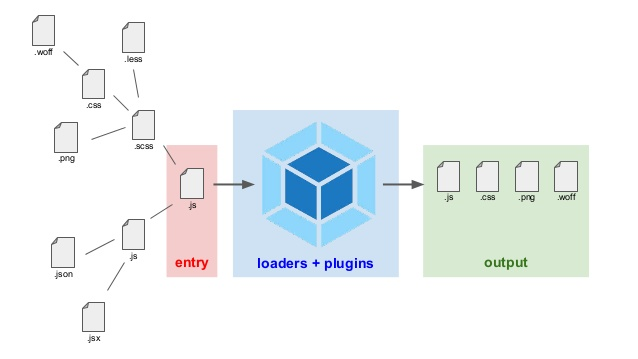
: 여러개의 파일을 하나의 파일로 묶어주는 개발 자동화 도구(생산성 향상)
- webpack은 파일을 묶는 과정에서 여러가지 작업들이 실행되도록 작업 계획을 세워주기도 함.
- sass, typescript, jsx와 같은 언어들을 네이티브 언어로 컴파일 해주거나,
- 개발 중에 파일이 수정 되었을 때 자동으로 브라우저의 내용을 리로드 해주는 등의 작업(DevServer)도 가능
| 웹팩의 등장 배경
각기 다른 파일에서 동일한 이름의 함수/변수를 생성시 충돌로 인해 application이 깨질 위험성이 있었음.
➡ 여러 개의 파일을 묶어주는 Bundler 의 탄생
: Javascript파일에 JS코드 뿐만 아니라 CSS, 이미지까지 모듈로 몰아넣을 수 있음.
, 웹개발에서 필요한 다양한 확장기능을 제공.
| 여러 파일의 모듈을 관리하는 방식들
🔹 전통적인 방식(🙁)
src 디렉토리
ㄴ hello.js (var word ="hello")
ㄴ world.js (var word ="world")
위 모듈들을 html파일에서 script 태그로 각각 로드한 뒤 공통되는 변수명을 사용했을 때 결과는?
나중에 로드한 파일의 변수의 값만 불러오는 문제가 생김.
🔹 ES6의 import/export 방식 (😐)
: export로 모듈을 내보내고, import로 해당 모듈을 불러오는 방식(ES6)
*문제점
- import, export 구문은 IE등 오래된 브라우저에서는 동작하지 않음.
- JS/이미지 파일이 많을 경우 로드하는 파일이 많아지므로 네트워크 커넥션이 많아져서 네트워크 속도가 느려짐.
🔹 웹팩(번들러) 방식 (😃)
- 코드 리팩토링
- 레거시 브라우저도 지원
| 웹팩 사용하기
👉 공식문서 참고
$ npm init
🔹 터미널에서 매뉴얼하게 타이핑하는 방법 (😐 )
: entry파일과 output파일을 직접 CLI에 명시하여 webpack 실행.(번거로움)
$npx webpack --entry ./src/index.js --output ./public/index_bundle.js
➡ index_bundle.js 파일이 생성됨
🔹 Configuration 파일로 사용하기(😀 )
: 설정파일을 만들어서 해당 내용대로 webpack 실행되도록 세팅해준다.
- webpack.config.js 파일 생성
const path = require('path');

module.exports = {
  entry: './src/index.js',
  output: {
    filename: 'index_bundle.js',
    path: path.resolve(__dirname, 'public'),
  },
};
- $ npx webpack
➡ 웹팩이 자동으로 configuration 파일을 찾아서 적혀진 내용대로 파일을 번들링해준다.
| Mode 도입하기 (🅳/🅿 )
웹팩은 모드별(개발 모드/프로덕션 모드)로 각각 디폴트 세팅이 있음
- production용 output 파일은 용량 최소화를 목적으로 작성되었기 때문에 읽기가 어렵게 되어있음.
- development용은 주석과 명시적인 변수명을 사용하여 가독성이 나은 편.
(➡ webpack.config.js, webpack.config.prod.js 파일을 따로 만들어서 개발용/배포용 따로 활용하기도 함)
| Loader 도입하기 (🧙♀️ 🎃)
: 웹팩을 잘 안다는 것은 얼마나 다양한 로더를 잘 알고 있는가라고 할 수 있을 정도로 로더는 매우 중요

로더의 역할은,
asset을 가공해서 원하는 형태로 뾰로롱 🎠 만들어주는 역할
ex) .js, .css, .sass, .cjs, .png, .jpg... ➡ 로더로 프로세스 ➡ .js,.css, .jpg, .png
로더 사용하기
(style-loader, css-loader로 실습)
$ npm install --save-dev(=-D) style-loader css-loader
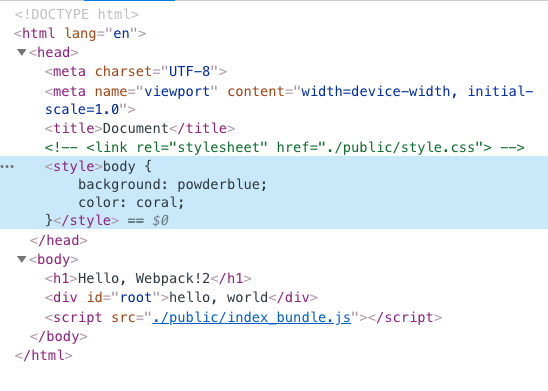
css-loader는 style.css 파일을 js형태로 만들어줌.(추출)style-loader는 번들링된 .js 태그를 html 페이지에 style 태그에 inject 한다.(주입)

+팁 ) loader는 체이닝 기법으로 앞의 로더부터 순차적/연쇄적으로 맞물려서 실행된다. 즉, 앞의 로더가 실행한 것을 기반으로 다음 로더가 실행된다. So, raw file을 js로 추출하는 로더 먼저 적고, 뒤에 번들링된 파일을 html에 주입시키는 로더를 불러야 한다. (순서 중요)
를 참고하여 공식 로더와 커뮤니티 로더들을 한번 훑어보면 도움이 된다.
| output 설정하기 (⚙️ )
: output의 디폴트는 번들링된 하나의 js파일만 생성되는 것.
만약 파일을 여럿으로 나누어 번들링 하고 싶다면?
configuration의 output을 직접 수정해준다.
entry 둘로 쪼개고
output에는 [name]예약어를 사용.
 entry: {
    index: './src/index.js',
    about: './src/about.js'
  },
  output: {
    filename: '[name]_bundle.js',
    path: path.resolve(__dirname, 'public'),
},| 플러그인의 도입 (💪 )
👉 공식문서/plugins/html webpack plugin
HtmlWebpackPlugin
: html 파일 자동 생성 기능
The HtmlWebpackPlugin simplifies creation of HTML files to serve your webpack bundles. This is especially useful for webpack bundles that include a hash in the filename which changes every compilation. You can either let the plugin generate an HTML file for you, supply your own template using lodash templates, or use your own loader.
$ npm install --save-dev html-webpack-plugin
기존에는 html파일을 매뉴얼로 생성했다면 이제는 html파일을 src 디렉토리로 옮겨준다.(템플릿 역할)
그리고 config파일에 플러그인을 require 해준다.
    var HtmlWebpackPlugin = require('html-webpack-plugin');

    ...

    module.exports = {

    ...,

    plugins: [new HtmlWebpackPlugin()]
    }
html webpack plugin 공식문서 의 options에서 필요한 속성들을 찾고 추가한다. (template, filename, chunks)
    plugins: [
       new HtmlWebpackPlugin({
         template: "./src/index.html",
         filename: "index.html",
         chunks: ["index"],
       }),
       new HtmlWebpackPlugin({
         template: "./src/about.html",
         filename: "about.html",
         chunks: ["about"],
       }),
     ],
➡ index.html, about.html 파일 각각 생성되고, chunks에 각각 index/about을 명시해줬기 때문에 index.html-index.js만 로드 / about.html-about.js만 로드된다.
| 보너스 🥠
- 소스파일 내용 변경됐을 때 자동으로 compile 해주는 옵션
$npx webpack --watch
- Lodash(플러그인)
$npm install lodash
index.js에 import _ from "lodash";로 불러온 뒤 _.join, _.map 등 다양한 메서드로 여러가지 모듈들에 사용할 수 있음.
-
DevServer
- save 하면 자동으로 브라우저에 리로드(live reload)
- 모듈 수정시 수정된 부분만 컴팩트하게 바뀌는 기능(hot module replacement) :: 입력해둔 다른 정보 그대로 유지되므로 매우 편리 -
Code splitting
- 여러 파일을 하나로 번들링 하다보면 파일이 너무 커질 수 있음 ➡ 코드를 쪼개어줌 -
Lazy Loading
- 스플리팅된 코드를 필요할 때만 불러와서 사용하는 것

