
STOMP
STOMP란?
STOMP란 Streaming Text Oriented Messaging Protocol의 약자로, 메시징 시스템 간 통신을 위한 간단하고 유연한 구조의 텍스트 기반 프로토콜이다.
STOMP는 다양한 명령어(Command)를 지원하며, 이를 이용해 메시지를 전송하고, 수신할 수 있다. STOMP는 메시지의 헤더(Header)와 바디(Body)로 구성되어 있으며, 헤더에는 메시지의 제목, 목적지, 메시지 타입 등의 정보가 포함되어 있다. 바디에는 메시지의 실제 내용이 들어간다.
위와 같은 구조를 통해 Publish-Subscribe 매커니즘을 제공한다. 즉 Broker를 통해 타 사용자들에게 메세지를 보내거나 서버가 특정 작업을 수행하도록 메세지를 보낼 수 있게 된다.
또한 RabbitMQ, ActiveMQ같은 외부 메세징 시스템을 STOMP Broker로 사용할 수 있도록 지원한다.
구조적인 면을 보자면, 스프링은 메세지를 외부 Broker에게 전달하고, Broker는 WebSocket으로 연결된 클라이언트에게 메세지를 전달하는 구조가 되겠다. 이와 같은 구조 덕분에 HTTP 기반의 보안 설정과 공통된 검증 등을 적용할 수 있게 된다.
COMMAND
header1:value1
header2:value2
Body^@
- COMMAND : SEND, SUBSCRIBE등 명령어를 지시
- header : 기존의 WebSocket으로는 불가능한 header작성
- destination: 이 헤더로 메세지를 보내거나 구독 할 수 있따.
일반적으로 다음의 형식을 따른다
"topic/.." -> publish-subcribe(1:N)
"queue/.." -> point to point(1:1)
다음은 ClientA가 5번 채팅방에 대해 구독을 하는 예시이다
SUBSCRIBE
destination: /topic/chat/room/5
id: sub-1
^@
다음은 ClientB에서 채팅 메세지를 보내는 예시이다.
SEND
destination: /pub/chat
content-type: application/json
{"chatRoomId": 5, "type": "MESSAGE", "writer": "clientB"} ^@
STOMP 서버는 모든 구독자에게 메세지를 Broadcasting하기 위해 MESSAGE COMMAND를 사용할 수 있다. 서버는 내용을 기반(chatRoomId)으로 메세지를 전송할 broker에 전달한다. (topic을 sub로 보아도 될 것 같다.)
MESSAGE
destination: /topic/chat/room/5
message-id: d4c0d7f6-1
subscription: sub-1
{"chatRoomId": 5, "type": "MESSAGE", "writer": "clientB"} ^@
SEND
SEND frame은 destination의 메세징 시스템으로 메세지를 보낸다. 필수 헤더는 어디로 보낼지에 대한 "destination" 하나이다. SEND frame의 body는 보내고자 하는 메세지이다.
SEND
destination: /queue/a
content-type: text/plain
hello queue a
^@
SUBSCRIBE
SUBSCRIBE frame은 주어진 destination에 등록하기 위해 사용된다. SEND frame과 마찬가지로 Subscribe는 client가 구독하기 원하는 목적지를 가리키는 "destination" 헤더를 필요로 한다. 가입된 대상에서 수신된 모든 메세지는 이후 MESSAGE frame로서 서버에서 클라이언트에게 전달된다.
STOMP에서의 SUBSCRIBE 요청시 처리되는 순서
- 클라이언트가 subscribe 요청을 보냅니다. 이 요청은 구독하려는 대상(destination)과 구독 ID(subscription ID)를 지정합니다.
- Stomp 브로커는 클라이언트의 subscribe 요청을 받습니다.
- 브로커는 해당 대상(destination)에 대한 구독(subscription)을 만듭니다. 이 구독은 대상(destination)에 대한 구독자(subscriber) 목록을 유지합니다.
- 브로커는 클라이언트에게 해당 구독 ID(subscription ID)를 할당합니다. 이 구독 ID(subscription ID)는 클라이언트의 구독 요청에 지정된 구독 ID(subscription ID)와는 다를 수 있습니다.
- 브로커는 클라이언트에게 subscribe 성공 응답을 보냅니다. 이 응답은 구독 ID(subscription ID)와 대상(destination) 정보를 포함합니다.
- 이후, 해당 대상(destination)에 새로운 메시지가 발행(publish)되면, 브로커는 해당 대상(destination)에 대한 모든 구독(subscription)에 메시지를 전달합니다.
- 클라이언트는 메시지를 받아들이기 위해 해당 대상(destination)에 대한 구독(subscription)을 해제(unsubscribe)할 수 있습니다. 클라이언트는 unsubscribe 요청을 보내고, 브로커는 해당 대상(destination)에 대한 구독(subscription)을 삭제합니다.
Stomp에서 보관된 session은 일반적으로 Stomp 브로커(예: Apache ActiveMQ)에서 관리됩니다.
Stomp 브로커는 일반적으로 메시지의 발신자와 수신자 간에 연결을 유지하고, 세션(Session)을 관리하는 역할을 합니다. 이러한 세션은 일반적으로 브로커와 연결된 클라이언트의 고유한 식별자를 가지고 관리됩니다.
클라이언트가 Stomp 브로커에 연결하면, 브로커는 해당 클라이언트에 대한 새로운 세션을 만들고, 해당 세션의 식별자를 클라이언트에게 제공합니다. 이후 클라이언트는 해당 식별자를 사용하여 세션을 유지하고, 메시지를 발신하고 수신할 수 있습니다
위와 같은 순서로 subscribe 요청이 처리되고 클라이언트는 이후 해당 대상(destination)에 대한 새로운 메시지를 수신할 수 있다.
SUBSCRIBE
id: 0
destination: /queue/foo
ack: client
^@
STOMP 구현
StompWebSocketConfig
@Configuration
@EnableWebSocketMessageBroker
public class StompWebSocketConfig implements WebSocketMessageBrokerConfigurer {
    @Override
    public void registerStompEndpoints(StompEndpointRegistry registry) {
        registry.addEndpoint("/stomp/chat")
            .setAllowedOriginPatterns("*")
            .withSockJS();
    }

    @Override
    public void configureMessageBroker(MessageBrokerRegistry registry) {
        registry.setApplicationDestinationPrefixes("/pub");
        registry.enableSimpleBroker("/sub");
    }
}/stomp/chat경로로WebSocket혹은SockJSClient가 웹소켓 핸드셰이크 커넥션을 생성할 것이다.setApplicationDestinationPrefixes을 통해/pub경로로 시작하는 STOMP 메세지의 destination 헤더는@MessageMapping메서드로 라우팅된다.- 내장된 메세지 브로커를 사용해 Client에게 SubScription, BroadCasting 기능을 제공하며
enableSimpleBroker을 통해/sub로 시작한는 destination 헤더를 가진 메세지를 브로커로 라우팅한다.
StompChatController
@Controller
@RequiredArgsConstructor
public class StompChatController {

    private final SimpMessagingTemplate template;

    @MessageMapping("/chat/enter")
    public void enter(ChatMessageDTO message) {
        message.setMessage(message.getWriter() + "님이 채팅방에 참여하였습니다.");
        template.convertAndSend("/sub/chat/room/" + message.getRoomId(), message);
    }

    @MessageMapping(value = "/chat/message")
    public void message(ChatMessageDTO message){
        template.convertAndSend("/sub/chat/room/" + message.getRoomId(), message);
    }
}-
@MessageMapping애노테이션을 통해서WebSocket으로 들어오는 메세지 발행을 처리한다. 클라이언트에서/pub/chat/enter으로 발행 요청을 하면Controller가 메세지를 받아서/sub/chat/room/roomId로 메세지를 전송한다. -
기존의
ChatHandler의 역할을 대신 해준다.
room.html
$(document).ready(function(){

                var roomName = [[${room.name}]];
                var roomId = [[${room.roomId}]];
                var username = [[${#authentication.principal.username}]];

                console.log(roomName + ", " + roomId + ", " + username);

                var sockJs = new SockJS("/stomp/chat");
                //1. SockJS를 내부에 들고있는 stomp를 내어줌
                var stomp = Stomp.over(sockJs);

                //2. connection이 맺어지면 실행
                stomp.connect({}, function (){
                    console.log("STOMP Connection")

                    //4. subscribe(path, callback)으로 메세지를 받을 수 있음
                    stomp.subscribe("/sub/chat/room/" + roomId, function (chat) {
                        var content = JSON.parse(chat.body);

                        var writer = content.writer;
                        var str = '';

                        if(writer === username){
                            str = "<div class='col-6'>";
                            str += "<div class='alert alert-secondary'>";
                            str += "<b>" + writer + " : " + content.message + "</b>";
                            str += "</div></div>";
                            $("#msgArea").append(str);
                        }
                        else{
                            str = "<div class='col-6'>";
                            str += "<div class='alert alert-warning'>";
                            str += "<b>" + writer + " : " + message + "</b>";
                            str += "</div></div>";
                            $("#msgArea").append(str);
                        }

                        $("#msgArea").append(str);
                    });

                    //3. send(path, header, message)로 메세지를 보낼 수 있음
                    stomp.send('/pub/chat/enter', {}, JSON.stringify({roomId: roomId, writer: username}))
                });

                $("#button-send").on("click", function(e){
                    var msg = document.getElementById("msg");
                    console.log(username + ":" + msg.value);
                    stomp.send('/pub/chat/message', {}, JSON.stringify({roomId: roomId, message: msg.value, writer: username}));
                    msg.value = '';
                });
            });
var sockJs = new SockJS("/stomp/chat")을 통해SockJS와의 연결 실행- 연결이 맺어지면
stomp.subscribe("/sub/chat/room/" + roomId, ..)을 통해서 구독 설정을 요청한다. - 이후
stomp.send('/pub/chat/enter', {}, JSON.stringify({roomId: roomId, writer: username}))을 전송하고StompChatController.enter가 이를 처리한다. - 아래의 코드를 통해서 메세지를 전송할때마다
/pub/chat/message로 데이터를 함께 보내면StompChatController.message가 이를 처리한다.
$("#button-send").on("click", function(e){
                    var msg = document.getElementById("msg");
                    console.log(username + ":" + msg.value);
                    stomp.send('/pub/chat/message', {}, JSON.stringify({roomId: roomId, message: msg.value, writer: username}));
                    msg.value = '';
                });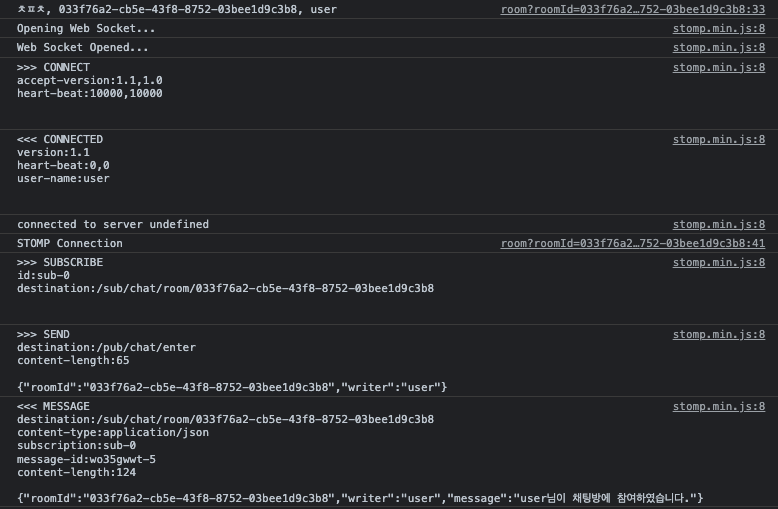
실행된 예시
개발하는 고라니님의 블로그를 참고하여 작성했습니다.