axious란?
: HTTP 기반 통신을 지원하는 가장 많이 사용되는 자바스크립트 라이브러리
| 구분 | axios | fetch |
|---|---|---|
| 모듈 설치 | 설치해야 함 (npm install --save axios) | 설치할 필요 없음 (브라우저 내장 API) |
| Promise API | 사용 | 사용 |
| 브라우저 호환성 | 뛰어나 | IE 지원하지 않음 (IE에서 사용하려면 Polyfill 라이브러리를 사용해야 함) |
| timeout 기능 | 지원 (timeout 시간 내에 응답이 오지 않으면 중단시킬 수 있음) | 지원하지 않음 |
| JSON 자동 변환 | 지원 (Content-type 정보를 이용해 자동으로 객체로 변환) | 지원하지 않음 (수신한 JSON 데이터를 객체로 변환하는 Promise 체인을 추가해야 함) |
- axios 이외에도 fetch와 같은 브라우저 내장 API나 jQuery 라이브러리가 제공하는 ajax 함수가 있으나, axios가 가장 강력한 기능을 제공
- axios는 사용을 위해 npm 패키지를 설치해야 한다는 단점이 있지만 브라우저 호환성, timeout을 이용한 중단(Abort) 기능, Content Type을 이용한 JSON 자동 변환 기능 등 장점이 많음
axious 라이브러리 사용 방법
axious.get() 메서드
GET 요청 처리를 수행해주는 axios 메서드
사용 방법
// url: 요청하는 백엔드 API의 URL을 지정
// config: 요청시에 저장할 설정값들
// 요청 후에는 Promise를 리턴하며 처리가 완료된 후에는 response 객체를 응답받음
axios.get( url, config )
사용 예시 : Promise
const requestAPI = () =>{
  const url = "/api/todolist/gdhong";
  axios.get(url)
  .then((response) => {
    console.log("# 응답객체 : ", response);
  });
};
requestAPI();
사용 예시 : async/await
const requestAPI = async () => {
  const url = "/api/todolist/gdhong"";
  const response = await axios.get(url);
  console.log("# 응답객체 : ", response);
};
requestAPI();
실습에서 사용한 axios.get(() 전문
<!DOCTYPE html>
<html lang="en">

<head>
    <meta charset="UTF-8">
    <meta name="viewport" content="width=device-width, initial-scale=1.0">
    <title>Document</title>
</head>

<body>
    <script src="https://cdn.jsdelivr.net/npm/axios/dist/axios.min.js"></script>
    <script>
        const getProductList = async () => {
            await axios
                .get('[여기에 url]')
                .then((response) => {
                    console.log(response.data); // 응답 데이터
                    return response.data;
                })
                .catch((error) => {
                    console.error('Error fetching data:', error);
                });
        }
        const response = getProductList();
        console.log(response);
    </script>
</body>

</html>
axios.post() 메서드
POST 요청을 처리하는 axios 메서드
주로 백엔드 API 서버로 데이터를 전달해 데이터를 추가할 때 사용
사용 방법
// url, config는 axios.get()과 동일
// data는 POST 요청의 HTTP Content Body로 전송할 데이터
axios.post( url, data, config )
실습에서 사용한 axios.post() 전문
<!DOCTYPE html>
<html lang="en">

<head>
    <meta charset="UTF-8">
    <meta name="viewport" content="width=device-width, initial-scale=1.0">
    <title>Document</title>
</head>

<body>
    <script src="https://cdn.jsdelivr.net/npm/axios/dist/axios.min.js"></script>
    <script>
        const getProductList = async () => {
            await axios
                .post('[여기에 url]',{"":"","":""})
                .then((response) => {
                    console.log(response.data); // 응답 데이터
                    if(response.data.result === "success"){
                    return response.data;
                    }

                })
                .catch((error) => {
                    console.error('Error fetching data:', error);
                });
        }
        const response = getProductList();
        console.log(response);
    </script>
</body>

</html>
axios 기타 함수
axios.get(), axios.post() 외에도 axios.put(), axios.delete()를 사용할 수 있다.
axios.put()은 PUT 요청을 처리하는 함수이며, axios.post()와 같은 방법으로 사용하면 된다.
axios.delete()는 DELETE 요청을 처리하는 함수이며, axios.get()과 같은 방법으로 사용한다.
axios.delete( url, config );
axios.put( url, data, config);
데이터베이스와 연동할 때 각 함수 사용법
| 조회 | 등록 | 수정 | 삭제 |
|---|---|---|---|
| GET | POST | PUT | delete |
크로스 오리진 에러
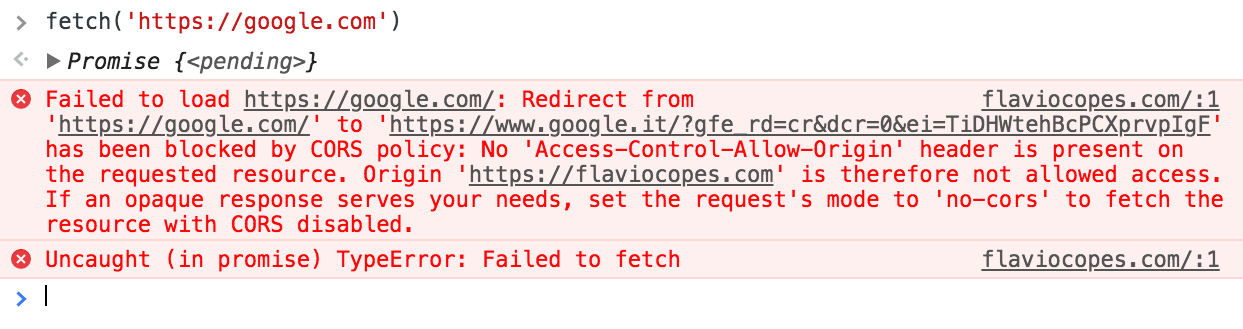
위에서 배운 함수를 이용해 axios 함수를 쓰려고 하면 이미지와 같은 오류가 발생하는 걸 확인할 수 있다.
크로스 오리진 에러란?
: 브라우저는 자신의 오리진과 다른 오리진의 API 서버와 통신할 때 문제가 발생한다는 개념
이렇게 함으로써 잠재적인 윟멍르 가진 문서의 로딩을 제한해 공격의 가능성을 줄일 수 있다.
- 크로스 오리진 문제는 웹브라우저에 내장된 SOP(Same Origin Policy : 동일 근원 정책)이라는 보안 정책 때문에 발생
- SOP(Same Origin Policy)는 "브라우저의 오리진과 동일한 오리진을 가진 서버일 때만 통신을 가능하게 한다"라는 의미를 가진 브라우저 내부의 보안정책
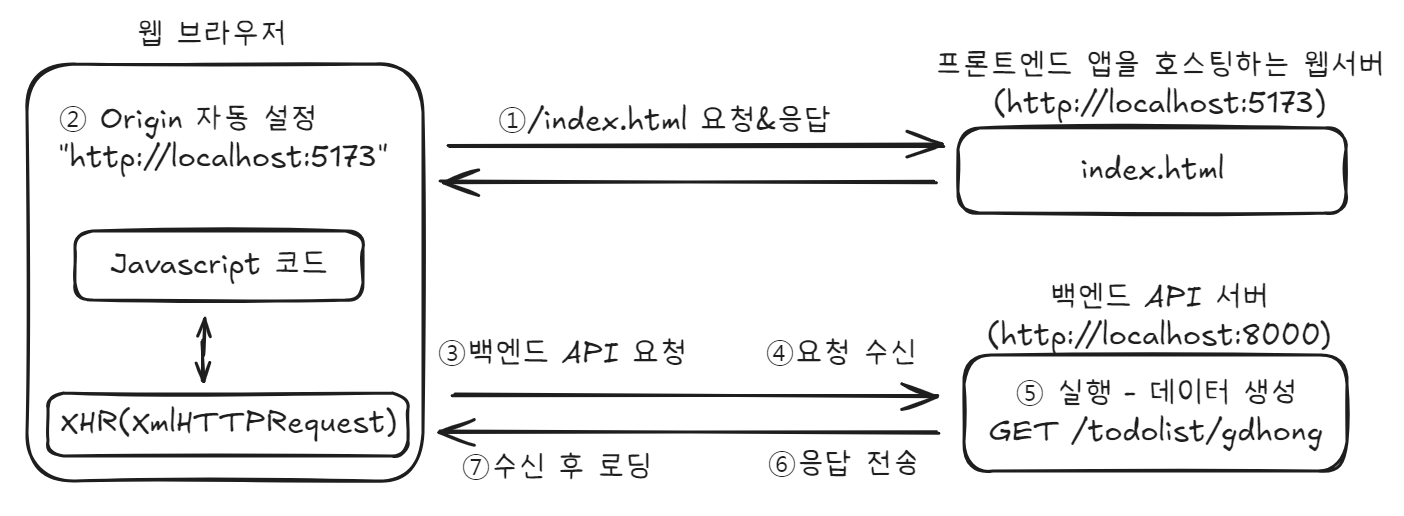
크로스 오리진 오류 발생 개요도
위 그림에서 웹 브라우저는 http://localhost:5173으로 index.html을 요청하여 응답받았다. 따라서 2번처럼 브라우저의 오리진은 http://localhost:5173의 문자열로 지정되었다. 이 오리진을 가진 브라우저는 자바스크립트 코드로 http://localhost:8000 오리진을 가진 백엔드 API 서버에 요청하였다. 이때 3~7번까지의 단계 중 7번 단계에서 응답 데이터를 로딩할 때 오류가 발생한 것
크로스 오리진 문제를 크로스 도메인(Crostt Domain)이라고 부르기도 하지만 이것은 정확한 표현이 아니다. 도메인은 같아도 포트 번호가 다르면 오류가 발생하기 때문.
URI 경로 중에서 앞에서 포트 번호까지의 문자열이 바로 오리진이다. 이 문자열이 1바이트라도 다르면 오류가 발생