오전
1교시
지난 시간 복습
- form tag ★★★
- 사용자가 입력한 데이터를 한번에 묶어서 보내는 태그
- 예: 회원 가입, 로그인
- 필수 속성 2개
- action: 클라이언트나 프론트엔드에서 작성한 데이터를 백엔드에 있는 서버에 전달해야 함 → 데이터를 전송하려면 데이터를 받아 줄 서버의 주소르 적는 공간이 필요 → action 속성에 넣는다: 서버(node.js) 배우면서 활용할 예정
- method: 통신 방법 지정 → get 방식은 데이터가 url에 동반, host 방식은 버퍼 형태의 데이터로 전달(데이터를 숨겨서 넘김). 기본 설정은 get
- 사용자가 입력한 데이터를 한번에 묶어서 보내는 태그
- input tag
- 사용자에게 입력 창 제공
- forming할 공간을 할당한 후 실제 사용자가 입력할 수 있는 창을 제공해야 함 → input 태그
- 종류가 매우 다양 → type 속성으로 input 태그의 모습을 결정
- type="text": 사용자가 글자를 작성하는 공간, 눈에 보이는 숫자나 글자를 작성할 때
- type="password": 작성한 글자가 화면에 보이지 않게 처리(보안)
- 사용자에게 편의성을 제공하면서 서버끼리 소통할 때 필요한 규칙을 정할 수 있는 속성 존재: required, placeholder, maxlength
- ★★ name, value 속성: 매우 중요! ★★
- name은 input 태그에 입력된 데이터를 가리킬 수 있는 키 값
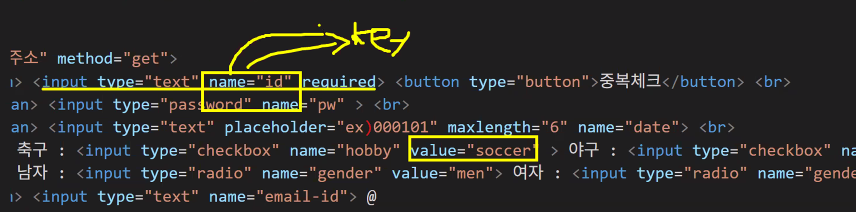
- 데이터를 받아주는 서버의 입장에서 넘겨 받은 게 글자뿐이면 해당 데이터가 뭔지 알 수 없음 → name(key 값)과 동반해서 구분자를 넣어줌: 어떤 데이터인지 명시
- 사용자가 직접 입력한 값이 자동으로 value에 들어감 → 사용자가 "선택"하는 경우에만 value에 값을 써 주기(checkbox, radio)
- name 속성이 그룹을 담당하는 개념이라면 실제 선택한 내역의 값을 담고 있는 건 value라는 속성
- type="checkbox": 중복 선택 가능, type="radio": 딱 하나만
- name은 input 태그에 입력된 데이터를 가리킬 수 있는 키 값
- 사용자에게 입력 창 제공
데이터를 넘길 때 키 값과 함께 넘겨줘야 함
→ 서버 입장에서는 데이터를 받을 때 넘겨받은 게 어떤 데이터인지 명시해주지 않으면 무슨 데이터인지 알 수 없음: 구분자를 반드시 넣어주어야 함!
사용자가 직접 작성한 값이 value에 담기게 되기 때문에 사용자가 입력하는 input에서는 절대 작성하면 안 되지만 checkbox나 radio(라디오버튼)처럼 사용자가 선택하는 형태라면 무엇을 선택했는지 서버에 알려줘야 하기 때문에 value값을 반드시 적어주어야 한다.
- select tag
- 선택한다는 개념
- 예: 회원가입 시 이메일 주소 도메인
- option tag와 함께 사용
- name은 select에, value는 option에
- 이미 option이 모두 select에 묶여 있기 때문에 name은 select에만 적으면 됨
- value는 굳이 적지 않아도 됨: option에서 고른 content가 자동으로 value가 되기 때문
- 만약 option에 적힌 내용이 아닌 다른 내용을 서버로 보내고 싶다면 value 작성하기
- 선택한다는 개념
type="submit"과 button tag- type="submit"으로 설정 시 value에 입력한 값이 버튼으로 보임
- form 태그 안에 button 태그를 넣으면 자동으로 type="submit"이 되기 때문에 만약 서버에 제출하는 버튼이 아닌 다른 버튼(예: 아이디 중복 검사)으로 사용하고 싶다면 type을 꼭 설정해 주어야 한다.(예: type="button")
- button 태그를 더 많이 사용하는 이유
- 디자인 커스텀이 용이함
- 기능 제작이 가능함
3. HTML 태그 실습
step 1
- 실제 웹페이지는 "영역" 개념이 가장 어려움

- 영역 배치를 잘 하는 게 가장 중요
- 큰 영역부터 작은 영역 순으로
- css 디자인 코드 배우면서 div 태그 소개할 예정
- 코드 작성보다 "화면 분석 먼저"
- 화면 설계서 만들기: ppt, 와이어프레임 형태, 다양한 툴을 이용해 화면 구성 먼저 하기
- form
- table
- input
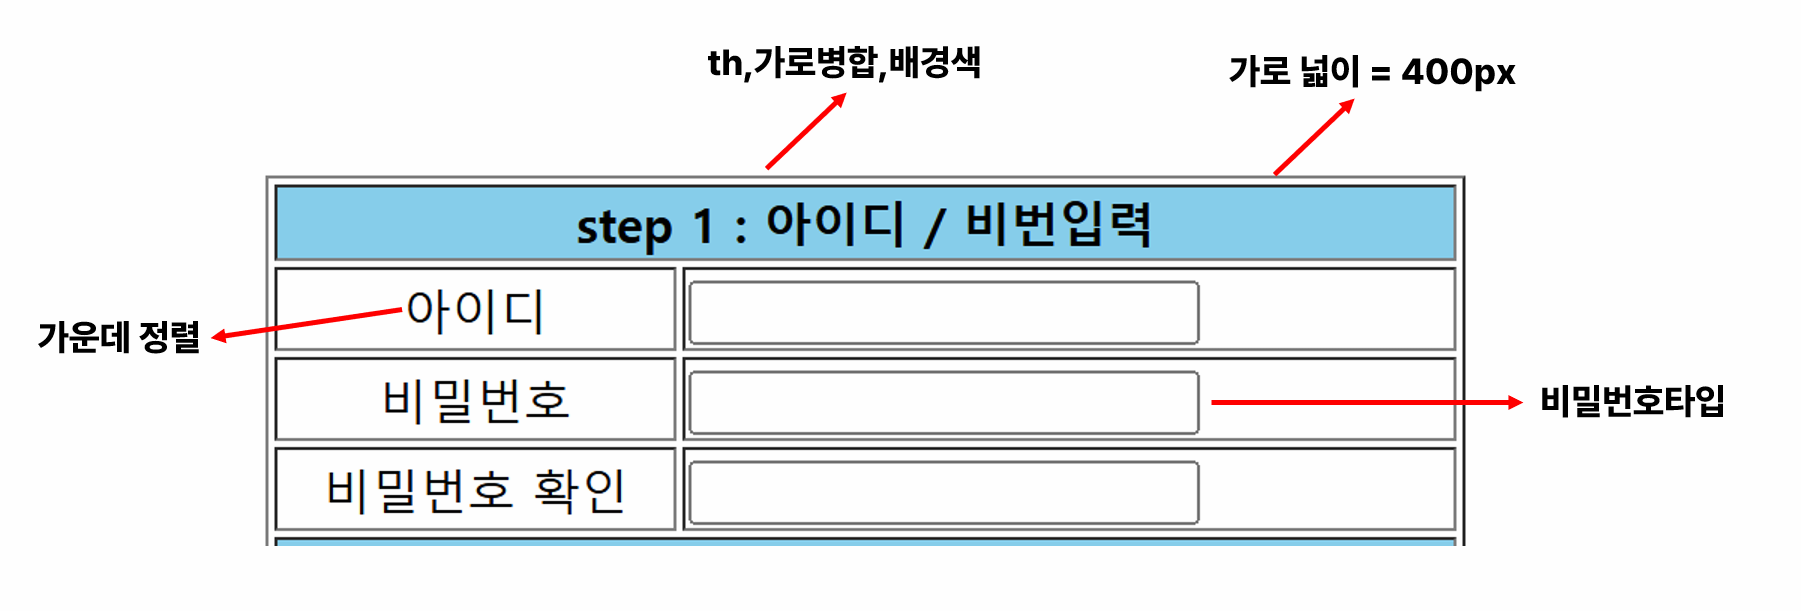
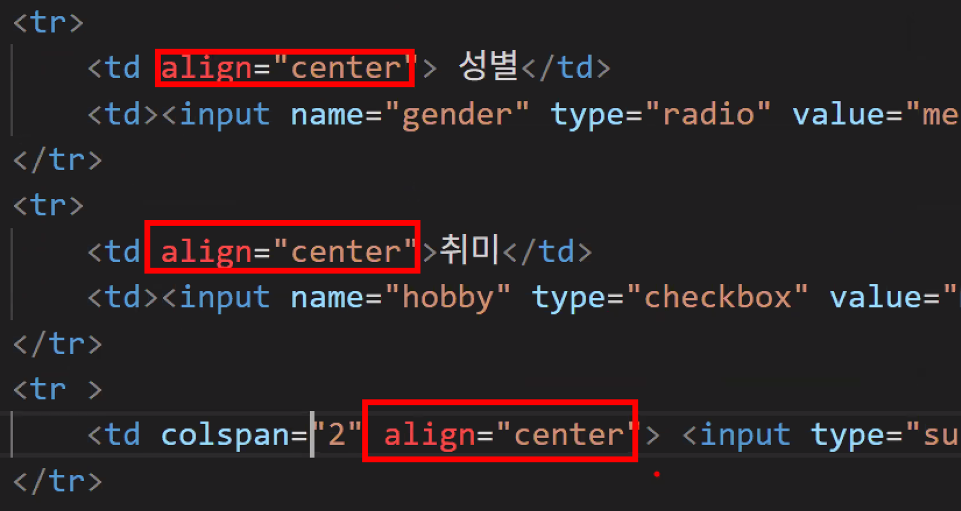
- 가로병합: colspan
- 화면 설계서 만들기: ppt, 와이어프레임 형태, 다양한 툴을 이용해 화면 구성 먼저 하기
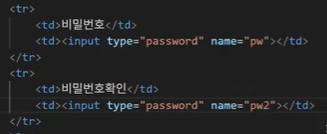
- 아래 코드의 문제점 2가지:
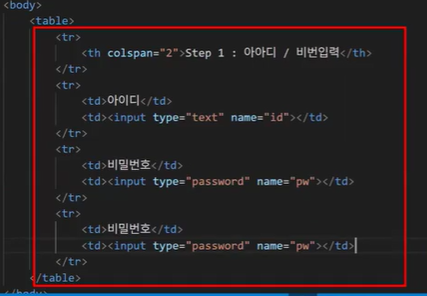
- name이 겹침
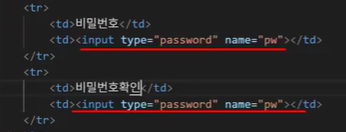
- name이 같다 == 같은 그룹이다 == 역할이 같다
- 하지만 비밀번호와 비밀번호 확인은 쓰임새는 같지만 역할이 다름 → 고유한 값이 필요 → name이 달라야 함
- form 태그가 없음
- 서버에게 제출하기 위한 용도라면 꼭 form 태그로 감싸야 함
- 코드 작성 순서를 역으로 해 보면 "해당 코드가 왜 필요한지" 알 수 있기 때문에 일부러 form 먼저 적지 않았음
- input 태그를 사용한다면 반드시 form 태그를 먼저 작성할 것
- name이 겹침
- method 속성
- get: 데이터가 바뀌지 않고 '조회'할 때만 사용
- post: 데이터가 바뀔 때(갱신, 삭제, 추가) + 보안
데이터베이스라는 공간에서 데이터를 꺼내볼 수도 있고 삭제할 수도 있고 수정할 수도 있음
'테이블' 개념
아이디, 비밀번호 입력해 로그인 하는 건 사실 '조회'만 하는 거지만 보안 문제 때문에 로그인에는 post를 사용한다!
- 우리는 아직 CSS를 안 배워서 속성으로 처리
- 나중에 CSS 배우고 나면 다시 돌아와서 다 CSS로 바꿀 예정
- border
- bgcolor
- align
- 나중에 CSS 배우고 나면 다시 돌아와서 다 CSS로 바꿀 예정
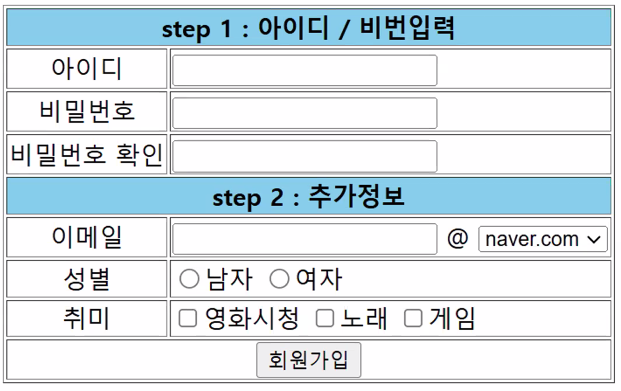
step 2
- table 새로 만드는 거 아니고 줄을 추가해주면 됨
- 이메일에는 select & option 태그
- 성별은 input 태그 type="radio"
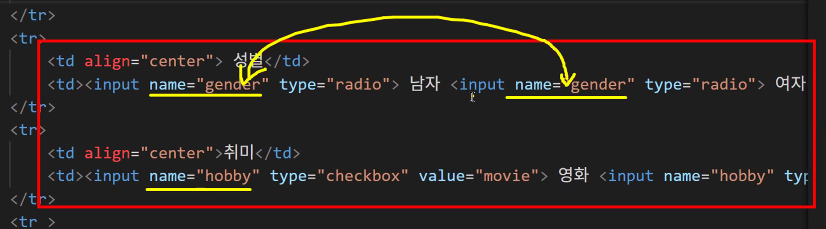
- name으로 그룹 명시 필수
- value로 특정 값 지칭해 주어야 함
- 취미는 input 태그 type="checkbox"
- 회원가입 버튼은:
- input 태그 type="submit" value="회원가입"
- button 태그
2교시: CSS
- 우리가 배운 태그 양이 많지 않지만 사실 태그는 이정도만 배워도 충분함
- 네이버 사이트 보면 아무리 열어봐도 div 태그뿐 → div 태그가 가장 많은 영역을 담당
- 한참 들어가면 우리가 배웠던 태그들만 나옴: ul, li, a, p, …
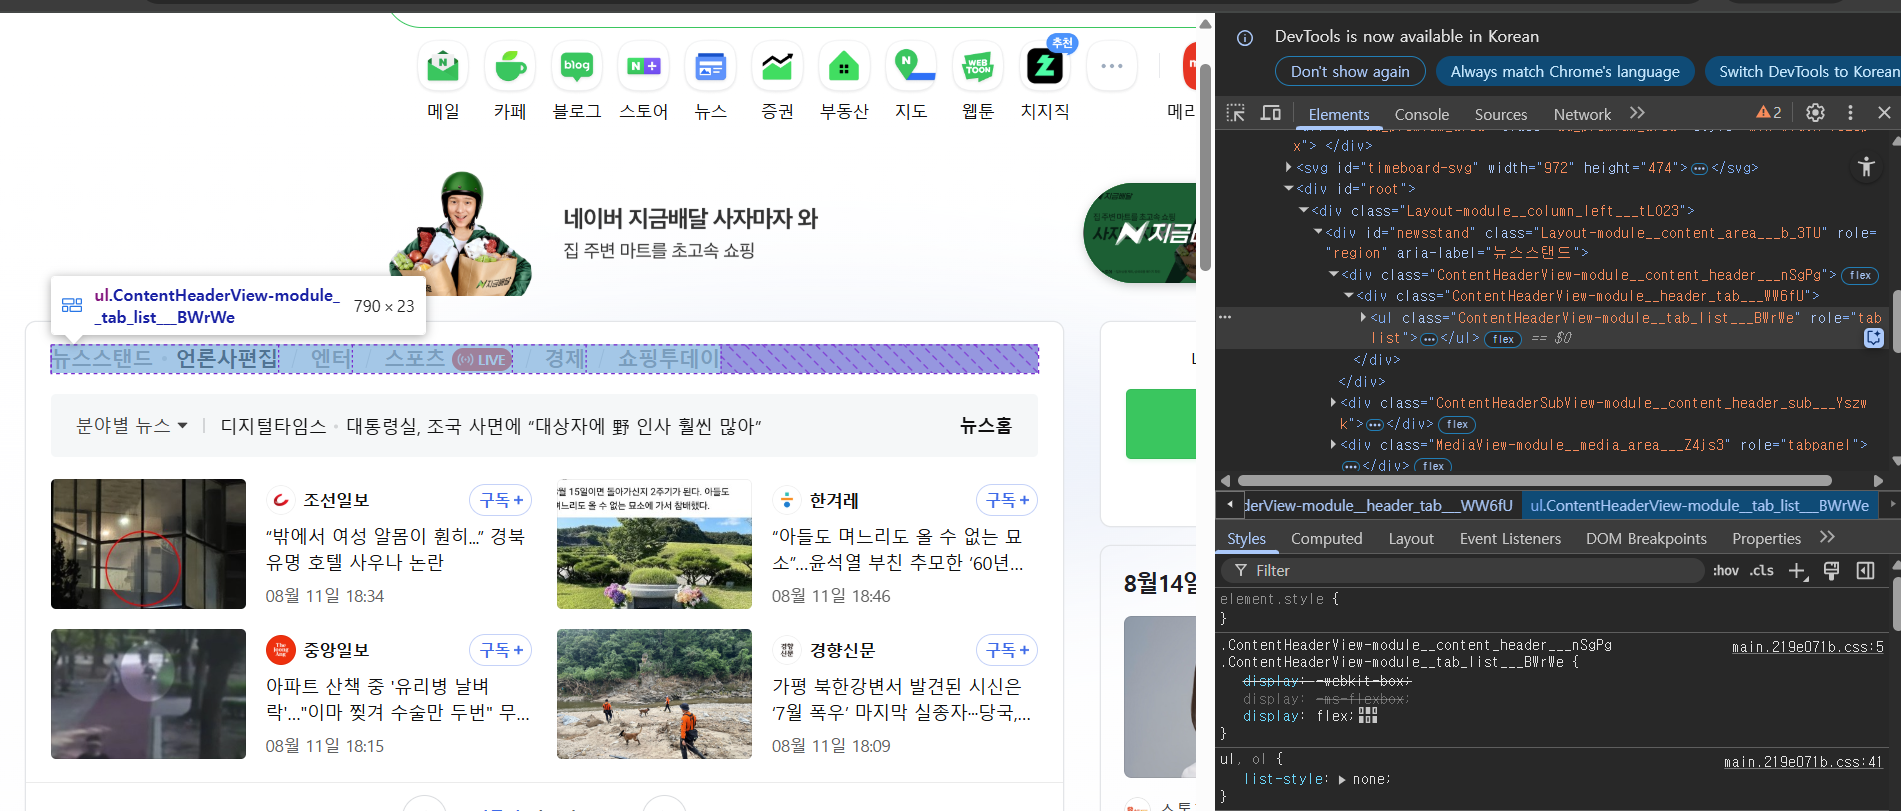
- 네이버 사이트 보면 아무리 열어봐도 div 태그뿐 → div 태그가 가장 많은 영역을 담당
과거에 사용한 방식: html 속성 이용
- 현재 지원은 하지만 권장하지 않는 방식임
- 문제점
- 디자인 변경 시 요소 하나하나 다 바꿔줘야 해서 불편
- 디자인 코드에서는 묶어서 쉽게 처리 가능 → 유지보수성
- 다른 페이지에서 사용 불가: 동일 디자인 적용하고 싶으면 하나씩 다시 다 적용해줘야 함
- 디자인 코드에서는 다른 페이지에도 동일 디자인 바로 적용 가능 → 재사용성
- 디자인 변경 시 요소 하나하나 다 바꿔줘야 해서 불편
- CSS: 유지보수성+재사용성+보안적 측면까지 보완
CSS(Cascading Style Sheets)
- HTML 문서의 스타일을 꾸밀 때 사용하는 스타일 시트 언어
- 문법은 하나뿐이지만 디자인은 끝이 없음
- 네이버 메인 페이지 하나에 해당하는 CSS 코드가 2만 ~ 3만 줄이라고 함

- 모바일 뷰 페이지의 등장으로 CSS 코드가 더 늘어남 & 복잡해짐 → 모바일 버전과 웹 버전을 동시에 만들기 때문
- 네이버 메인 페이지 하나에 해당하는 CSS 코드가 2만 ~ 3만 줄이라고 함
- CSS란?
- cascading: 누적되는, 떨어지는
- cas·cade 1. (of water) pour downward rapidly and in large quantities. 2. arrange (a number of devices or objects) in a series or sequence.
- CSS가 없다면 이렇게 보임:
- 왜 CSS를 따로 만들었을까? → 유지보수 편의성 + 재사용성이 뛰어나기 때문
- 과거: HTML이 정보 표현(뼈대 만들기)과 디자인 둘 다 담당
- 개발 페이지의 양이 많아지고 볼륨이 증가함에 따라 정보 표현과 디자인을 나눠야 할 필요성이 증가
- 현재: HTML은 정보 표현만, 디자인은 CSS가 처리
- 뼈대는 그대로 두고 옷을 갈아 끼우고 싶다 → CSS
- 기본 구조 → '디자인'
- 무엇을? → ★★★ 선택자 ★★★
- 어떻게? → 선언
- cascading: 누적되는, 떨어지는
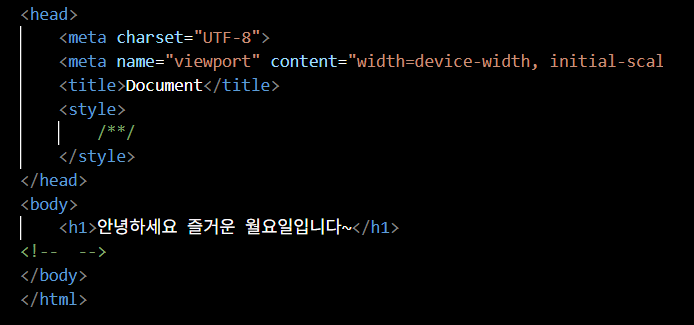
- style 태그
- 번역기 역할: 여기서부터는 css 영역임을 알림
- 주석 모양부터 다름
- 주석 모양부터 다름
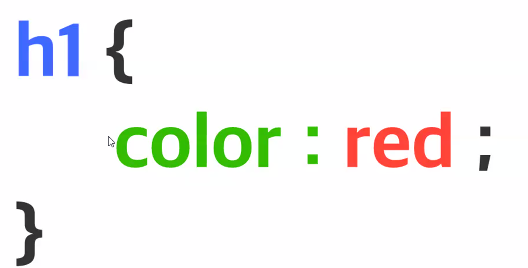
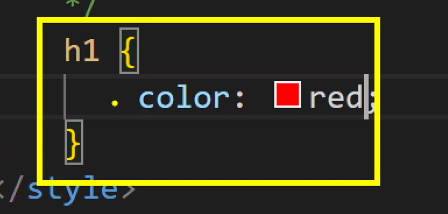
- 실습: h1 태그의 글자 색상 변경하기
- 번역기 역할: 여기서부터는 css 영역임을 알림
- CSS: 뼈대를 담당하는 HTML에 디자인 코드를 작성하는 언어
- 주의점: HTML과 CSS는 다른 언어다!
- 사용법: 반드시 head 태그에 style 태그를 선언한다 → style 태그: CSS 번역기
- 문법: 선택자(누구를), 선언(어떻게)
font 속성
- 글자의 폰트를 정의하는 속성
font-family- 글꼴
- 예: 나눔고딕, 굴림, 돋움
- 내 컴퓨터에 설치된 폰트여야 함
- 같은 family에 속하는 폰트 여러 개 적어 둘 수 있음 → 1번으로 적은 게 없으면 2번 적용하라는 뜻
- 웹 폰트(by CDN) 쓸 수도 있음 → 컴퓨터에 없어도 보임(파일이 없더라도 누구나 똑같은 환경을 볼 수 있음)
- 글꼴
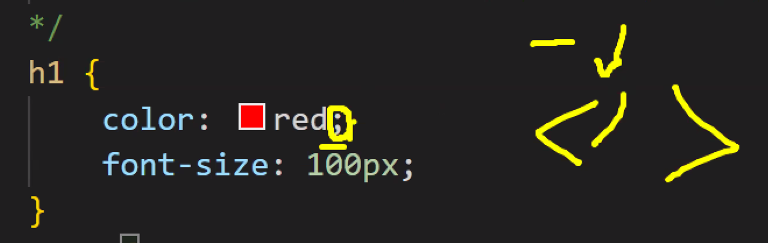
font-size- 글자 크기
- px, em, rem
- 글자 크기
font-weight- 글자 두께
- bold, 100~900
- 글자 두께
font-style- 글자 스타일
- italic
- 글자 스타일
픽셀(pixel, px)
- 디지털 이미지를 구성하는 최소 단위
- 점(dot) 또는 화소(畫素)라고도 함
- 해상도
- 픽셀 단위로 표현되는 이미지의 크기를 나타내는 지표
- 예: 1920x1080 해상도 → 가로 1920개, 세로 1080개의 픽셀로 이루어진 이미지를 의미
- 디자이너들이 맥북 쓰는 이유가 바로 해상도 차이 때문
- 일반적으로 맥북 에어는 2560 x 1600 해상도를 가지며, 맥북 프로는 3024 x 1964 (14인치) 또는 3456 x 2234 (16인치) 해상도를 가짐 → 픽셀이 많으면 쨍하고 예쁘지만 해상도가 높을수록 더 많은 데이터를 처리해야 하므로, 높은 주사율을 유지하려면 더 강력한 그래픽 카드가 필요
- PPI (Pixels Per Inch)
- 1인치 안에 몇 개의 픽셀이 들어가는지를 나타내는 단위
- 이미지의 선명도를 결정
3교시: CSS
- 주의 사항
- 우리는
.html파일로 쓰고 있기 때문에(확장자가.html파일) CSS 코드를 쓰기 위해서는 style 태그를 꼭 열어줘야 함- 언어의 체계가 다르기 때문
- style 태그 안에는 CSS 코드만 적을 수 있음(HTML은 X)
- 우리는
- CSS 코드 형태
- JavaScript에서의 객체 구조와 같은 형태
- JavaScript에서 객체는 {key: value} 형태로 데이터를 저장하며, 키는 문자열 또는 심볼이고 값은 어떤 데이터 타입도 가능
- key: value 구조는 value의 종류만 다양할 때 주로 사용
- 세미콜론
- HTML의 닫는 태그(
</tag name>)와 같은 의미- 문장이 끝났음을 알림
- Python은 tab과 enter라는 개념으로 줄을 구분 짓기 때문에 굳이 쓰지 않음
- HTML의 닫는 태그(
- JavaScript에서의 객체 구조와 같은 형태
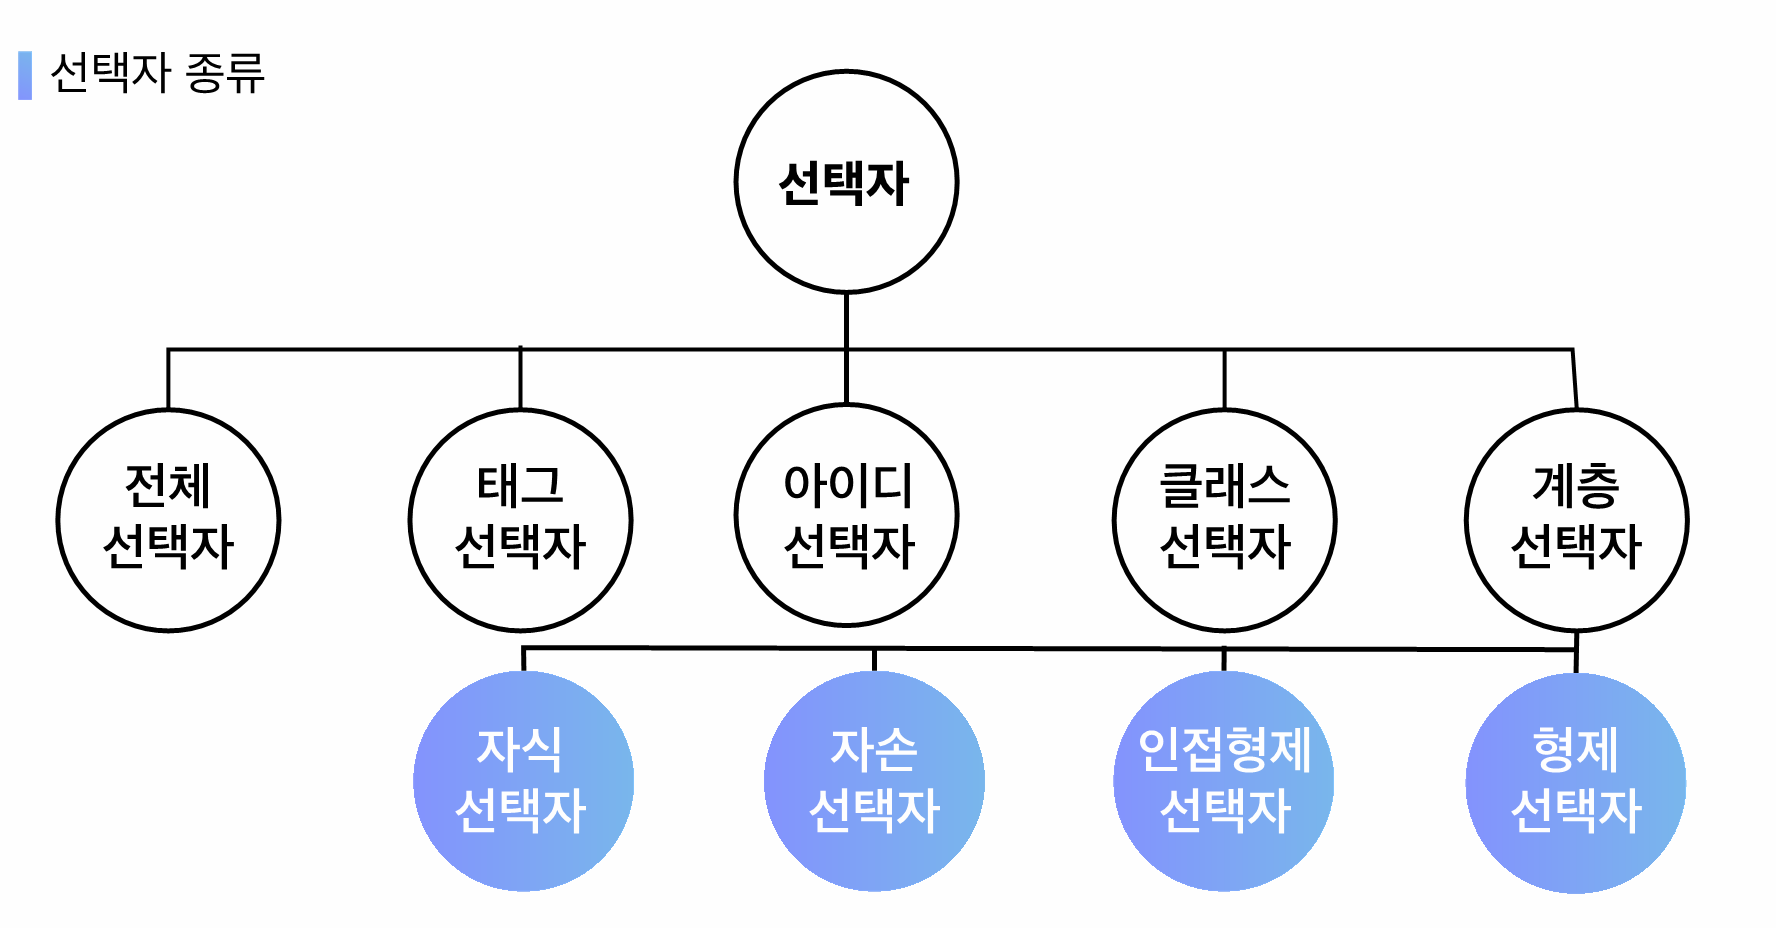
선택자
- 어떤 요소에게 스타일을 부여할 건지를 명시하는 방법
- 요소(element)는 아래 노란 박스를 의미함

- 요소(element)는 아래 노란 박스를 의미함
- 중요 포인트
- 선택자는 우선 순위가 존재한다. → 범위가 좁을수록 우선순위가 올라간다.
- 중복되는 속성에서만 우선 순위가 발생한다.
- 종류
- 전체 선택자: 모든 요소에게 스타일을 부여할 때 활용하는 선택자
*로 표시되며 웹 문서 내 모든 요소 선택
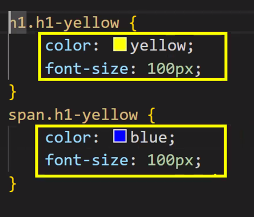
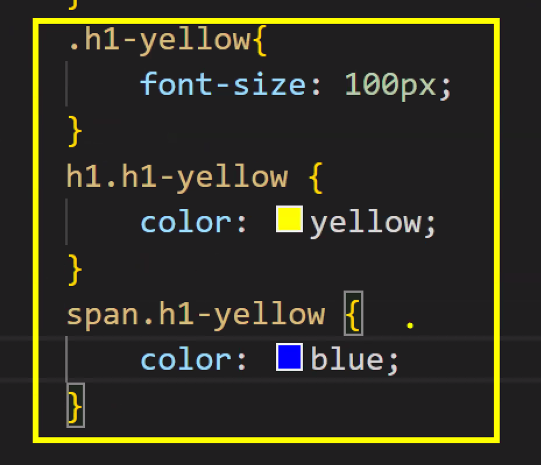
- 태그 선택자 == 타입 선택자: 특정 태그에게 스타일을 부여할 때 활용하는 선택자. 요소 이름으로 사용하여 요소 선택
- 클래스 선택자: 특정 태그들의 "그룹"을 만들 때 활용하는 선택자. 마침표(
.) 기호로 표시되며 특정한 요소 선택- 특징: 중복이 가능하다 → 여러 태그들에게 그룹을 시킬 수 있다. (공통되는 스타일을 적용할 경우)
- 아이디 선택자: 특정 요소만 가지는 고유한 값의 선택자.
#기호로 표시되며 특정한 요소 선택- 특징: 중복이 불가능하다 → 오직 하나의 태그에게만 이름을 부여한다.
- 사용처: CSS에서는 영역을 구분짓는 스타일에 활용한다 → 영역은 겹치지 않기 때문 (HTML 구조의 공간 분할을 적용할 때) → 중복되는 것에는 class 사용
- 전체 선택자: 모든 요소에게 스타일을 부여할 때 활용하는 선택자
- 우선순위: 전체 < 태그 < 클래스 < 아이디
- CSS는 범위가 좁을수록 우선순위가 높아짐
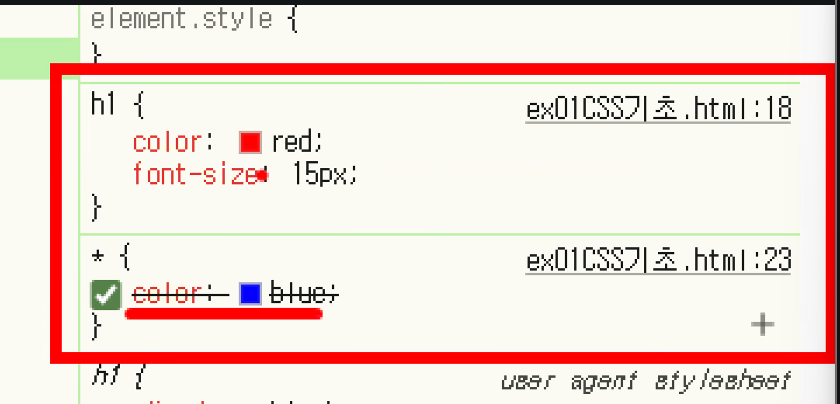
- 전체 선택자, 태그 선택자 둘 다 영향을 받음: 중복이 발생한 속성에서만 우선순위가 발생하고 덮어씌워지는 것
→ cascading style sheets라는 이름이 붙은 이유가 여기에 있음
- 전체 선택자, 태그 선택자 둘 다 영향을 받음: 중복이 발생한 속성에서만 우선순위가 발생하고 덮어씌워지는 것
UX / UI와 연결됨
UX(User eXperience): 사용자 경험 → 느낌, 태도, 행동
예: 경험상 사이트 오른쪽 위에 로그인이 있음
여기 있는 태그가 두 번째 태그임 → 컴퓨터는 모름 → 알려주기: id/class
UI(User Interface): 예쁘게 디자인을 배치하는 것
- 구조를 깔끔하게 짜는 방법: 공통점 찾기
- font-size가 같기 때문에 공통인 부분을 묶어서 빼면 좋음
- 클래스의 특징은 '공통적'으로 준다는 것
- 분석을 잘 해서 코드를 줄이는 게 중요함 → 중복되는 것 줄여 쓰기!
- font-size가 같기 때문에 공통인 부분을 묶어서 빼면 좋음
- 아이디 선택자
- body 태그 안에 고유한 아이디는 하나씩만 존재
- 정의한 후, 한 페이지에서 한 번만 사용
- 그렇지 않으면 웹 표준 테스트에서 오류
- 한 페이지에 한 번만 들어가는 로고, 상단 메뉴, 하단 정보 등 스타일 정의할 때 사용
- 클래스 선택자
- 여러 개의 태그에 동시에 적용될 수 있다
- 몇 번이고 재사용 가능
- 반복적으로 사용되는 스타일
클래스는 공유할 수 있는 그룹, 아이디는 나만 가지고 있는 고유한 값
- id는 언제 쓸까?
- 동작 이벤트 부여(기능)
- 영역 구분(영역 배치)
- 검색창은 화면에 단 하나라 id 가짐

- 검색창은 화면에 단 하나라 id 가짐
오후
4교시: Text Summarization — 평가 지표 만들기
지난 시간 복습
- 질의응답(Question Answering)
- QA는 질문과 지문을 함께 토큰화
- 알아서 아래와 같이 분리됨
- 시작 토큰: CLS
- 질문
- 분리 토큰: SEP
- 본문
- 분리 토큰: SEP
- 따라서 현재 텍스트가 질문인지 지문인지 우리가 찾아줘야 함 → offset_mapping 활용
- offset_mapping은 현재 단어가 본문에서 몇 번째 문자 범위인지 알려줌
- preprocess_function 정의 과정이 조금 복잡함
- 중요 포인트: 토크나이저는 동일하게 사용을 하되 오프셋 매핑을 활용해 실제 문자 위치 정보를 알려주는 start_positions와 end_positions를 직접 넣어주기 → 추출적 요약이기 때문에(내 문서 내에서 찾아야 하기 때문에) 시작과 끝을 알려주는 것
- 정답의 시작 위치, 끝 위치 담기
- 데이터에 들어 있는 정답 위치 기록
for i, offset in enumerate(offset_mapping):→ i는 미니배치 내에서 몇 번째 샘플인지를 의미answer = answers[i]→ i번째 샘플의 정답- 정답의 시작 위치 →
answers[i]에 들어 있음 →start_char = answer["answer_start"][0] - 정답의 끝 위치 → 텍스트 데이터의 길이 만큼 →
end_char = start_char + len(answer["text"][0])
- context 위치 찾기 → context가 어디인지 알려줘야 그 안에서 정답이 존재하는지 확인할 수 있음 → sequence_ids 함수 활용
sequence_ids = inputs.sequence_ids(i)→[None, 0, 0, 0, 0, 0, 0, 0, None, 1, 1, 1, 1, 1, 1, 1, 1, 1, None, None, ..., None]형태- while 문으로 question(0)인지 context(1)인지 판별해서 context_start, context_end에 각각 idx 담기
- 어디가 context인지 context의 시작과 끝 위치를 담는 것이 중요
- 컨텍스트 안에 정답이 없으면 (0,0), 정답이 있으면 그 값을 start_position, end_position에 각각 담아서 허깅페이스 모델 학습용 데이터셋에 넣어주기
- (0,0) → 학습에 사용하지 않을 거라는 의미
- 요약(summarize)
- 문서나 기사에서 중요한 정보를 포함하되 짧게 만드는 과정
- 번역과 함께 Seq2Seq 문제로 구성할 수 있는 대표적인 작업 중 하나
- 추출적(extractive) 요약과 생성적(abstractive) 요약 두 가지가 존재
- T5 모델의 특성상 prefix를 적어 주어야 함
- T5 모델의 특징: 입력 데이터 앞쪽에 prefix를 붙여 토큰화
- prefix = "summarize long sentences"
- 원본 문장과 요약 후 문장을 각각 토큰화
- 정답 레이블을 토큰화 할 때는 토크나이저에서 text_target 인수에 대입하면 됨
- 평가지표: ROUGE(Recall-Oriented Understudy for Gisting Evaluation)
- recall(재현율) 기반
- '정답 요약'과 기계가 생성한 요약을 비교해서 얼마나 겹치는지를 측정하는 방식
DataCollatorForSeq2Seq
- 패딩 도구
from transformers import DataCollatorForSeq2Seq
data_collator = DataCollatorForSeq2Seq(tokenizer=tokenizer, model=checkpoint)
추가 공부
DataCollator의 역할과 기능
- 동적 배치 생성 (그룹화에 초점)
- 다양한 길이의 입력 시퀀스를 효율적으로 하나의 배치로 결합해준다.
- 입력 데이터의 길이가 서로 다를 때, 배치 내에서 가장 긴 시퀀스의 길이에 맞춰 다른 시퀀스를 패딩한다.
- 동적 패딩과 비슷한 기능이지만, 동적 배치 생성의 목적은 계산 처리의 효율성을 높이기 위해 여러 입력을 하나의 배치로 그룹화 하는데 있다
- 동적 패딩은 배치 내 다양한 길이의 시퀀스를 max_length하나로 통일하는 것이 아니라, 각 배치마다 다른 가장 긴 시퀀스의 길이에 맞춰 효율적인 패딩을 가능하게 하고, 이를 통해 메모리 사용과 계산 효율성을 개선해준다.
- 동적 패딩 (효율적인 처리에 초점)
- 각 배치 내에서 가장 긴 시퀀스에 맞춰 다른 시퀀스들을 패딩한다.
- 레이블 처리
- 레이블도 적절히 패딩하며, 손실 계산 시 무시할 부분을 특수 값(보통 -100)으로 마스킹함
예시 :
[1,2,3]->[1,2,3, -100, -100]
- 레이블도 적절히 패딩하며, 손실 계산 시 무시할 부분을 특수 값(보통 -100)으로 마스킹함
- 모델 특정 입력 준비
- 예: seq2seq 모델을 위한 디코더 입력을 자동으로 생성
예시: 디코더 입력 생성 →타겟 시퀀스를 한 칸씩 오른쪽으로 시프트하고, 시작 토큰을 추가
- 입력:
["Hello", "World"] - 디코더 입력:
[<start>, "Hello", "World"] - 레이블:
["Hello", "World", <end>]
- 입력:
- 예: seq2seq 모델을 위한 디코더 입력을 자동으로 생성
- 텐서 변환
- 입력 데이터를 PyTorch 텐서로 변환한다.
Tokenizer의 역할과 기능
-
텍스트 분할 (Tokenization)
- 입력된 텍스트를 더 작은 단위인 토큰으로 나눈다.
예시:
"Hello, how are you?" →["Hello", ",", "how", "are", "you", "?"]
- 입력된 텍스트를 더 작은 단위인 토큰으로 나눈다.
-
숫자 변환 (Encoding)
- 토큰을 모델이 이해할 수 있는 숫자(token_id)로 변환한다.
예시:
["Hello", "world"]→[101, 7592, 2088, 102]
- 토큰을 모델이 이해할 수 있는 숫자(token_id)로 변환한다.
-
특수 토큰 추가
[CLS],[SEP]등 모델에 필요한 특수 토큰을 추가한다.
-
패딩 (Padding)
- 입력 시퀀스의 길이를 동일하게 맞추기 위해 패딩 토큰을 추가해준다.
-
Attention Mask 생성
- 패딩된 부분을 모델이 무시하도록 하는 마스크를 생성
-
디코딩 (Decoding)
- token_id를 다시 텍스트로 변환한다.
라벨에서 패딩된 부분을 -100으로 설정하는 의미
-100은 PyTorch와 같은 딥러닝 프레임 워크에서 손실 함수 계산 시 자동으로 무시되며, 그레디언트 계산에서도 제외된다.- 즉, Cross Entropy loss와 같은 손실 함수에서 -100으로 표시된 위치의 예측은 손실 계산에 포함되지 않는다.
Tokenizer와 DataCollator의 관계
- Tokenizer와 DataCollator는 상호 보완적인 역할을 한다.
- Tokenizer는 텍스트를 모델이 이해할 수 있는 형태로 변환
- Tokenizer의 경우 데이터셋 준비 단계에서 활용되며, 원시 텍스트가 입력되어 token_id, attention mask 등의 출력으로 나옴
- DataCollator는 이러한 변환된 데이터를 효율적인 배치 형태로 만들어 모델 훈련을 최적화
- DataCollator의 경우 모델 훈련 루프 내에서 사용되며, 토큰화된 샘플들의 리스트가 입력되어 Tensor 형태의 배치로 출력됨
- Tokenizer는 텍스트를 모델이 이해할 수 있는 형태로 변환
- Tokenizer에서 별도로 패딩을 하지 않더라도, DataCollator에서 패딩을 넣을 수 있음
삼항연산자
- 조건문을 한 줄로 기볍게 사용할 때 사용
- 예시
실행 문장1 if 조건식 else 실행 문장 2
- 조건식이 참이면 실행 문장 1 실행, 거짓이면 실행 문장 2를 실행
# 나이가 18살 이상이면 '성인입니다'. 그렇지 않으면 '미성년자입니다'를 출력
age=25
print(성인입니다.) if age >= 18 else print("미성년자입니다.")
평가를 위한 평가 지표 생성: 요약에 대한 평가 — ROUGE
- ROUGE(Recall-Oriented Understudy for Gisting Evaluation)
- 학습한 모델이 요약한 내용이 실제 요약본과 얼마나 유사한지 유사도를 파악해 줌
- 텍스트 요약에서 사용되는 평가 지표 중 하나
- '사람이 만든 기준 요약'과 자동 생성된 요약 사이의 유사도를 측정
- '정답 요약'과 기계가 생성한 요약을 비교해서 얼마나 겹치는지를 측정
- 점수 해석
- 0-0.3 : 매우 낮음
- 0.3-0.5 : 중간 이하
- 0.5-0.7 : 양호
- 0.7-0.9 : 우수
- 0.9-1.0 : 사람 수준
평가 지표 함수로 만들기
- 예측 값과 실제 값을 compute에 전달하여 ROUGE 지표를 계산하는 함수 생성
!pip install -q rouge_score
!pip install -q evaluate
import numpy as np
from evaluate import load
metrics = load("rouge")
def compute_metrics(eval_pred):
# eval_pred: trainer가 평가 시 넘겨주는 튜플 값 → (예측, 정답값)
predictions, labels = eval_pred
# 일부 환경에서 예측값이 튜플 형태로 출력될 때가 있음 → (prediction, )
# 조건문 달아주고 시작하기: 예측값이 튜플 형태로 들어올 때까지 고려
if isinstance(predictions, tuple):
predictions = predictions[0]
# ROUGE 평가 지표는 "자연어를 비교"하는 평가 지표 → 모델이 출력한 숫자를 비교하지 않음 → 예측값을 문자로 변환하여 비교
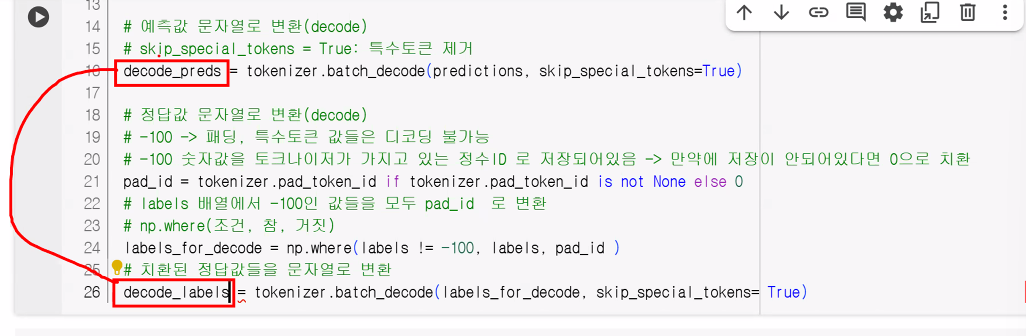
# 예측 값 문자열로 변환(decode)
decode_preds = tokenizer.batch_decode(predictions, skip_special_tokens=True) # skip_special_tokens=True: 특수 토큰 제거
# 정답 값 문자열로 변환(decode)
# -100 → 패딩, 특수 토큰 값들은 디코딩 불가능
# -100 숫자 값은 토크나이저가 가지고 있는 정수 ID로 저장되어 있음
# 만약에 저장이 안 되어 있다면 0으로 치환
pad_id = tokenizer.pad_token_id if tokenizer.pad_token_id is not None else 0 # 예외를 방지하는 안전 장치
# labels 배열에서 -100인 값들을 모두 pad_id로 변환
# np.where(조건, 참, 거짓)
labels_for_decode = np.where(labels != -100, labels, pad_id)
# 치환된 정답값들을 문자열로 변환
decode_labels = tokenizer.batch_decode(labels_for_decode, skip_special_tokens=True)
# 문자열로 변환한 데이터를 비교 → 유사도를 계산
result = metrics.compute(
predictions=decode_preds
, references=decode_labels
, use_stemmer=True # 어간 추출 → run / running이 비슷한 유사도를 가지게 됨
)
# 패딩을 제외한 예측값의 길이
# pred != pad_id → 패딩이 아닌 값은 True(1), 패딩은 False(1)
prediction_lens = [np.count_nonzero(pred != pad_id) for pred in predictions]
# 예측값의 평균 길이 확인
# 길이 값이 있으면 평균을, 없으면 0.0을 담아주기
result["gen_len"] = float(np.mean(prediction_lens)) if prediction_lens else 0.0
# 값 v가 실수 또는 정수인지 검사 → 실수, 정수가 아니라면 그대로 출력
# 실수, 정수라면 반올림(소수점 4번째) 진행
return {k: round(v, 4) if isinstance(v,(int,float)) else v for k, v in result.items()}- 토큰 분류(token classification)에서 평가 함수 정의했던 거랑 비슷함
- eval_pred: 학습해 주는 도구인 트레이너가 평가 시 넘겨주는 튜플 형태의 값
- 예측 결과와 정답 값을 넘겨주기 때문에 두 개의 변수에 담아줌: predictions, labels
- 토큰 분류에서는 logits, labels라는 변수에 담았었음
- 이때는 logit.shape →
[batch_size, seq_length, num_labels]였기 때문에pred = np.argmax(logits, axis=2)로 처리했지만 여기는 predictions에 들어오는 형태가 다름
- 이때는 logit.shape →
- eval_pred: 학습해 주는 도구인 트레이너가 평가 시 넘겨주는 튜플 형태의 값
predictions는 이런 형태를 하고 있음:
predictions = (
    np.array([[ 101, 2023, 2003, 1037, 2742, 102],       # 토큰 ID 예시
              [ 101, 2057, 2293, 2023, 3185, 102]]),
    None
)
첫 번째 요소는 실제 tokenizer로 디코딩할 대상(토큰 ID), 두 번째 요소는 None이거나 logits 관련 추가 정보일 수 있음
따라서 아래와 같이 첫 번째만 꺼내서 쓰는 것if isinstance(predictions, tuple): predictions = predictions[0]
추가 공부
1. eval_pred가 넘어오는 형태
Trainer나 Seq2SeqTrainer에서 compute_metrics를 실행할 때, eval_pred는 아래 형태로 전달됩니다.
eval_pred = (predictions, labels)여기서
predictions: 모델의 출력 (토큰 ID 또는 로짓 값)labels: 정답 토큰 ID
하지만 Seq2SeqTrainer에서는 경우에 따라 predictions가 튜플로 들어올 수 있습니다. 예를 들어:
- 예시 — 튜플 형태로 들어올 때
predictions = (
np.array([[ 101, 2023, 2003, 1037, 2742, 102], # 토큰 ID 예시
[ 101, 2057, 2293, 2023, 3185, 102]]),
None
)이 경우 첫 번째 요소는 실제 tokenizer로 디코딩할 대상(토큰 ID),
두 번째 요소는 None이거나 logits 관련 추가 정보일 수 있습니다.
그래서 이럴 때:
if isinstance(predictions, tuple):
predictions = predictions[0]로 첫 번째만 꺼내 쓰는 거죠.
2. 토큰 ID 형태
실제 predictions는 보통 토큰 ID(정수) 배열입니다. 예를 들어:
predictions = np.array([
[101, 2023, 2003, 1037, 2742, 102, 0, 0], # 0이 pad_id
[101, 2057, 2293, 2023, 3185, 102, 0, 0]
])여기서 각 숫자는 토크나이저의 vocabulary ID입니다.
예를 들어 BERT 토크나이저에서:
- 101 →
[CLS](시작 토큰) - 102 →
[SEP](종료 토큰) - 0 →
[PAD](패딩 토큰) - 2023 →
"this" - 2003 →
"is" - 2742 →
"test"
3. 디코딩 과정 예시
이걸 디코딩하면:
decode_preds = tokenizer.batch_decode(predictions, skip_special_tokens=True)결과는:
[
"this is a test",
"we love this model"
]4. 레이블과의 관계
labels도 비슷하게 ID 배열이지만, Trainer 내부에서는 패딩 토큰을 -100으로 채우는 경우가 많습니다.
이유는 loss 계산 시 패딩 부분은 무시하기 위해서 입니다.
예시:
labels = np.array([
[101, 2023, 2003, 1037, 2742, 102, -100, -100],
[101, 2057, 2293, 2023, 3185, 102, -100, -100]
])compute_metrics에서:
labels_for_decode = np.where(labels != -100, labels, pad_id)를 하면:
labels_for_decode = [
[101, 2023, 2003, 1037, 2742, 102, 0, 0],
[101, 2057, 2293, 2023, 3185, 102, 0, 0]
]이제 tokenizer.batch_decode로 자연어로 변환 가능해집니다.
5. 정리
즉, predictions 값은 보통 (배치 크기, 시퀀스 길이) 형태의 numpy.ndarray이거나 경우에 따라 (ndarray, None) 형태의 튜플로 들어옵니다.
| 상황 | 예시 형태 |
|---|---|
| 일반적인 경우 | np.ndarray([[101, 2023, ...], [101, 2057, ...]]) |
| 튜플로 들어오는 경우 | (np.ndarray([[101, ...], ...]), None) |
ROUGE 계산 결과
- 딕셔너리 형태로 저장됨
- result는 ROUGE 계산 결과를 담고 있는 딕셔너리임
{
'rouge1': 0.456789,
'rouge2': 0.217891,
'rougeL': 0.392812,
'rougeLsum': 0.391923,
'gen_len': 72.3333333333
}정리 표
| 항목 | 평가 기준 | 의미 | 값 범위 | 해석 기준 |
|---|---|---|---|---|
rouge1 | unigram | 단어 단위 내용 일치도 | 0 ~ 1 | 0~0.3: 낮음 / 0.3~0.5: 보통 이하 / 0.5~0.7: 양호 / 0.7~0.9: 우수 / 0.9~1.0: 사람 수준 |
rouge2 | bigram | 문맥·연속성 일치도 | 0 ~ 1 | 보통 rouge1보다 낮음. 문맥이 잘 맞으면 0.3 이상, 0.5↑이면 매우 양호 |
rougeL | LCS | 순서를 유지한 구조적 일치도 | 0 ~ 1 | 문장 구조 보존 정도 평가. 0.5↑이면 문장 구조를 잘 유지한 편 |
rougeLsum | LCS+문장 | 문장 단위 구조적 일치도 | 0 ~ 1 | 여러 문장 요약에서 구조적 유사도를 평가. rougeL과 유사하지만 문장 단위로 더 세밀 |
gen_len | 토큰 수 | 평균 생성 길이(패딩 제외) | ≥ 0 (정수/실수) | 요약의 평균 길이. 너무 짧으면 정보 손실, 너무 길면 불필요한 내용 포함 가능 |
- rouge2는 bigram → 두 개의 토큰씩 묶어서 문맥 연속성(일치도) 확인
- Lsum: 문장 단위의 구조적 유사도
- gen_len: 생성된 문장의 평균 길이
- 우리가 만들었음
- 디코드 작업 진행 중
- rouge는 문자열 형태에서 비교 → 실제 두 단어가 같은지 확인
추가 공부
- pad_id 변수를 따로 만들지 않고 바로 np.where 안에서 tokenizer.pad_token_id를 쓰는 방식으로 처리해도 동작상 문제는 없음
labels = np.where(labels != -100, labels, tokenizer.pad_token_id)
decode_labels = tokenizer.batch_decode(labels, skip_special_tokens=True)주의 사항
- tokenizer.pad_token_id가 None일 수 있음
- 일부 토크나이저는 pad_token이 정의되지 않아 pad_token_id가 None일 수 있음
- 특히 GPT 계열이나 T5 계열 변형
- 이 경우 np.where(..., tokenizer.pad_token_id) 부분에서 None이 들어가면 디코딩 과정에서 에러가 발생
- 토크나이저가 None을 int로 변환할 수 없음
- 일부 토크나이저는 pad_token이 정의되지 않아 pad_token_id가 None일 수 있음
🤔 tokenizer.pad_token_id가 None인 경우에는 아래와 같은 에러가 납니다.
TypeError: int() argument must be a string, a bytes-like object or a real number, not 'NoneType'- 메모리 복사 vs. 가독성
- pad_id 변수를 두는 건 CPU 메모리에 거의 영향을 주지 않지만, 코드 가독성을 높여서 "이 값이 패딩 토큰 ID"라는 것을 명확하게 해주는 장점이 있음
- 한 줄로 쓰면 간결하지만, 미래에 다른 사람이 코드를 볼 때 "여기서 왜 pad_token_id를 쓰고 있지?" 하는 의문이 생길 수 있음
- 추천 방식
- 만약 모든 환경에서 pad_token_id가 반드시 정의돼 있음을 보장할 수 있다면, 한 줄로 쓰는 것이 가능하지만 안전성까지 고려한다면 원래 코드처럼 pad_id를 별도로 정의하는 것을 권장
- 결론
- 안전성과 가독성 때문에 원래처럼 pad_id 변수를 만들어 쓰는 것을 추천
- 줄이려면 아래와 같이만 줄이기
pad_id = tokenizer.pad_token_id or 0
labels = np.where(labels != -100, labels, pad_id)
decode_labels = tokenizer.batch_decode(labels, skip_special_tokens=True)추가 공부 2
더 간결하면서도 안전하게 리팩토링한 버전
- 핵심:
- pad_id 안전 처리: pad_token_id 없을 때 0을 fallback으로 설정
- 불필요한 주석과 중복 코드 최소화
- 가독성 높은 변수명 및 순서 정리
import numpy as np
from evaluate import load
metrics = load("rouge")
def compute_metrics(eval_pred):
predictions, labels = eval_pred
# 예측값이 튜플로 들어오는 경우 처리 → 예측값이 튜플 형태일 경우 첫 번째 요소 사용
if isinstance(predictions, tuple):
    predictions = predictions[0]
# pad_token_id 안전 처리 (없으면 0 사용)
pad_id = tokenizer.pad_token_id or 0
# 예측값 디코딩
decoded_preds = tokenizer.batch_decode(predictions, skip_special_tokens=True)
# 정답값 디코딩: -100(무시 토큰)을 pad_id로 치환 후 디코딩
labels = np.where(labels != -100, labels, pad_id)
decoded_labels = tokenizer.batch_decode(labels, skip_special_tokens=True)
# ROUGE 점수 계산
result = metrics.compute(
predictions=decode_preds,
references=decode_labels,
use_stemmer=True
)
# 평균 생성 길이
result["gen_len"] = float(np.mean([np.count_nonzero(p != pad_id) for p in predictions])) or 0.0
# 결과 소수점 4자리까지 반올림 (정수, 실수만)
return {k: round(v * 100, 4) if isinstance(v, (int, float)) else v
for k, v in result.items()}- pad_id 안전 처리
- pad_token_id가 None일 경우 자동으로 0을 사용 → 에러 방지
- 조건문 최소화
- tuple 예측 처리, np.where 치환, 디코딩 단계를 직관적으로 배치
- 불필요한 중복 변수 제거
- labels_for_decode 같은 중간 변수를 없애고, 바로 labels를 업데이트
- 함수 내 불필요한 중간 변수 제거: 리스트 컴프리헨션 최소화
- 한 번만 쓰이는 값들은 바로 연산에 결합 → prediction_lens를 별도 변수로 두지 않고 평균 계산 시 바로 사용
- 결과 처리 일관성
- Rouge 결과는 % 단위 변환 및 round 처리로 바로 사용 가능
초간결 버전
import numpy as np
from evaluate import load

metrics = load("rouge")

def compute_metrics(eval_pred):
    preds, labels = eval_pred
    if isinstance(preds, tuple):
        preds = preds[0]

    pad_id = tokenizer.pad_token_id or 0
    # -100을 pad_id로 치환 후 디코딩
    decoded_preds  = tokenizer.batch_decode(preds, skip_special_tokens=True)
    decoded_labels = tokenizer.batch_decode(np.where(labels != -100, labels, pad_id), skip_special_tokens=True)

    result = metrics.compute(predictions=decoded_preds, references=decoded_labels, use_stemmer=True)
    result["gen_len"] = float(np.mean([np.count_nonzero(p != pad_id) for p in preds])) or 0.0

    return {k: round(v * 100, 4) if isinstance(v, (int, float)) else v for k, v in result.items()}
특징
1. 중간 변수 최소화
labels_for_decode,prediction_lens등 별도 변수 없이 계산 시 바로 처리
- 안전한 pad_id 처리
tokenizer.pad_token_id가None이면 자동으로 0 사용
- 배치 디코딩은 한 번에, 길이 계산도 리스트 내에서 바로 평균 계산
- 가독성은 유지하면서도 최소한의 로직만 남김
완전 초압축 버전(한 줄 디코딩 + 한 줄 길이 계산)
- 기능은 동일하지만, 최대한 줄 수를 줄이고 가독성은 조금 희생한 형태
import numpy as np
from evaluate import load

metrics = load("rouge")

def compute_metrics(eval_pred):
    p, l = eval_pred
    if isinstance(p, tuple): p = p[0]
    pad = tokenizer.pad_token_id or 0
    result = metrics.compute(
        predictions=tokenizer.batch_decode(p, skip_special_tokens=True),
        references=tokenizer.batch_decode(np.where(l != -100, l, pad), skip_special_tokens=True),
        use_stemmer=True
    )
    result["gen_len"] = float(np.mean([np.count_nonzero(x != pad) for x in p])) or 0.0
    return {k: round(v * 100, 4) if isinstance(v, (int, float)) else v for k, v in result.items()}
✨ 특징:
1. 변수 최소화 → preds, labels_for_decode 같은 중간 변수 없이 바로 처리
2. 배치 디코딩과 -100 치환을 한 줄에서 처리
3. 평균 생성 길이 계산도 한 줄에서 처리
4. 안전하게 pad_token_id 없으면 0 사용
이 버전은 실험 및 빠른 프로토타입 제작에는 좋지만, 프로덕션에서는 가독성이 좋은 이전 “초간결 안전 버전”을 쓰길 권장
여러 평가 지표를 동시에 지원하는 멀티 메트릭 버전
- Hugging Face 🤗의 평가 라이브러리 evaluate 기준
- 사용 가능한 메트릭(예: bleu, rouge, meteor 등)을 추가할 수 있음
import numpy as np
from evaluate import load

# 필요한 지표들 로드 (예: rouge, bleu, meteor)
metric_names = ["rouge", "bleu", "meteor"]
metrics = [load(name) for name in metric_names]

def compute_metrics(eval_pred):
    preds, labels = eval_pred
    if isinstance(preds, tuple):
        preds = preds[0]

    pad_id = tokenizer.pad_token_id or 0

    decoded_preds = tokenizer.batch_decode(preds, skip_special_tokens=True)
    decoded_labels = tokenizer.batch_decode(np.where(labels != -100, labels, pad_id), skip_special_tokens=True)

    results = {}
    # 각 메트릭별 계산 및 결과 병합
    for metric in metrics:
        # 지표 이름에 따라 옵션 다르게 처리
        if metric.info.name == "rouge":
            # ROUGE 특성상 어간 추출(use_stemmer) 옵션 별도 적용 가능
            result = metric.compute(predictions=decoded_preds, references=decoded_labels, use_stemmer=True)
        else:
            # 그 외 지표는 기본 compute 호출
            result = metric.compute(predictions=decoded_preds, references=decoded_labels)
        results.update(result)


    # 생성 길이 평균 계산
    results["gen_len"] = float(np.mean([np.count_nonzero(p != pad_id) for p in preds])) or 0.0

    # 결과 100배 후 소수점 4자리 반올림 (숫자에 한함)
    return {k: round(v * 100, 4) if isinstance(v, (int, float)) else v for k, v in results.items()}
✅ 사용 및 확장 방법
rouge,bleu등은 Hugging Faceevaluate라이브러리에서 로드해야 사용 가능합니다.from evaluate import load rouge = load("rouge") bleu = load("bleu") # meteor = load("meteor") 등 필요하면 추가
- 다른 지표도 얼마든지 추가할 수 있음 (예: SQuAD Exact/EM, METEOR 등)
- metrics 딕셔너리 형태로 여러 결과가 한 번에 반환되어 Trainer 등에서 바로 출력 및 로깅 가능
💡 특징 요약
- 예측과 정답값을 모두 디코딩, 패딩/특수 토큰 예외 안전 처리
- 메트릭별 후처리(소수점, % 변환, 레퍼런스 형식 등) 반영
- 다른 평가 지표도 함수 내부에서 쉽게 확장
추가 공부 3: compute_metrics 함수
- 텍스트 요약 모델의 출력과 정답(reference)을 ROUGE 점수로 비교한 뒤, 부가적으로 생성된 토큰 길이(
gen_len)를 포함해서 딕셔너리 형태로 반환하는 함수를 만든 것
1. ROUGE metric이 반환하는 값 구조
metrics.compute() (여기서는 evaluate 라이브러리의 rouge 로드)를 호출하면 보통 다음과 같이 숫자(float) 값들이 나옵니다:
{
    "rouge1": 0.5234,      # ROUGE-1 F1 score
    "rouge2": 0.3123,      # ROUGE-2 F1 score
    "rougeL": 0.4981,      # ROUGE-L F1 score
    "rougeLsum": 0.5002    # 문장 단위(Lsum) 기준 ROUGE-L
}
여기에 compute_metrics에서 gen_len 키를 추가합니다:
{
    "rouge1": 0.5234,
    "rouge2": 0.3123,
    "rougeL": 0.4981,
    "rougeLsum": 0.5002,
    "gen_len": 18.7
}
2. "실수, 정수가 아니라면 그대로 출력"의 의미
마지막 return 구문에서
return {k: round(v, 4) if isinstance(v,(int,float)) else v for k, v in result.items()}를 사용
즉,
- 값
v가 정수(int)나 소수(float)이면 → 소수점 4자리까지 반올림 - 그 외 타입이면(
str,list,dict등)
→ 원래 값 그대로 반환
3. 실제로 숫자가 아닌 값이 나올 수 있는 경우
rouge_score의 compute 기본 설정(F1 score 반환)에서는 보통 숫자만 나옵니다.
그런데 다음 상황에서는 숫자가 아닌 값이 반환될 수 있습니다:
-
metrics.compute(..., use_aggregator=False)옵션 사용
→ 개별 샘플별 점수를 리스트 형태로 반환
예:{ "rouge1": [0.5, 0.4, 0.6], "rouge2": [0.3, 0.25, 0.35], ... } -
ROUGE 점수가 아닌 다른 항목을 추가한 경우
예를 들어"predictions"또는"references"를 그대로 dict에 넣는다면
값이 문자열 리스트가 될 수 있음:{ "rouge1": 0.5234, "references": ["요약문 예시1", "요약문 예시2"] } -
빈 prediction이나 reference가 있을 경우
특정 조건에서 metric 라이브러리가 예외 메시지나 None을 줄 수 있음.
4. 결론 — compute_metrics 반환 예시
일반적인 요약 모델 학습 후 평가 시
{
    'rouge1': 0.5234,
    'rouge2': 0.3123,
    'rougeL': 0.4981,
    'rougeLsum': 0.5002,
    'gen_len': 18.7
}
use_aggregator=False 사용 시 (숫자가 아닌 값 포함)
{
    'rouge1': [0.53, 0.48, 0.52],
    'rouge2': [0.32, 0.30, 0.28],
    'rougeL': [0.50, 0.49, 0.51],
    'rougeLsum': [0.50, 0.47, 0.49],
    'gen_len': 18.7
}
→ 여기서 리스트는 int/float가 아니므로 그대로 출력됨
5교시: Text Summarization — 학습
from transformers import AutoModelForSeq2SeqLM, Seq2SeqTrainingArguments, Seq2SeqTrainer
# 모델 객체 생성
model = AutoModelForSeq2SeqLM.from_pretrained(checkpoint)
# 하이퍼파라미터 정의
training_args = Seq2SeqTrainingArguments(
output_dir="./results/my_awesome_billsum_model"
, eval_strategy="steps"
, learning_rate=2e-5
, weight_decay=0.01
, load_best_model_at_end=True
, per_device_train_batch_size=16
, per_device_eval_batch_size=16
, save_total_limit=3
, num_train_epochs=4
, predict_with_generate=True
, fp16=True
, logging_strategy="steps"
, logging_steps=2
, push_to_hub=False
)
trainer = Seq2SeqTrainer(
model=model
, args=training_args
, train_dataset=tokenized_billsum["train"]
, eval_dataset=tokenized_billsum["test"]
, processing_class=tokenizer
, data_collator=data_collator
, compute_metrics=compute_metrics
)
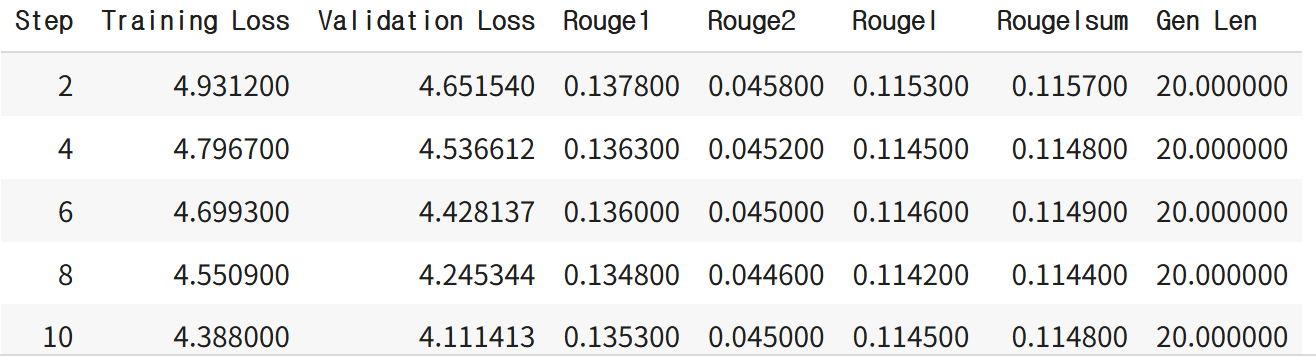
trainer.train()실행 화면 예시:
# 학습한 결과를 허깅페이스에 업로드
%cd /content/drive/MyDrive/Colab Notebooks/NLP

# 허깅페이스 로그인
from huggingface_hub import login

# 파일 형태의 api_key 불러오기
with open("./key/huggingface_api_key", 'r') as f:
    api_key = f.read().strip()

login(token=api_key)

# 허깅페이스 업로드
repo_id = "★유저아이디★/my_billsum_summarize_model"

trainer.save_model(repo_id)
model.save_pretrained(repo_id)
tokenizer.save_pretrained(repo_id)

trainer.push_to_hub(repo_id)
6교시: Text Summarization — 사용
저장한 모델 불러와서 사용하기
# task="summarization"

from transformers import pipeline

checkpoint_mymodel="be2be2/my_billsum_summarize_model"

summarization = pipeline(
    task="summarization"
    , model=checkpoint_mymodel
    , tokenizer=checkpoint_mymodel
)

# 요약할 문장
text = """summarize: The Inflation Reduction Act lowers prescription drug costs,
health care costs, and energy costs. It's the most aggressive action on tackling
the climate crisis in American history, which will lift up American workers and
create good-paying, union jobs across the country. It'll lower the deficit and
ask the ultra-wealthy and corporations to pay their fair share. And no one making
under $400,000 per year will pay a penny more in taxes."""

result = summarization(text)
result
Your max_length is set to 200, but your input_length is only 103. Since this is a summarization task, where outputs shorter than the input are typically wanted, you might consider decreasing max_length manually, e.g. summarizer('...', max_length=51)
[{'summary_text': "the Inflation Reduction Act lowers prescription drug costs, health care costs, and energy costs . it's the most aggressive action on tackling the climate crisis in American history . no one making under $400,000 per year will pay a penny more in taxes."}]Q. 학습할 때와 prefix가 다른데 왜 작동하죠?
- config.json 확인해 보면 prefix에 'summarize"' 도 있음
- prefix를 다르게 써도 작동하는 것은 모델이 prefix를 통해 작업을 인식하지만, 그 근본적 작동 원리는 텍스트-투-텍스트 변환이고, 사전 학습부터 다양한 prefix를 접했기 때문에 어느 정도 유연성을 갖고 있기 때문
- 다만, 동일한 prefix를 사용하면 더 좋은 성능과 빠른 수렴이 기대됨
- 모델에 따라 학습 시와 정확히 동일한 prefix를 써야 하는 경우도 있음
- 우리가 사용한 T5 모델은 유연성이 있음
T5 모델에서 텍스트 요약 시 prefix를 학습할 때와 평가할 때 다르게 써도 작동하는 이유는 다음과 같습니다.
1. T5는 모든 NLP 작업을 텍스트-투-텍스트(text-to-text) 포맷으로 통일하여 처리하는 인코더-디코더 트랜스포머 모델입니다. 각 작업에 대응하는 특정 prefix(예: "summarize: ")를 입력 문장 앞에 붙여서 모델이 해당 작업을 수행하도록 지시합니다. 즉, prefix는 모델에게 현재 어떤 작업을 해야 하는지 알려주는 역할을 합니다.
2. 학습 시에는 모델이 다양한 작업(prefix 포함)을 학습하면서 입력과 출력의 매핑을 익힙니다. 이때 prefix는 작업의 정체성을 암시하는 신호 역할을 하여, 모델이 그에 맞는 출력을 생성하도록 도와줍니다.
3. 평가(추론) 시에는 학습된 모델이 입력에 붙은 prefix를 보고 어떤 작업을 수행할지 결정합니다. 만약 평가 시 prefix가 다른 형태이거나 없더라도, 근본적으로는 학습 시와 유사한 조건 하에서 텍스트 변환(task 수행)이 이루어지기 때문에 어느 정도 작동합니다. 즉, prefix의 변화가 있더라도 모델이 문맥과 작업 유형을 이해하는 데 큰 문제를 일으키지 않는 경우가 많습니다.
4. 다만, prefix를 학습 때와 평가 때 다르게 사용할 경우 성능 차이가 있을 수 있습니다. 이는 prefix가 작업 신호로서 모델에 영향을 주기 때문인데, 동일한 prefix를 사용하는 것이 보통 더 빠른 수렴과 더 좋은 성능에 도움이 됩니다.
5. 사전학습 단계 역시 여러 작업에서 다양한 prefix를 포함하여 진행되는데, 이로 인해 모델이 prefix가 다소 다르게 주어져도 작업 수행에 유연하게 대응할 수 있는 특성을 가지게 됩니다.
왜 prefix를 다르게 써도 모델이 제대로 작동하는 걸까요?
간단히 말해, T5 모델은 prefix를 작업 지시어로 사용하는데, 학습과 평가는 모두 텍스트 입력-출력 매핑이라는 점에서 동일한 원리를 따르며, 사전학습과 다중 작업 학습 덕분에 prefix가 다소 변해도 모델이 작동하게 설계되어 있기 때문입니다.
즉, prefix를 다르게 써도 작동하는 것은 모델이 prefix를 통해 작업을 인식하지만, 그 근본적 작동 원리는 텍스트-투-텍스트 변환이고, 사전 학습부터 다양한 prefix를 접했기 때문에 어느 정도 유연성을 갖고 있기 때문입니다. 다만, 동일한 prefix를 사용하면 더 좋은 성능과 빠른 수렴이 기대됩니다.
T5 모델과 같은 사전 학습된 언어 모델이 prefix를 다르게 써도 제대로 작동하는 이유는, 모델이 학습 당시 다양한 prefix와 여러 작업을 접하며 여러 형태의 작업 지시어에 유연하게 반응하도록 학습되었기 때문입니다. 즉, prefix는 모델에게 수행할 작업을 알려주는 신호 역할을 하는데, 모델 내부에서는 입력 텍스트와 prefix를 함께 해석하며 텍스트 변환을 진행하기 때문에, prefix가 약간 다르더라도 모델이 작업의 맥락을 이해하고 적절히 대응할 수 있습니다.
더 구체적으로, prefix tuning과 prompt tuning 기법에서 볼 수 있듯이, 모델은 입력값 앞에 붙은 prefix(또는 학습 가능한 prefix 토큰 시퀀스)를 통해 작업에 맞는 출력을 생성하도록 설계되어 있지만, 사전 학습과 다양한 작업에서 여러 형태의 prefix를 경험했기 때문에 어느 정도 다름을 허용합니다. 때문에 학습 시와 평가 시 prefix가 달라도 근본적으로 입력-출력 매핑 원리가 유지되면서 모델이 작동할 수 있습니다.
또한, prefix tuning 기법은 입력 시퀀스마다 학습 가능한 prefix를 넣고 나머지 모델 파라미터는 고정시키는 식으로 미세조정을 하여 모델이 특정 작업에 더 잘 적응하도록 돕는데, 이로 인해 prefix가 약간 변경되어도 학습된 패턴에 의해 작업 수행이 가능해지는 것입니다.
요약하면,
- 모델은 다양한 prefix에 대해 학습 및 사전 학습되었고
- prefix는 작업 신호 역할을 하지만 텍스트 변환 자체는 입력-출력 매핑이라는 근본 원리에 기반함
- 따라서 prefix가 다소 달라도 모델이 문맥과 작업 유형을 이해해 작동할 수 있음
- 다만, 동일한 prefix를 사용하는 것이 보통 더 좋은 성능을 냅니다.
# 요약할 문장
text2 = """summarize long sentences The Inflation Reduction Act lowers prescription drug costs,
health care costs, and energy costs. It's the most aggressive action on tackling
the climate crisis in American history, which will lift up American workers and
create good-paying, union jobs across the country. It'll lower the deficit and
ask the ultra-wealthy and corporations to pay their fair share. And no one making
under $400,000 per year will pay a penny more in taxes."""

result2 = summarization(text2)
result2
Your max_length is set to 200, but your input_length is only 104. Since this is a summarization task, where outputs shorter than the input are typically wanted, you might consider decreasing max_length manually, e.g. summarizer('...', max_length=52)
[{'summary_text': "the Inflation Reduction Act lowers prescription drug costs, health care costs, and energy costs . it's the most aggressive action on tackling the climate crisis in American history . no one making under $400,000 per year will pay a penny more in taxes."}]→ 2초 걸림('summarize:' 는 3초)
# 요약할 문장
text3 = """aaa The Inflation Reduction Act lowers prescription drug costs,
health care costs, and energy costs. It's the most aggressive action on tackling
the climate crisis in American history, which will lift up American workers and
create good-paying, union jobs across the country. It'll lower the deficit and
ask the ultra-wealthy and corporations to pay their fair share. And no one making
under $400,000 per year will pay a penny more in taxes."""

result3 = summarization(text3)
result3
Your max_length is set to 200, but your input_length is only 105. Since this is a summarization task, where outputs shorter than the input are typically wanted, you might consider decreasing max_length manually, e.g. summarizer('...', max_length=52)
[{'summary_text': "the Inflation Reduction Act lowers prescription drug costs, health care costs, and energy costs . it's the most aggressive action on tackling the climate crisis in American history . no one making under $400,000 per year will pay a penny more in taxes."}]→ 4초 걸림
T5 모델을 본인이 가진 데이터로 학습할 때, 만약 prefix를 "summarize long sentences"로 설정하여 학습했다면, 평가(추론) 시에는 반드시 그 정확한 prefix를 사용해야 가장 좋은 성능을 기대할 수 있습니다.
그 이유는 다음과 같습니다:
- Prefix는 작업 지시어로서 모델이 어떤 태스크를 수행할지 알려주는 역할을 합니다. 학습 과정에서 모델이 "summarize long sentences"라는 prefix에 대응하는 입력-출력 매핑을 익히기 때문에, 평가 시에도 같은 prefix를 줘야 학습된 작업 신호와 맞아떨어집니다.
- 학습 시와 평가 시 prefix가 다소 다르거나 완전히 다르게 주어지는 경우, 모델이 어느 정도 작동할 수는 있지만(사전학습 단계에서 여러 prefix를 접했기 때문에 어느 정도 유연성은 있음), 성능 저하가 발생할 가능성이 높고, 학습된 작업과 평가에서 기대하는 작업 간 혼란이 생길 수 있습니다.
- Prefix tuning이나 prompt tuning 같은 기법에서는 prefix(또는 continuous prompt)가 고정된 모델 파라미터 대신 작업에 맞는 출력 생성을 유도하는 역할을 하므로, 같은 prefix를 사용하는 것이 중요합니다.
따라서, 본인의 데이터로 "summarize long sentences" prefix를 사용하여 학습했다면, 평가할 때도 가능하면 반드시 그 동일한 prefix를 입력에 포함시키는 것이 권장됩니다. 다른 prefix를 쓰면 작동할 수는 있으나 성능이 떨어지거나 원하는 작업 출력이 안 나올 위험이 있습니다.
요약:
| 상황 | Prefix 사용 권장 방법 | 결과 |
|---|---|---|
| 학습과 평가 모두 동일 prefix 사용 | "summarize long sentences" | 최적 성능 발휘 |
| 평가 시 다른 prefix 사용 | 다른 prefix 사용 가능하나 권장하지 않음 | 성능 저하, 작업 혼동 가능성 있음 |
즉, "무조건" 동일 prefix를 써야 하는 것은 아니지만, 최선의 성능과 안정적인 결과를 위해서는 학습 때 사용한 prefix를 그대로 쓰는 것이 좋습니다.
AWS Skill Builder
Cloud Quest: Cloud Practitioner
하루 돌아보기
👍 잘한 점
- 웹 강의 시간에 대답 열심히 했음
- 쉬는 시간 활용해서 오늘 배운 내용 복습함
- Text Summarization에서 더 알고 싶은 부분 추가로 공부함
👎 아쉬웠던 점
- 빅데이터분석기사 시험 접수하고 결제한 줄 알았는데 결제를 안 했었나보다. 오늘 아침에 확인해보니까 접수가 안 된 상태였음😭
- 아쉽지만 어쩔 수 없지! 정보처리기사 실기랑 리눅스마스터에 더 집중하자
🔬 개선점
- 빅데이터분석기사 못 보는 대신 AWS와 네이버클라우드를 원래 계획했던 것보다 더 파고들어보자