[인공지능사관학교: 자연어분석A반] 학습 내용 보충 - QA 토크나이징 결과와 전처리
token_type_ids와 sequence_ids
BERT 기반 질문-응답(Question Answering, QA) 모델의 토크나이저 출력 구조
| Key | 설명 |
|---|---|
input_ids | 토큰 ID로 변환된 문장 |
token_type_ids | 0(question), 1(context)로 구분 |
attention_mask | 실제 토큰이면 1, 패딩이면 0 |
offset_mapping | 각 토큰이 원래 문장의 어느 문자 구간인지 (start, end 인덱스) |
- input_ids
- 질문과 문맥(context)을 하나의 시퀀스로 이어 붙여 토큰화하고, 각 토큰을 ID로 변환한 값
- token_type_ids
- BERT 기반 QA 모델에서 question(질문)은 0, context(문맥)은 1로 구분**
- 입력 시퀀스의 각 토큰이 어느 부분(질문/문맥)에 속하는지 모델이 구분할 수 있게 해줌
- 대부분의 경우에서 사용되는 표준 방식입니다.
- attention_mask
- 실제 입력에 해당하는 토큰이면 1, 패딩 토큰이면 0으로 구분합니다.
- offset_mapping
- 각 토큰이 원래 텍스트 내 어느 문자 범위(시작/끝 인덱스)에 해당하는지 나타냄
- 정답을 원래 문장 위치로 재매핑할 때 필요
preprocess_function에서 사용한 sequence_ids는 뭘까?
- sequence_ids(또는 segment_ids로 불리기도 함)
- Hugging Face Tokenizer의 내부 함수
- Huggingface의 일부 Tokenizer에서 토큰화 과정 결과에 포함되는 경우가 있음
- 각 토큰이 질문(0), 본문(1), 또는 특수 토큰(None)인지 식별할 수 있게 위치 정보를 반환
- 각 토큰이 어느 시퀀스에 속하는지를 나타냄
- 특히 여러 시퀀스를 합쳐 처리할 때 구분하기 위한 값
- 주로 토크나이저에서 내부적으로 관리
- Hugging Face Tokenizer의 내부 함수
- token_type_ids
- Tokenizer가 생성한 "리스트"
- 각 토큰이 어느 segment에 속하는지(일반적으로 질문 0, 본문 1, 특수 토큰도 0 또는 1) 정보를 포함
- 실제 모델 입력값이기도 함
- 주로 BERT 등에서 사용
- 각 토큰이 어느 세그먼트(예: 첫 번째 문장, 두 번째 문장)에 속하는지 구분해주는 값
- 일반적으로 문장 쌍 입력(Task 예: 문장 유사도, QA 등)에서 첫 번째 문장은 0, 두 번째 문장은 1로 할당
- seq2seq 계열에서는 필수로 쓰이지 않지만 일부 Transformer 기반 모델이나 Tokenizer에서는 지원하기도 힘
즉,
- token_type_ids는 세그먼트(문장) 구분자 역할
- sequence_ids는 시퀀스(문장 단위 또는 입력 전체) 구분 용도
로 역할과 쓰임새가 다름
추가로, seq2seq에서는 기본적으로 input_ids, attention_mask, 그리고 특별 토큰(eos, bos 등)을 더 자주 다루며, token_type_ids·sequence_ids는 사용 모델에 따라 포함될 수도 있고 생략될 수도 있습니다.
- token_type_ids와 sequence_ids를 혼동할 수 있는데, 대부분의 QA 토크나이저 출력에는 sequence_ids는 포함되지 않음
- 대신 token_type_ids만 사용하며, 이것으로 질문과 문맥의 구분이 이루어짐
- 일부 토크나이저 구현(특히 Huggingface 등)에서 내부적으로 sequence_ids를 사용
- 일반적인 토크나이저 출력의 디폴트 키는 위 표와 같음
token_type_ids와 sequence_ids의 관계
- token_type_ids는 sequence_ids의 정보에서 None값이 제외된 형태
- 배열의 길이, 인덱싱 방식, 특수토큰 처리 등에서 차이가 존재
- 예를 들어, sequence_ids는 [None, 0, ..., None, 1, ..., None] 형태로 특수토큰 위치에 None이 들어가며, token_type_ids는 [0, 0, ..., 1, 1, ...]처럼 특수토큰을 무시하고 해당 부분을 0 또는 1로 처리
따라서,
- 문맥(context) 영역의 시작/끝 인덱스를 찾고 싶다면 special token(None)의 존재 때문에 sequence_ids를 사용하는 편이 일반적(특히 오프셋 계산 등 전처리 구현에서)
- token_type_ids는 특수토큰 위치 정보가 없거나 문장/문맥 단순 분리 등에는 사용할 수 있지만, 위처럼 context의 실제 시작/끝이 필요한 QA 전처리에서는 sequence_ids 사용이 더 안전
sequence_ids와 token_type_ids의 활용
- 실제 QA(Question Answering) 데이터 전처리 과정에서 각각의 역할에 따라 다르게 활용됨
- sequence_ids는 전처리(특히 정답 위치 매핑)에 주로 쓰임
- 예시: 토크나이저를 통해 질문과 본문(context)이 하나로 합쳐지고, 각 토큰이 질문(0), 본문(1), 특수토큰(None)인지 구분하는 리스트가 생성됨
- 오프셋 매핑(offset_mapping)을 사용할 때, 정답이 반드시 본문에 있어야 하므로, sequence_ids에서 context(1) 영역의 시작·종료 인덱스를 확인하여 정답 위치(Indexing)를 지정하는 데 사용
- token_type_ids는 실제 모델 입력에 포함되는 벡터 → 각 토큰이 어느 부분(질문/본문)에 속하는지 모델이 구분하게 해줌
- 예시:
[0, 0, ..., 1, 1]처럼 질문에는 0, 본문에는 1로 할당되어 BERT 등 모델의 segment embedding 처리에 활용 - 실제 추론 또는 학습 단계에서 token_type_ids 값이 모델에 전달되어 질문-본문 관계를 부여함
- 예시:
- sequence_ids는 전처리(특히 정답 위치 매핑)에 주로 쓰임
- 실제 활용 예시:
- 정답(Answer) 위치 찾기: preprocess 함수에서 offset_mapping과 함께 sequence_ids로 context 영역의 토큰 index를 찾아 정답 span의 시작·끝 위치를 지정
- 모델입력 준비: token_type_ids는 input_ids 등과 함께 모델 forward에 input으로 넘기며, 모델은 이를 사용해 질문과 문맥을 구분
- 요약 표:
| 구분 | 목적/역할 | 활용 시점 |
|---|---|---|
| sequence_ids | 질문·문맥·특수토큰 구분 (None, 0, 1) | 정답 위치 매핑 등 전처리 |
| token_type_ids | 모델에게 질문(0), 문맥(1) 구분값 제공 | 모델 입력 (추론/학습) |
실제 QA 파이프라인에서 offset_mapping을 통한 정답 위치 지정에는 sequence_ids가, 모델 내부적으로 segment embedding에는 token_type_ids가 사용되는 구조입니다.
QA 토크나이징 결과 예제
- 질문(question) 과 본문(context) 을 하나의 입력으로 묶어 BERT 계열 토크나이저로 전처리했을 때 나오는 대표적인 출력 값 확인해보기
📌
from transformers import BertTokenizer

tokenizer = BertTokenizer.from_pretrained("bert-base-uncased")

question = "Where does John live?"
context = "John lives in New York City."
inputs = tokenizer(
    question,
    context,
    max_length=32,
    padding="max_length",
    truncation="only_second",
    return_offsets_mapping=True
)

print(inputs.keys())
출력 키:
dict_keys(['input_ids', 'token_type_ids', 'attention_mask', 'offset_mapping'])1. input_ids
- 질문과 본문을 하나의 시퀀스로 이어 붙인 뒤, 각 토큰을 모델의 단어 사전(vocabulary) ID로 변환한 것.
- 특수 토큰
[CLS],[SEP]등이 포함됩니다.
예시:
[101, 2073, 2515, 2198, 2338, 102, 2198, 3268, 1999, 2047, 2259, 2103, 1012, 102, 0, 0, 0, ...](마지막의 0들은 패딩 토큰)
2. token_type_ids
- 각 토큰이 질문(0) 인지 본문(1) 인지 나타냅니다.
- BERT 계열 모델의 segment embeddings 계산에 사용됩니다.
예시:
[0, 0, 0, 0, 0, 0, 1, 1, 1, 1, 1, 1, 1, 1, 0, 0, 0, ...]→ [CLS], 질문, 그리고 첫 번째 [SEP] 까지는 0, 본문과 두 번째 [SEP] 까지는 1, 이후 패딩은 0.
3. attention_mask
- 실제 입력 토큰이면 1, 패딩이면 0
- 모델이 불필요한 패딩 토큰에 주의를 주지 않게 막는 역할
예시:
[1, 1, 1, 1, 1, 1, 1, 1, 1, 1, 1, 1, 1, 1, 0, 0, 0, ...]4. offset_mapping
- 각 토큰이 원본 문자열의 시작 인덱스, 끝 인덱스(문자 단위) 를 튜플로 나타낸 것
- QA 전처리에서 정답 span(시작·끝 위치)을 찾는 데 사용됩니다.
예시 (질문과 본문 모두 포함):
[(0, 0), (0, 5), (6, 10), (11, 15), (16, 20), (0, 0),
 (0, 4), (5, 10), (11, 13), (14, 17), (18, 22), (23, 27),
 (27, 28), (0, 0), (0, 0), ...]
여기서 (0,0)은 특수 토큰이나 패딩의 경우입니다.
✅ 정리
sequence_ids: 전처리 시 내부적으로 질문/본문/특수 토큰 구간을 구분하기 위해 사용됩니다 (예:[None, 0, 0, ..., 1, 1, ..., None]).token_type_ids: 최종적으로 모델에 입력되어 질문·본문을 구분하는 역할을 합니다.offset_mapping: 정답이 본문에서 몇 번째 토큰에 있는지를 계산할 때 반드시 필요합니다.
📌 QA 전처리~추론 전체 흐름
[질문(question)] + [본문(context)]
            │
            ▼
  1. Tokenizer 처리
  -----------------------------------------
  input_ids       → 토큰을 Vocab ID로 변환
  token_type_ids  → 질문(0) / 본문(1) 구분 (모델 입력용)
  attention_mask  → 실제 토큰(1) / 패딩(0) 구분
  offset_mapping  → 원문 내 문자 시작/끝 인덱스
  sequence_ids    → 전처리 단계 전용: 질문(0), 본문(1), 특수토큰(None)
  -----------------------------------------
            │
            ▼
  2. 전처리에서 정답 위치 매핑
      - sequence_ids 로 context(1) 영역의 시작/끝 인덱스 찾기
      - offset_mapping으로 정답 문자의 시작/끝이 포함된 토큰 index 계산
      - start_positions / end_positions 생성
            │
            ▼
  3. 모델 입력
      input_ids
      token_type_ids
      attention_mask
      start_positions / end_positions (학습 시 라벨)
            │
            ▼
  4. 모델 내부
      - token_type_ids를 통해 segment embedding 적용
        → 질문/본문 정보 반영
      - attention mask로 패딩 무시
      - 결과: 각 토큰이 정답 시작/끝일 확률 예측
            │
            ▼
  5. 후처리
      - 예측된 start, end 인덱스를 offset_mapping으로 원문 위치로 변환
      - 원본문에서 해당 구간을 잘라 최종 정답 생성
🔍 핵심 차이 활용 정리
| 역할 | sequence_ids (전처리) | token_type_ids (모델입력) |
|---|---|---|
| 질문/본문 구분 | 전처리 중 정답 context 영역만 찾기 위해 사용 | 모델에서 segment embedding 계산에 활용 |
| 특수토큰 처리 | None 값으로 구간의 시작·끝 포인트 정확히 식별 | 특수토큰 포함 0/1만 존재 |
| 출력 여부 | tokenizer.sequence_ids()로만 얻음 (모델에 직접 미전달) | tokenizer 출력에 기본 포함, 모델 입력 |
| Offset 매핑 | offset_mapping과 함께 context 토큰 위치 제한에 사용 | 사용 안 함 |
✅ 간단한 비유
- sequence_ids = "지도에서 구역 경계 표시" (정답이 속한 지역 정확히 찾기)
- token_type_ids = "모델에 주는 색깔 구분" (이 토큰은 질문 부분, 저 토큰은 본문 부분)
📌 전체 과정 코드
- 실제 데이터 하나를 토크나이징하고,
sequence_ids→offset_mapping→start_positions/end_positions계산까지 전처리 과정을 그대로 확인
# Fast 토크나이저는 Huggingface에서 Rust로 구현되어 빠르고 offset_mapping 지원이 가능
from transformers import BertTokenizerFast

# Fast 토크나이저 로드
tokenizer = BertTokenizerFast.from_pretrained("bert-base-uncased")

# 예시 데이터
question = "Where does John live?"
context  = "John lives in New York City."
answer_text = "New York City"
answer_start = context.index(answer_text)  # 14

# 토크나이징
inputs = tokenizer(
    question,
    context,
    max_length=32,
    padding="max_length",
    truncation="only_second",
    return_offsets_mapping=True
)

print("input_ids:", inputs["input_ids"])
print("token_type_ids:", inputs["token_type_ids"])
print("attention_mask:", inputs["attention_mask"])

# offset_mapping: 각 토큰의 문자 시작/끝 위치
offset_mapping = inputs["offset_mapping"]

# sequence_ids: 질문(0), 본문(1), 특수 토큰(None)
sequence_ids = inputs.sequence_ids()

print("\noffset_mapping:")
for i, m in enumerate(offset_mapping):
    print(f"{i:2d} {m} seq_id={sequence_ids[i]} token={tokenizer.convert_ids_to_tokens(inputs['input_ids'][i])}")
input_ids: [101, 2073, 2515, 2198, 2444, 1029, 102, 2198, 3268, 1999, 2047, 2259, 2103, 1012, 102, 0, 0, 0, 0, 0, 0, 0, 0, 0, 0, 0, 0, 0, 0, 0, 0, 0]
token_type_ids: [0, 0, 0, 0, 0, 0, 0, 1, 1, 1, 1, 1, 1, 1, 1, 0, 0, 0, 0, 0, 0, 0, 0, 0, 0, 0, 0, 0, 0, 0, 0, 0]
attention_mask: [1, 1, 1, 1, 1, 1, 1, 1, 1, 1, 1, 1, 1, 1, 1, 0, 0, 0, 0, 0, 0, 0, 0, 0, 0, 0, 0, 0, 0, 0, 0, 0]
offset_mapping:
0 (0, 0) seq_id=None token=[CLS]
1 (0, 5) seq_id=0 token=where
2 (6, 10) seq_id=0 token=does
3 (11, 15) seq_id=0 token=john
4 (16, 20) seq_id=0 token=live
5 (20, 21) seq_id=0 token=?
6 (0, 0) seq_id=None token=[SEP]
7 (0, 4) seq_id=1 token=john
8 (5, 10) seq_id=1 token=lives
9 (11, 13) seq_id=1 token=in
10 (14, 17) seq_id=1 token=new
11 (18, 22) seq_id=1 token=york
12 (23, 27) seq_id=1 token=city
13 (27, 28) seq_id=1 token=.
14 (0, 0) seq_id=None token=[SEP]
15 (0, 0) seq_id=None token=[PAD]
16 (0, 0) seq_id=None token=[PAD]
17 (0, 0) seq_id=None token=[PAD]
18 (0, 0) seq_id=None token=[PAD]
19 (0, 0) seq_id=None token=[PAD]
20 (0, 0) seq_id=None token=[PAD]
21 (0, 0) seq_id=None token=[PAD]
22 (0, 0) seq_id=None token=[PAD]
23 (0, 0) seq_id=None token=[PAD]
24 (0, 0) seq_id=None token=[PAD]
25 (0, 0) seq_id=None token=[PAD]
26 (0, 0) seq_id=None token=[PAD]
27 (0, 0) seq_id=None token=[PAD]
28 (0, 0) seq_id=None token=[PAD]
29 (0, 0) seq_id=None token=[PAD]
30 (0, 0) seq_id=None token=[PAD]
31 (0, 0) seq_id=None token=[PAD]🔍 context 구간 파악 & 정답 인덱스 찾기
# ===== 1. context 구간 찾기 (스페셜토큰/패딩 제외) =====
context_start = None
context_end = None

for i, seq_id in enumerate(sequence_ids):
    if seq_id == 1 and offset_mapping[i] != (0, 0):  # 실제 context 영역
        if context_start is None:
            context_start = i
        context_end = i  # 마지막 유효 토큰 계속 갱신

print("context 범위 토큰 index:", context_start, "~", context_end)

# ===== 2. 정답 문자 범위 =====
start_char = answer_start
end_char = answer_start + len(answer_text)
print("정답 문자 범위:", (start_char, end_char))

# ===== 3. start_position 찾기 =====
start_position = None
for i in range(context_start, context_end + 1):
    token_start, token_end = offset_mapping[i]
    if token_start <= start_char < token_end:  # 시작 문자가 포함된 토큰
        start_position = i
        break

# ===== 4. end_position 찾기 =====
end_position = None
for i in range(context_end, context_start - 1, -1):
    token_start, token_end = offset_mapping[i]
    if token_start < end_char <= token_end:  # 끝 문자가 포함된 토큰
        end_position = i
        break

# ===== 5. 출력 =====
print("start_position:", start_position)
print("end_position:", end_position)
print("start_token:", tokenizer.convert_ids_to_tokens(inputs["input_ids"][start_position]))
print("end_token:", tokenizer.convert_ids_to_tokens(inputs["input_ids"][end_position]))
context 범위 토큰 index: 7 ~ 13
정답 문자 범위: (14, 27)
start_position: 10
end_position: 12
start_token: new
end_token: city📌 실행 시 해석 (예시 결과)
context 범위 토큰 index: 7 ~ 13
정답 문자 범위: (14, 27)
start_position: 10
end_position: 12
start_token: new
end_token: city즉:
1. sequence_ids로 context 영역(7 ~ 13번 토큰) 확인
2. offset_mapping으로 "New York City"의 문자 범위를 만족하는 토큰 index 찾음
3. 전처리 라벨 start_positions = 10, end_positions = 12 완성
💡 이렇게 하면 질문 / 본문 / 특수토큰이 섞인 상태에서도 context 영역만 정확히 찾아서 정답 위치를 지정할 수 있습니다.
이게 바로 sequence_ids와 offset_mapping을 함께 쓰는 핵심 이유입니다.
원본 텍스트:
질문: "Where does John live?"
본문: "John lives in New York City."
정답: "New York City" (문자 위치: 14~27)

    │
    ▼

1. Tokenizer 적용
   - 입력: 문장 합성 "[CLS] 질문 [SEP] 본문 [SEP]"
   - 출력 데이터:
     - input_ids: 토큰을 숫자로 변환 (예: [101, 2073, 2515, ...])
     - token_type_ids: 각 토큰이 질문(0)인지 본문(1)인지 구분
     - attention_mask: 패딩 구분 (1=실제토큰, 0=패딩)
     - offset_mapping: 각 토큰이 원문 내 위치 (문자 시작/끝 인덱스)
     - sequence_ids: 각 토큰이 질문(0), 본문(1), 특수토큰(None) 구분 (전처리용)

    │
    ▼

2. 전처리 - 정답 위치 매핑
   - sequence_ids 사용: 본문(context) 영역 토큰의 시작/끝 인덱스 탐색
   - offset_mapping 사용: 원문 내 정답 문자 위치를 토큰 단위 인덱스로 변환
   - 결과: start_positions, end_positions (모델이 학습할 정답 토큰 위치)

    │
    ▼

3. 모델 입력
   - input_ids, token_type_ids, attention_mask, start_positions, end_positions
   - token_type_ids는 모델 내부 segment embedding에서 질문/본문 구분 역할

    │
    ▼

4. 모델 예측
   - start_logits, end_logits 예측
   - 의미: 각 토큰 별로 정답 시작/끝일 확률

    │
    ▼

5. 후처리
   - 예측된 토큰 인덱스를 offset_mapping으로 다시 원문 문자 위치로 변환
   - 원문에서 정답 텍스트 추출
1. 원본 텍스트 입력
| 질문 (question) | 본문 (context) | 정답 (Answer) |
|---|---|---|
| Where does John live? | John lives in New York City. | New York City |
| 문자 위치 (Char index) | 0 ... 27 | 14 ~ 27 |
2. 토크나이저 출력 구조 (각 토큰별 상세 정보)
| 인덱스 | 토큰 | token_type_ids | sequence_ids | offset_mapping | 설명 |
|---|---|---|---|---|---|
| 0 | [CLS] | 0 | None | (0, 0) | 특수 토큰 |
| 1 | where | 0 | 0 | (0, 5) | 질문 영역 토큰 |
| 2 | does | 0 | 0 | (6, 10) | 질문 영역 토큰 |
| 3 | john | 0 | 0 | (11, 15) | 질문 영역 토큰 |
| 4 | live | 0 | 0 | (16, 20) | 질문 영역 토큰 |
| 5 | ? | 0 | 0 | (20, 21) | 질문 영역 토큰 |
| 6 | [SEP] | 0 | None | (0, 0) | 특수 토큰 (질문-본문 구분) |
| 7 | john | 1 | 1 | (0, 4) | 본문 영역 토큰 |
| 8 | lives | 1 | 1 | (5, 10) | 본문 영역 토큰 |
| 9 | in | 1 | 1 | (11, 13) | 본문 영역 토큰 |
| 10 | new | 1 | 1 | (14, 17) | 본문 영역 토큰 (정답 범위) |
| 11 | york | 1 | 1 | (18, 22) | 본문 영역 토큰 (정답 범위) |
| 12 | city | 1 | 1 | (23, 27) | 본문 영역 토큰 (정답 범위) |
| 13 | . | 1 | 1 | (27, 28) | 본문 영역 토큰 |
| 14 | [SEP] | 1 | None | (0, 0) | 특수 토큰 |
| 15~31 | [PAD] | 0 | None | (0, 0) | 패딩 토큰 |
3. 정답 위치 찾는 과정 (전처리 관점)
- Step 1:
sequence_ids에서1인 구간(본문 영역) 토큰 인덱스를 찾음 → 인덱스 7부터 13까지 - Step 2:
offset_mapping기반으로 본문의 문자 인덱스와 정답 문자 인덱스(14~27)를 비교 - Step 3: 본문 내 정답에 해당하는 토큰 인덱스 산출
- 정답 시작 토큰 인덱스: 10 (
new) - 정답 끝 토큰 인덱스: 12 (
city)
- 정답 시작 토큰 인덱스: 10 (
- Step 4: 이 값들을
start_positions = 10,end_positions = 12로 학습 라벨로 사용
4. 전처리 → 모델 입력 → 추론 → 후처리 전체 흐름도
원본 문장 (질문 + 본문, 정답 포함)
          ↓
[토크나이저]
 - input_ids: 토큰의 Vocabulary ID 변환
 - token_type_ids: 질문(0) / 본문(1) 구분용 (모델 입력)
 - attention_mask: 실제 토큰(1) / 패딩(0)
 - sequence_ids: 질문(0) / 본문(1) / 특수토큰(None) 구분 (전처리용)
 - offset_mapping: 토큰별 원본 문자 인덱스 범위
          ↓
[전처리]
 - sequence_ids로 본문 토큰 범위 파악
 - offset_mapping과 정답 문자 범위로 정답 토큰 인덱스 계산
 - start_positions, end_positions 생성
          ↓
[모델 입력]
 - input_ids, token_type_ids, attention_mask, start_positions, end_positions
          ↓
[모델 추론]
 - start_logits, end_logits 예측 (토큰별 정답 위치 확률)
          ↓
[후처리]
 - 예측 토큰 인덱스 → offset_mapping으로 원문 문자 인덱스 변환
 - 원문에서 정답 텍스트 추출
전처리 시 sequence_ids와 offset_mapping을 사용해 정답 토큰 위치를 정확히 찾는 과정과, 학습 및 추론 때 모델 입력으로 사용하는 token_type_ids의 역할 차이를 명확히 확인할 수 있음
matplotlib / seaborn을 이용한 토큰별 색상 표시 및 주석 표시
import matplotlib.pyplot as plt
import seaborn as sns

tokens = [tokenizer.convert_ids_to_tokens(i) for i in inputs["input_ids"]]
sequence_id_colors = {None: "#999999", 0: "#1f77b4", 1: "#2ca02c"}  # 회색, 파랑, 초록
colors = [sequence_id_colors.get(sid, "#000000") for sid in sequence_ids]

plt.figure(figsize=(12, 2))
bars = plt.bar(range(len(tokens)), [1]*len(tokens), color=colors)

plt.xticks(range(len(tokens)), tokens, rotation=45, ha='right', fontsize=12)
plt.yticks([])  # y축 숨김
plt.title("Token Sequence Visualization (Blue: Question, Green: Context, Gray: Special Token)", fontsize=14)

# 정답 토큰 범위 강조 (start_position ~ end_position)
for i in range(start_position, end_position + 1):
    bars[i].set_edgecolor("red")
    bars[i].set_linewidth(3)

# 범례 표시
import matplotlib.patches as mpatches
legend_handles = [
    mpatches.Patch(color="#1f77b4", label="Question (sequence_id=0)"),
    mpatches.Patch(color="#2ca02c", label="Context (sequence_id=1)"),
    mpatches.Patch(color="#999999", label="Special Token (sequence_id=None)"),
    mpatches.Patch(edgecolor="red", facecolor="none", linewidth=3, label="Answer Tokens"),
]
plt.legend(handles=legend_handles, bbox_to_anchor=(1, 1), loc='upper left')

plt.tight_layout()
plt.show()
| Index | Token | Token Type ID | Sequence ID | Offset | Segment |
|---|---|---|---|---|---|
| 0 | [CLS] | 0 | None | (0, 0) | Special Token |
| 1 | where | 0 | 0 | (0, 5) | Question |
| 7 | john | 1 | 1 | (0, 4) | Context |
import matplotlib.pyplot as plt
import numpy as np
from transformers import BertTokenizerFast

# 1) Fast Tokenizer 로드 (원래 전처리 코드)
tokenizer = BertTokenizerFast.from_pretrained("bert-base-uncased")

question = "Where does John live?"
context = "John lives in New York City."
answer_text = "New York City"
answer_start = context.index(answer_text)

inputs = tokenizer(
    question,
    context,
    max_length=32,
    padding="max_length",
    truncation="only_second",
    return_offsets_mapping=True,
)

sequence_ids = inputs.sequence_ids()

# context 영역 찾기
context_start = 0
while sequence_ids[context_start] != 1:
    context_start += 1
context_end = context_start
while context_end < len(sequence_ids) and sequence_ids[context_end] == 1:
    context_end += 1
context_end -= 1

# 2) 예시로 start_tokens & end_tokens 확률 생성 (랜덤 또는 직접 설정)
# 실제로는 모델의 start_logits, end_logits에 softmax를 취한 값
np.random.seed(0)  # 재현성 위한 시드 고정
seq_len = len(inputs["input_ids"])
start_probs = np.random.rand(seq_len)
end_probs = np.random.rand(seq_len)

# 정답 토큰 범위만 확률 높게 설정 (예: 10~12)
start_probs[context_start:context_end+1] = 0.1  # 낮은 확률로 시작
start_probs[10] = 0.9  # 정답 시작 토큰
end_probs[context_start:context_end+1] = 0.1
end_probs[12] = 0.85  # 정답 끝 토큰

# 3) 막대차트 시각화
tokens = [tokenizer.convert_ids_to_tokens(tid) for tid in inputs["input_ids"]]

plt.figure(figsize=(14, 5))

# 토큰 텍스트를 x축 레이블로 사용
x = np.arange(len(tokens))

bar_width = 0.4

bars1 = plt.bar(x - bar_width/2, start_probs, width=bar_width, color='skyblue', label='Start Probability')
bars2 = plt.bar(x + bar_width/2, end_probs, width=bar_width, color='salmon', label='End Probability')

plt.xticks(x, tokens, rotation=45, ha='right', fontsize=12)

plt.ylabel('Probability')
plt.title('Token-wise Start and End Probabilities')

# 정답 토큰 구간 색칠 (배경음영)
plt.axvspan(10 - 0.5, 12 + 0.5, color='yellow', alpha=0.2, label='Answer Token Span')

# 범례
plt.legend(loc='upper right')

# 각 바 위에 확률값 표시
for bar in bars1 + bars2:
    height = bar.get_height()
    if height > 0.1:  # 작은 값은 생략해도 무방
        plt.text(bar.get_x() + bar.get_width()/2, height + 0.02, f'{height:.2f}', ha='center', va='bottom', fontsize=9)

plt.tight_layout()
plt.show()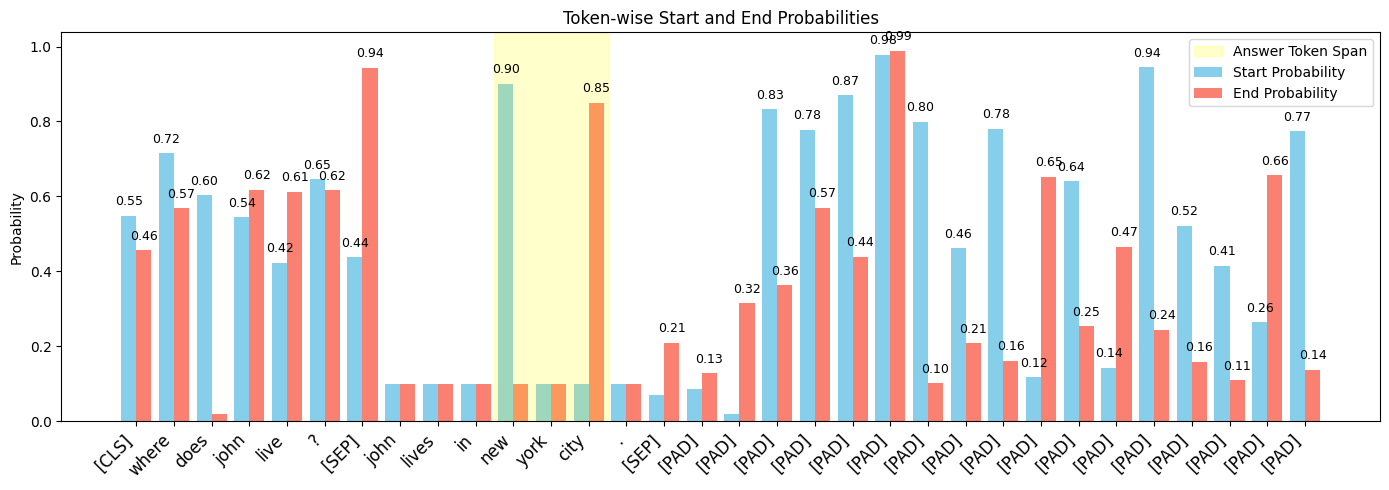
- start_probs와 end_probs는 모델이 각 토큰이 답변의 시작/끝 토큰일 확률을 나타내는 것으로 가정합니다. 위 예시는 임의 확률을 생성해 시각화한 것입니다.
- 노란색 음영 영역이 정답 토큰 범위를 강조해 주며, 각각 블루막대와 레드막대는 시작과 끝일 확률을 나타냅니다.
- 토큰 라벨은 회전되어 아래 표시되어 토큰과 확률을 함께 쉽게 볼 수 있습니다.
에러 해결 방법
- 토크나이징 시
return_offsets_mapping=True옵션으로offset_mapping을 얻어 전처리에서 정답 위치 계산에 사용합니다. offset_mapping은 모델 인풋으로 넣지 않고, 모델에는inputs에서offset_mapping키를 제거하거나 빼고 전달합니다.BertForQuestionAnswering모델은offset_mapping이라는 입력 키워드를 인식하지 못해서 제거하지 않으면 에러가 발생합니다.offset_mapping은 토크나이저 출력 중 하나이며, 모델에 직접 넘기는 입력으로 사용하지 않습니다.
- 즉,
offset_mapping은 전처리 단계에서 정답 위치 계산 등에 활용하고, 모델에는input_ids,attention_mask,token_type_ids등만 입력해야 합니다.
예시는 아래와 같습니다:
inputs = tokenizer(question, context, return_offsets_mapping=True, return_tensors="pt")

offset_mapping = inputs.pop("offset_mapping")  # 모델에 넘기지 않도록 제거

outputs = model(**inputs)  # 여기에는 offset_mapping이 포함되지 않음