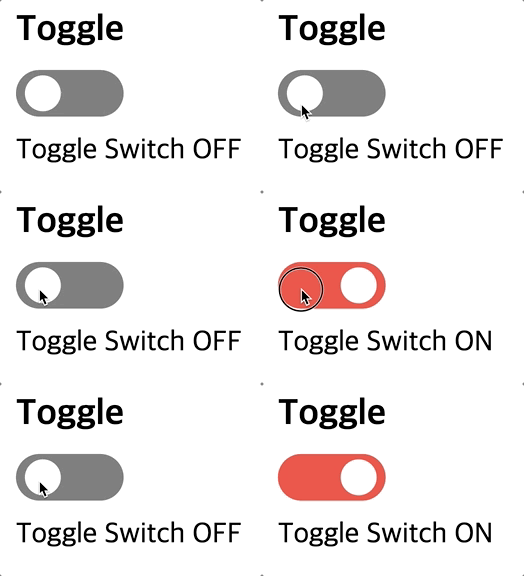
Toggle 구현방법
Toggle이란 상태가 두 가지만 존재하여, 두 가지 상태 사이에서의 전환을 반복하는 것을 의미하기 때문에 React의 useState Hooks 를 통해 상태를 지정했습니다.
HTML에서 두 가지 선택지로 반복하는 대표적인 태그는 <input type='checkbox'> 체크박스를 사용했고,
체크박스의 상태를 변경시킬 때마다 하얀색 공의 위치와 배경색이 몇초에 걸려 바뀌기 때문에 애니메이션 기능을 사용했습니다.
저는 공의 위치에 맞춰 label의 배경색이 너비가 바뀌면서 변경되기 원했지만,
시행착오
label의 배경색을 애니메이션 효과를 주게 되면 전체적으로 서서히 변경되고- ball의 배경이 되는 label 위에 새로운 요소를 만들어 스타일링을 하려 했으나, 기존의 label이 먹히지 않는 Error가 발생했습니다.
가상선택자 사용
실제 HTML상에서는 요소를 추가하지 않으면서 요소를 추가해주기 위해 가상선택자 ::before 를 사용했습니다.
기존의 input의 배경색을 grey로 지정하고,
그 위에 덮어씌운 가상선택자의 배경색을 tomato로 지정했습니다.
Toggle이 선택되지 않았을 때 눌렀을 때 : grey → tomato 로 너비가 점점 넓어지면서 변경되고
Toggle이 선택된 상태에서 눌렀을 때 : tomato → grey 로 너비가 점점 좁아지면서 변경되기 때문에
각각의 애니메이션효과를 styled-components의 keyframes를 통해 지정해줬습니다.
이 때, tomato 배경색이 넘쳐나는 것을 방지하기 위해 브라우저의 개발자도구를 활용해 적절하게 수정했습니다.
느낀 점
가상선택자 및 애니메이션 활용이 익숙치 않지만 자주 사용함으로써 익숙해지려고 합니다.
코드
import React, { useState } from 'react'
import styled, { keyframes } from 'styled-components'

import Title from '../common/Title'

const Toggle = () => {
  const [isChecked, setIsChecked] = useState(false)

  const handleToggle = () => {
    setIsChecked(!isChecked)
  }
  return (
    <WholeBox>
      <Title text='Toggle' />
      <Input
        type='checkbox'
        id='switch-input'
        className='switch-checkbox'
        checked={isChecked}
        onChange={handleToggle}
      />
      <Label
        isChecked={isChecked}
        className='switch-label'
        htmlFor='switch-input'
      >
        <Ball className='ball' />
      </Label>
      <Text>Toggle Switch {isChecked ? 'ON' : 'OFF'}</Text>
    </WholeBox>
  )
}

const WholeBox = styled.div`
  padding: 10px;
`

const Input = styled.input`
  display: none;
  & {
    :checked + .switch-label .ball {
      transform: translateX(30px);
    }
  }
`

const checkedColor = keyframes`
from {
    width: 0px;
    left: 11px;
    border-radius: 0;
  }
  to {
    width: 100%;
  }
`

const uncheckedColor = keyframes`
from {
    width: 50px;
  }
  to {
    width: 0;
    left: 11px;
    border-radius: 0;
  }
  `

const Label = styled.label`
  position: relative;
  display: block;
  width: 60px;
  height: 26px;
  border-radius: 50px;
  background-color: grey;

  &::before {
    content: '';
    display: block;
    position: absolute;
    top: 0;
    left: 0;
    width: 0;
    height: 100%;
    background-color: tomato;
    border-radius: 50px;
    animation: ${props => (props.isChecked ? checkedColor : uncheckedColor)}
      0.2s linear forwards;
  }
`

const Ball = styled.div`
  position: absolute;
  width: 20px;
  height: 20px;
  border-radius: 50%;
  top: 3px;
  left: 5px;
  transition: transform 0.2s linear;
  background-color: white;
  z-index: 3000;
`

const Text = styled.p`
  margin-top: 10px;
`

export default Toggle
참고내용
