
이제부터, 조금 더 프레임워크 수준의 내용을 봐보자.
3.5. 설정 (Configuration)
3.5.1. Embabel 활성화
Spring Boot 애플리케이션 클래스에 @EnableAgents 를 붙여 에이전트 기능을 켠다.
@SpringBootApplication
@EnableAgents(
    loggingTheme = LoggingThemes.STAR_WARS,
    localModels = { "docker" }, // deprecated 됨
    mcpClients = { "docker" }
)
class MyAgentApplication {
    public static void main(String[] args) {
        SpringApplication.run(MyAgentApplication.class, args);
    }
}- 일반적인 Spring Boot 앱과 동일하다.
@EnableAgents가 에이전트 프레임워크를 활성화한다.- 로그 테마, 로컬 LLM, MCP 도구의 출처 등을 지정할 수 있다.
3.5.2. Configuration Properties
Embabel은 application.yml / application.properties 에서 설정 가능한 다양한 프로퍼티를 제공한다.
예시)
embabel.agent.platform.name: 플랫폼 이름embabel.agent.platform.scanning.annotation:@Agent/@Agentic자동 스캔 여부embabel.agent.platform.autonomy.agent-confidence-cut-off: 에이전트 선택 최소 신뢰도embabel.agent.platform.models.openai.*: OpenAI 모델 재시도 및 백오프 설정embabel.agent.platform.test.mock-mode: 테스트용 목(mock) 모드 활성화embabel.agent.platform.process-repository.window-size: 메모리에 유지할 프로세스 수
이런 설정을 통해
- 에이전트 스캔 방식
- 랭킹/선택 전략
- LLM 재시도 정책
- SSE 버퍼 크기
- 테스트 모드 여부
를 세밀하게 제어할 수 있다.
자세한 건 공식 문서를 참고하자. (https://docs.embabel.com/embabel-agent/guide/0.1.3/#configuration-properties)
3.6. 애노테이션 모델
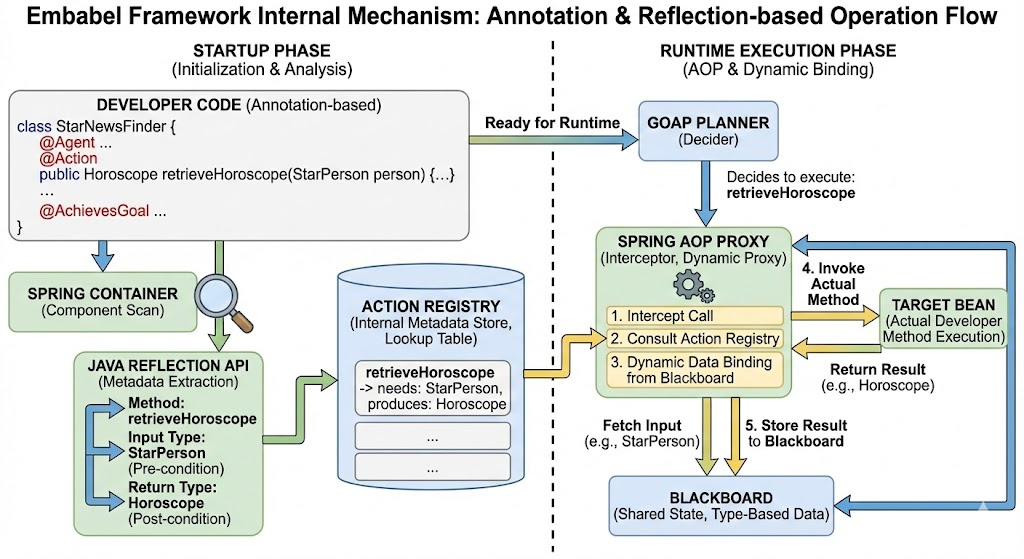
Embabel은 Spring 스타일의 애노테이션 기반 모델을 제공한다.
@Agent: 에이전트 클래스 정의@Action: 에이전트가 수행하는 액션 메서드@Condition: 조건 평가 메서드@AchievesGoal: 특정 Goal을 달성하는 최종 액션
Java에 특히 잘 맞고, Kotlin에서도 유효한 접근 방식이다.
3.6.1. @Agent
- 클래스에 붙여 에이전트를 정의한다.
- Spring 컴포넌트 스캔 대상이며, Spring Bean + 에이전트 플랫폼에 모두 등록된다.
description파라미터를 필수로 제공해야 한다.- 이 설명은 LLM이 에이전트를 선택할 때 사용된다.
3.6.2. @Action
Action 메서드를 표시한다. 다음과 같은 메타데이터를 지정할 수 있다.
description: 사람을 위한 설명pre: 타입 기반 precondition 외에 추가로 만족해야 할 조건 목록post: 실행 후 만족할 수 있는 추가 조건 목록canRerun: 이미 실행한 액션을 다시 실행할 수 있는지 여부 (기본 false)cost: 0~1 사이의 상대 비용value: 0~1 사이의 상대 가치toolGroups: 이 액션 실행에 필요한 툴 그룹toolGroupRequirements: 툴 그룹에 대한 QoS 요구사항
3.6.3. @Condition
조건을 평가하는 메서드에 사용한다.
OperationContext를 파라미터로 받아 블랙보드 등에 접근할 수 있다.- 도메인 객체 파라미터를 받을 경우, 블랙보드에 해당 타입의 객체가 없으면 자동으로 false가 된다.
- 여러 번 호출될 수 있으므로 **부작용(side effect)이 없어야 한다.**
3.6.4. 파라미터 규칙
@Action메서드는 최소 하나 이상의 파라미터를 가져야 한다.- 타입 기반 precondition으로 동작하니까!
@Condition메서드는 0개 이상 가질 수 있다.- 파라미터 순서는 중요하지 않다.
파라미터는 크게 두 종류이다.
- **도메인 객체**: 액션의 일반 입력. 블랙보드에서 채워진다.
- nullable 파라미터는 "있으면 쓰고, 없으면 null" 로 다룰 수 있어 선택적 입력 구현 가능.
- **인프라 객체**:
OperationContext,ActionContext등.
도메인 객체의 유무가 플래닝에서 **precondition** 을 결정한다.
ActionContext / ExecutingOperationContext 는 다른 에이전트를 서브 프로세스로 실행할 때 사용하며, 그 외에는 OperationContext 를 사용하는 것이 권장된다.
3.6.5. 이름 기반 바인딩
@RequireNameMatch 를 통해 파라미터를 **이름으로** 바인딩할 수 있다.
3.6.6. 반환 타입 처리
- 보통 액션은 하나의 도메인 객체를 반환한다.
null반환도 가능하며, 이 경우 재계획이 발생한다.
특수 케이스로, SomeOf 인터페이스를 구현한 **유니온 타입** 을 반환할 수 있다.
data class FrogOrDog(
    val frog: Frog? = null,
    val dog: Dog? = null,
) : SomeOf- non-null 필드만 블랙보드에 바인딩된다.
- 해당 액션의 postcondition은 이 타입에 포함된 모든 필드를 포함한다.
- 여러 필드가 동시에 non-null 이어도 허용되며, 플래너가 그 중 적절한 경로를 선택할 수 있다.
3.6.7. 액션 구현
@Action 메서드는 **일반 메서드**다. 어떤 라이브러리나 프레임워크도 자유롭게 사용할 수 있다.
특별한 점은 OperationContext 를 통해
- 블랙보드 접근
- LLM 호출
이 가능하다는 점뿐이다.
3.6.8. @AchievesGoal
@Action 메서드에 붙여, 이 액션이 특정 Goal을 달성함을 표시한다.
에이전트가 "언제 끝났는지"를 정의하는 중요한 어노테이션이다.
3.6.9. StuckHandler 구현
에이전트 클래스가 StuckHandler 를 구현하면, 플래너가 "막혔다(STUCK)"고 판단했을 때 스스로 이를 처리할 수 있다.
예시)
@Agent(description = "self unsticking agent")
class SelfUnstickingAgent : StuckHandler {

    @Action
    @AchievesGoal(description = "the big goal in the sky")
    fun toFrog(dog: Dog): Frog = Frog(dog.name)

    override fun handleStuck(agentProcess: AgentProcess): StuckHandlerResult {
        agentProcess.addObject(Dog("Duke"))
        return StuckHandlerResult(
            message = "Unsticking myself",
            handler = this,
            code = StuckHandlingResultCode.REPLAN,
            agentProcess = agentProcess,
        )
    }
}
개념적으로는 "계획이 막혔을 때, 스스로 필요한 데이터를 블랙보드에 추가하고 다시 계획하게 만드는" 역할이다.
3.6.10. 중첩 프로세스 (Nested processes)
@Action 메서드 안에서 **다른 에이전트 프로세스**를 호출할 수 있다.
ActionContext.asSubProcess(...)를 사용하여 서브 프로세스를 생성한다.- 복잡한 반복/평가 패턴(예: generate → evaluate → refine)을 별도 에이전트로 구성한 뒤,
이를 서브 프로세스로 재사용하는 식으로 구성할 수 있다.
@Action
fun report(
    reportRequest: ReportRequest,
    context: ActionContext,
): ScoredResult<Report, SimpleFeedback> = context.asSubProcess(
    // Will create an agent sub process with strong typing
    EvaluatorOptimizer.generateUntilAcceptable(
        maxIterations = 5,
        generator = {
            it.promptRunner().withToolGroup(CoreToolGroups.WEB).create(
                """
        Given the topic, generate a detailed report in ${reportRequest.words} words.

        # Topic
        ${reportRequest.topic}

        # Feedback
        ${it.input ?: "No feedback provided"}
                """.trimIndent()
            )
        },
        evaluator = {
            it.promptRunner().withToolGroup(CoreToolGroups.WEB).create(
                """
        Given the topic and word count, evaluate the report and provide feedback
        Feedback must be a score between 0 and 1, where 1 is perfect.

        # Report
        ${it.input.report}

        # Report request:

        ${reportRequest.topic}
        Word count: ${reportRequest.words}
        """.trimIndent()
            )
        },
    ))
3.7. DSL
Embabel은 Kotlin/Java DSL로 에이전트를 정의할 수도 있다.
- 여러 단계를 하나의 **원자적 액션**처럼 묶고 싶을 때 유용하다.
- 표준 빌더:
SimpleAgentBuilderScatterGatherBuilderConsensusBuilderRepeatUntil,RepeatUntilAcceptable등
이 빌더들은 모두 **타입 안전**하고, 일관된 API를 사용한다.
var agent = SimpleAgentBuilder
    .returning(Joke.class)
    .running(tac -> tac.ai()
        .withDefaultLlm()
        .createObject("Tell me a joke", Joke.class))
.buildAgent("joker", "This is guaranteed to return a dreadful joke");- 리턴 타입을 명시한다.
- 실행할 action을 작성한다. 현재 agentProcess에 접근할 수 있도록 컨텍스트를 파라미터로 전달받아야 한다.
- 이름과 description을 부여하여 에이전트를 만든다.
(DSL을 아직 공부하지 않았다. kotlin dsl을 추가로 공부해봐야 겠다)
@Action
FactChecks runAndConsolidateFactChecks(
        DistinctFactualAssertions distinctFactualAssertions,
        ActionContext context) {

    var llmFactChecks = properties.models().stream()
            .flatMap(model -> factCheckWithSingleLlm(model, distinctFactualAssertions, context))
            .toList();

    return ScatterGatherBuilder
            .returning(FactChecks.class)             // 전체 결과 타입 지정
            .fromElements(FactCheck.class)           // 개별 요소의 타입 지정
            .generatedBy(llmFactChecks)              // 병렬로 실행될 함수들 지정
            .consolidatedBy(this::reconcileFactChecks) // 결과 병합 함수 지정
            .asSubProcess(context);                  // 현재 프로세스의 서브프로세스로 실행
}- Scatter-Gather 에이전트 구성 시작 여러 작업을 병렬로 실행한 뒤 결과를 모아 최종 결과를 만드는 방식이다.
- 전체 반환 타입 지정 (**returning**)
이 에이전트는 최종적으로
FactChecks객체를 반환한다. - 수집할 요소 타입 지정 (**fromElements**)
병렬 실행의 각 결과가
FactCheck타입임을 명시한다. - 병렬로 실행될 함수 목록 (**generatedBy**)
llmFactChecks리스트는 여러 LLM 모델에 대해 각각FactCheck작업을 수행하는 함수들이다. - 결과 병합 함수 지정 (**consolidatedBy**)
여러
FactCheck결과를 받아 하나의FactChecks로 합친다. 여기서는reconcileFactChecks메서드를 사용한다. - 서브프로세스로 실행 (**asSubProcess**)
이
scatter-gather흐름은 현재 에이전트 실행의 하위 프로세스로 수행된다.SimpleAgentBuilder의asAgent()대신 사용할 수 있으며 API 패턴은 동일하다.
3.7.2. 에이전트 빈 등록 (Registering Agent Beans)
@Agent 애노테이션을 사용하면 해당 클래스는 Spring이 즉시 감지해서 자동으로 등록한다.
반면, DSL로 에이전트를 구성하는 경우에는 에이전트를 Spring에 직접 등록하는 과정이 추가로 필요하다.
아래 예제처럼, Agent 타입을 반환하는 @Bean 을 선언하면
@Agent 로 클래스 선언을 한 것과 동일하게 자동으로 에이전트로 등록된다.
@Configuration
class FactCheckerAgentConfiguration {

    @Bean
    fun factChecker(factCheckerProperties: FactCheckerProperties): Agent {
        return factCheckerAgent(
            llms = listOf(
                LlmOptions(AnthropicModels.CLAUDE_35_HAIKU).withTemperature(.3),
                LlmOptions(AnthropicModels.CLAUDE_35_HAIKU).withTemperature(.0),
            ),
            properties = factCheckerProperties,
        )
    }
}- DSL을 사용할 경우, 위처럼
@Bean으로 반환된 Agent 객체가 자동 등록된다. - 여러 LLM 옵션을 리스트로 넘겨
FactChecker에이전트를 구성하고 있다.
3.8. Core Types
3.8.1. LlmOptions
어떤 LLM을 어떤 하이퍼파라미터로 사용할지 정의하는 클래스이다.
var options = LlmOptions.withModel(OpenAiModels.GPT_4O_MINI)
    .withTemperature(0.8);

var analyticalOptions = LlmOptions.withModel(OpenAiModels.GPT_4O_MINI)
    .withTemperature(0.2)
    .withTopP(0.9);
주요 메서드
withModel(String)withTemperature(Double)withTopP(Double)withTopK(Integer)withPersona(String)
3.8.2. PromptRunner
모든 LLM 호출은 PromptRunner 를 통해 이뤄져야 한다.
@Action
public Story createStory(UserInput input, OperationContext context) {
    var runner = context.ai().withDefaultLlm();

    var customRunner = context.ai().withLlm(
        LlmOptions.withModel(OpenAiModels.GPT_4O_MINI)
            .withTemperature(0.8)
    );

    return customRunner.createObject("Write a story about: " + input.getContent(), Story.class);
}
핵심 기능:
createObject(prompt, Class<T>): 타입이 맞지 않으면 예외 → 재시도 → 재계획createObjectIfPossible(...): 실패 시 null 반환 → 재계획 트리거generateText(...): 단순 텍스트 응답
툴 및 컨텍스트:
withToolGroup(String/ToolGroup)withToolObject(Object/ToolObject)withPromptContributor(PromptContributor)
LLM 설정:
withLlm(LlmOptions)withGenerateExamples(Boolean)
특정 타입에 대한 Fluent API도 제공한다.
3.9. Tools
툴은 LLM이 외부 행동을 수행할 수 있게 해주는 호출 가능한 메서드들이다.
- 에이전트 레벨 또는
PromptRunner레벨에서 툴 그룹/툴 객체를 지정할 수 있다. - 도메인 객체에
@Tool을 붙여 LLM이 해당 메서드를 호출할 수 있게 할 수 있다.
**툴 그룹 (ToolGroup)** 은 사용자 의도와 실제 툴 구현을 분리하는 간접 계층이다.
예시)
- “Brave를 써라 / Google을 써라"가 아니라,
- “WEB 툴을 써라"라고 요청하면 환경에 따라 다른 구현을 매핑할 수 있다.
@Action(toolGroups = {CoreToolGroups.WEB})처럼 선언하면, 해당 액션 실행 시 LLM은 웹 툴을 사용할 수 있게 된다.
3.10. 구조화된 프롬프트 요소 (Structured Prompt Elements)
Embabel은 프롬프트를 구조적으로 구성하기 위한 **PromptContributor** 모델을 제공한다.
- 직접 문자열을 만들어도 되지만,
- 여러 에이전트/액션에서 공통적으로 쓰이는 맥락을 **재사용**하고 싶다면 유용하다.
PromptContributor 인터페이스
contribution(): String을 구현해, 프롬프트에 추가될 텍스트를 제공한다.
LlmReference 는 PromptContributor 의 서브 인터페이스로,
프롬프트 내용 + @Tool 메서드를 함께 제공할 수 있다.
빌트인 유틸:
Persona: 에이전트 페르소나 정의
val persona = Persona.create(
    name = "Alex the Analyst",
    persona = "A detail-oriented data analyst with expertise in financial markets",
    voice = "Professional yet approachable, uses clear explanations",
    objective = "Help users understand complex financial data through clear analysis"
)
You are Alex the Analyst.
Your persona: A detail-oriented data analyst with expertise in financial markets.
Your objective is Help users understand complex financial data through clear analysis.
Your voice: Professional yet approachable, uses clear explanations.RoleGoalBackstory: Crew AI 스타일의 역할/목표/배경 정의
var agent = RoleGoalBackstory.withRole("Senior Software Engineer")
    .andGoal("Write clean, maintainable code")
    .andBackstory("10+ years experience in enterprise software development")
Role: Senior Software Engineer
Goal: Write clean, maintainable code
Backstory: 10+ years experience in enterprise software development직접 구현 예시
class CustomSystemPrompt(private val systemName: String) : PromptContributor {
    override fun contribution(): String {
        return "System: $systemName - Current time: ${LocalDateTime.now()}"
    }
}

class ConditionalPrompt(
    private val condition: () -> Boolean,
    private val trueContent: String,
    private val falseContent: String
) : PromptContributor {
    override fun contribution(): String {
        return if (condition()) trueContent else falseContent
    }
}
3.11. 템플릿 (Templates)
PromptRunner.withTemplate(String) 으로 Jinja 템플릿 기반 프롬프트를 사용할 수 있다.
3.12–3.14
- **AgentProcess** : 에이전트 실행 인스턴스, ID/상태/히스토리 등 관리
- **ProcessOptions** : 컨텍스트 ID, 블랙보드, 테스트 모드, 로깅 수준, 종료 정책, 딜레이 등 설정
- **AgentPlatform** : 특정 환경에서 에이전트를 실행하는 SPI. 다양한 구현 가능.
3.15. Embabel 에이전트 호출하기 (Invoking Embabel Agents)
대부분의 예제에서는 Embabel Shell을 통해 UserInput 기반으로 에이전트를 호출하지만, 프로그램 코드에서 타입 안전하게 직접 호출하는 것도 가능하다.
웹 애플리케이션에서는 보통 이 방식을 사용한다.
사용자 입력을 LLM에게 해석시키는 대신, 어떤 에이전트를 호출할지 코드가 결정하기 때문에 훨씬 결정적(deterministic) 이다.
3.15.1. 코드에서 AgentProcess 생성하기
AgentPlatform 을 통해 직접 에이전트 프로세스를 만들고 실행할 수 있다.
// 바인딩과 함께 프로세스 생성
val agentProcess = agentPlatform.createAgentProcess(
    agent = myAgent,
    processOptions = ProcessOptions(),
    bindings = mapOf("input" to userRequest)
)

// 비동기 시작 후 완료까지 기다림
val result = agentPlatform.start(agentProcess).get()

// 또는 동기 실행
val completedProcess = agentProcess.run()
val result = completedProcess.last<MyResultType>()
여러 입력 객체를 받아 자동으로 바인딩해주는 방식도 있다.
// 웹 컨트롤러에서 흔히 사용하는 방식
val agentProcess = agentPlatform.createAgentProcessFrom(
    agent = travelAgent,
    processOptions = ProcessOptions(),
    travelRequest,
    userPreferences
)
3.15.2. AgentInvocation 사용하기
AgentInvocation 은 고수준의 type-safety API 로, 결과 타입을 기반으로 적절한 에이전트를 자동으로 찾아 호출한다.
기본 사용법
// 결과 타입을 명시하여 호출
val invocation =
    AgentInvocation.create(agentPlatform, TravelPlan::class.java)

val plan = invocation.invoke(travelRequest)
name 기반 입력 전달
Map<String, Object> inputs = Map.of(
    "request", travelRequest,
    "preferences", userPreferences
);

TravelPlan plan = invocation.invoke(inputs);
실행 옵션 커스터마이징
verbosity(프롬프트/응답 표시 여부), 디버그 옵션 등 설정 가능:
val invocation =
    AgentInvocation.builder(agentPlatform)
        .options { options ->
            options.verbosity { v ->
                v.showPrompts(true)
                 .showResponses(true)
                 .debug(true)
            }
        }
        .build(TravelPlan::class.java)

val plan = invocation.invoke(travelRequest)
비동기 호출도 가능하다
CompletableFuture<TravelPlan> future = invocation.invokeAsync(travelRequest);

// 완료 시 처리
future.thenAccept(plan -> {
    logger.info("Travel plan generated: {}", plan);
});

// 또는 기다리기
TravelPlan plan = future.get();
AgentInvocation은 다음 기준으로 에이전트를 자동 선택한다.
- 플랫폼에 등록된 모든 에이전트 탐색
- 해당 에이전트가 생성하는 Goal의 결과 타입이 요청 타입과 일치하는지 확인
- 첫 번째로 일치하는 에이전트를 선택
- 없으면 오류 발생
실제 웹 애플리케이션 예시 (Tripper 여행 플래너)
다음은 htmx 기반 UI와 함께 async 에이전트를 호출하는 예시이다.
@Controller
class TripPlanningController(
    private val agentPlatform: AgentPlatform
) {

    private val activeJobs = ConcurrentHashMap<String, CompletableFuture<TripPlan>>()

    @PostMapping("/plan-trip")
    fun planTrip(
        @ModelAttribute tripRequest: TripRequest,
        model: Model
    ): String {
        val jobId = UUID.randomUUID().toString()

        val invocation = AgentInvocation.builder<TripPlan>(agentPlatform)
            .options { options ->
                options.verbosity { v ->
                    v.showPrompts(true)
                     .showResponses(false)
                     .debug(false)
                }
            }
            .build()

        val future = invocation.invokeAsync(tripRequest)
        activeJobs[jobId] = future

        future.whenComplete { result, throwable ->
            if (throwable != null) {
                logger.error("Trip planning failed for job $jobId", throwable)
            } else {
                logger.info("Trip planning completed for job $jobId")
            }
        }

        model.addAttribute("jobId", jobId)
        model.addAttribute("tripRequest", tripRequest)
        return "trip-planning-progress"
    }

    @GetMapping("/trip-status/{jobId}")
    @ResponseBody
    fun getTripStatus(@PathVariable jobId: String): ResponseEntity<Map<String, Any>> {
        val future = activeJobs[jobId]
            ?: return ResponseEntity.notFound().build()

        return when {
            future.isDone -> {
                try {
                    val tripPlan = future.get()
                    activeJobs.remove(jobId)

                    ResponseEntity.ok(mapOf(
                        "status" to "completed",
                        "result" to tripPlan,
                        "redirect" to "/trip-result/$jobId"
                    ))
                } catch (e: Exception) {
                    activeJobs.remove(jobId)
                    ResponseEntity.ok(mapOf(
                        "status" to "failed",
                        "error" to e.message
                    ))
                }
            }
            future.isCancelled -> {
                activeJobs.remove(jobId)
                ResponseEntity.ok(mapOf("status" to "cancelled"))
            }
            else -> {
                ResponseEntity.ok(mapOf(
                    "status" to "in_progress",
                    "message" to "Planning your amazing trip..."
                ))
            }
        }
    }
}
핵심 패턴
- 비동기 실행: invokeAsync() 로 웹 요청을 블로킹하지 않음
- 작업 관리: Future를 맵에 저장해 폴링(polling) 방식으로 상태 확인
- UI 통합: htmx로 프론트엔드에서 주기적으로 상태 갱신
- 에러 처리: 예외를 사용자에게 명확히 전달
- 리소스 정리: 완료된 작업을 메모리에서 제거
- ProcessOptions 활용: 프롬프트/응답/디버그 출력 제어
3.16. API vs SPI
Embabel은 API와 SPI를 명확하게 구분한다.
- API (Application Programming Interface)
- Embabel을 사용하는 개발자가 상호작용하는 공식 인터페이스 → 일반 앱 개발자가 사용하는 영역 (Action, Agent, AgentInvocation 등)
- SPI (Service Provider Interface)
- Embabel 내부 동작을 확장하거나 커스터마이징하려는 개발자를 위한 인터페이스 → 플랫폼 구현자, 고급 확장 기능, 사용자 정의 플래너 등을 만들 때 사용
즉,
- API는 에이전트를 “사용”하는 사람,
- SPI는 Embabel 자체를 “확장”하고 싶은 사람이 사용하는 영역이다.
이외에도
-
**Spring/Embabel 통합**
- Spring Boot + Spring AI 위에서 동작
- 기존 엔터프라이즈 인프라와 자연스럽게 연동
-
**LLM 선택 전략**
- 액션 단위로 LLM과 설정(temperature 등)을 달리 쓰도록 권장
- 가능한 작은/저렴한 LLM부터 시도하되, 복잡도에 따라 조정
3.21. 테스트
Embabel은 Spring처럼 **단위 테스트 + 통합 테스트** 를 모두 강하게 지원한다.
-
**단위 테스트**
FakePromptRunner,FakeOperationContext로 LLM 호출을 모킹- 프롬프트 내용, 하이퍼파라미터, 툴 그룹 등을 검증
- Mockito / mockk 사용 가능
-
**통합 테스트**
- 실제 AgentPlatform 환경에서 전체 플로우 테스트
- LLM 호출은 모킹하면서, DB/외부 시스템은 실제로 붙여볼 수도 있음
EmbabelMockitoIntegrationTest제공
핵심 패턴:
- 프롬프트에 도메인 데이터가 잘 포함되었는지 검증
- temperature, toolGroups, persona 등 설정이 의도대로인지 검증
- 여러 LLM 호출이 올바른 순서/개수로 이루어졌는지 확인
4. 설계 관점 (Design Considerations)
4.1. 도메인 객체
핵심은 "풍부한 도메인 모델"이다.
- 타입 안전성과 툴 노출 가능성 확보
- 행동(메서드)을 통해 비즈니스 로직 캡슐화
- 일부 메서드는
@Tool로 LLM 호출 허용
@Tool(description = "Build the project using the given command in the root")
fun build(command: String): String { ... }
도메인 객체는 JPA, JDBC, Spring Data 등 JVM 친화적인 기술로 저장할 수 있고, 이는 기존 애플리케이션과의 통합에 매우 유리하다.
4.3. LLM 혼합
- 기능을 잘게 나눈 액션 단위로,
각 액션에 맞는 LLM(크기/성능/비용/친환경성)을 선택하는 것이 좋다. - 어떤 액션은 작은 로컬 LLM,
어떤 액션은 강력한 클라우드 LLM을 사용할 수 있다.
Embabel은 이 멀티 LLM 구성을 **자연스럽고 타입 안전하게** 지원한다.
8. 플래닝 모듈 (Planning Module)
Embabel의 플래너는 A* 기반 GOAP(Goal-Oriented Action Planning) 를 사용한다.
A* Search와 관련된 자세한 내용은 Agent 관련 글을 보자.