목차 :
- @Repository
- @Service
- @Controller
- @Controller vs @RestController
- @Resource
- @RequestMapping
- HttpServletRequest
- 파라미터
- spring jackson
##@Repository
- @Repository : 외부I/O 처리(퍼시스턴스 레이어, DB나 파일같은 외부 I/O 작업을 처리함)
- 어노테이션을 붙이면 핸들러가 스캔할 수 있는 빈(Bean) 객체가 되어 서블릿용 컨테이너에 생성됩니다.
사용 예시
@Repository("userDAO")
public class UserDAO {-
DB처리를 할 DAO 클래스를 작성한 뒤, @Repository 어노테이션을 붙여줍니다.
-
확실하게 하고 싶으면 괄호안에 Bean ID에 해당하는 이름을 붙여줘도 됩니다.
루트 컨테이너의 객체는 어디서든 공유가능하기 때문에, 아래와 같이 자동 의존성 주입(DI) 어노테이션을 이용해 객체를 받아올 수 있습니다.
##@Service
-
@Service : 로직 처리(서비스 레이어, 내부에서 자바 로직을 처리함)
-
어노테이션을 붙이면 핸들러가 스캔할 수 있는 빈(Bean) 객체가 되어 서블릿용 컨테이너에 생성됩니다.
##@Controller
- @Controller : 컨트롤러(프레젠테이션 레이어, 웹 요청과 응답을 처리함)
- 어노테이션을 붙이면 servlet-context.xml에서 이것을 인식하여 컨트롤러로 등록함.
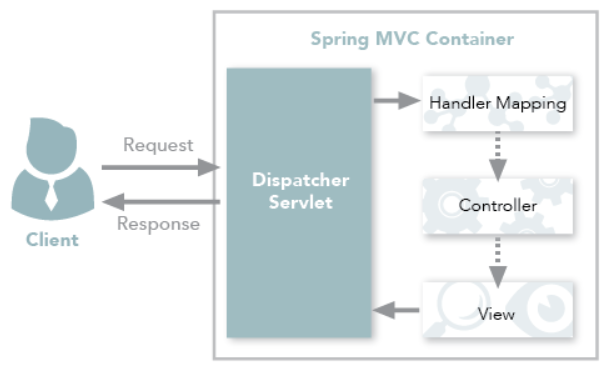
- @Controller는 View 또는 Data를 반환
@Controller가 View를 반환할 떄
출처 : https://dejavuhyo.github.io/posts/spring-boot-json-response/
- Client는 URI 형식으로 웹 서비스에 요청을 보낸다.
- Mapping되는 Handler와 그 Type을 찾는 DispatcherServlet이 요청을 인터셉트한다.
- Controller가 요청을 처리한 후에 응답을 DispatcherServlet으로 반환하고, DispatcherServlet은 View를 사용자에게 반환한다.
@Controller가 View를 반환하기 위해서는 ViewResolver가 사용되며, ViewResolver 설정에 맞게 View를 찾아 렌더링합니다.
##@Controller vs @RestController
1.@Controller
Spring MVC의 컨트롤러에서도 Data를 반환해야 하는 경우
- @ResponseBody 어노테이션을 활용-> Controller도 Json 형태로 데이터 반환 가능
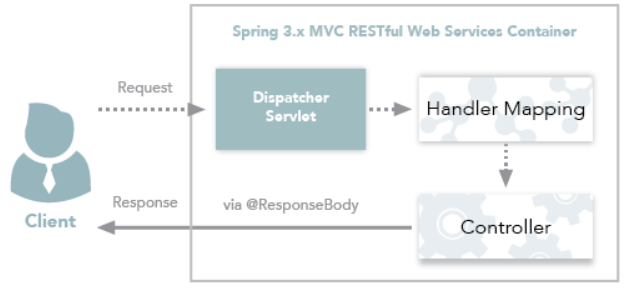
1) Client는 URI 형식으로 웹 서비스에 요청을 보낸다.
2) Mapping되는 Handler와 그 Type을 찾는 DispatcherServlet이 요청을 인터셉트한다
3) @ResponseBody를 사용하여 Client에게 Json 형태로 데이터를 반환한다.
예제
import com.mang.blog.application.user.model.UserVO;
import com.mang.blog.application.user.service.UserService;
import org.springframework.stereotype.Controller;
import org.springframework.ui.Model;
import org.springframework.web.bind.annotation.RequestBody;
import org.springframework.web.bind.annotation.GetMapping;
import org.springframework.web.bind.annotation.PostMapping;
import org.springframework.web.bind.annotation.RequestMethod;
import org.springframework.web.bind.annotation.ResponseBody;

import javax.annotation.Resource;

@Controller
@RequestMapping("/user")
public class UserController {

    @Resource(name = "userService")
    private UserService userService;

    @PostMapping(value = "/retrieveUserInfo")
    public @ResponseBody UserVO retrieveUserInfo(@RequestBody UserVO userVO){
        return userService.retrieveUserInfo(userVO);
    }

    @GetMapping(value = "/userInfoView")
    public String userInfoView(Model model, @RequestParam(value = "userName", required = true) String userName){
        UserVO userVO = userService.retrieveUserInfo(userName);
        model.addAttribute("userInfo", userVO);
        return "/user/userInfoView";
    }

}
retrieveUserInfo는 UserVO라는 데이터를 반환하고자 하고 있고, UserVO를 json으로 반환하기 위해 @ResponseBody라는 어노테이션을 붙여주고 있다.
userInfoView 함수에서는 View를 전달해주고 있기 때문에 String을 반환값으로 설정해주었다.
2.@RestController
@RestController는 Spring MVC Controlle에 @ResponseBody가 추가된 것이다.
RestController의 주용도는 Json 형태로 객체 데이터를 반환하는 것이다.
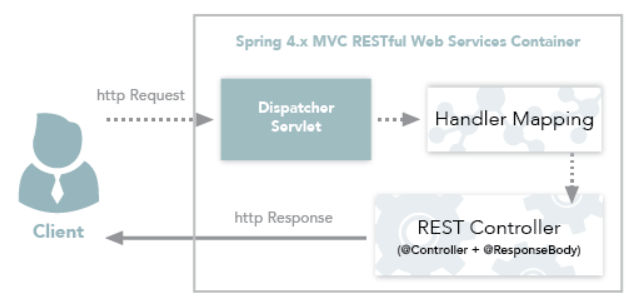
1) Client는 URI 형식으로 웹 서비스에 요청을 보낸다.
2) Mapping되는 Handler와 그 Type을 찾는 DispatcherServlet이 요청을 인터셉트한다.
3) RestController는 해당 요청을 처리하고 데이터를 반환한다.
예제
import com.mang.blog.application.user.model.UserVO;
import com.mang.blog.application.user.service.UserService;
import org.springframework.http.HttpStatus;
import org.springframework.http.ResponseEntity;
import org.springframework.web.bind.annotation.RequestBody;
import org.springframework.web.bind.annotation.RequestMapping;
import org.springframework.web.bind.annotation.RequestMethod;
import org.springframework.web.bind.annotation.RestController;

import javax.annotation.Resource;

@RestController
@RequestMapping("/user")
public class UserController {

    @Resource(name = "userService")
    private UserService userService;

    @PostMapping(value = "/retrieveUserInfo1")
    public UserVO retrieveUserInfo1(@RequestBody UserVO userVO){
        return userService.retrieveUserInfo(userVO);
    }

    @PostMapping(value = "/retrieveUserInfo2")
    public ResponseEntity<UserVO> retrieveUserInfo2(@RequestParam(value = "userName", required = true) String userName){
        userVO = userService.retrieveUserInfo(userName);

        if(userVO == null){
            return new ResponseEntity<>(HttpStatus.NOT_FOUND);
        }

        return new ResponseEntity<>(userVO, HttpStatus.OK);
    }

    @PostMapping(value = "/retrieveUserInfo3")
    public ResponseEntity<UserVO> retrieveUserInfo3(@RequestParam(value = "userName", required = true) String userName){
        return Optional.ofNullable(userService.retrieveUserInfo(userName))
                .map(userVO -> new ResponseEntity<>(userVO, HttpStatus.OK))
                .orElse(new ResponseEntity<>(HttpStatus.NOT_FOUND));
    }
}
retrieveUserInfo1의 메소드는 UserVO를 그대로 반환하고 있습니다.
하지만 이렇게 처리하는 것 보다 retrieveUserInfo2처럼 결과 데이터와 상태코드를 함께 제어하여 반환하는 것이 좋습니다.
만약 userService에서 반환하는 형태가 Optional이라면 retrieveUserInfo3 처럼 깔끔하게 처리를 해줄 수 있습니다.
##@Resource
자동 의존성 주입 어노테이션
- @Resource
- @Inject
- @Autowired
@Resource : 주입하려고 하는 객체의 이름(id)이 일치하는 객체를 자동으로 주입한다.
1) 의존성 설정
<dependency>
        <groupId>javax.annotation</groupId>
    <artifactId>javax.annotation-api</artifactId>
    <version>1.3.2</version>
</dependency>- 프로젝트에서 사용하기 위해 javax.annotation-api 의존성을 추가한다.
2) @Resource - 필드 주입
@Resource(name="userDAO")
private UserDAO dao;
##@RequestMapping
- 스프링은 HandlerMppaing에 의해 컨트롤러가 결정된다. 이 컨트롤러에서 HandlerAdapter에 의해 실행 메서드가 결정되는 데 @RequestMapping 어노테이션이 그 정보를 제공해 준다.
@RequestMapping(value="/first", method = RequestMethod.GET, consumes = {}, produces={"application/json;charset=UTF-8"})Consumes : 수신 하고자하는 데이터 포맷을 정의한다.
Produces : 출력하고자 하는 데이터 포맷을 정의한다.
#Content-Type 의 종류.
1) Multipart Related MIME 타입
- Content-Type: Multipart/related <-- 기본형태
- Content-Type: Application/X-FixedRecord
2) XML Media의 타입
- Content-Type: text/xml
- Content-Type: Application/xml
- Content-Type: Application/xml-external-parsed-entity
- Content-Type: Application/xml-dtd
- Content-Type: Application/mathtml+xml
- Content-Type: Application/xslt+xml
3) Application의 타입
- Content-Type: Application/EDI-X12 <-- Defined in RFC 1767
- Content-Type: Application/EDIFACT <-- Defined in RFC 1767
- Content-Type: Application/javascript <-- Defined in RFC 4329
- Content-Type: Application/octet-stream : <-- 디폴트 미디어 타입은 운영체제 종종 실행파일, 다운로드를 의미
- Content-Type: Application/ogg <-- Defined in RFC 3534
- Content-Type: Application/x-shockwave-flash <-- Adobe Flash files
- Content-Type: Application/json <-- JavaScript Object Notation JSON; Defined in RFC 4627
- Content-Type: Application/x-www-form-urlencode <-- HTML Form 형태
* x-www-form-urlencode와 multipart/form-data은 둘다 폼 형태이지만 x-www-form-urlencode은 대용량 바이너리 테이터를 전송하기에 비능률적이기 때문에 대부분 첨부파일은 multipart/form-data를 사용하게 된다.
4) 오디오 타입
- Content-Type: audio/mpeg <-- MP3 or other MPEG audio
- Content-Type: audio/x-ms-wma <-- Windows Media Audio;
- Content-Type: audio/vnd.rn-realaudio <-- RealAudio; 등등
5) Multipart 타입
- Content-Type: multipart/mixed: MIME E-mail;
- Content-Type: multipart/alternative: MIME E-mail;
- Content-Type: multipart/related: MIME E-mail <-- Defined in RFC 2387 and used by MHTML(HTML mail)
- Content-Type: multipart/formed-data <-- 파일 첨부
6) file 타입
- Content-Type: application/msword <-- doc
- Content-Type: application/pdf <-- pdf
- Content-Type: application/vnd.ms-excel <-- xls
- Content-Type: application/x-javascript <-- js
- Content-Type: application/zip <-- zip
- Content-Type: image/jpeg <-- jpeg, jpg, jpe
- Content-Type: text/css <-- css
- Content-Type: text/html <-- html, htm
- Content-Type: text/plain <-- txt
- Content-Type: text/xml <-- xml
- Content-Type: text/xsl <-- xsl
##HttpServletRequest
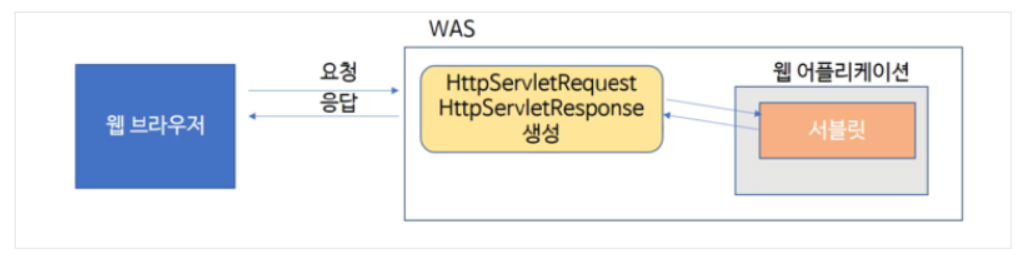
출처 : https://zester7.tistory.com/33
WAS가 웹브라우져로부터 Servlet요청을 받으면
- 요청을 받을 때 전달 받은 정보를 HttpServletRequest객체를 생성하여 저장
- 웹브라우져에게 응답을 돌려줄 HttpServletResponse객체를 생성(빈 객체)
- 생성된 HttpServletRequest(정보가 저장된)와 HttpServletResponse(비어 있는)를 Servlet에게 전달
HttpServletRequest
- Http프로토콜의 request 정보를 서블릿에게 전달하기 위한 목적으로 사용
- Header정보, Parameter, Cookie, URI, URL 등의 정보를 읽어들이는 메소드를 가진 클래스
- Body의 Stream을 읽어들이는 메소드를 가지고 있음
HttpServletResponse
- Servlet은 HttpServletResponse객체에 Content Type, 응답코드, 응답 메시지등을 담아서 전송함
#HttpServletRequest
-
원하는 데이터를 꺼낼때는 HttpServletRequest객체안에 메소드를 이용
-
//getParameter() : 반환타입 String
String id = httpServletRequest.getParameter("id");
예시
@Controller
public class HomeController{
    @RequestMapping("/ex")
    public String ex1(HttpServletRequest httpServletRequest, Model model){
        String id = httpServletRequest.getParameter("id");
        String pwd = httpServletRequest.getParameter("pwd");
        model.addAttribute("id",id);
        model.addAttribute("pwd",pwd);
        return "/ex";
    }
}- id와 pwd를 HttpServletRequest 객체를 통해 받아오고,
- Model 객체를 이용해서 뷰로 값을 넘긴다.
##파라미터
#@RequestParam
-
GET방식으로 넘어온 URI의 queryString을 받기에 적절
-
@RequestParam로 값을 받아올 수 있다. -> 메소드의 파라미터값으로 @RequestParam을 넣어주면 된다.
@Controller
public class HomeController{
    @RequestMapping("/ex")
    public String ex1(@RequestParam("id") String id, @RequestParam("pwd") String pwd, Model model){
        model.addAttribute("id",id);
        model.addAttribute("pwd",pwd);
        return "/ex";
    }
}- 주소창에 ".../ex?id={id값}&pwd={pwd값}"을 준다.
#@PathVariable
- @PathVariable의 경우 url에서 각 구분자에 들어오는 값을 처리해야 할 때 사용합니다.
@Controller
public class HomeController{
@PostMapping("/ex/{id}")
public String ex1(@PathVariable("id") String id) {
	return "/ex";
}- 주소창에 ".../ex/{id값}"을 준다.
#@ResponseBody
- http요청의 body 부분을 java 객체로 받을 수 있게 해주는 어노테이션. 주로 json을 받을 때 활용한다.
@RestController
public class HomeController
{
    // HTTP 요청의 내용을 Member 객체에 매핑하기위해 @RequestBody 애너테이션을 설정한다.
    @postMapping(value="/member/login")
    public MemberDto login(@RequestBody Member member)
    {
    	MemberDto memberDto = memberService.login(member);
    	return memberDto;
    }
}
##spring jackson
Jackson은JSON데이터 구조를 처리해주는 라이브러리
#Jackson은 어떻게 동작하는가?
Spring3.0 이후로 컨트롤러의 리턴 방식이 @RequestBody형식이라면, Spring은 MessageConverter API 를 통해, 컨트롤러가 리턴하는 객체를 *후킹 할 수 있다.
**후킹
: 운영 체제나 응용 소프트웨어 등의 각종 컴퓨터 프로그램에서 소프트웨어 구성 요소 간에 발생하는 함수 호출, 메시지, 이벤트 등을 중간에서 바꾸거나 가로채는 명령, 방법, 기술이나 행위를 말한다.
Jackson은 JSON데이터를 출력하기 위한 MappingJacksonHttpMessageConverter를 제공한다.
만약 우리가 스프링 MessageConverter를 위의 MappingJacksonHttpMessageConverter으로 등록한다면, 컨트롤러가 리턴하는 객체를 다시 뜯어(자바 리플렉션 사용), Jackson의 ObjectMapper API로 JSON 객체를 만들고 난 후, 출력하여 JSON데이터를 완성한다.
Spring 3.1 이후로 만약 클래스패스에 Jackson 라이브러리가 존재한다면, ( 쉽게 말해Jackson을 설치했느냐 안했느냐 ) 자동적으로 MessageConverter가 등록되어 아래처럼 사용할 수 있다.
@RequestMapping("/json")
@ResponseBody()
public Object printJSON() {
    Person person = new Person("Mommoo", "Developer");
    return person;
}- 이제는 그냥 데이터 인스턴스만 리턴 하더라도
JSON데이터가 출력된다.
컨트롤러가 리턴 -> MessageConverter API 를 통해, 컨트롤러가 리턴하는 객체를 후킹(가로챔) -> Jackson은 JSON 데이터를 출력하기 위한 MappingJacksonHttpMessageConverter제공 -> Jackson의 ObjectMapper API로 JSON 객체를 만들고 난 후, 출력
#Jackson을 사용하기 위해 알아야 하는 기본지식
Jackson은 기본적으로 프로퍼티로 동작
Java는 프로퍼티를 제공하는 문법이 없다. (멤버변수랑은 다름)
Java의 프로퍼티는 보통 Getter와 Setter의 이름 명명 규칙으로 정해진다.
Person 같은 경우는 Getter만 존재 하므로, Getter를 기준으로 프로퍼티를 도출 할 수 있다. 즉 Name 과 Job이 Person 프로퍼티입니다.
Person의 멤버변수 이름도 똑같이 name, job이지만, 프로퍼티는 Getter, Setter기준이므로 멤버변수 이름을 변경하더라도 상관 없다.
Jackson 라이브러리도 JSON 데이터로 출력되기 위해서는 멤버변수의 유무가 아닌 프로퍼티 즉, Getter, Setter를 기준으로 작동한다.
예로 아래와 같이 코딩하더라도 전혀 문제가 없습니다.
public class Person {
    public String getName() {
        return "Mommoo";
    }

    public String getJob() {
        return "Developer";
    }
}

@RequestMapping("/json")
@ResponseBody()
public Object printJSON() {
    return new Person();
}- 결론적으로 Jackson을 사용한다면, Getter에 신경써야 한다.