##Dispatcher-Servlet
1.개념
: 클라이언트로부터 어떠한 요청이 오면 Tomcat(톰캣)과 같은 서블릿컨테이너가 요청을 받는데, 이때 제일 앞에서 서버로 들어오는 모든 요청을 처리하는 *프론트 컨트롤러를 Spring에서 정의하였고, 이를 Dispatcher-Servlet이라고 한다.
-
공통처리 작업을 Dispatcher 서블릿이 처리한 후, 적절한 세부 컨트롤러로 작업을 위임해준다.
-
Dispatcher-Servlet이 처리하는 url 패턴을 지정해주어야 하는데 일반적으로는 /*.do와 같은 /로 시작하며 .do로 끝나는 url 패턴에 대해서 처리하라고 지정해준다.
**프론트 컨트롤러(Front Controller)
-
프론트 컨트롤러는 주로 서블릿 컨테이너의 제일 앞에서 서버로 들어오는 클라이언트의 모든 요청을 받아서 처리해주는 컨트롤러이다.
-
MVC 구조에서 함께 사용되는 패턴이다.
2.Dispatcher-Servlet의 장점
-
Spring MVC에서 web.xml의 역할을 축소시켜주었습니다.
-
기존에는 모든 서블릿에 대해 URL 매핑을 활용하기 위해서 web.xml에 모두 등록해주어야 했지만, dispatcher-servlet이 해당 어플리케이션으로 들어오는 모든 요청을 핸들링해주면서 작업을 상당히 편리하게 할 수 있게 되었습니다.
3.Dispatcher-Servlet의 흐름
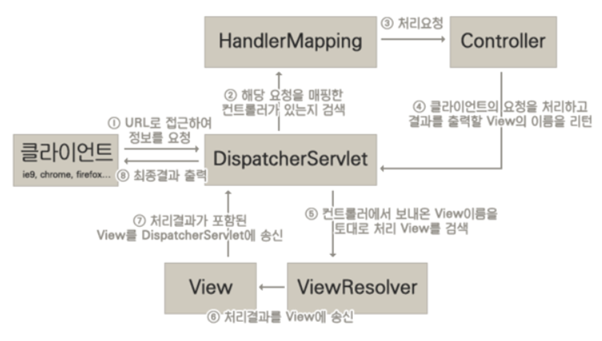
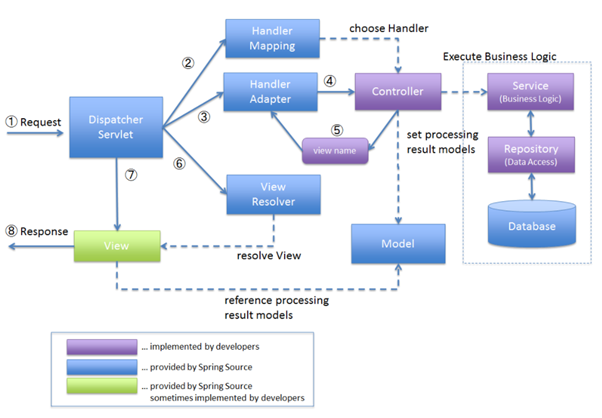
- 클라이언트로부터의 요청을 받으면 > DispatcherServlet에서
HandlerMapping을 통해 Controller로 위임 처리 > 위임 처리 받은 Controller는 비즈니스 로직을 처리 후 > ViewResolver를 통해 View로 데이터를 전달하게 해줍니다.
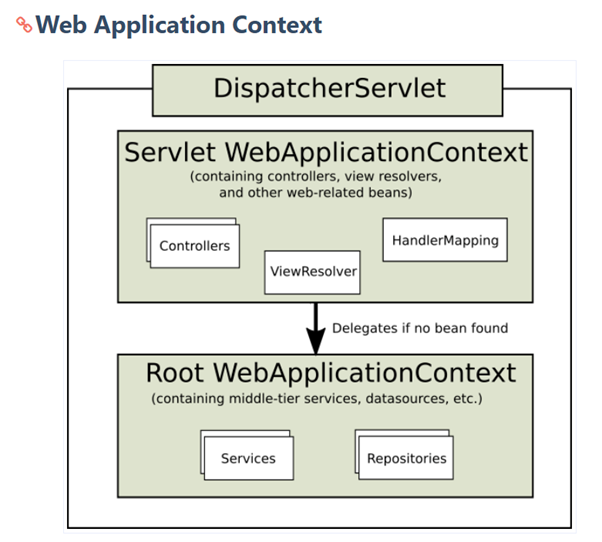
##Application Context
- Web Application 최상단에 위치하고 있는 Context
- 서로 다른 Servlet-Context에서 공유해야하는 Bean들을 등록해놓고 사용할 수 있다.
- 웹 애플리케이션 전체에 적용 가능한 프로퍼티, DB 연결, 로깅 기능 등에 이용한다.
- 특정 Servlet설정과 관계 없는 설정을 한다 (@Service, @Repository, @Configuration, @Component)
- Servlet Context에 동일한 Bean이 있을 경우 Servlet Context Bean이 우선된다.
- 하나의 컨텍스트에 정의된 AOP 설정은 다른 컨텍스트의 Bean에는 영향을 미치지 않는다.
- Application Context에 정의된 Bean은 Servlet Context에 정의 된 Bean을 사용할 수 없다.
##Servlet-Context (servlet-context.xml)
- Servlet 단위로 생성되는 context
- Spring에서 servlet-context.xml 파일은 DispatcherServlet 생성 시에 필요한 설정 정보를 담은 파일 (Interceptor, Bean생성, ViewResolver등..)
- URL설정이 있는 Bean을 생성 (@Controller, Interceptor)
- Application Context를 자신의 부모 Context로 사용한다.
- Application Context와 Servlet Context에 같은 id로 된 Bean이 등록 되는 경우, Servlet Context에 선언된 Bean을 사용한다.
- Bean 찾는 순서
- Servlet Context에서 먼저 찾는다.
- 만약 Servlet Context에서 bean을 못찾는 경우 Application Context에 정의된 bean을 찾는다.
- Servlet Context에 정의된 Bean은 Application Context의 Bean을 사용할 수 있다.
##web.xml 설정
1.web.xml 이란
-
서블릿 클래스는 JSP 페이지와 달리 설치뿐만 아니라 등록을 하는 과정을 필요로 한다. 여기서 서블릿 클래스를 등록하는 곳의 이름을
Web application deployment descriptor라고 하는데 (줄여서 DD-Deployment Descriptor) 이 역할을 하는 것이 바로web.xml이다. -
web.xml파일은 웹 애플리케이션 디렉터리마다 딱 하나씩만 존재할 수 있다. -
DD는 WAS 구동 시
/WEB-INF디렉토리에 존재하는web.xml을 읽어 웹 애플리케이션의 설정을 구성하기 위해 존재한다.
<?xml version="1.0" encoding="UTF-8"?>
<web-app version="2.5" xmlns="http://java.sun.com/xml/ns/javaee"
      xmlns:xsi="http://www.w3.org/2001/XMLSchema-instance"
      xsi:schemaLocation="http://java.sun.com/xml/ns/javaee http://java.sun.com/xml/ns/javaee/web-app_2_5.xsd">
 <!-- The definition of the Root Spring Container shared by all Servlets and Filters -->
      <!-- applicationContext.xml에서 설정한 Bean은 모든 서블릿, 필터에서 공유 -->
      <context-param>
            <param-name>contextConfigLocation</param-name>
            <param-value>/WEB-INF/spring/applicationContext.xml</param-value>
      </context-param>

      <!-- Creates the Spring Container shared by all Servlets and Filters -->
      <!-- 서블릿과 필터에 공유 할 수 있도록 리스너를 설정 -->
      <listener>
          <listener-class>
              org.springframework.web.context.ContextLoaderListener
          </listener-class>
      </listener>

      <!-- Processes application requests -->
      <servlet>
          <servlet-name>dispatcherServlet</servlet-name>
          <servlet-class>org.springframework.web.servlet.DispatcherServlet</servlet-class>
          <init-param>
              <param-name>contextConfigLocation</param-name>
              <param-value>
                  <!-- dispatcherServlet 생성 시, 서블릿 설정파일 로드 -->
                  /WEB-INF/spring/appServlet/servlet-context.xml
              </param-value>
          </init-param>
          <load-on-startup>1</load-on-startup>
      </servlet>

    <!-- dispatcherServlet 대한 url-pattern을 정의
        /로 들어오는 모든 요청은 DispatcherServlet에서 처리 -->
      <servlet-mapping>
            <servlet-name>dispatcherServlet</servlet-name>
            <url-pattern>/</url-pattern>
      </servlet-mapping>
</web-app>
##Context 설정은 어떻게 쓸까?
- Application Context
- 공통 기능을 할 수 있는 Bean설정 (Datasource, Service 등..)
- 각 Servlet에서 공유할 수 있는 Bean
- Servlet Context
- Servlet 구성에 필요한 Bean 설정 (Controller, Interceptor, MappingHandler등..)
1.Component Scan 사용시 컨텍스트 설정 방법
ApplicationContext.xml
<context:component-scan base-package="egovframework">
	<context:include-filter type="annotation" expression="org.springframework.stereotype.Service"/>			 	<context:include-filter type="annotation" expression="org.springframework.stereotype.Repository"/>       	<context:exclude-filter type="annotation" expression="org.springframework.stereotype.Controller"/>
</context:component-scan>
- Service와 Repository는 Include
- Controller는 Exclude
Servlet-Context.xml
<context:component-scan base-package="egovframework">
	<context:include-filter type="annotation" expression="org.springframework.stereotype.Controller"/>			<context:exclude-filter type="annotation" expression="org.springframework.stereotype.Service"/> 			<context:exclude-filter type="annotation" expression="org.springframework.stereotype.Repository"/>
</context:component-scan>-
Controller는 Include 한다
-
Service와 Repository는 Exclude
/*
2.위와같은 컨텍스트 설정 이유
- 이유 : 스프링이
Transaction을 적용하기 위해서이다.
스프링 트랜잭션은 AOP를 이용해서 해당 빈의 proxy를 만들어서 tx가 적용되는 bean을 바꿔치기 한다. 그러면 원래 @Service(또는 @Transactional) 어노테이션이 붙은 빈은 뒤로 숨고 tx가 적용된 proxy bean이 @Service가 붙은 bean으로 대치된다.
만약 Application Context와 Servlet Context가 모든 stereotype의 컴포넌트를 풀 스캔 할 경우, tx 설정은 Application Context에만 적용되어 있기 때문에 Application Context의 @Service는 트랜잭션이 적용이 되지만 Servlet Context의 @Service는 트랜잭션이 적용이 안된다.
Bean 객체는 Servlet Context가 우선되므로 @Controller가 동작하여 같은 context(Servlet Context)안에서 검색을 하고, @Service가 지정된 bean이 있으므로 이 bean을 사용한다. 이 @Service가 지정된 bean은 트랜잭션 적용이 안 되어 있어 트랜잭션 처리가 안된다.
core가 되는 프로젝트는 applicationContext에서 component-scan을 통해 bean을 생성 하고 있었고
각 endpoint가 되는 프로젝트내의 패키지는 모두 servlet-context에서 component-scan을 하고 있었다.
*/
##Interceptor
- Spring에서는 Interceptor라는 기능을 제공
- 이 Interceptor를 통해서 dispatcher로 들어온 요청들을 가로챈다음 특정 작업을 진행할 수 있게 도와준다.
- 이를 통해서 요청의 전,후 처리가 가능
#Filter와 Interceptor의 차이
-
호출 시점
- Filter는 DispatcherServlet이 실행되기 전 , Interceptor는 DispatcherServlet이 실행된 후
-
설정 위치
- Filter는 web.xml , Interceptor는 spring-servlet.xml
-
구현 방식
- Filter는 web.xml에서 설정을 하면 구현이 가능하지만, Interceptor는 설정은 물론 메서드 구현이 필요합니다.
#Interceptor를 구현
- 구현방법 2가지
- HandlerInterceptor 인터페이스를 구현
- HandlerInterceptorAdapter 클래스를 상속 받는다.
1.HandlerInterceptor 인터페이스 구현
public class MyInterceptor implements HandlerInterceptor{
	// controller로 보내기 전에 처리하는 인터셉터
	// 반환이 false라면 controller로 요청을 안함
	// 매개변수 Object는 핸들러 정보를 의미한다. ( RequestMapping , DefaultServletHandler )
	@Override
	public boolean preHandle(
			HttpServletRequest request, HttpServletResponse response,
			Object obj) throws Exception {

		System.out.println("MyInterCeptor - preHandle");
		return false;
	}

	// controller의 handler가 끝나면 처리됨
	@Override
	public void postHandle(
			HttpServletRequest request, HttpServletResponse response,
			Object obj, ModelAndView mav)
			throws Exception {
	}

	// view까지 처리가 끝난 후에 처리됨
	@Override
	public void afterCompletion(
			HttpServletRequest request, HttpServletResponse response,
			Object obj, Exception e)
			throws Exception {
	}
}-
preHandle() : 컨트롤러가 호출되기 전에 실행됩니다.
- 매개변수 obj는 Dispatcher의 HandlerMapping 이 찾아준 컨트롤러의 메서드를 참조할 수 있는 HandlerMethod 객체입니다.
-
postHandle() : 컨트롤러가 실행된 후에 호출됩니다.
-
afterComplete() : 뷰에서 최종 결과가 생성하는 일을 포함한 모든 일이 완료 되었을 때 실행됩니다.
-
각 메서드의 반환값이 true이면 핸들러의 다음 체인이 실행되지만 false이면 중단하고 남은 인터셉터와 컨트롤러가 실행되지 않습니다.
2.HandlerInterceptorAdapter 클래스를 상속 받아 구현
public class MyInterceptor extends HandlerInterceptorAdapter {
	@Override
	public boolean preHandle(
			HttpServletRequest request, HttpServletResponse response,
			Object obj) throws Exception {

		System.out.println("MyInterCeptor - preHandle");
		return true;
	}
}- HandlerInterceptorAdapter 클래스를 상속 받으면, postHandle() , afterCompletion() 메서드가 구현되어 있으므로 필요한 메서드만 오버라이딩 하면 됩니다.
##Resource Handler
- Image, JS, CSS HTML 과 같은 정적 리소스를 처리하는 Handler이다.
- 모든 톰캣에는 이러한 정적 리소스를 처리할 수 있는 DefaultServlet이 등록 되어있다.
- 프로젝트를 생성하고 아무 설정을 하지 않더라도 Resource 요청을 하면 동작이 된다.
- 특정 요청에 대한 Resource를 Control할 필요가 있다면 Resource Handler를 정의해서 Config에 등록해줘야한다.
- Spring 은 DefaultServlet에 요청을 '위임' 해서 이러한 Resource 요청을 처리하는것이다.
1.ResourceHandler 설정방법
1)설정
@Configuration
public class WebConfig implements WebMvcConfigurer {

    @Override
    public void addResourceHandlers(ResourceHandlerRegistry registry) {
        registry.addResourceHandler("/mobile/**")
                .addResourceLocations("classpath:/mobile/")
                .setCacheControl(CacheControl.maxAge(10, TimeUnit.MINUTES));
    }
}-
WebMvcConfigurer를 구현하고
addResourceHandlers메소드를 오버라이딩 합니다. 그후 registry를 이용해 핸들러를 등록하면 됩니다. -
addResourceHandler()
- addResourceHandler에는 사용자의 요청을 Resource로 맵핑할 경로를 적어주면 됩니다. 위 예제는 /mobile/ 이하로 오는 모든 요청을 resourceHandler에서 처리하겠다는 의미입니다.
-
addResourceLocations()
- 이 메소드는 요청에 맵핑될 정적자원들의 위치를 지정하는 메소드입니다.
-
setCacheControl()
- 정적자원에 대한 캐싱관련 설정을 위한 메소드입니다. 위 예제는 10분간 캐싱을 한다는 의미 입니다.
2) 파일 경로
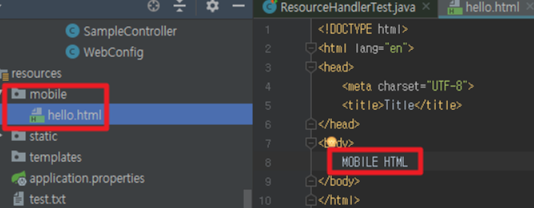
- 설정한 경로에 파일을 생성
##viewResolver
- ViewResolver는 사용자가 요청한 것에 대한 응답 view를 렌더링하는 역할을 합니다. (view 이름으로부터 사용될 view 객체를 맵핑하는 역할)
- DispatcherServlet에 별도의 ViewResolver를 등록하지 않는다면, DispatcherServlet에 등록되어있는
InternalResourceViewResolver를 사용합니다.
1.InternalResourceViewResolver
Default(기본) 뷰 리졸버. JSP를 뷰로 사용할 때 쓰인다.
설정
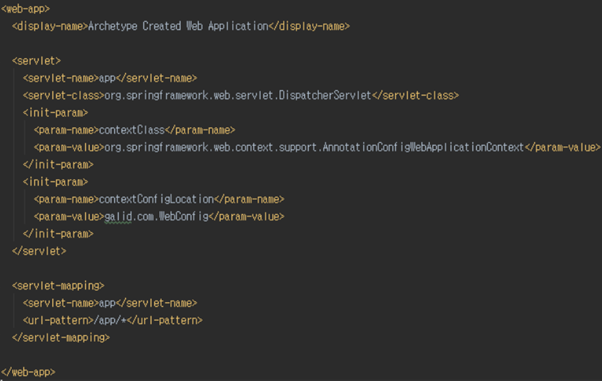
- web.xml
-
WebConfig Class

WebConfig파일에는 아무런 설정이 되어있지 않습니다.
-
HelloController Class
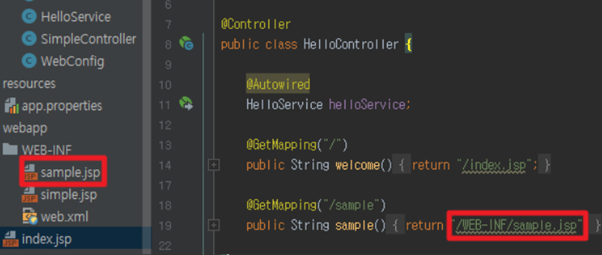
-
Controller class의 Handler 메소드에는 응답할 view의 전체 경로 및 확장자를 포함하도록 했습니다.
-
또한 view파일은 WEB-INF 디렉토리 하위에 위치하도록 했습니다.
-