대망으로 라이브러리 도움 없이 Drag and Drop이 지원되는 TODO 리스트를 만들어 보자!
지난 포스트에 이어서 React에 Vanilla 스크립트를 붙여서 기능을 구현해봤다.
작업 후기에 대해 먼저 나누자면,,
왠만하면 라이브러리를 통해서 기능을 구현하자...
React의 DOM 조작과 Vanilla의 DOM 조작이 생각보다 잘 충돌이 되어서 너무 골치가 아팠다..
처음부터 Vanilla로 할껄 ㅠㅠㅠ 😭
생각치 못한 이슈들이 계속 발생되었고 이를 깔끔하게 처리하기 너무 어려웠다.
라이브러리 제작자분들이 진짜 리스빽한다..
그래도 어느정도 만족스로운 결과물을 만들어서 겨우 마무리 짓기로 했다.
동작의 큰 흐름을 살펴보면 아래와 같이 정리가 될 것 같다.
- 마크업 선언 및 document에 이벤트 등록
- drag시
- drag된 element를 클론하여
ghost를 생성하고 기존 element에placeholder적용한다.- move시
- 커서에 따라
ghost가 움직이도록 한다.- drop이 가능한 새로운 보드에 도착시
placeholder를 해당 보드 끝에 이동시킨다.- item에 이동시 상황에 따라
placeholder와item들의 위치를transform한다.- drop시
ghost를placeholder자리로 되돌아가도록하고 제거한다.sourcedestination정보를 callback으로 전달해주고 상태를 변경시킨다.
마크업 및 이벤트 등록
모바일 기기에서도 터치 드래그가 가능하도록 세팅하고 useEffect에 등록한다.
코드가 좀 길어서 과감하게 넘어가도록 하자.
TodoExample.tsx
import { Dispatch, SetStateAction, useEffect, useState } from 'react';
import registDND from './TodoExample.drag';
export type TItemStatus = 'todo' | 'doing';
export type TItem = {
id: string;
status: TItemStatus;
title: string;
index: number;
};
export type TItems = {
[key in TItemStatus]: TItem[];
};
export default function TodoExample() {
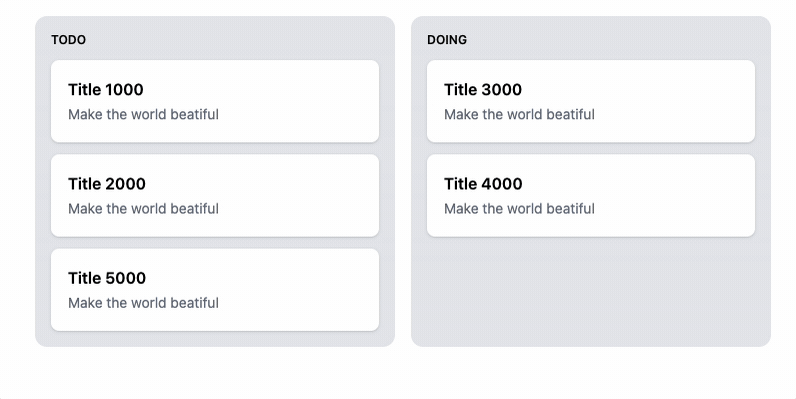
const [items, setItems] = useState<TItems>({
todo: [...Array(5)].map((_, i) => ({
id: `${i}${i}${i}`,
title: `Title ${i + 1}000`,
status: 'todo',
index: i,
})),
doing: [],
});
useEffect(() => {
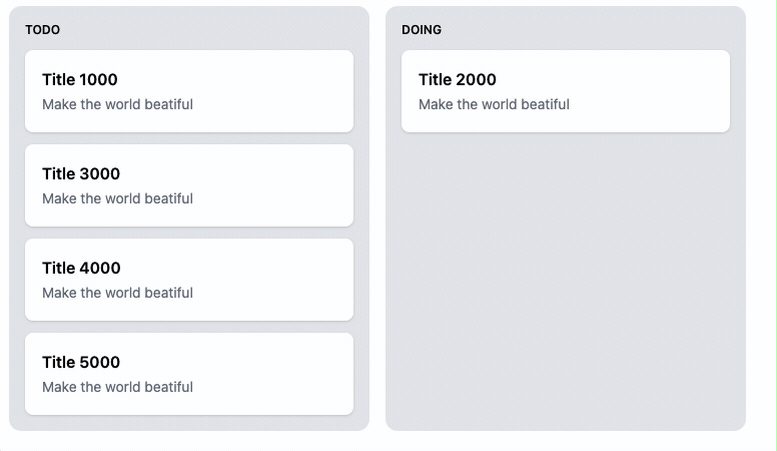
const clear = registDND(({ source, destination }) => {
if (!destination) return;
const scourceKey = source.droppableId as TItemStatus;
const destinationKey = destination.droppableId as TItemStatus;
setItems((items) => {
const _items = JSON.parse(JSON.stringify(items)) as typeof items;
const [targetItem] = _items[scourceKey].splice(source.index, 1);
_items[destinationKey].splice(destination.index, 0, targetItem);
return _items;
});
});
return () => clear();
}, [setItems]);
return (
<div className="p-4">
<div className="mt-4 flex">
<div className="todo grid flex-1 select-none grid-cols-2 gap-4 rounded-lg">
{Object.keys(items).map((key) => (
<div
key={key}
data-droppable-id={key}
className="flex flex-col gap-3 rounded-xl bg-gray-200 p-4 ring-1 ring-gray-300 transition-shadow dark:bg-[#000000]"
>
<span className="text-xs font-semibold">{key.toLocaleUpperCase()}</span>
{items[key as TItemStatus].map((item, index) => (
<div
key={item.id}
data-index={index}
className="dnd-item rounded-lg bg-white p-4 transition-shadow dark:bg-[#121212]"
>
<h5 className="font-semibold">{item.title}</h5>
<span className="text-sm text-gray-500">Make the world beatiful</span>
</div>
))}
</div>
))}
</div>
</div>
</div>
);
}react-beatiful-dnd처럼 콜백을 넘겨주도록 했다.{ source: { droppableId: 'todo', index: 1, }, destination: { droppableId: 'doing', index: 0, } }
TodoExample.drag.ts
const isTouchScreen =
  typeof window !== 'undefined' && window.matchMedia('(hover: none) and (pointer: coarse)').matches;

const startEventName = isTouchScreen ? 'touchstart' : 'mousedown';
const moveEventName = isTouchScreen ? 'touchmove' : 'mousemove';
const endEventName = isTouchScreen ? 'touchend' : 'mouseup';

const getDelta = (startEvent: MouseEvent | TouchEvent, moveEvent: MouseEvent | TouchEvent) => {
  if (isTouchScreen) {
    const se = startEvent as TouchEvent;
    const me = moveEvent as TouchEvent;

    return {
      deltaX: me.touches[0].pageX - se.touches[0].pageX,
      deltaY: me.touches[0].pageY - se.touches[0].pageY,
    };
  }

  const se = startEvent as MouseEvent;
  const me = moveEvent as MouseEvent;

  return {
    deltaX: me.pageX - se.pageX,
    deltaY: me.pageY - se.pageY,
  };
};

export type DropItem = {
  droppableId: string;
  index: number;
};

export type DropEvent = {
  source: DropItem;
  destination?: DropItem;
};

export default function registDND(onDrop: (event: DropEvent) => void) {
  const startHandler = (startEvent: MouseEvent | TouchEvent) => {
    const moveHandler = (moveEvent: MouseEvent | TouchEvent) => {
	  // Touch 이벤트에서 moveEvent와 scrollEvent가 같이 발생되는 것을 방지한다.
      if (moveEvent.cancelable) moveEvent.preventDefault();
      ...
    }
    const endHandler = () => {...}

    // scrollEvent를 막을 수 있게 `passive: false` 해준다.
    document.addEventListener(moveEventName, moveHandler, { passive: false });
    document.addEventListener(endEventName, endHandler, { once: true });
  }

  document.addEventListener(startEventName, startHandler);
  return () => document.removeEventListener(startEventName, startHandler);
}
Drag
drag된 element를 클론하여 ghost를 생성하고 기존 element에 placeholder 적용한다.
로직은 DND-이벤트-뽀개기에서와 같기 때문에 간단히 코드만 보고 넘어가도록 하자.
const startHandler = (startEvent: MouseEvent | TouchEvent) => {
  const item = (startEvent.target as HTMLElement).closest<HTMLElement>('.dnd-item');

  if (!item || item.classList.contains('moving')) {
    return;
  }

  // 초기 item의 위치, 크기 정보를 미리 할당해놓는다.
  const itemRect = item.getBoundingClientRect();

  const ghostItem = item.cloneNode(true) as HTMLElement;
  ghostItem.classList.add('ghost');
  ghostItem.style.position = 'fixed';
  ghostItem.style.top = `${itemRect.top}px`;
  ghostItem.style.left = `${itemRect.left}px`;
  ghostItem.style.width = `${itemRect.width}px`;
  ghostItem.style.height = `${itemRect.height}px`;
  ghostItem.style.pointerEvents = 'none';

  ghostItem.style.border = '2px solid rgb(96 165 250)';
  ghostItem.style.opacity = '0.95';
  ghostItem.style.boxShadow = '0 30px 60px rgba(0, 0, 0, .2)';
  ghostItem.style.transform = 'scale(1.05)';
  ghostItem.style.transition = 'transform 200ms ease, opacity 200ms ease, boxShadow 200ms ease';

  item.classList.add('placeholder');
  // `global.css`
  //  .todo .dnd-item.placeholder {
  //    @apply border border-blue-500 opacity-50 ring-2 ring-blue-400;
  //  }
  item.style.cursor = 'grabbing';

  document.body.style.cursor = 'grabbing';
  document.body.appendChild(ghostItem);

  //...
};onDrop에서 값을 넘겨주기 위한 변수를 정의한다.
let destination: HTMLElement | null | undefined;
let destinationItem: HTMLElement | null | undefined;
let destinationIndex: number;
let destinationDroppableId: string;

const source = item.closest<HTMLElement>('[data-droppable-id]');
if (!source) return console.warn('Need `data-droppable-id` at dnd-item parent');
if (!item.dataset.index) return console.warn('Need `data-index` at dnd-item');
// 다른 보드로 이동시 생성하는 임시 sourceItem
let movingItem: HTMLElement;
const sourceIndex = Number(item.dataset.index);
const sourceDroppableId = source.dataset.droppableId!;
기타 아이템들이 살아 움직일 수 있도록 style 세팅도 해주자.
document.querySelectorAll<HTMLElement>('.dnd-item:not(.ghost)').forEach((item) => {
  item.style.transition = 'all 200ms ease';
});
Move
커서의 움직임에 따라 ghost가 움직이도록 한다.
const moveHandler = (moveEvent: MouseEvent | TouchEvent) => {
  //...
  const { deltaX, deltaY } = getDelta(startEvent, moveEvent);
  ghostItem.style.top = `${itemRect.top + deltaY}px`;
  ghostItem.style.left = `${itemRect.left + deltaX}px`;
  //...
}
ghost 중심 위치에 어떤 엘리먼트가 있는지 확인하여 DND에 관련 된 값을 추출해낸다.
const ghostItemRect = ghostItem.getBoundingClientRect();

const pointTarget = document.elementFromPoint(
  ghostItemRect.left + ghostItemRect.width / 2,
  ghostItemRect.top + ghostItemRect.height / 2,
);

const currentDestinationItem = pointTarget?.closest<HTMLElement>('.dnd-item');
const currentDestination = pointTarget?.closest<HTMLElement>('[data-droppable-id]');
const currentDestinationDroppableId = currentDestination?.dataset.droppableId;
const currentDestinationIndex = Number(currentDestinationItem?.dataset.index);

const currentSourceItem = movingItem ?? item;
const currentSourceIndex = Number(currentSourceItem.dataset.index);
const currentSource = currentSourceItem.closest<HTMLElement>('[data-droppable-id]')!;
const currentSourceDroppableId = currentSource.dataset.droppableId;
기존 hover된 보드 스타일을 제거해주고,
현재 drop이 가능한 보드위에 있을 경우 해당 보드에 hover 이벤트를 추가해준다.
// 이후 endHandler 이벤트에서도 사용되기에 재사용할 수 있도록 메소드를 추출해준다.
const clearDroppableShadow = () => {
  document.querySelectorAll<HTMLElement>('[data-droppable-id]').forEach((element) => {
    element.style.boxShadow = 'none';
  });
}

const moveHandler = (moveEvent: MouseEvent | TouchEvent) => {
  //...
  clearDroppableShadow();
  if (currentDestination) {
    currentDestination.style.boxShadow = '0 4px 12px rgba(0, 0, 0, 0.3)';
  }
  //...
}
같은 위치에 있을 때, 타겟 엘리먼트가 움직이고 있을 땐 이후 동작을 수행하지 않는다.
if (
  currentDestinationItem?.isSameNode(currentSourceItem) ||
  currentDestinationItem?.classList.contains('moving')
) {
  return;
}
이제부터 핵심 로직이다.
핵심 로직 — 다른 보드로 placeholder 이동시키기
개발 편의상, drop이 가능한 보드로 이동시 placeholder를 해당 보드 끝으로 이동시키기로 했다.
위 상황과 같이 아이템 위치까지 이동하기 전에 무조건 보드 위로 진입할거라고 생각했다.
결국 버그를 유발하는 원인이 되었다.
if (
  currentDestination &&
  currentDestinationDroppableId &&
  currentDestinationDroppableId !== currentSourceDroppableId
) {
  if (!movingItem) {
    // 💥 react element의 위치를 이동시키면 react에서 node를 추적할 수 없어 ERROR가 발생된다.
    // 이를 해결하기 위해 눈속임 들어갑니다~!
    movingItem = item.cloneNode(true) as HTMLElement;
    item.classList.remove('dnd-item');
    item.style.display = 'none';
  }

  // 보드 끝에 placeholder를 추가한다.
  currentDestination.appendChild(movingItem);

  // 보드 끝 기준으로 도착지 정보를 갱신해준다.
  destination = currentDestination;
  destinationDroppableId = currentDestinationDroppableId;
  destinationIndex = currentDestination.querySelectorAll('.dnd-item').length - 1;

  // 보드들의 index 정보들을 갱신해준다.
  currentDestination.querySelectorAll<HTMLElement>('.dnd-item').forEach((v, i) => {
    v.dataset.index = i + '';
    v.style.transform = '';
    v.classList.remove('moved');
  });
  currentSource.querySelectorAll<HTMLElement>('.dnd-item').forEach((v, i) => {
    v.dataset.index = i + '';
    v.style.transform = '';
    v.classList.remove('moved');
  });
}

// 만약 위치를 바꿀 타겟이 없다면 이후 동작을 수행하지 않는다.
if (!currentDestinationItem) {
  return;
}
이제 도착지 기준으로 item들의 위치를 조정해주면 된다.
핵심 로직 — item들의 위치를 조정해주기
우선 item의 높이가 고정 되었다고 생각했을 때 이동되어야할 거리를 계산해보자.
const ITEM_MARGIN = 12;
const distance = itemRect.height + ITEM_MARGIN;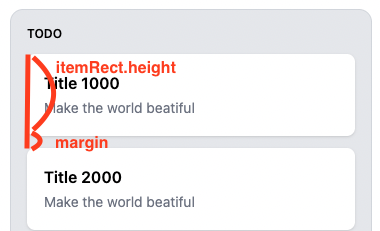
이제 index의 차이 바탕으로 item들을 이동시키면 된다.
const transX = indexDiff * distance;
currentSourceItem.style.transform = `translate3d(0, ${transX}px, 0)`;
source index과 destination index 사이에 있는 item들은 한 칸씩 이동시키면 된다.
그럼 여러가지 경우의 수에 대해서 고려해보자.
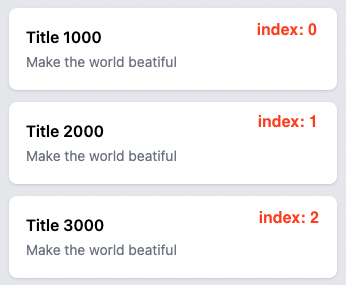
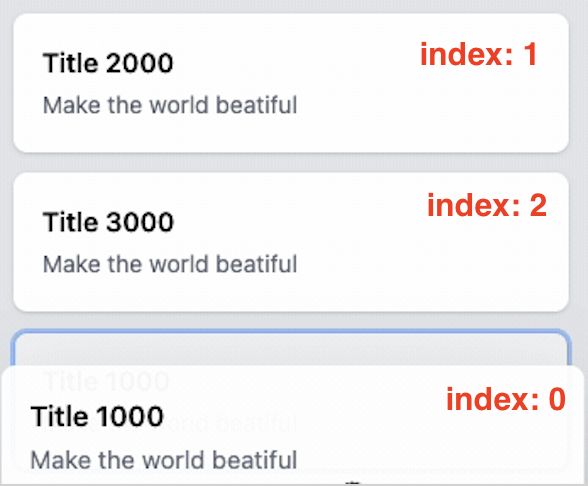
위에서 아래로 이동할 경우 (index: 0 → index: 2)
Title 1000는 아래 방향으로 두 칸 이동한다. (2 - 0) * distance
Title 2000 Title 3000은 위 방향으로 한 칸 이동한다. 1 * -distance
아래에서 위로 이동할 경우 (index: 2 → index: 0)
Title 3000는 위 방향으로 두 칸 이동한다. (0 - 2) * -distance
Title 1000 Title 2000은 아래 방향으로 한 칸 이동한다. 1 * distance
위에서 아래로 이동후 다시 위로 이동할 경우 (index: 0 → index: 2 → index: 1)
다시 위로 이동하는 시점에서 index가 꼬이기에 다르게 동작되어야 한다.
다시 올라가는 경우, index 차이에서 1만큼 더 차이나면 된다.
Title 1000는 위 방향으로 두 칸 이동한다. (0 - 1 - 1) * -distance
Title 2000 Title 300는 아래 방향으로 한 칸 이동한다. 1 * distance
애니메이션을 제거하여 보면 이와 같이 동작할 것이다.

코드는 아래와 같이 작성했다.
// 도착지 정보를 target item 기준으로 갱신해준다.
destinationItem = currentDestinationItem;
destination = currentDestinationItem.closest<HTMLElement>('[data-droppable-id]');
destinationDroppableId = destination?.dataset.droppableId + '';


let indexDiff = currentDestinationIndex - currentSourceIndex;
// 위에서 아래로 간다면 (ex. index 1 -> 3)
const isForward = currentSourceIndex < currentDestinationIndex;
// 움직였던 item으로 다시 움직이는지 여부
const isDestinationMoved = destinationItem.classList.contains('moved');

if (isDestinationMoved) {
  indexDiff += isForward ? -1 : 1;
}

destinationIndex = currentSourceIndex + indexDiff;

// indexDiff만큼 placeholder를 이동시킨다.
const transX = indexDiff * distance;
currentSourceItem.style.transform = `translate3d(0, ${transX}px, 0)`;

// indexDiff 사이에 있는 item들을 이동시킨다.
let target = currentDestinationItem;
while (
  target &&
  target.classList.contains('dnd-item') &&
  !target.classList.contains('placeholder')
) {
  if (isDestinationMoved) {
    target.style.transform = '';
    target.classList.remove('moved');
    target = (
      isForward ? target.nextElementSibling : target.previousElementSibling
    ) as HTMLElement;
  } else {
    target.style.transform = `translate3d(0, ${isForward ? -distance : distance}px, 0)`;
    target.classList.add('moved');
    target = (
      isForward ? target.previousElementSibling : target.nextElementSibling
    ) as HTMLElement;
  }
}startHandler에서 추가해줬던 item.style.transition = 'all 200ms ease'에 의해서 item들이 200ms을 거쳐 밀려나는 동안 다시 target으로 트리거되지 않도록 moving 클래스명을 추가해주고 끝나면 다시 제거해준다.
currentDestinationItem.classList.add('moving');
currentDestinationItem.addEventListener(
  'transitionend',
  () => {
    currentDestinationItem?.classList.remove('moving');
  },
  { once: true },
);
// 빈번하게 발생될시 transitionend이 트리거되지않을 수 있어 setTimeout으로도 수행하도록 했다.
setTimeout(() => {
  currentDestinationItem?.classList.remove('moving');
}, 200);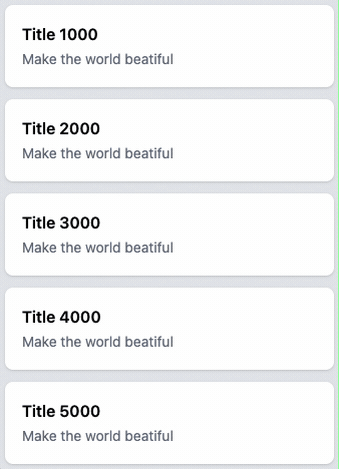
Drop
클릭, 터치를 뗐을 때 endHandler가 수행된다.
const endHandler = () => {
  //...
  document.removeEventListener(moveEventName, moveHandler);
}ghost를 placeholder 자리로 되돌아가도록 한다.
const sourceItem = movingItem ?? item;
// 미관상 placehoder 스타일을 바로 제거해준다.
item.classList.remove('placeholder');
movingItem?.classList.remove('placeholder');

// 초기 지정했던 doucment의 cursor를 초기화 한다.
document.body.removeAttribute('style');
// 모든 보드의 `hover` 상태를 초기화 한다.
clearDroppableShadow();

const itemRect = sourceItem.getBoundingClientRect();
ghostItem.classList.add('moving');
ghostItem.style.left = `${itemRect.left}px`;
ghostItem.style.top = `${itemRect.top}px`;
ghostItem.style.opacity = '1';
ghostItem.style.transform = 'none';
ghostItem.style.borderWidth = '0px';
ghostItem.style.boxShadow = '0 1px 3px rgba(0, 0, 0, 0.15)';
ghostItem.style.transition = 'all 200ms ease';ghost가 완전히 placehoder로 되돌아가게 되었을 때 ghost를 제거해주고,
style 상태를 초기화하고,
source destination 정보를 callback으로 전달해준다.
ghostItem.addEventListener(
  'transitionend',
  () => {
    ghostItem.remove();

    // 💥 react rerender 이후로 실행되도록하는 꼼수
    setTimeout(() => {
      // transform 된 item들을 초기화 해준다.
      document.querySelectorAll<HTMLElement>('.dnd-item').forEach((item) => {
        item.removeAttribute('style');
        item.classList.remove('moving', 'moved');
      });

      // 꼼수를 위해 숨겨놓은 item을 되돌린다.
      item.classList.add('dnd-item');
      item.removeAttribute('style');
      movingItem?.remove();
    }, 0);

    // DND 정보를 최종적으로 callback으로 전달해준다.
    onDrop({
      source: {
        droppableId: sourceDroppableId,
        index: sourceIndex,
      },
      destination: destination
      ? {
        droppableId: destinationDroppableId,
        index: destinationIndex,
      }
      : undefined,
    });
  },
  { once: true },
);
이제 콜벡을 통해서 react 상태를 변경해주면 끝이다!
registDND(({ source, destination }) => {
  if (!destination) return;

  const scourceKey = source.droppableId as TItemStatus;
  const destinationKey = destination.droppableId as TItemStatus;

  setItems((items) => {
    const _items = JSON.parse(JSON.stringify(items)) as typeof items;
    const [targetItem] = _items[scourceKey].splice(source.index, 1);
    _items[destinationKey].splice(destination.index, 0, targetItem);
    return _items;
  });
});
진짜 끝이다!!!!! 🏄🏻♂️
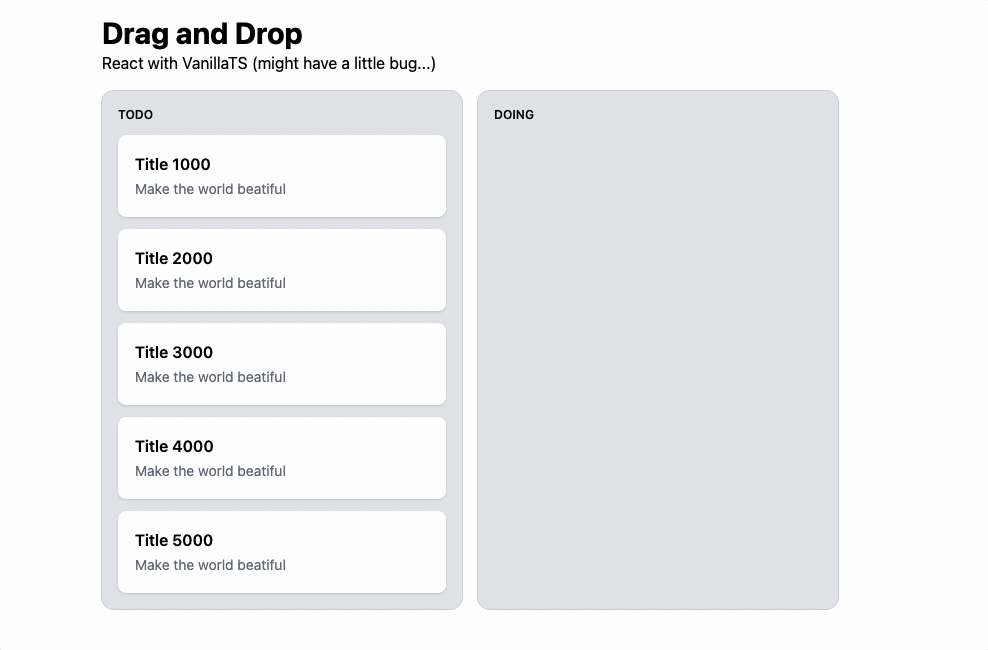
횡방향 DND,동적인 item 높이,키보드 접근성등 추가되어야할 부분이 상당히 많지만,,
더 이상 작업할 여력이 없어 DND 시리즈를 이번 포스트로 마무리합니다.부족함이 많았던 DND 시리즈에 관심을 주시고 긴 길을 끝까지 읽어주셔서 정말 감사합니다! (_ _)
그럼20000👋🏻
실제 동작 확인 링크
전체 코드 소스코드 링크
참고 링크
글 이전


꾸준히 보고 있습니다. 결과물이 정말 감동적이에요