이전 포스트에서 연구한 drag 이벤트를 활용하여 Resize 기능을 구현해보자.
TL;DR
getBoundingClientRect를 활용하여 엘리먼트의 크기 정보를 얻는다.
Drag 거리에 맞춰 엘리먼트 크기를 조정해준다.
복습 — Drag 이벤트 등록
DOM 이벤트를 활용하여 마우스의 움직임을 추적한다.
- 클릭시(
onMouseDown)document에mousemovemouseup이벤트를 등록한다. - element의 클릭 이벤트가 부모로 전파되지 않길 원할 경우
stopPropagation을 호출한다. - 클릭된 상태에서 마우스를 움직일시
mousemove에 등록 된 함수가 계속 호출된다. - 클릭(
mousedown) 이벤트 발생시의 마우스 위치를 기준으로,
이동(mousemove) 이벤트에서 상대적으로 이동한 거리(deltaX, deltaY)를 계산하고
콜벡으로 받은onDragChange에게 전달해준다. mouseup이벤트에서mousemove이벤트를 제거한다.
export default function registMouseDownDrag(
  onDragChange: (deltaX: number, deltaY: number) => void,
  stopPropagation?: boolean,
) {
  return {
    onMouseDown: (clickEvent: React.MouseEvent<Element, MouseEvent>) => {
      // 2️⃣
      if (stopPropagation) clickEvent.stopPropagation();

      // 3️⃣
      const mouseMoveHandler = (moveEvent: MouseEvent) => {
        // 4️⃣
        const deltaX = moveEvent.screenX - clickEvent.screenX;
        const deltaY = moveEvent.screenY - clickEvent.screenY;
        onDragChange(deltaX, deltaY);
      };

      // 5️⃣
      const mouseUpHandler = () => {
        document.removeEventListener('mousemove', mouseMoveHandler);
      };

      // 1️⃣
      document.addEventListener('mousemove', mouseMoveHandler);
      document.addEventListener('mouseup', mouseUpHandler, { once: true });
    },
  };
}
기본 응용 — Drag로 Resize하기
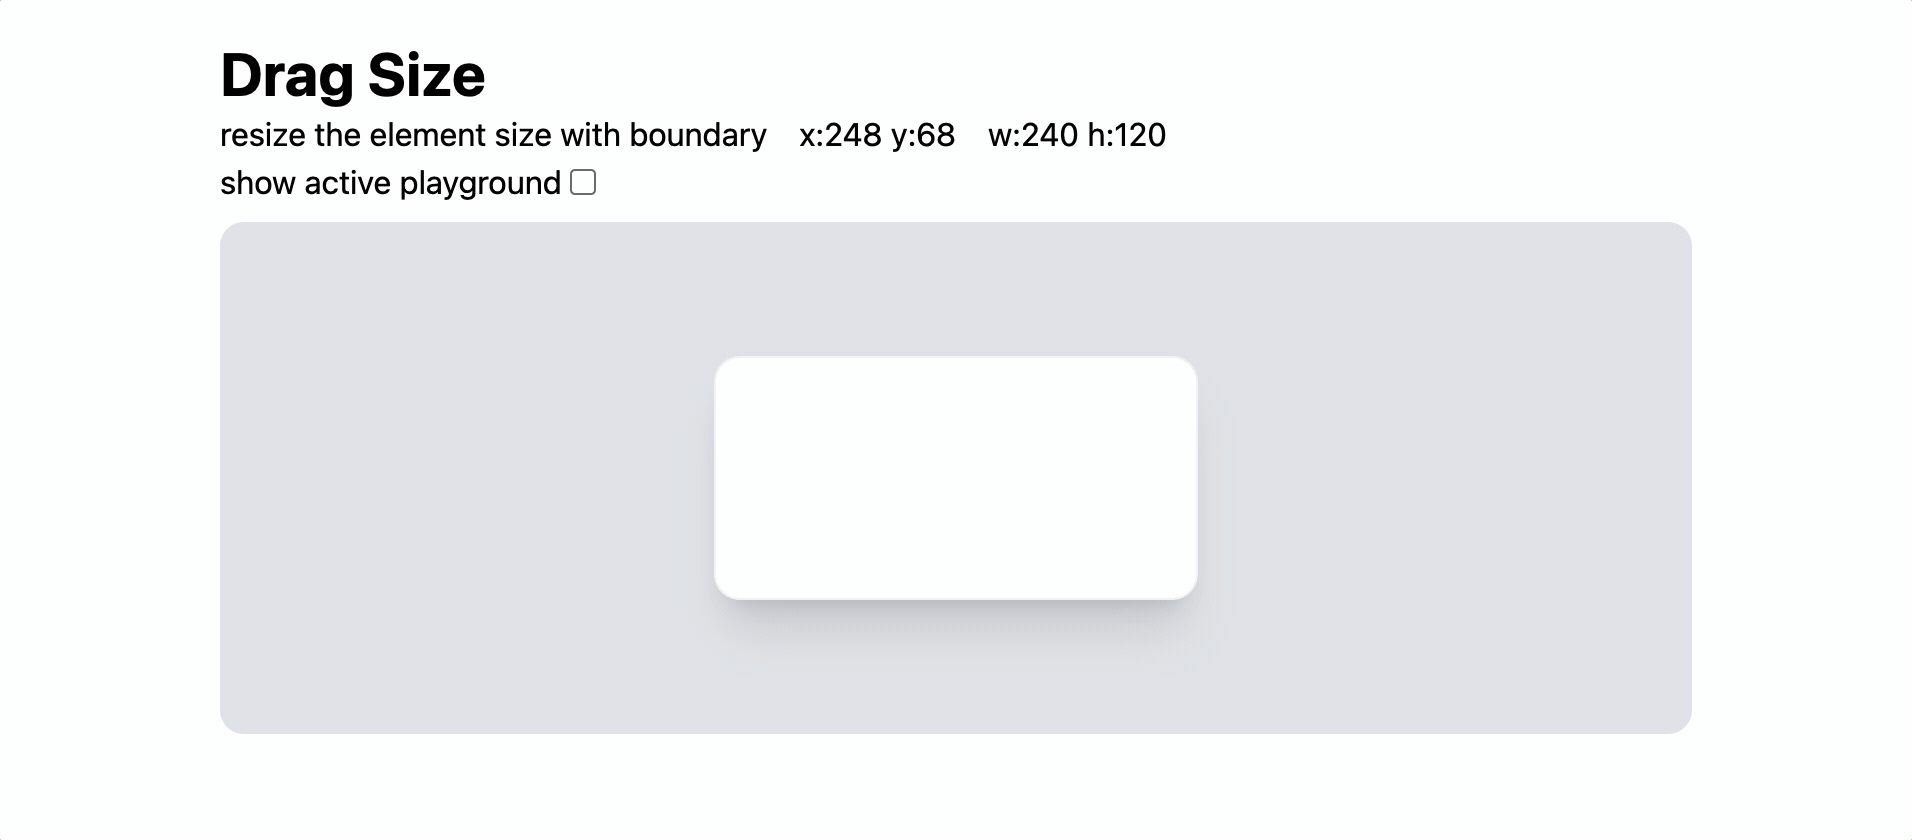
마우스의 움직임 바탕으로 element의 size를 조정해보자.
- element의
config(위치, 크기) 상태를 정의한다. - element의
config을 초기화 한다.
덤으로 boundary를 기준으로 중앙정렬을 해주자. - element의 우하단에 resize를 동작시키는 영역을 정의한다. (tailwind를 사용했다.)
- config 상태를 변경하여 element의 크기를 변화시킨다.
// 1️⃣
const [{ x, y, w, h }, setConfig] = useState({
  x: 0,
  y: 0,
  w: 0,
  h: 0,
});

const boundaryRef = useRef<HTMLDivElement>(null);
// 2️⃣
useEffect(() => {
  const boundary = boundaryRef.current?.getBoundingClientRect();

  if (boundary) {
    const DEFAULT_W = 240;
    const DEFAULT_H = 120;
    setConfig({
      x: Math.floor(boundary.width / 2 - DEFAULT_W / 2),
      y: Math.floor(boundary.height / 2 - DEFAULT_H / 2),
      w: DEFAULT_W,
      h: DEFAULT_H,
    });
  }
}, []);

return (
  <Boundary ref={boundaryRef}>
    <div
      style={{ width: w, height: h, left: x, top: y }}
      className="relative"
    >
      <Box />
      <div
        // 3️⃣
        className="absolute -bottom-0.5 left-3 right-3 h-2 cursor-s-resize"
        {...registMouseDownDrag((deltaX, deltaY) => {
          // 4️⃣
          setConfig({
            x,
            y,
            w: w + deltaX,
            h: h + deltaY,
          });
        })}
        />
    </div>
  </Boundary>
);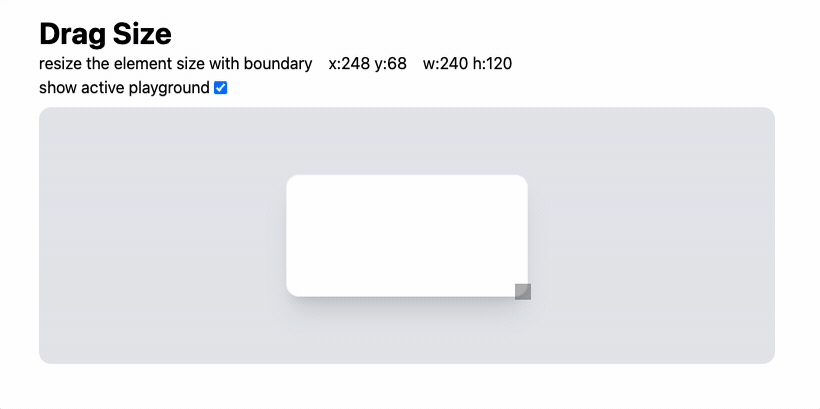
추가 응용 — Boundary 적용
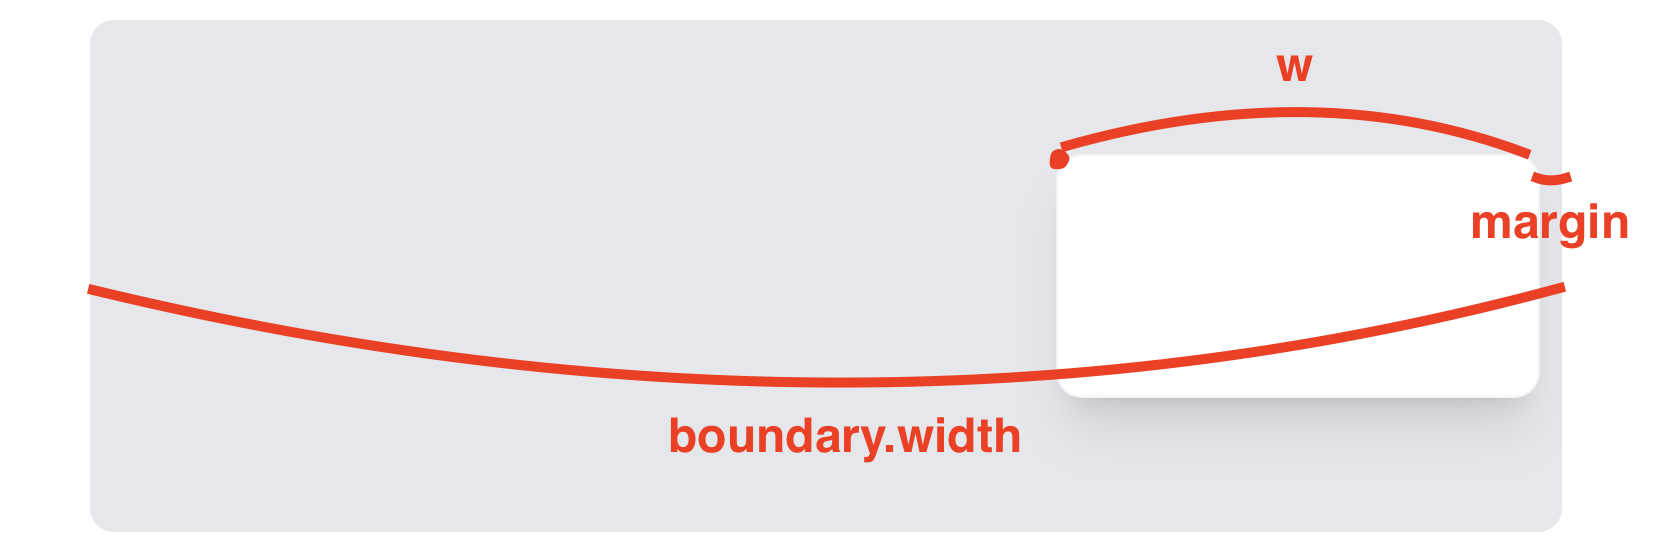
element가 움직일 수 있는 범위를 계산해보자.
좌측 끝 = BOUNDARY_MARGIN
우측 끝 = boundary.width - w - BOUNDARY_MARGIN
자, 이제 element가 확장할 수 있는 범위를 계산해보자.

최소 width = MIN_W
최대 width = boundary.width - x - BOUNDARY_MARGIN
그림을 그려보니 생각보다 간단하지 않는가?!
이제 아래 주요 로직을 따라 코드를 작성해보도록 하자.
- position drag 이벤트를 등록해준다.
resize의 클릭 이벤트가 부모로 전파되지 않도록stopPropagation해준다.resize되는 범위를 잘 설정해준다.
const inrange = (v: number, min: number, max: number) => {
  if (v < min) return min;
  if (v > max) return max;
  return v;
};

const BOUNDARY_MARGIN = 12;
const MIN_W = 80;
const MIN_H = 80;<Boundary ref={boundaryRef}>
<div
style={{ width: w, height: h, left: x, top: y }}
className="relative"
// 1️⃣
{...registMouseDownDrag((deltaX, deltaY) => {
if (!boundaryRef.current) return;
const boundary = boundaryRef.current.getBoundingClientRect();
setConfig({
x: inrange(x + deltaX, BOUNDARY_MARGIN, boundary.width - w - BOUNDARY_MARGIN),
y: inrange(y + deltaY, BOUNDARY_MARGIN, boundary.height - h - BOUNDARY_MARGIN),
w,
h,
});
}
>
<Box />
<div
className="absolute -bottom-0.5 left-3 right-3 h-2 cursor-s-resize"
style={{ backgroundColor: '#12121250' }}
{...registMouseDownDrag((deltaX, deltaY) => {
if (!boundaryRef.current) return;
// 3️⃣
const boundary = boundaryRef.current.getBoundingClientRect();
setConfig({
x,
y,
w: inrange(w + deltaX, MIN_W, boundary.width - x - BOUNDARY_MARGIN),
h: inrange(h + deltaY, MIN_H, boundary.height - y - BOUNDARY_MARGIN),
});
// 2️⃣
}, true)}
/>
</div>
</Boundary>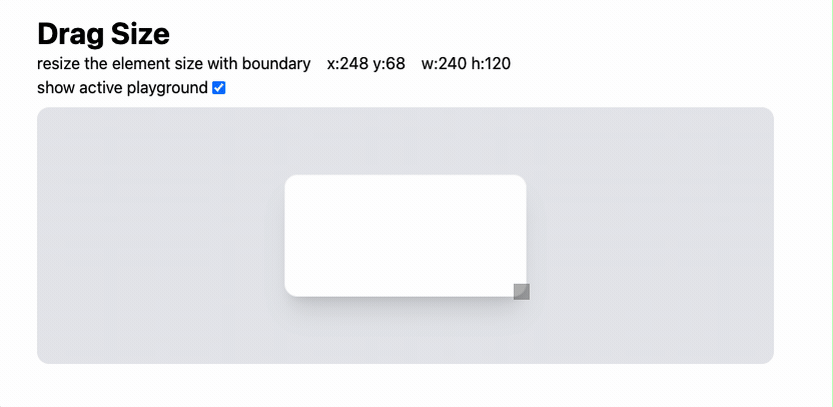
오호, 이 정도면 좀 쓸만할 것 같다 💪🏾
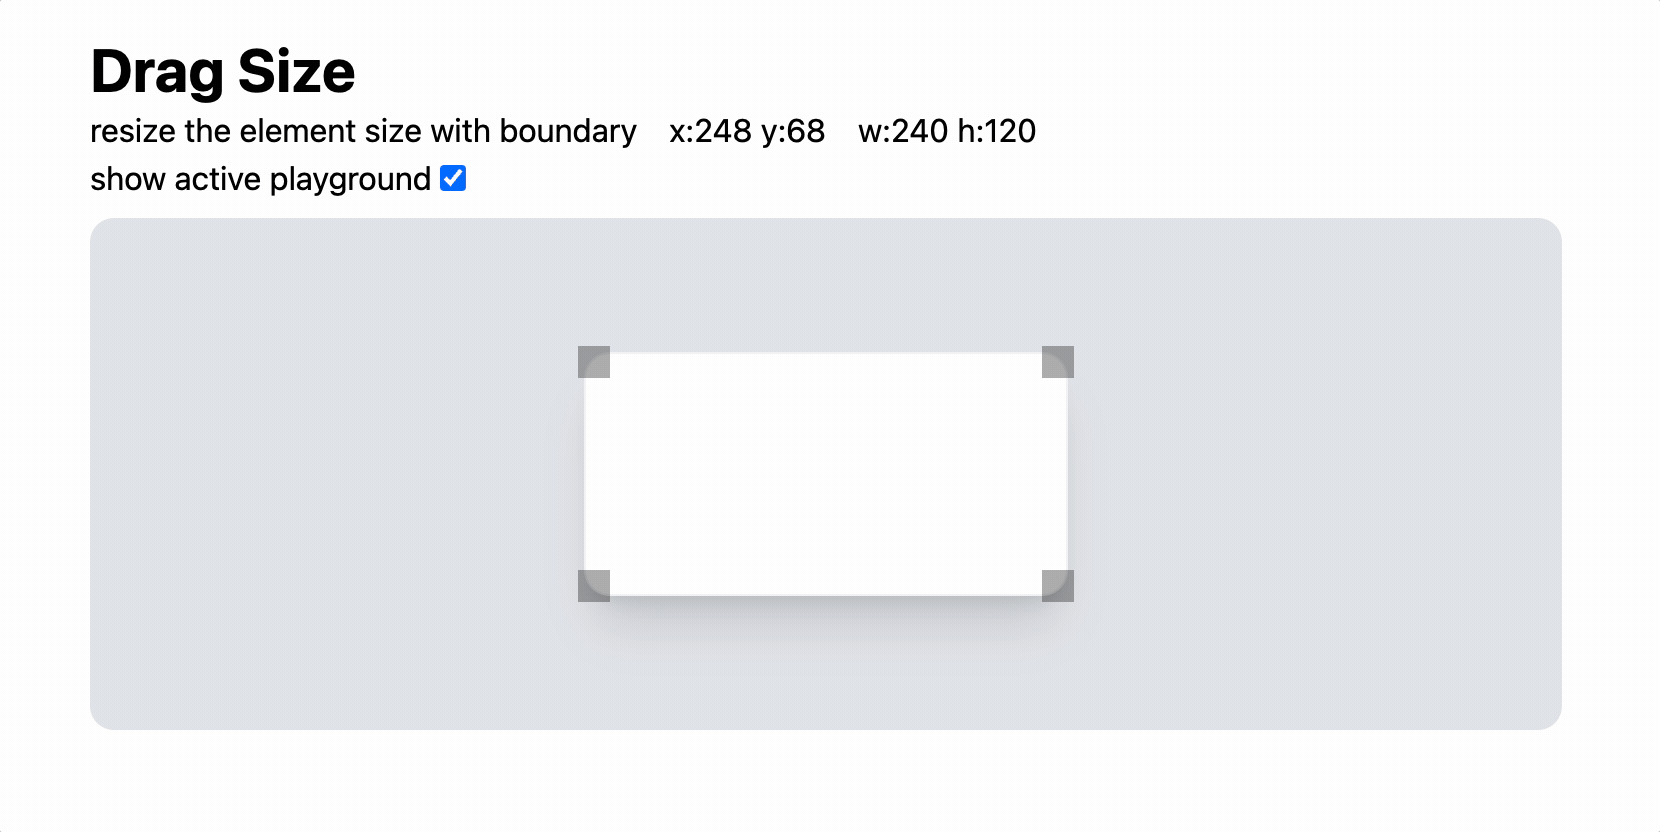
심화 응용 — 여러 방향의 Resize
우리가 많이 접한 편집툴은 좌상단, 우상단, 좌하단, 우하단 4가지 방향으로 Resize할 수 있다.
다른 방향으로 진행하기 위해서 무엇을 고려해야하는지 살펴보자.
좌상단인 경우, 우하단 동작 방식과 좀 다르다.
x가 줄어드는 만큼 w가 증가해야지 위치가 고정된 상태에서 element 크기가 달라진다.
그렇다면 이들의 범위를 계산해보도록 하자.

maxX = x + w - MIN_W
maxWidth = x + w - BOUNDARY_MARGIN
이를 코드에 적용하면 아래와 같다.
여기서 deltaX가 줄어 들 때 width가 증가한다는 점을 놓치지 말자.
width = w - deltaX
{/* 좌상단 */}
<div
  className="absolute -top-1 -left-1 h-4 w-4 cursor-nw-resize"
  style={{ '#12121250' }}
  {...registMouseDownDrag((deltaX, deltaY) => {
    setConfig({
      x: inrange(x + deltaX, BOUNDARY_MARGIN, x + w - MIN_W),
      y: inrange(y + deltaY, BOUNDARY_MARGIN, y + h - MIN_H),
      w: inrange(w - deltaX, MIN_W, x + w - BOUNDARY_MARGIN),
      h: inrange(h - deltaY, MIN_H, y + h - BOUNDARY_MARGIN),
    });
  }, true)}
/>
다른 방향에서의 원리도 이와 비슷하다.
적절히 응용해보도록 하자.
{/* 우상단 */}
<div
  className="absolute -top-1 -right-1 h-4 w-4 cursor-ne-resize"
  style={{ backgroundColor: '#12121250' }}
  {...registMouseDownDrag((deltaX, deltaY) => {
    if (!boundaryRef.current) return;

    const boundary = boundaryRef.current.getBoundingClientRect();

    setConfig({
      x,
      y: inrange(y + deltaY, BOUNDARY_MARGIN, y + h - MIN_H),
      w: inrange(w + deltaX, MIN_W, boundary.width - x - BOUNDARY_MARGIN),
      h: inrange(h - deltaY, MIN_H, y + h - BOUNDARY_MARGIN),
    });
  }, true)}
/>

{/* 좌하단 */}
<div
  className="absolute -bottom-1 -left-1 h-4 w-4 cursor-ne-resize"
  style={{ backgroundColor: '#12121250' }}
  {...registMouseDownDrag((deltaX, deltaY) => {
    if (!boundaryRef.current) return;

    const boundary = boundaryRef.current.getBoundingClientRect();

    setConfig({
      x: inrange(x + deltaX, BOUNDARY_MARGIN, x + w - MIN_W),
      y,
      w: inrange(w - deltaX, MIN_W, x + w - BOUNDARY_MARGIN),
      h: inrange(h + deltaY, MIN_H, boundary.height - y - BOUNDARY_MARGIN),
    });
  }, true)}
/>
상하좌우 방향은 그저 하드코딩을 이어가면 된다.
그럼 다음 기능 개발로 넘어가보자 🏄🏻♂️
실제 동작은 아래 링크에서 볼 수 있다.
https://dnd-playground.vercel.app/resize
style 및 전체 코드는 아래 깃허브에서 살펴보면 될 것 같다.
https://github.com/bepyan/dnd-playground/blob/main/src/components/DragSizeExample.tsx


드래그앤드랍의 정석이랄까요!? 좋은 강의 감사합니다.