MyBatis 설정
- 의존성 추가
implementation 'org.springframework.boot:spring-boot-starter-data-jdbc'
implementation 'org.mybatis.spring.boot:mybatis-spring-boot-starter:2.1.4'- 데이터베이스 연결하기 (application.yml)
spring:
	datasource:
    	    driver-class-name: org.postgresql.Driver
            jdbc-url: jdbc:postgresql://localhost/mybatis
            username: test
            password: test@@
        mybatis:
        	# 패키지 명을 생략할 수 있도록 alias 설정
        	type-aliases-package: com.mybatis.dto

            # mapper.xml 위치 지정
            mapper-locations: mybatis-mapper/**/*.xml

            # model 프로퍼티 camel case 설정
            configuration.map-underscore-to-camel-case=true

        # mapper 로그레벨 설정
        logging:level:com:atoz_develop:mybatissample:repository=DEBUG
Mapper XML 파일
- SQL Map XML 파일은 첫번째(first class)엘리먼트만을 가진다.
cache: 해당 네임스페이스를 위한 캐시 설정cache-ref: 다른 네임스페이스의 캐시 설정에 대한 참조resultMap: 데이터베이스 결과데이터를 객체에 로드하는 방법을 정의하는 엘리먼트sql: 다른 구문에서 재사용하기 위한 SQL 조각insert: 매핑된 INSERT 구문update: 매핑된 UPDATE 구문delete: 매핑된 DELETE 구문select: 매핑된 SELECT 구문
SELECT
<select id="selectPerson" parameterType="int" resultType="hashmap">
	SELECT * FROM PERSON WHERE ID = #{id}
</select>
-> 이 구문의 이름은 selectPerson이고 int 타입의 파라미터를 가진다. 그리고 결과 데이터는 HashMap에 저장된다.
-
파라미터 표기법: #{id}
-
이 표기법은 마이바티스에게 PreparedStatement 파라미터를 만들도록 지시한다. JDBC를 사용할 때 PreparedStatement에는 "?" 형태로 파라미터가 전달된다. 즉 결과적으로 위 설정은 아래와 같이 작동하게 되는 셈이다.
// JDBC 코드와 유사함
String selectPerson = "SELECT * FROM PERSON WHERE ID=?";
PreparedStatement ps = conn.prepareStatement(selectPerson);
ps.setInt(1,id);- select 엘리먼트는 각각의 구문이 처리하는 방식에 대해 세부적으로 설정하도록 많은 속성을 설정할 수 있다.
<select
	id="selectPerson"
    parameterType="int"
    resultType="hashmap"
    resultMap="personResultMap"
    flushCache="false"
    useCache="true"
    timeout="10"
    fetchSize="256"
    statementType="PREPARED"
resultSetType="FORWARD_ONLY">| 속성 | 설명 |
|---|---|
| id | 구문을 찾기 위해 사용될 수 있는 네임스페이스내 유일한 구분자 |
| parameterType | 구문에 전달될 파라미터의 패키지 경로를 포함한 전체 클래스명이나 별칭 |
| resultType | 이 구문에 의해 리턴되는 기대타입의 패키지 경로를 포함한 전체 클래스명이나 별칭 |
| resultMap | 외부 resultMap 의 참조명 |
| flushCache | 이 값을 true로 셋팅하면 구문이 호출될때마다 로컬, 2nd 레벨 캐시가 지워질것이다.(flush) 디폴트는 false이다. |
| useCache | 이 값을 true로 셋팅하면 구문의 결과가 2nd 레벨 캐시에 캐시 될 것이다. 디폴트는 true이다. |
| timeout | 예외가 던져지기 전에 데이터베이스의 요청 결과를 기다리는 최대시간을 설정한다. 디폴트는 셋팅하지 않는 것이고 드라이버에 따라 다소 지원되지 않을 수 있다. |
| fetchSize | 지정된 수만큼의 결과를 리턴하도록 하는 드라이버 힌트 형태의 값이다. 디폴트는 셋팅하지 않는 것이고 드라이버에 따라 다소 지원되지 않을 수 있다. |
| statementType | STATEMENT, PREPARED 또는 CALLABLE 중 하나를 선택할 수 있다. 마이바티스에게 Statement, PreparedStatement 또는 CallableStatement를 사용하게 한다. 디폴트는 PREPARED이다. |
INSERT, UPDATE AND DELETE
<insert
	id="insertAuthor"
    parameterType="domain.blog.Author"
    flushCache="true"
    statementType="PREPARED"
    keyProperty=""
    keyColumn=""
    useGeneratedKeys=""
    timeout="20">

<update
	id="updateAuthor"
    parameterType="domain.blog.Author"
    flushCache="true"
    statementTypes="PREPARED"
    timeout="20">

<delete
	id="deleteAuthor"
    parameterType="domain.blog.Author"
    flushCache="true"
    statementType="PREPARED"
timeout="20">| 속성 | 설명 |
|---|---|
| id | 구문을 찾기 위해 사용될 수 있는 네임스페이스내 유일한 구분자 |
| parameterType | 구문에 전달될 파라미터의 패키지 경로를 포함한 전체 클래스명이나 별칭 |
| flushCache | 이 값을 true로 셋팅하면 구문이 호출될때마다 캐시가 지워질것이다. 디폴트는 false |
| timeout | 예외가 던져지기 전에 데이터베이스의 요청 결과를 기다리는 최대시간을 설정한다. 디폴트는 셋팅하지 않는 것이고 드라이버에 따라 다소 지원되지 않을 수 있다. |
| statementType | STATEMENT, PREPARED, CALLABLE중 하나를 선택할 수 있다. 마이바티스에게 Statement, PreparedStatement 또는 CallableStatement를 사용하게 한다. 디폴트는 PREPARED 이다. |
| useGeneratedKeys | (입력(insert, update)에만 적용) 데이터베이스에서 내부적으로 생성한 키 (예를들어 MySQL또는 SQL Server와 같은 RDBMS의 자동 증가 필드)를 받는 JDBC getGeneratedKeys 메소드를 사용하도록 설정한다. 디폴트는 false 이다. |
| keyProperty | (입력(insert, update)에만 적용) getGeneratedKeys 메소드나 insert 구문의 selectKey 하위 엘리먼트에 의해 리턴된 키를 셋팅할 프로퍼티를 지정 |
| keyColumn | (입력(insert, update)에만 적용) 생성키를 가진 테이블의 칼럼명을 셋팅. 키 칼럼이 테이블이 첫번째 칼럼이 아닌 데이터베이스(P |
<insert id="insertAuthor">
	insert into Author (id, username, password, email, bio)
    values (#{id}, #{username}, #{password}
</insert>

<update id="updateAuthor">
	update Author set
    	username = #{username},
        password = #{password},
        email = #{email},
        bio = #{bio}
        where id = #{id}
</update>

<delete id="deleteAuthor">
	delete from Author where id = #{id}
</delete>
사용하는 데이터베이스가 자동생성키(예를들면 MySQL과 SQL서버)를 지원한다면 useGeneratedKeys="true"로 설정하고 대상 프로퍼티에 keyProperty를 세팅할 수 있다. 예를들어 Author 테이블이 id 컬럼에 자동생성키를 적용했다고 하면 구문은 아래와 같다.
<insert id="insertAuthor" useGeneratedKeys="true" keyProperty="id">
	insert into Author (username, password, email, bio)
    values (#{username},#{password},#{email},#{bio})
</insert>
사용하는 데이터베이스가 다중레코드 입력을 지원한다면 Author의 목록이나 배열을 전달할수 있고 자동생성키를 가져올 수 있다.
<insert id="insertAuthor" useGeneratedKeys="true" keyProperty="id">
	insert into Author (username, password, email, bio) values
    <foreach item="item" collection="list" separator=",">
    	(#{item.username}, #{item.password}
    </foreach>
</insert>
MyBatis foreach문 지원 태그
- collection: 전달받은 인자. List or Array 형태만 가능
- item: 전달받은 인자 값을 alias 명으로 대체
- open: 구문이 시작될때 삽입할 문자열
- close: 구문이 종료될때 삽입할 문자열
- separator: 반복 되는 사이에 출력할 문자열
- index: 반복되는 구문 번호이다. 0부터 순차적으로 증가
리스트인 경우
<select id="selectAuthor" resultType="com.test.Author">
  select * from ttest where name in
    <foreach collection='list' index='index' item='abc' open='(' close=')' separator=','>
        #{abc}
    </foreach>
</select>
배열일 경우
<select id="selectAuthor" resultType="com.test.Author">
	select * from ttest where name in
	<foreach collection='array' index='index' item='abc' open='(' close=')' separator=','
    	#{abc}
    </foreach>
</select>
마이바티스는 자동생성키 컬럼을 지원하지 않는 다른 데이터베이스를 위해 다른 방법 또한 제공한다.
이 예제는 랜덤 ID를 생성하고 있다.
<insert id="insertAuthor">
	<selectKey keyProperty="id" resultType="int" order="BEFORE">
    	select CAST(RANDOM()*1000000 as INTEGER) a from SYSIBM.SYSDUMMY1
    </selectKey>
    insert into Author
    	(id, username, password, email, bio, favourite_section)
    values
    	(#{id}, #{username}, #{password}, #{email}, #{bio}, #{favouriteSection, jdbcType=VARCHAR})
</insert>
-> selectKey구문이 먼저 실행되고 Author id프로퍼티에 셋팅된다. 그리고 나서 insert 구문이 실행된다.
<selectKey
	keyProperty="id"
    resultType="int"
    order="BEFORE"
statementType="PREPARED">| 속성 | 설명 |
|---|---|
| keyProperty | selectKey구문의 결과가 셋팅될 대상 프로퍼티 |
| keyColumn | 리턴되는 결과셋의 컬럼명은 프로퍼티에 일치한다. 여러개의 칼럼을 사용한다면 목록은 콤마를 사용해서 구분한다. |
| resultType | 결과의 타입 |
| order | BEFORE 또는 AFTER를 셋팅할 수 있다. BEFORE로 설정하면 키를 먼저 조회하고 그 값을 keyProperty에 세팅한 뒤 insert 구문을 실행한다. AFTER로 설정하면 insert 구문을 실행한 뒤 selectKey 구문을 실행한다. |
| statementeType | Statement, PreparedStatement, CallableStatement을 매핑하기 위해 STATEMENT, PREPARED, CALLABLE 구문타입을 지원한다. |
@Select("select * from user where id = #{id}")
User findById(@Param("id") long id);

@Select("select * from user where name = #{name}")
User findByName(@Param("name") String name);

@Select("select * from user where email = #{email}")
User findByEmail(@Param("email") String email);
you can just write:
@Select("select * from user where ${column} = #{value}")
User findByColumn(@Param("column") String column, @Param("value") String value);
in which the ${column} will be substituted directly and the #{value} will be "preapred"
User userOfId1 = userMapper.findByColumn("id", 1L);
User userOfNameKid = userMapper.findByColumn("name", "kid");
User userOfEmail = userMapper.findByColumn("email", "non@nowhere.com");
Result Maps
- TypeAliases 설정
<!-- XML 설정파일에서 -->
<typeAlias type="com.test.model.User" alias="User"/><resultMap id="detailedBlogResultMap" type="Blog">
<constructor>
<idArg column="blog_id" javaType="int" />
</constructor>
<result property="title" column="blog_title" />
<association property="author" javaType="Author">
<id property="id" column="author_id" />
<result proeprty="username" column="author_username"/>
<result property="password" column="author_password"/>
</association>
<collection property="posts" ofType="Post">
<id property="id" column="post_id" />
<result property="author" javaType="Author"/>
<discriminator javaType="int" column="draft">
<case value="1" resultType="DraftPost"/>
</discriminator>
</collection>
</resultMap>-
resultMap
- id: 추후 쿼리를 정의하는 태그에서 resultType 대신 사용될 resultMap argument의 value가 될 것이다.- type: 객체로 만들 자바 클래스이다. 위는 설정에서 typeAliace를 정의한 경우이고, com.freeboard02.domain.post 처럼 경로로 명시하여도 된다.
-
constructor
- 생성자이다. 위 예제에서는 id만 이용하고 있는데 이 경우에는 Blog(int blog_id) 꼴의 생성자를 호출할 것이다.- JPA에서 기본 생성자를 생성하고 setter를 이용하여 값을 채워넣는 것을 선호하는 것과는 반대로 MyBatis는 생성자를 이용한 빈 생성을 선호하기 때문에 이러한 기능을 제공한다.
- 만약 바로 아래에 result로 정의된 title property를 argument로 포함하는 생성자를 빈을 사용하고 싶다면 (setter로 값을 할당하고 싶지 않다면) 을 constructor 태그사이에 추가하면된다. 이 경우에는 Blog(int id, String title) 꼴의 생성자를 호출할 것이다.
-
result
- 결과값의 column을 자바 클래스의 어떤 멤버 변수에 할당할 것인지 정의한다.- result로 정의된 값들은 setter를 이용해서 값을 할당한다.
- 이 때 column은 aliace로 변경된 값을 지정해주어야한다.
-
association
- has one일 때 사용하는 태그- resultMap이라는 Argument를 사용할 수 있는데 해당 태그 내부에 정의된 result를 다른 resultMap으로 분리하고 이를 참조하는 경우에 쓰인다.
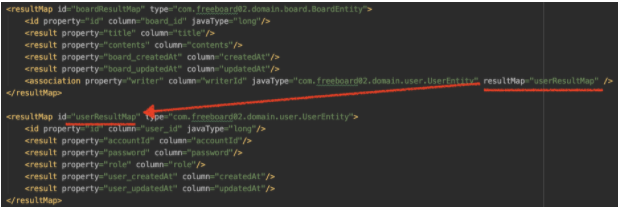
- 위 이미지에서는 boardResultMap의 association으로 userResultMap을 포함한다.
- resultMap이라는 Argument를 사용할 수 있는데 해당 태그 내부에 정의된 result를 다른 resultMap으로 분리하고 이를 참조하는 경우에 쓰인다.
-
collection
- has many일 때 사용하는 태그- discriminator: switch .. case .. 문처럼 작동한다.
-> vehicle_type이라는 column의 값을 case value와 비교한 뒤 같은 값인 경우의 resultMap을 매칭시킨다.<discriminator javaType="int" column="vehicle_type"> <case value="1" resultMap="carResult" /> <case value="2" resultMap="vanResult" /> </discriminator>
- discriminator: switch .. case .. 문처럼 작동한다.
Join을 이용한 Lazy Loding을 사용하는 예제
<resultMap id="blogResult" type="Blog">
	<association property="author" column="author_id" javaType="Author" select="selectAuthor" />
</resultMap>

<select id="selectBlog" resultMap="blogResult">
	select * from blog where id = #{id}
</select>

<select id="selectAuthor" resultType="Author">
	select * from author where id = #{id}
</select>
위 예제 동작 방식
1. selectBlog의 쿼리 select from blog where id = #{id}가 수행된다.
2. 결과물을 blogResult에 매핑한다.
3. author_id 컬럼 - author 멤버 변수를 제외한 나머지 컬럼과 멤버 변수가 자동으로 매칭된다.
4. author를 채우기 위해서 select="selectAuthor"를 수행한다.
5. selectAuthor의 select from author where id = #{id}가 수행된다. (이 때 아이디로는 blogResult의 association에 명시된 column인 author_id가 자동으로 사용된다.)
6. 결과값을 이용해 Author 자바 빈을 생성한 뒤 Blog 자바 빈에 set 한다.