NestJS에서 Swagger 사용하기
Swagger
Swagger는 NestJS 공식 홈페이지에서 소개하는 API 문서 자동화 도구이다. 협업 시에 '어느 엔드 포인트에 들어가서 어떤 메서드를 사용하고, body에는 이런 값이 들어간다'라는 것을 설명해야 할 때가 있다. Swagger를 이용하면 ppt나 notion을 사용했을 때보다 용이하다.
코드를 짜면서 즉각적으로 작성 · 수정할 수 있다는 장점이 있으며 API를 테스트해 볼 수도 있다.
Swagger 설치
express 환경과 fastify 환경에 따라 설치해야 하는 모듈이 다르다. 나는 express를 사용하기 때문에 아래 모듈을 설치했다.
npm install --save @nestjs/swagger swagger-ui-expressSwagger 사용 (1)
main에서 SwaggerModule 클래스로 Swagger를 초기화한다. createDocument() 메서드를 사용해서 API 문서를 만들 수 있다. config는 일종의 옵션으로 title, description, version 등을 설정할 수 있다. 접속하는 엔드 포인트는 SwaggerModule.setup()메서드에서 설정한다. http://localhost:3000/docs로 접속할 수 있다.
import { HttpExceptionFilter } from 'src/cats/commons/exceptions/http-exception.filter';
import { NestFactory } from '@nestjs/core';
import { AppModule } from './app.module';
import { ValidationPipe } from '@nestjs/common';
import { DocumentBuilder, OpenAPIObject, SwaggerModule } from '@nestjs/swagger';

async function bootstrap() {
  const app = await NestFactory.create(AppModule);
  app.useGlobalPipes(new ValidationPipe());
  app.useGlobalFilters(new HttpExceptionFilter());

  const config = new DocumentBuilder()
    .setTitle('C.I.C')
    .setDescription('cat')
    .setVersion('1.0.0')
    .addTag('cats')
    .build();
  const document: OpenAPIObject = SwaggerModule.createDocument(app, config);
  SwaggerModule.setup('docs', app, document);

  ⁝
  (생략)
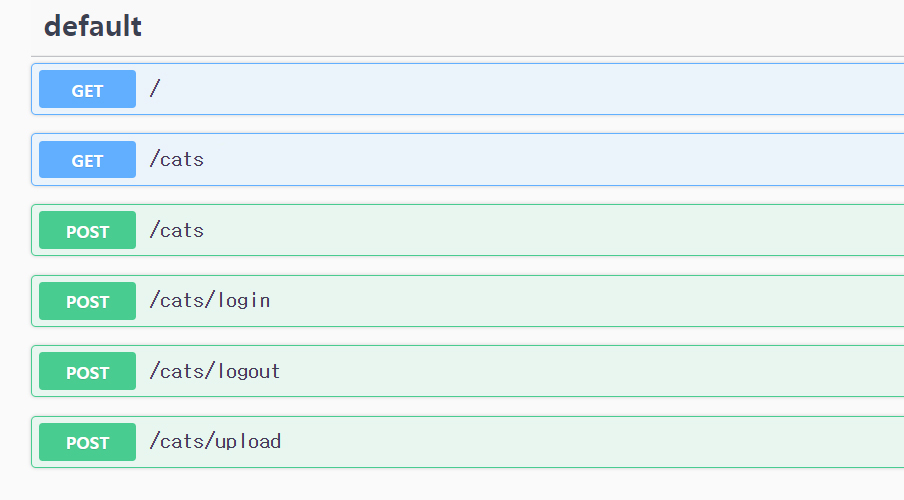
http://localhost:3000/docs에 접속하면 Nest가 내 controller를 해석하여 해당하는 API를 띄워 준다.
 하지만 각각의 API가 무엇을 뜻하는지 즉각적으로 알아보기 힘들다. API에 설명을 달아 주는 건 controller에서
 @ApiOperation 데코레이터가 담당한다.
 @ApiOperation({ summary: '회원가입' })
  @Post()
  async signUp(@Body() body: CatRequestDto) {
    // ‥ (생략)
 }
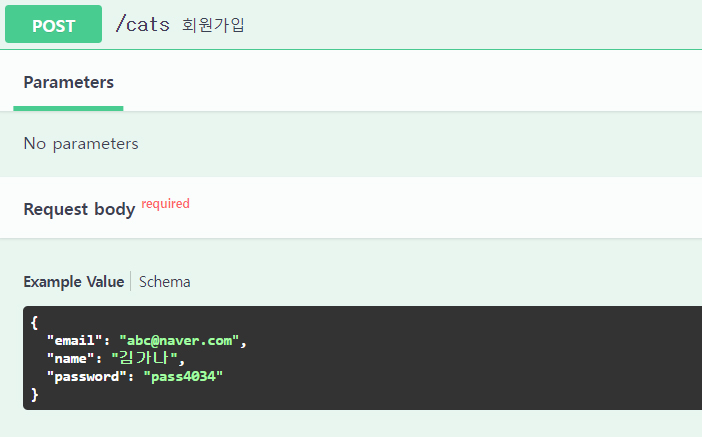
해당하는 API에 summary를 달아 주면 Swagger에서 대응하는 설명이 나타난다.

Swagger 사용 (2) - Request body 설정
Swagger는 API 테스트 기능을 지원하기 때문에 직접 body를 입력하여 테스트해 볼 수 있다. 이때 어떤 body를 써야 하는지, 어떤 객체들을 넘겨 줘야 하는지 알려 주기 위해 또 다른 설정이 필요하다. 이 설정은 DTO, CatRequestDto에서 @ApiProperty 데코레이터로 할 수 있다.
@ApiProperty({
  example: 'qwerty@abc.com',
  description: 'email',
  required: true,
})
// ‥ (생략)
Request body 영역도 잘 뜬다.
Swagger 사용 (3) - Response 설정
지금까지는 API 설명, Request로 보내야 하는 것을 설정해 줬다. 이제 마지막으로 Response를 보냈을 때 결과값이 어떻게 출력되는지 설정할 차례다. Response 설정은 API 설명을 작성했을 때처럼 controller에서 해 준다.
우선 ResponseDto를 만들기 위해 cat.dto.ts 파일을 생성했다. response는 signUp에 대한 대응으로 readonly인 readOnlyData(버추얼 필드)가 왔기 때문에 cat.dto.ts도 이에 맞는 코드만 작성해 준다.
파일 내 코드는 아래와 같다.
export class ReadOnlyCatDto {
  @ApiProperty({
    example: '3425343334',
    description: 'id',
  })
  id: string;

  @ApiProperty({
    example: 'qwerty@abc.com',
    description: 'email',
  })
  email: string;

  @ApiProperty({
    example: '김가나',
    description: 'name',
  })
  name: string;
}
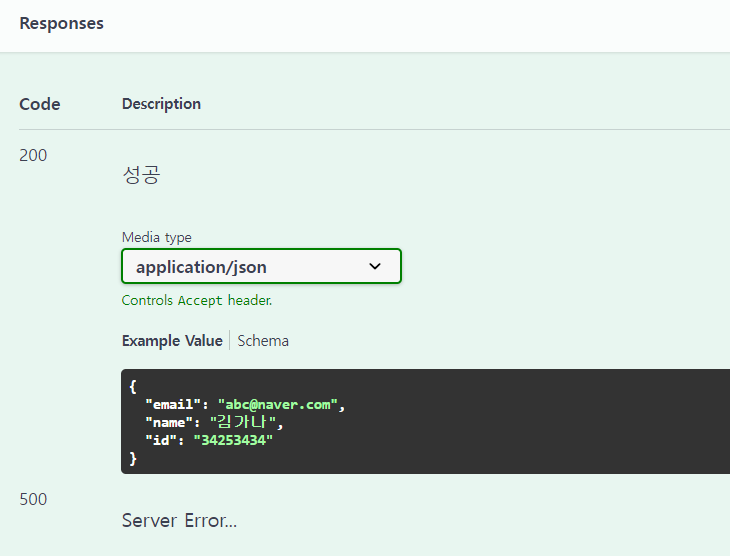
@ApiResponse 데코레이터로 status 값에 대한 description을 설정할 수 있다.
  @ApiResponse({
    status: 500,
    description: 'Server Error...',
  })
  @ApiResponse({
    status: 200,
    description: '성공',
    type: ReadOnlyCatDto
  })
  @ApiOperation({ summary: '회원가입' })
500 error가 발생했을 때와 200으로 성공했을 때 각각 작성해 준다. type에는 지금까지 사용했던 RequestDto가 아닌 Response용 DTO가 와야 한다.

Swagger 사용 (3) - 보안 설정
Swagger 문서는 노출되었을 때 심각한 보안 문제를 초래할 수 있다. 그렇기 때문에 Swagger에 보안을 해 줘야 한다.express-basic-auth 라이브러리를 사용하여 보안 설정을 해 보자.
npm install express-basic-auth// main.ts
import * as expressBasicAuth from 'express-basic-auth';설치와 import를 마친 후 main.ts에 미들웨어를 추가해 준다.
  app.use(
    ['/docs', '/docs-json'],
    expressBasicAuth({
      challenge: true,
      users: { [process.env.SWAGGER_USER]: process.env.SWAGGER_PASSWORD },
    }),
);SWAGGER_USER는 /docs로 접속을 시도할 때 필요한 아이디, SWAGGER_PASSWORD는 비밀번호로 .env에 환경변수로 저장해 두었다. (노출되면 ❌) 여기까지 설정하면 아래 캡처처럼 진입할 때 로그인을 해야 한다.

