LifeSports Application(ReactNative & Nest.js) - 17. payment-service, rental-service 연결
다음의 명령어를 이용해 rental-service를 생성하고, 모듈과 서비스를 만들도록 하겠습니다.
#1 rental-service
rental-service를 작성해보도록 하겠습니다. payment-service에서 발행되는 메시지는 결제 데이터 혹은 FAILURE_PAYMENT 라는 메시지입니다. 그러면 이 메시지를 구독하고 있는 메서드에서는 2개의 케이스를 다뤄야겠죠.
- ./src/app.controller.ts
...

@Controller('rental-service')
export class AppController {
    ...

    @Post('rental')
    public async rental(@Body() vo: RequestRental): Promise<any> {
        try {
            const result: any = await this.rentalService.create(Builder(RentalDto).price(vo.price)
                                                                                  .borrower(vo.borrower)
                                                                                  .tel(vo.tel)
                                                                                  .userId(vo.userId)
                                                                                  .date(vo.date)
                                                                                  .time(vo.time)
                                                                                  .mapId(vo.mapId)
                                                                                  .mapName(vo.mapName)
                                                                                  .build());

            if(result.status === statusConstants.ERROR) {
                return await Object.assign({
                    statusCode: HttpStatus.INTERNAL_SERVER_ERROR,
                    payload: null,
                    message: result.message
                });
            }

            return await Object.assign({
                statusCode: HttpStatus.CREATED,
                payload: Builder(ResponseRental).rentalId(result.payload.rentalId)
                                                .price(result.payload.price)
                                                .borrower(result.payload.borrower)
                                                .tel(result.payload.tel)
                                                .userId(result.payload.userId)
                                                .date(result.payload.date)
                                                .time(result.payload.time)
                                                .mapId(result.payload.mapId)
                                                .mapName(result.payload.mapName)
                                                .status(result.payload.status)
                                                .build(),
                message: "Successfully rental"
            });
        } catch(err) {
            return await Object.assign({
                statusCode: HttpStatus.BAD_REQUEST,
                payload: null,
                message: "Error message: " + err
            });
        }
    }

    ...

    @EventPattern('PAYMENT_RESPONSE')
    public async responsePayment(data: any): Promise<any> {
        try {
            if(data === 'FAILURE_PAYMENT') {
                const result: any = await this.rentalService.deleteRental(Builder(RentalDto).rentalId(data.rentalId)
                                                                                            .build());

                if(result.status === statusConstants.ERROR) {
                    return await Object.assign({
                        status: HttpStatus.INTERNAL_SERVER_ERROR,
                        payload: null,
                        message: "Error message: " + result.message
                    });
                }

                return await Object.assign({
                    status: HttpStatus.INTERNAL_SERVER_ERROR,
                    payload: null,
                    message: "Error message: " + data
                });
            }

            const result: any = await this.rentalService.completeRental(Builder(RentalDto).rentalId(data.rentalId)
                                                                                          .build());

            if(result.status === statusConstants.ERROR) {
                return await Object.assign({
                    status: HttpStatus.INTERNAL_SERVER_ERROR,
                    payload: null,
                    message: "Error message: " + result.message
                });
            }

            return await Object.assign({
               status: HttpStatus.OK,
               payload: null,
               message: "Successful complete rental!"
            });
        } catch(err) {
            return await Object.assign({
                status: HttpStatus.INTERNAL_SERVER_ERROR,
                payload: null,
                message: "Error message: " + err
            });
        }
    }
}
reponsePayment의 코드는 다음과 같습니다. 우선 FAILURE_PAYMENT의 케이스에 대해 다룹니다. data가 FAILURE_PAYMENT라면 대관 데이터를 삭제하는 서비스를 호출하고, 그렇지 않다면 대관 데이터의 상태를 변경하는 서비스를 호출합니다.
- ./src/rental/rental.service.ts
...

@Injectable()
export class RentalService {
    ...

    try {
            const entity: any = await new this.rentalModel(Builder(Rental).rentalId(uuid())
                                                                          .price(dto.price)
                                                                          .borrower(dto.borrower)
                                                                          .tel(dto.tel)
                                                                          .userId(dto.userId)
                                                                          .date(dto.date)
                                                                          .time(dto.time)
                                                                          .mapId(dto.mapId)
                                                                          .mapName(dto.mapName)
                                                                          .status(status.PENDING)
                                                                          .createdAt(new Date().toDateString())
                                                                          .build())
                                                                          .save();

            if(!entity) {
                return await Object.assign({
                    status: statusConstants.ERROR,
                    payload: null,
                    message: "rental-service: database error"
                });
            }

            return await Object.assign({
                status: statusConstants.SUCCESS,
                payload: Builder(RentalDto).rentalId(entity.rentalId)
                                           .price(entity.price)
                                           .borrower(entity.borrower)
                                           .tel(entity.tel)
                                           .userId(entity.userId)
                                           .date(entity.date)
                                           .time(entity.time)
                                           .mapId(entity.mapId)
                                           .mapName(entity.mapName)
                                           .status(entity.status)
                                           .createdAt(entity.createdAt)
                                           .build(),
                message: "Successful transaction"
            });
        } catch(err) {
            return Object.assign({
                status: statusConstants.ERROR,
                payload: null,
                message: "rental-service: " + err
            });
        }
    }

    public async completeRental(dto: RentalDto): Promise<any> {
        try {
            const result  = await this.rentalModel.updateOne({ rentalId: dto.rentalId }, { $set: { status: status.BEING }});

            if(!result) {
                return await Object.assign({
                    statusCode: statusConstants.ERROR,
                    payload: null,
                    message: "Not exist data",
                });
            }

            return await Object.assign({
                statusCode: statusConstants.SUCCESS,
                payload: null,
                message: "Success update"
            });
        } catch(err) {
            return await Object.assign({
                statusCode: statusConstants.ERROR,
                payload: null,
                message: "rental-service database: " + err,
            });
        }
    }
}
1) deleteRental: FAILURE_PAYMENT의 케이스에 관해 다루는 메서드입니다. deleteOne메서드를 이용해 대관 데이터를 삭제하죠.
2) completeRental: 결제가 성공적으로 이루어졌을 때 호출되는 메서드입니다. PENDING의 상태 값을 가진 대관 데이터를 BEING으로 변경합니다.
이런 식으로 rental-service의 코드까지 완성이 되었으니 테스트를 진행해보도록 하겠습니다.
#2 테스트
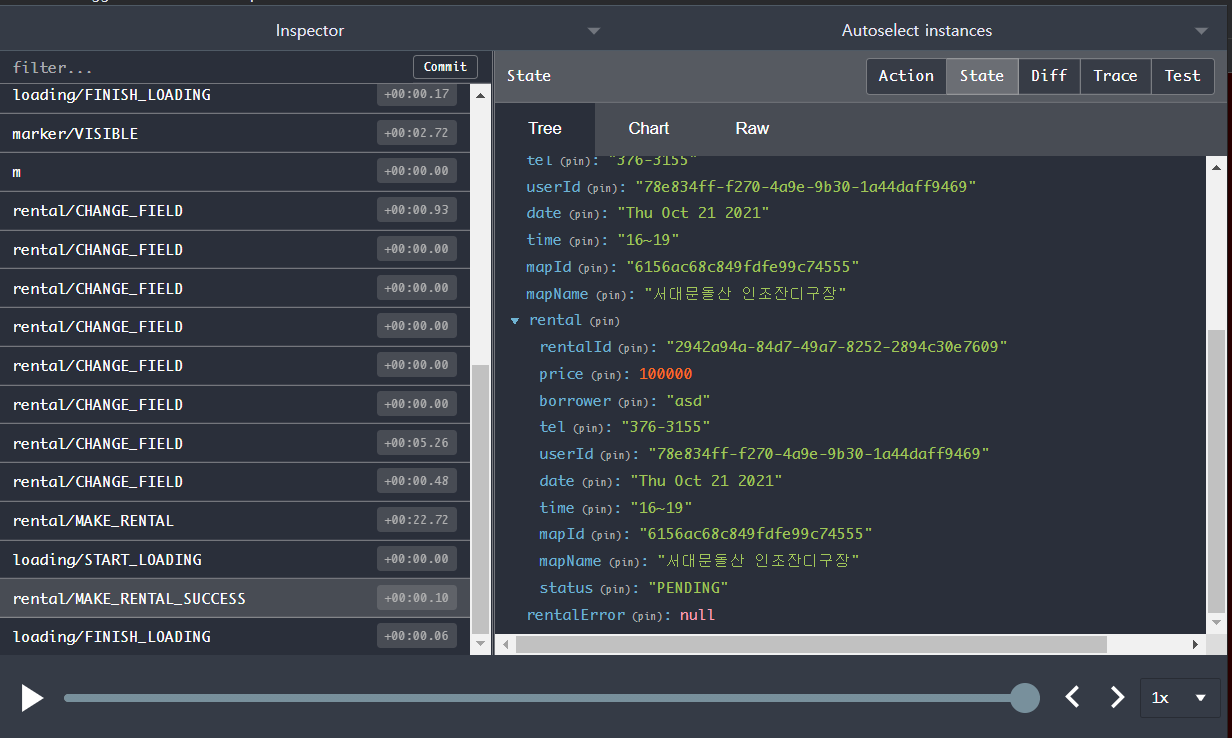
다음의 요청으로 임시의 대관 데이터를 생성하도록 하겠습니다.
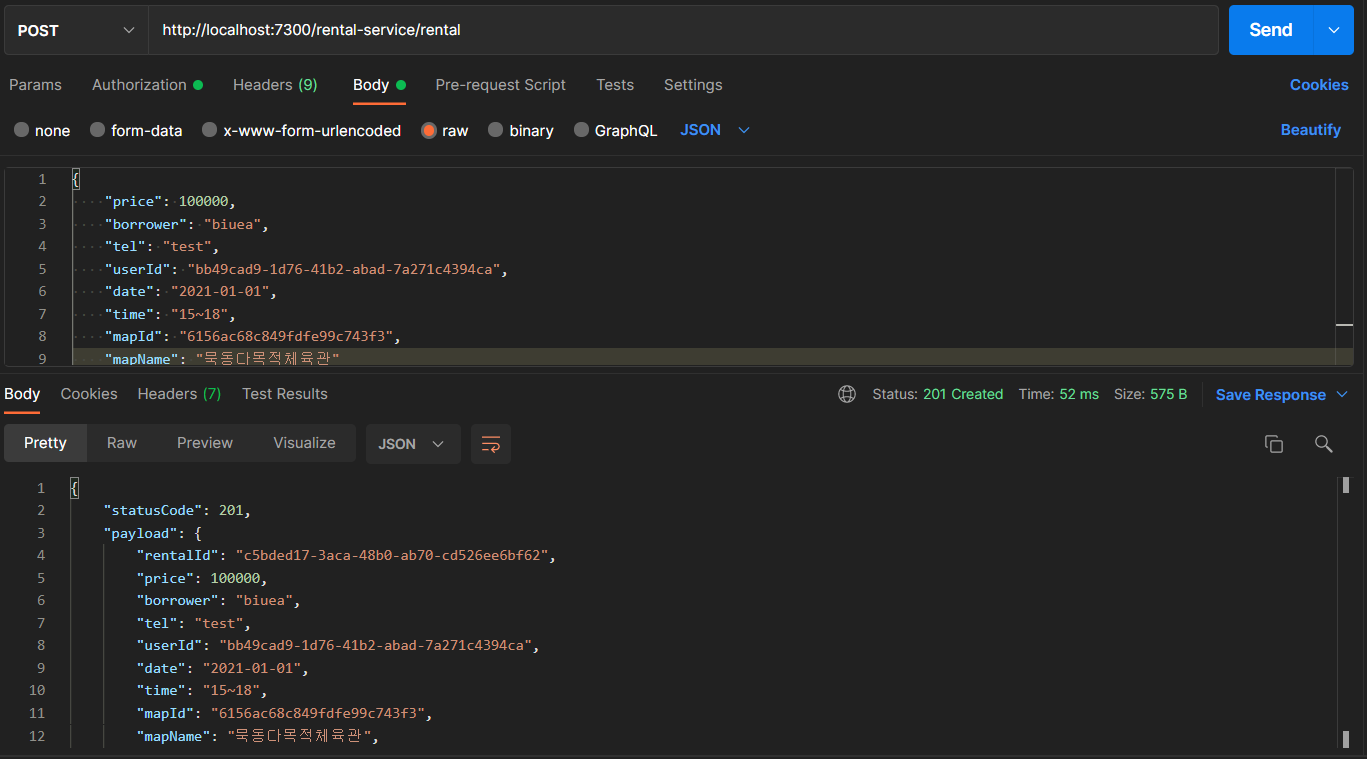
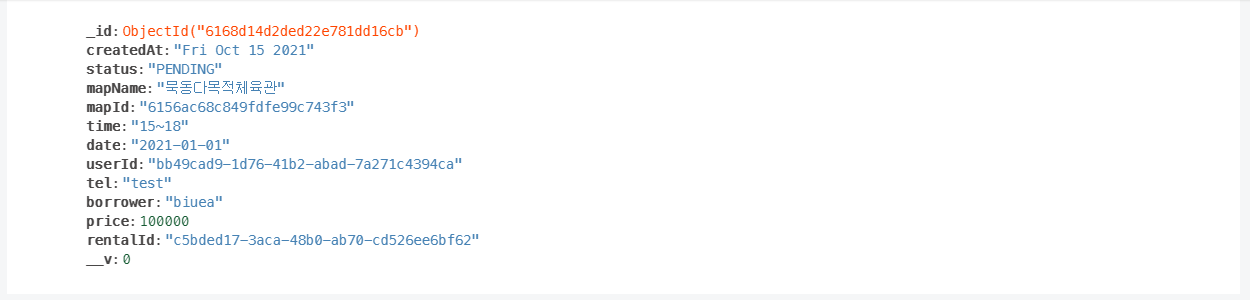
대관 데이터가 잘 생성되었으니 사용자는 결제 탭으로 넘어가게 되고 결제를 진행합니다.
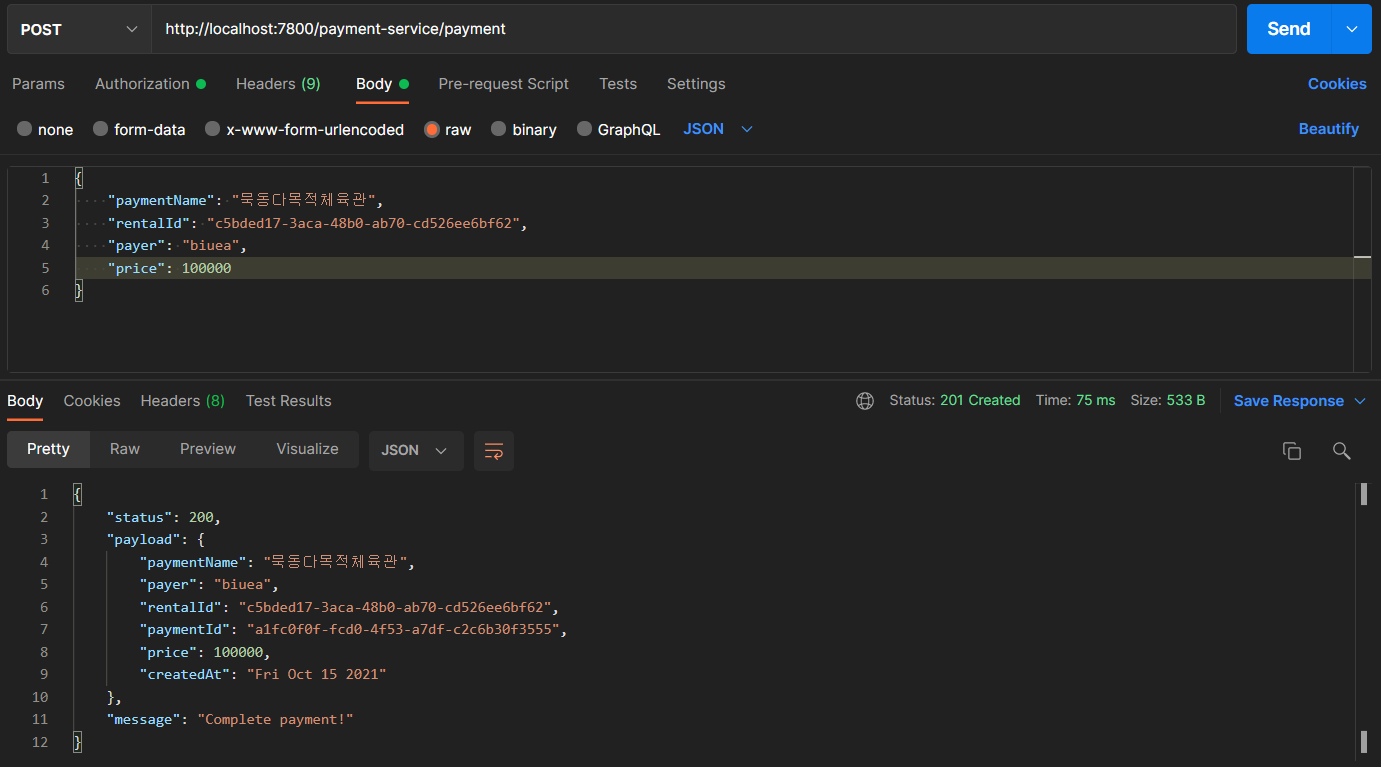

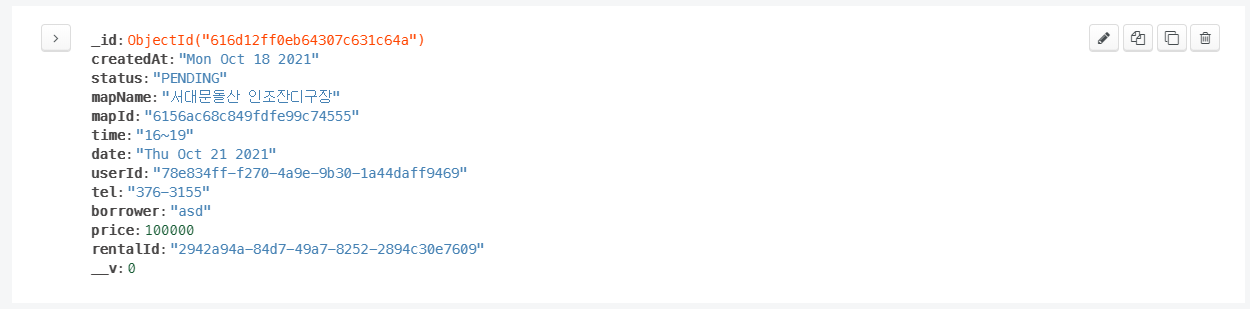
결제가 잘 진행되었고, 데이터 또한 잘 생성되었습니다. 그러면 사용자가 대관한 데이터의 상태 값이 BEING이 되었는지 확인해보도록 하겠습니다.
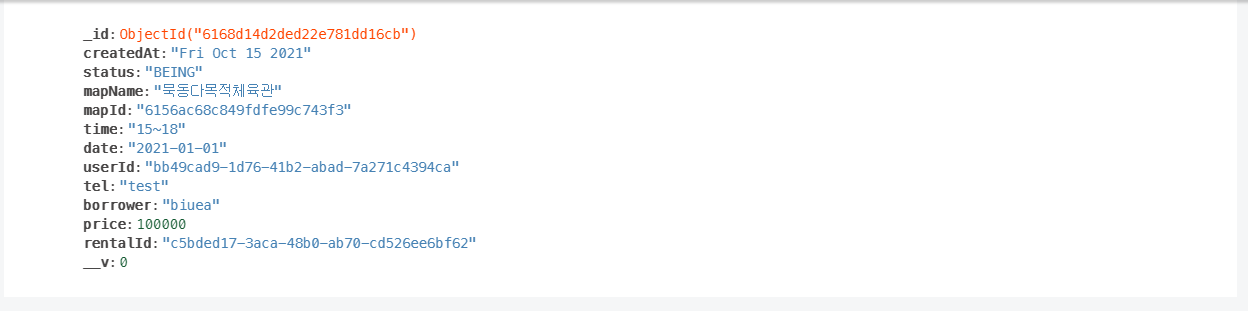
상태 값 또한 잘 변경된 모습입니다. 이로써 백엔드 단위에서 결제부터 대관까지 서비스 구현을 마쳤으니 UI로 넘어가도록 하겠습니다.
#3 rental redux
대관을 위해선 state를 만들어야 합니다. UI를 만들기 전에 리덕스 모듈부터 만들어보도록 하겠습니다.
- ./src/lib/api/rental.js
import client from './client';

export const rental = ({
    price,
    borrower,
    tel,
    userId,
    date,
    time,
    mapId,
    mapName
}) => client.post('http://10.0.2.2:8000/rental-service/rental', {
    price,
    borrower,
    tel,
    userId,
    date,
    time,
    mapId,
    mapName
});

export const getRental = rentalId => client.get(`http://10.0.0.2:8000/rental-service/${rentalId}/rental`);

export const getRentals = userId => client.get(`http://10.0.0.2:8000/rental-service/${userId}/rentals`);

export const expiredRental = rentalId => client.patch(`http://10.0.0.2:8000/rental-service/${rentalId}/rental`);- ./src/modules/rental.js
import { createAction, handleActions } from "redux-actions";
import createRequestSaga, { createRequestActionTypes } from "../lib/createRequestSaga";
import * as rentalAPI from '../lib/api/rental';
import { takeLatest } from "@redux-saga/core/effects";

const CHANGE_FIELD = 'rental/CHANGE_FIELD';
const INITIALIZE = 'rental/INITIALIZE';
const [
    MAKE_RENTAL,
    MAKE_RENTAL_SUCCESS,
    MAKE_RENTAL_FAILURE,
] = createRequestActionTypes('rental/MAKE_RENTAL');

export const changeField = createAction(CHANGE_FIELD, ({
    key,
    value
}) => ({
    key,
    value
}));

export const initialize = createAction(INITIALIZE);

export const makeRental = createAction(MAKE_RENTAL, ({
    price,
    borrower,
    tel,
    userId,
    date,
    time,
    mapId,
    mapName
}) => ({
    price,
    borrower,
    tel,
    userId,
    date,
    time,
    mapId,
    mapName
}));

const makeRentalSaga = createRequestSaga(MAKE_RENTAL, rentalAPI.rental);

export function* rentalSaga() {
    yield takeLatest(MAKE_RENTAL, makeRentalSaga);
}

const initialState = {
    price: null,
    borrower: '',
    tel: '',
    userId: '',
    date: '',
    time: '',
    mapId: '',
    mapName: '',
    rental: null,
    rentalError: null
};

const rental = handleActions(
    {
        [INITIALIZE]: state => initialState,
        [CHANGE_FIELD]: (state, { payload: { key, value }}) => ({
            ...state,
            [key]: value
        }),
        [MAKE_RENTAL_SUCCESS]: (state, { payload: rental }) => ({
            ...state,
            rental,
        }),
        [MAKE_RENTAL_FAILURE]: (state, { payload: rentalError }) => ({
            ...state,
            rentalError
        })
    },
    initialState,
);

export default rental;
모듈을 완성했으니 대관 관련 UI를 작성하도록 하겠습니다.
- ./src/map/DetailScreen.js
import React, { useState } from 'react';
import { ScrollView, StyleSheet } from 'react-native';
import DetailFooter from './components/DetailFooter';
import DetailHeader from './components/DetailHeader';
import DetailContent from './components/DetailContent';
import DetailNav from './components/DetailNav';

const DetailScreen = () => {
    const [error, setError] = useState('');

    return(
        <ScrollView style={ styles.container }>
            <DetailHeader />
            <DetailNav error={ error }/>
            <DetailContent />
            <DetailFooter setError={ setError }/>
        </ScrollView>
    );
};

const styles = StyleSheet.create({
    container: {
        flexDirection: 'column',
        flex: 1,
    },
});

export default DetailScreen;- ./src/navigator/map/MapStackNavigation.js
import 'react-native-gesture-handler';
import React from 'react';
import { createStackNavigator } from '@react-navigation/stack';
import MapScreen from '../../pages/map/MapScreen';
import DetailScreen from '../../pages/map/DetailScreen';

const Stack = createStackNavigator();

const MapStackNavigation = () => {
    return(
        <Stack.Navigator>
            <Stack.Screen name="Map"
                          component={ MapScreen }
                          options={{
                              headerShown: false,
                          }}
            />
            <Stack.Screen name="Detail"
                          component={ DetailScreen }
            />
        </Stack.Navigator>
    );
};

export default MapStackNavigation;
DetailScreen을 만들고 네비게이션에 등록하도록 하겠습니다.
- ./src/pages/map/components/DetailHeader.js
import React from 'react';
import { Linking, StyleSheet, Text, View } from 'react-native';
import { useSelector } from 'react-redux';
import palette from '../../../styles/palette';

const DetailHeader = () => {
    const { map } = useSelector(({ map }) => ({ map: map.map }));
    const onOpenUrl = () => {
        Linking.openURL(`${ map.home_page }`);
    };

    return(
        <View style={ styles.container } >
            <View style={ styles.title } >
                <Text style={ styles.font } >
                    { map.nm }
                </Text>
            </View>
            <View style={ styles.sub }>
                <Text>
                    { map.addr }
                </Text>
                <Text>
                    전화번호: { map.tel }
                </Text>
                <Text>
                    홈페이지:
                    <Text onPress={ onOpenUrl }>
                        { map.home_page }
                    </Text>
                </Text>
            </View>
        </View>
    );
};

const styles = StyleSheet.create({
    container: {
        width: '100%',
        height: 150,
        backgroundColor: palette.white[0],
        borderBottomColor: palette.gray[3],
        borderBottomWidth: 1
    },
    title: {
        width: '100%',
        height: 40,
        marginTop: 30,
        marginLeft: 10
    },
    font: {
        fontWeight: 'bold',
        fontSize: 20
    },
    sub: {
        flexDirection: 'column',
        width: '100%',
        height: 40,
        margin: 10
    },
});

export default DetailHeader;
header부분에는 전화번호와 홈페이지를 표시하였습니다. 그리고 홈페이지의 url을 클릭하면 Linking을 이용하여 대상 홈페이지로 이동이 가능합니다.
- ./src/pages/map/components/DetailNav.js
import React from 'react';
import { Text, View } from 'react-native';
import { useSelector } from 'react-redux';
import NavIcon from './common/NavIcon';
const DetailNav = () => {
const { map } = useSelector(({ map }) => ({ map: map.map }));
return(
<View style={ styles.container }>
<View style={ styles.icon }>
<NavIcon name={ "ios-car" } />
{
map.parking_lot === '주차 가능' ?
<Text style={ styles.text } >
주차 가능
</Text> :
<Text style={ styles.text }>
주차 불가
</Text>
}
</View>
<View style={ styles.icon } >
<NavIcon name={ "ios-home" } />
{
map.in_out === '실내' ?
<Text style={ styles.text } >
실내
</Text> :
<Text style={ styles.text } >
야외
</Text>
}
</View>
<View style={ styles.icon } >
<NavIcon name={ "ios-person" } />
{
map.edu_yn === '유' ?
<Text style={ styles.text } >
교육 가능
</Text> :
<Text style={ styles.text } >
교육 불가
</Text>
}
</View>
</View>
);
};
const styles = StyleSheet.create({
container: {
flexDirection: 'row',
width: '100%',
height: 150,
justifyContent: 'center',
alignItems: 'center',
backgroundColor: palette.white[0],
borderBottomColor: palette.gray[3],
borderBottomWidth: 1
},
icon: {
width: '30%',
height: 50,
justifyContent: 'center',
alignItems: 'center'
},
text: {
fontWeight: 'bold'
}
});
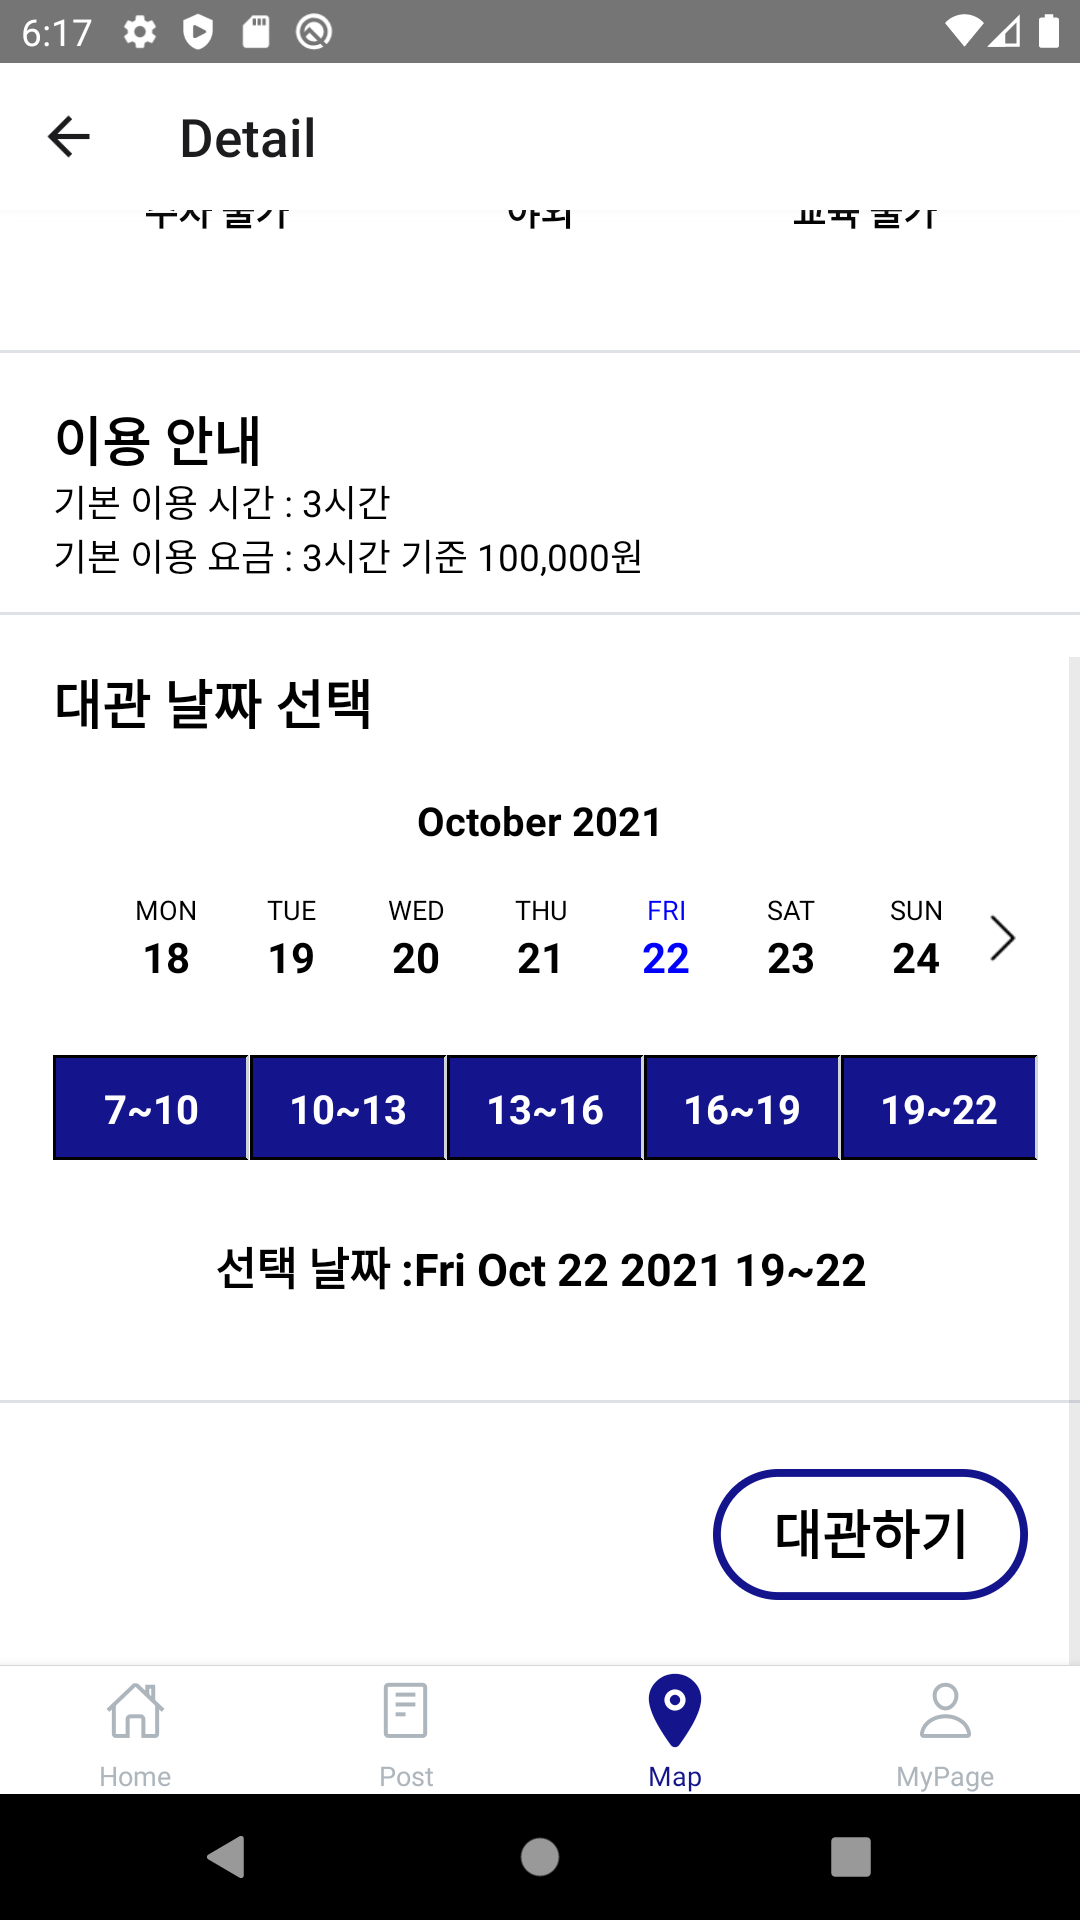
export default DetailNav;대관 시 참고하면 좋을 정보들을 위한 컴포넌트입니다.
다음의 라이브러리를 설치하도록 하겠습니다.
npm install --save react-native-calendar-strip- ./src/pages/map/components/DetailContent.js
import React from 'react';
import { StyleSheet, View, Text } from 'react-native';
import CalendarStrip from 'react-native-calendar-strip';
import CustomTimePicker from './common/CustomTimePicker';
import { useDispatch, useSelector } from 'react-redux';
import { changeField } from '../../../modules/rental';
import palette from '../../../styles/palette';

const DetailContent = () => {
    const dispatch = useDispatch();
    const {
        time,
        date
    } = useSelector(({ rental }) => ({
        time: rental.time,
        date: rental.date,
    }));
    const onDate = e => {
        dispatch(changeField({
            key: 'date',
            value: e.toString().substr(0, 15),
        }));
    };

    return(
        <View style={ styles.container } >
            <View style={ styles.rule_info_container }>
                <Text style={ styles.rule_info }>
                    이용 안내
                </Text>
                <Text>
                    기본 이용 시간 : 3시간
                    { '\n' }
                    기본 이용 요금 : 3시간 기준 100,000원
                </Text>
            </View>
            <View style={ styles.date_container }>
                <Text style={ styles.date_title }>
                    대관 날짜 선택
                </Text>
                <CalendarStrip style={ styles.date }
                                calendarHeaderStyle={{ color: palette.black[0] }}
                                dateNumberStyle={{ color: palette.black[0] }}
                                dateNameStyle={{ color: palette.black[0] }}
                                onDateSelected={ onDate }
                                disabledDateNameStyle={{color: palette.gray[4] }}
                                disabledDateNumberStyle={{color: palette.gray[4] }}
                                highlightDateNumberStyle={{color: palette.blue[0] }}
                                highlightDateNameStyle={{color: palette.blue[0] }}
                                startingDate={ new Date() }
                                minDate={ new Date() }
                />
                <CustomTimePicker />
                {
                    date &&
                    <View style={ styles.select }>
                        <Text style={ styles.select_font }>
                            선택 날짜 :
                        </Text>
                        <Text style={ styles.select_font }>
                            { date + "\t" + time }
                        </Text>
                    </View>
                }
            </View>
        </View>
    );
};


const styles = StyleSheet.create({
    container: {
        width: '100%',
        height: 400,
        backgroundColor: palette.white[0],
        borderBottomColor: palette.gray[3],
        borderBottomWidth: 1
    },
    rule_info_container: {
        width: '100%',
        height: 100,
        padding: 20,
        borderBottomColor: palette.gray[3],
        borderBottomWidth: 1
    },
    rule_info: {
        fontWeight: 'bold',
        fontSize: 20
    },
    date_container: {
        width: '100%',
        height: 100,
        padding: 20
    },
    date_title: {
        fontSize: 20,
        fontWeight: 'bold',
    },
    date: {
        height: 120,
        paddingTop: 20,
        paddingBottom: 10,
    },
    select: {
        flexDirection: 'row',
        justifyContent: 'center',
        height: 60,
    },
    select_font: {
        fontWeight: 'bold',
        fontSize: 17,
    }
});

export default DetailContent;- ./src/pages/map/components/common/CustomTimePicker.js
import React from "react";
import { StyleSheet, View } from "react-native";
import TimeButton from "./TimeButton";

const timeArray = [
    '7~10',
    '10~13',
    '13~16',
    '16~19',
    '19~22'
];

const CustomTimePicker = () => {
    return(
        <View style={ styles.container }>
            <View style={ styles.content }>
                {
                    timeArray.map((time) => {
                        return <TimeButton time={ time } />
                    })
                }
            </View>
        </View>
    );
};

const styles = StyleSheet.create({
    container: {
        flexDirection: 'row',
        width: '100%',
        height: 70,
    },
    content: {
        flexDirection: 'row',
        height: 100
    },
});

export default CustomTimePicker;- ./src/pages/map/components/common/TimeButton.js
import React from 'react';
import { StyleSheet, Text } from 'react-native';
import { TouchableOpacity } from 'react-native-gesture-handler';
import { changeField } from '../../../../modules/rental';
import { useDispatch } from 'react-redux';
import palette from '../../../../styles/palette';

const TimeButton = ({ time }) => {
    const dispatch = useDispatch();
    const onSetTime = () => {
        dispatch(changeField({
            key: 'time',
            value: time
        }));
    };

    return <TouchableOpacity style={ styles.shape }
                             onPress={ onSetTime }
           >
                <Text style={ styles.font }>
                    { time }
                </Text>
           </TouchableOpacity>
};

const styles = StyleSheet.create({
    shape: {
        width: 75,
        height: 40,
        backgroundColor: palette.blue[4],
        alignItems: 'center',
        justifyContent: 'center',
        borderLeftColor: palette.white[4],
        borderRightColor: palette.gray[4],
        borderWidth: 1
    },
    font: {
        fontWeight: 'bold',
        fontSize: 15,
        color: palette.white[0]
    },
});

export default TimeButton;
date와 time을 state에 저장한 후 값이 들어오면 화면에 띄워주도록 하였습니다.
- ./src/pages/map/components/DetailFooter.js
import React, { useEffect } from 'react';
import { useNavigation } from '@react-navigation/native';
import { View, TouchableOpacity, Text, StyleSheet } from 'react-native';
import { useDispatch, useSelector } from 'react-redux';
import { changeField, initialize, makeRental } from '../../../modules/rental';
import palette from '../../../styles/palette';

const DetailFooter = ({ setError }) => {
    const dispatch = useDispatch();
    const {
        price,
        nickname,
        tel,
        userId,
        date,
        time,
        _id,
        nm,
        rental,
        rentalError
    } = useSelector(({
        user,
        map,
        rental
    }) => ({
        price: rental.price,
        nickname: user.user.nickname,
        tel: map.map.tel,
        userId: user.user.userId,
        date: rental.date,
        time: rental.time,
        _id: map.map._id,
        nm: map.map.nm,
        rental: rental.rental,
        rentalError: rental.rentalError
    }));
    const navigation = useNavigation();
    const onRental = () => {
        const borrower = nickname;
        const mapId = _id;
        const mapName = nm;

        dispatch(makeRental({
            price,
            borrower,
            tel,
            userId,
            date,
            time,
            mapId,
            mapName
        }));
    };

    useEffect(() => {
        dispatch(changeField({
            key: 'price',
            value: 100000,
        }));
    }, [dispatch]);

    useEffect(() => {
        dispatch(changeField({
            key: 'borrower',
            value: nickname,
        }));
    }, [dispatch, nickname]);

    useEffect(() => {
        dispatch(changeField({
            key: 'tel',
            value: tel,
        }));
    }, [dispatch, tel]);

    useEffect(() => {
        dispatch(changeField({
            key: 'userId',
            value: userId,
        }));
    }, [dispatch]);

    useEffect(() => {
        dispatch(changeField({
            key: 'mapId',
            value: _id,
        }));
    }, [dispatch, _id]);

    useEffect(() => {
        dispatch(changeField({
            key: 'mapName',
            value: nm,
        }));
    }, [dispatch, nm]);

    useEffect(() => {
        if(rental) {
            dispatch(initialize());

            navigation.navigate("Payment", {
                rentalId: rental.rentalId
            });
        }

        if(rentalError) {
            setError(rentalError.message);

            navigation.goBack();
        }
    }, [dispatch, rental, navigation]);

    return(
        <View style={ styles.container }>
            <TouchableOpacity style={ styles.shape }
                              onPress={ onRental }
            >
                <Text style={ styles.font }>
                    대관하기
                </Text>
            </TouchableOpacity>
        </View>
    );
};

const styles = StyleSheet.create({
    container: {
        width: '100%',
        height: 100,
        justifyContent: 'center',
        alignItems: 'flex-end',
        paddingRight: 20,
        backgroundColor: palette.white[0]
    },
    shape: {
        flexDirection: 'column',
        justifyContent: 'center',
        alignItems: 'center',
        width: 120,
        height: 50,
        borderRadius: 30,
        borderWidth: 3,
        borderColor: palette.blue[4]
    },
    font: {
        fontWeight: 'bold',
        fontSize: 20
    }
});

export default DetailFooter;
대관하기 기능을 위한 컴포넌트입니다. user, map, rental에서 state값들을 읽어와 앞서 작성해둔 rental 모듈을 호출하여 makeRental을 실행합니다. makeRental을 실행한 후 rentalId값을 Payment 스크린에 값을 담아 넘기는 방식으로 진행하겠습니다.
잘 되는지 테스트를 진행해보겠습니다.
#4 wsl ip 변경 이슈
wsl은 재부팅을 하면 ip번호가 바뀌는 문제가 생깁니다. 따라서 kong apigateway에서 기존에 설정해두었던 wsl의 ip번호가 의미가 없게 되는 것이죠. 이 문제를 해결하기 위해 현재 윈도우의 ip(저의 경우 wifi ipv4) -> wsl의 ip를 연결하여 현재 윈도우의 ip로 네트워크 통신이 가능하도록 만들겠습니다.
1) 관리자 모드로 powershell을 엽니다.
2) C:\Users\han\Desktop 경로에서 fsutil file createnew wsl2_port.ps1 10000 명령어를 이용하여 스크립트 파일을 생성하도록 하겠습니다.
3) 스크립트 파일의 내용
If (-NOT ([Security.Principal.WindowsPrincipal][Security.Principal.WindowsIdentity]::GetCurrent()).IsInRole([Security.Principal.WindowsBuiltInRole] "Administrator")) {
  $arguments = "& '" + $myinvocation.mycommand.definition + "'"
  Start-Process powershell -Verb runAs -ArgumentList $arguments
  Break
}

$remoteport = bash.exe -c "ifconfig wifi0 | grep 'inet '"
$found = $remoteport -match '\d{1,3}\.\d{1,3}\.\d{1,3}\.\d{1,3}';

if ( $found ) {
  $remoteport = $matches[0];
}
else {
  Write-Output "The Script Exited, the ip address of WSL 2 cannot be found";
  exit;
}

$ports = @();

Invoke-Expression "netsh interface portproxy reset";

for ( $i = 0; $i -lt $ports.length; $i++ ) {
  $port = $ports[$i];
  Invoke-Expression "netsh interface portproxy add v4tov4 listenport=$port connectport=$port connectaddress=$remoteport";
}

Invoke-Expression "netsh interface portproxy show v4tov4";
저의 경우에는 와이파이 네트워크를 쓰기 때문에 wifi0의 ipv4주소를 사용하였습니다.
$remoteport = bash.exe -c "ifconfig wifi0 | grep 'inet '"
만일 eth0의 네트워크를 사용하신다면 wifi0 -> eth0로 바꾸시면 됩니다.
그리고 $ports = @(); 에 연결하고 싶은 port 번호를 기재할 수 있는데 저의 경우에는 8000 번호를 넣으니 에뮬레이터 로컬호스트에서 8000번과 연결이 되지 않아 port번호를 비우고 실행을 하니 실행이 되었습니다.
4) .\wsl2_port.ps1 로 스크립트 파일을 실행합니다.
해당 과정을 거치게 되면 현재 연결된 인터넷 ip -> wsl의 ip로 매핑이 됩니다.
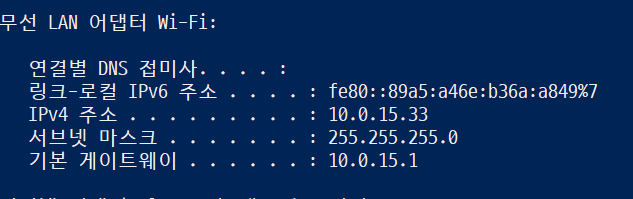
현재 제 ip는 10.0.15.33이니 kong에 등록된 service들의 host를 10.0.15.33로 변경하도록 하겠습니다.

이런 식으로 모든 service의 host를 변경하고 테스트해보도록 하겠습니다.

잘 연결된 모습을 살펴볼 수 있습니다.
- 그리고 만약 ResourceSavingView가 undefined 에러가 발생한다면
npm install --save @react-navigation/elements react-natvice-screens를 설치해주시길 바랍니다.
#5 테스트
api gateway연결을 해결했으니 마저 테스트를 진행하도록 하겠습니다.
대관 데이터가 잘 생성된 모습을 확인할 수 있습니다. 그러면 다음 포스트에서는 결제페이지까지 완성하고, 연동을 진행해보도록 하겠습니다.
