LifeSports Application(ReactNative & Nest.js) - 24. post-service(5)
#1 리덕스 모듈
controller에서 작성한 endpoint를 api디렉토리에 등록하도록 하겠습니다.
- ./src/lib/api/post.js
...

export const comment = ({
    postId,
    userId,
    writer,
    content
}) => client.post(`http://10.0.2.2:8000/post-service/comment`, {
    postId,
    userId,
    writer,
    content
});

export const deleteComment = _id => client.delete(`http://10.0.2.2:8000/post-service/${id}/comment`);
등록이 되었으니 해당 api들을 리덕스 모듈에 담도록 하겠습니다.
- ./src/modules/comment.js
import { createAction, handleActions } from "redux-actions";
import createRequestSaga, { createRequestActionTypes } from "../lib/createRequestSaga";
import * as postAPI from '../lib/api/post';
import { takeLatest } from "@redux-saga/core/effects";

const INITIALIZE = 'comment/INITIALIZE';

const CHANGE_FIELD = 'comment/CHANGE_FIELD';

const [
    COMMENT_REGISTER,
    COMMENT_REGISTER_SUCCESS,
    COMMENT_REGISTER_FAILURE
] = createRequestActionTypes('comment/COMMENT_REGISTER');

const [
    COMMENT_DELETE,
    COMMENT_DELETE_SUCCESS,
    COMMENT_DELETE_FAILURE
] = createRequestActionTypes('comment/COMMENT_DELETE');

export const initialize = createAction(INITIALIZE);

export const changeField = createAction(CHANGE_FIELD, ({
    key,
    value
}) => ({
    key,
    value
}));

export const commentRegister = createAction(COMMENT_REGISTER, ({
    postId,
    userId,
    writer,
    content
}) => ({
    postId,
    userId,
    writer,
    content
}));

export const deleteComment = createAction(COMMENT_DELETE, _id => _id);

const commentRegisterSaga = createRequestSaga(COMMENT_REGISTER, postAPI.comment);

const deleteCommentSaga = createRequestSaga(COMMENT_DELETE, postAPI.deleteComment);

export function* commentSaga() {
    yield takeLatest(COMMENT_REGISTER, commentRegisterSaga);
    yield takeLatest(COMMENT_DELETE, deleteCommentSaga);
}

const initialState = {
    postId: null,
    userId: null,
    writer: null,
    content: null,
    message: null,
    error: null,
};

const comment = handleActions(
    {
        [INITIALIZE]: state => initialState,
        [CHANGE_FIELD]: (state, { payload: { key, value }}) => ({
            ...state,
            [key]: value
        }),
        [COMMENT_REGISTER_SUCCESS]: (state, { payload: message }) => ({
            ...state,
            message,
        }),
        [COMMENT_REGISTER_FAILURE]: (state, { payload: error }) => ({
            ...state,
            error
        }),
        [COMMENT_DELETE_SUCCESS]: (state, { payload: message }) => ({
            ...state,
            message,
        }),
        [COMMENT_DELETE_FAILURE]: (state, { payload: error }) => ({
            ...state,
            error
        }),
    },
    initialState,
);

export default comment;
모듈을 만들어 성공적으로 댓글이 등록이 되거나 댓글을 삭제했을 경우, message에 true값이 들어갈 수 있도록 하였습니다. 앞서 작성한 post-service에서의 payload인 true값을 message에 반환시켜주는 것이죠.
UI를 작성하도록 하겠습니다.
#2 UI
DetailFooter 컴포넌트에서 userId, nickname, content state를 changeField 메서드를 이용하여 상태값을 업데이트 해주도록 하겠습니다. 그리고 전달받은 post의 값 중 comments state를 CommentList 컴포넌트로 넘겨주도록 하겠습니다.
- ./src/pages/post/components/DetailFooter.js
import React, { useEffect } from 'react';
import { useDispatch, useSelector } from 'react-redux';
import { StyleSheet, TextInput, View } from 'react-native';
import palette from '../../../styles/palette';
import CommentButton from './CommentButton';
import { changeField } from '../../../modules/comment';
import CommentList from './CommentList';

const DetailFooter = post => {
    const dispatch = useDispatch();
    const {
        userId,
        nickname,
        content,
    } = useSelector(({
        user,
        comment
    }) => ({
        userId: user.user.userId,
        nickname: user.user.nickname,
        content: comment.content
    }));
    const onChange = e => {
        dispatch(changeField({
            key: 'content',
            value: e.nativeEvent.text
        }));
    };

    useEffect(() => {
        dispatch(changeField({
            key: 'userId',
            value: userId
        }))
    }, [dispatch, userId]);

    useEffect(() => {
        dispatch(changeField({
            key: 'writer',
            value: nickname
        }));
    }, [dispatch, nickname]);

    return(
        <View style={ styles.container }>
            <View style={ styles.search_box }>
                ...
                <CommentButton />
            </View>
            <View style={ styles.comment_box }>
                <CommentList comments={ post.post.comments } />
            </View>
        </View>
    );
};

...

export default DetailFooter;
DetailFooter에서 전달받은 comments의 값을 map 함수를 이용하여 CommentCard 컴포넌트에 나누어 주도록 하겠습니다.
- ./src/pages/post/components/CommentList.js
import React from 'react';
import { StyleSheet, View } from 'react-native';
import CommentCard from './CommentCard';

const CommentList = comments => {
    return(
        <View style={ styles.container }>
            {
                comments.comments &&
                comments.comments.map((item, i) => {
                    return <CommentCard item={ item }/>
                })
            }
        </View>
    );
};

const styles = StyleSheet.create({
    container: {
        flex: 1
    }
});

export default CommentList;
CommentCard 컴포넌트에서는 item의 값들을 유저에게 보여주는 역할을 합니다. 동시에 삭제 아이콘을 삽입하여 item.userId 값과 현재 로그인한 userId값을 매칭하여 맞다면 이 아이콘을 이용하여 삭제 메서드를 이용할 수 있게 구현하였습니다.
- ./src/pages/post/components/CommentCard.js
import React, { useEffect } from 'react';
import { StyleSheet, Text, ToastAndroid, TouchableOpacity, View } from 'react-native';
import palette from '../../../styles/palette';
import Icon from 'react-native-vector-icons/Ionicons';
import { useDispatch, useSelector } from 'react-redux';
import { deleteComment } from '../../../modules/comment';

const CommentCard = ({ item }) => {
    const dispatch = useDispatch();
    const {
        userId,
        message,
    } = useSelector(({
        user,
        comment,
    }) => ({
        userId: user.user.userId,
        message: comment.message,
    }));
    const showToastForDelete = e => {
        ToastAndroid.show(
            "Compeletely delete comment",
            ToastAndroid.SHORT
        );
    };
    const onDelete = e => {
        dispatch(deleteComment(item._id));
    };

    useEffect(() => {
        if(message) {
            showToastForDelete();
        }
    }, [message]);

    return(
        <View style={ styles.card }>
            <Text style={ styles.writer }>
                { item.writer }
            </Text>
            <Text>
                { item.content }
            </Text>
            <View style={ styles.footer }>
                <Text style={ styles.date }>
                    { item.createdAt.substring(0, 15)}
                </Text>
                {
                    item.userId === userId &&
                    <TouchableOpacity onPress={ onDelete }>
                        <Icon name={ "ios-backspace"}
                              color={ palette.red[1] }
                              size={ 20 }
                        />
                    </TouchableOpacity>
                }
            </View>
        </View>
    );
};

const styles = StyleSheet.create({
    card: {
        flex: 1,
        borderBottomColor: palette.gray[2],
        borderBottomWidth: 2,
        padding: 5
    },
    writer: {
        fontWeight: 'bold',
        fontSize: 15
    },
    footer: {
        flexDirection: 'row',
        alignItems: 'center'
    },
    date: {
        fontSize: 12
    }
});

export default CommentCard;
그리고 최종적으로 PostDetailScreen에서 댓글 삽입, 삭제가 정상적으로 이루어질 경우 반환되는 message state를 이용하여 게시글을 새로 불러오도록 하였습니다.
- ./src/pages/post/PostDetailScreen.js
...

const PostDetailScreen = () => {
    ...
    const {
        post,
        message,
    } = useSelector(({
        posts,
        comment,
    }) => ({
        post: posts.post,
        message: comment.message,
    }));

    ...

    useEffect(() => {
        if(message) {
            dispatch(readPost(route.params._id));
        }
    }, [dispatch, message]);

    ...
};

...

export default PostDetailScreen;
댓글에 대한 부분은 전반적으로 완료가 된 것 같습니다. 최종적으로 테스트를 한번 진행해보도록 하겠습니다.
#3 테스트
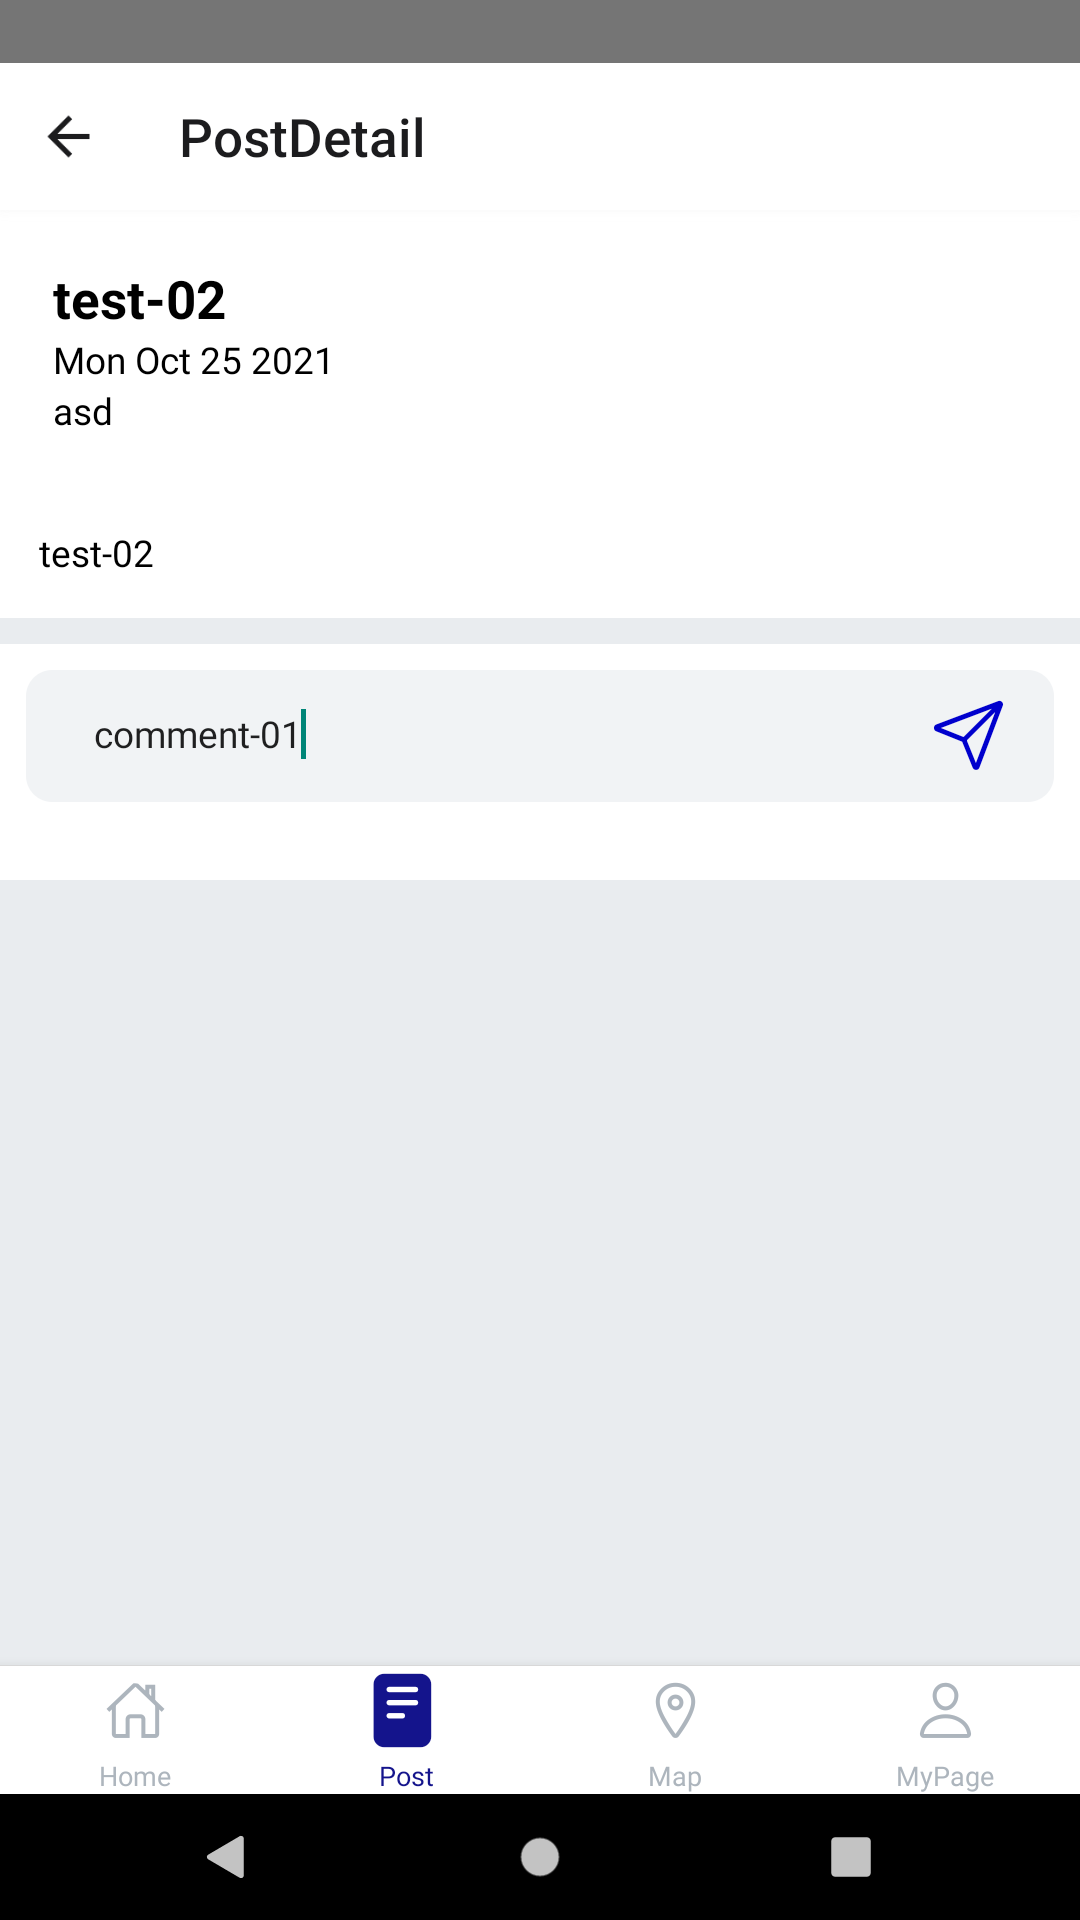
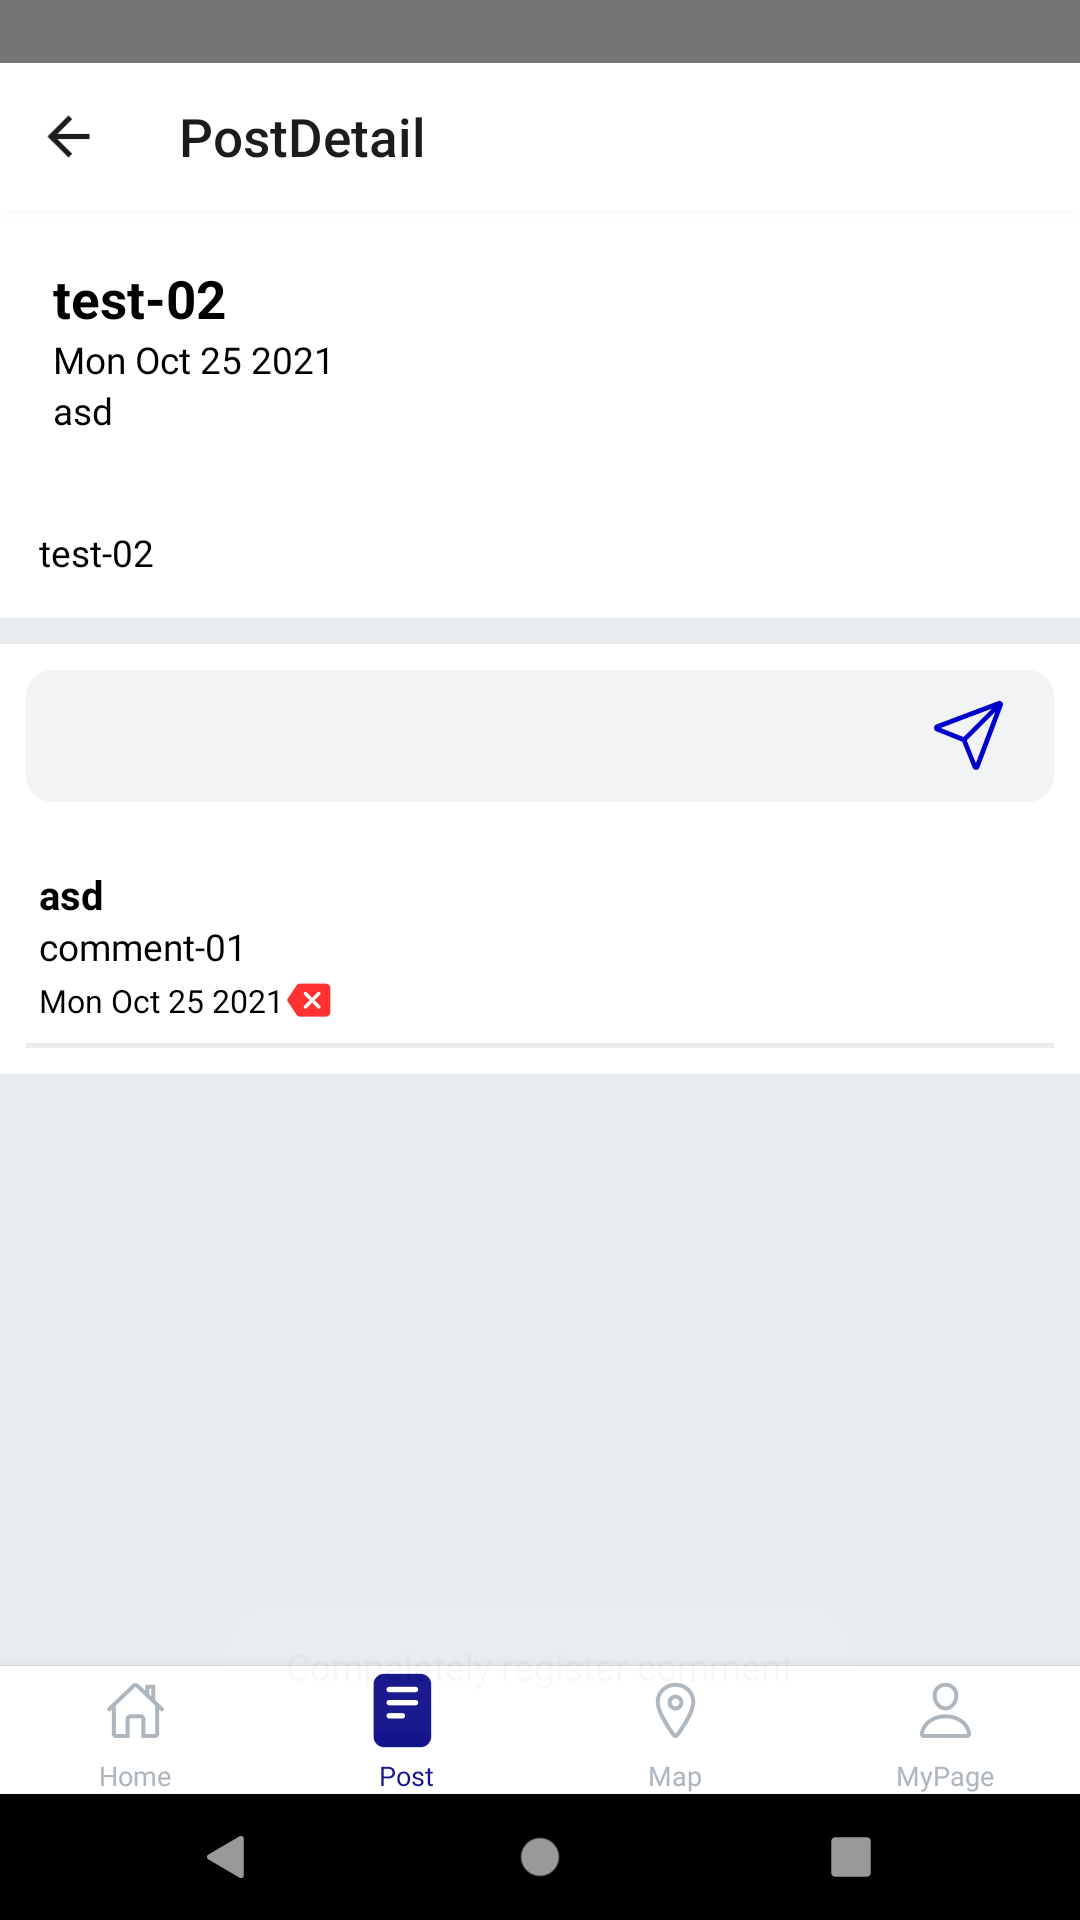
1) 댓글 저장

2) 댓글 삭제
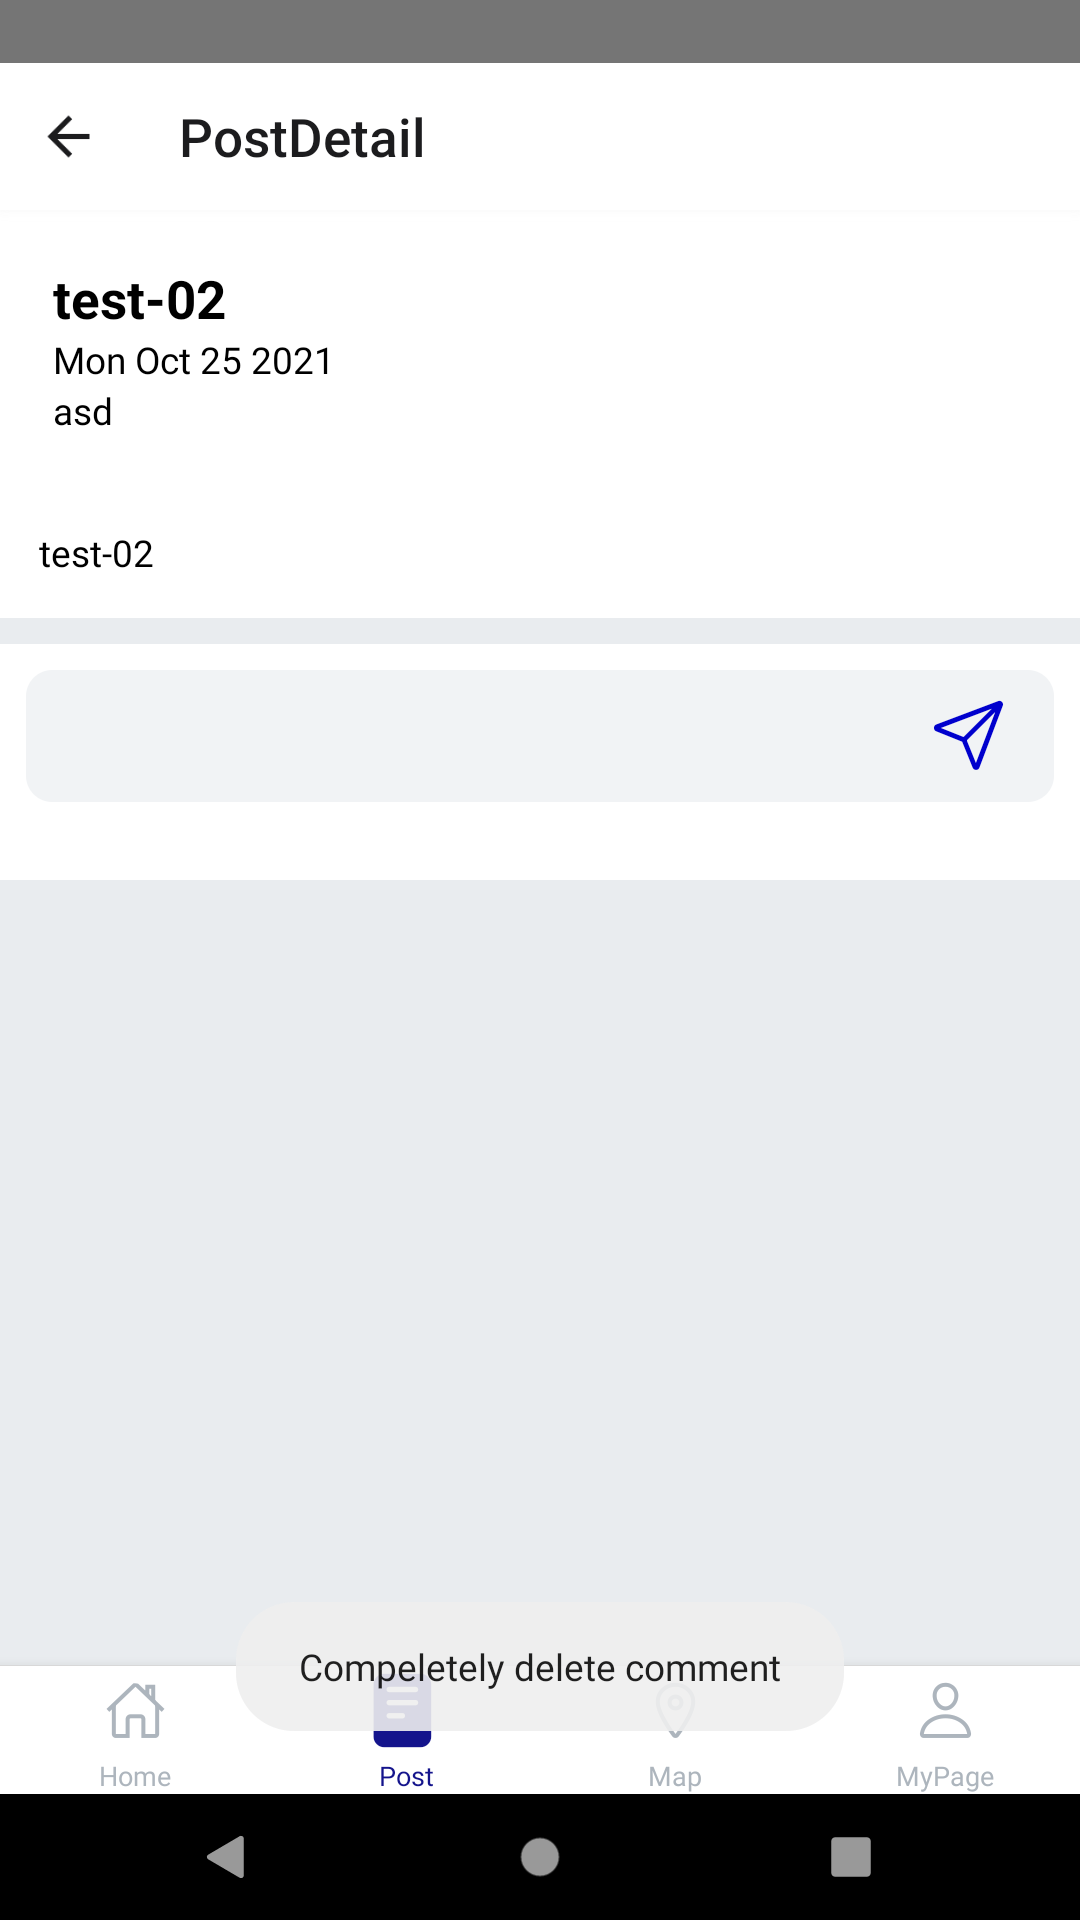
테스트 결과 1), 2) 전부 잘 수행되는 모습을 살펴볼 수 있습니다. 이로써 post-service에 대한 글을 마치고, 다음 포스트에서는 message-service를 구현해보도록 하겠습니다.

4개의 댓글

I have read your blog it is very helpful for me. I want to say thanks to you. I have bookmark your site for future updates.agenolx bandar slot
I have read your blog it is very helpful for me. I want to say thanks to you. I have bookmark your site for future updates.bandar togel online
i really like this article please keep it up.seo optimization services